PPT to MP4 converter
Convert your file from Microsoft PowerPoint Presentation File to MPEG-4 Video Stream with this PPT to MP4 converter .
Enter the timestamps of where you want to cut your video. The format is HH:MM:SS. HH = hour, MM = minutes, SS = seconds.
Example: 00:02:23 for 2 minutes and 23 seconds.

How to convert a PPT to a MP4 file?
- Choose the PPT file you want to convert
- Change quality or size (optional)
- Click on "Start conversion" to convert your file from PPT to MP4
- Download your MP4 file
Not convinced? Click on the following link to convert our demo file from PPT to MP4 :
Stay connected:
Rate this tool 4.2 / 5
You need to convert and download at least 1 file to provide feedback
Feedback sent
Thank you for your vote
Convert to PPT
Convert from ppt, file format, ppt (microsoft powerpoint presentation file).
PPT is the binary file format for Microsoft Office PowerPoint 97-2007. Presentations using PowerPoint can include images, text, audio, video, charts, graphs, hyperlinks, and animation to provide presentations created for students and businesses. Mos...
MP4 (MPEG-4 Video Stream)
MPEG-4 Part 14 files (MP4) are capable of storing multimedia such as audio, video, and subtitles. This file type is commonly used by Apple and other producers of mobile products which allow audio, still images, or video. This includes but is not limi...
Specify a downloader that fits your task
Home Blog PowerPoint Tutorials How To Convert a PowerPoint Presentation to a HD Video in 3 Steps
How To Convert a PowerPoint Presentation to a HD Video in 3 Steps
There are many reasons why you may consider converting a PowerPoint presentation to a High-Definition video ; for example if you want to share a presentation online through YouTube or Vimeo, create a self-running presentation or save the slide show video to a DVD.

In this article we will guide you on how to convert a PowerPoint presentations to a High Definition video (as an MP4 video file,Windows Media Video .wmv file or QuickTime Video File .mov) using Microsoft PowerPoint.
PowerPoint lets you save presentations as videos directly from the File > Save As dialog box; however if you need to choose the output video quality while saving the presentation then it is recommended to use the File > Export > Create a Video option.
High Definition (HD) or high-quality presentation uses a higher resolution (1280×720 or 1920×1080) to save the video information. It can improve the overall experience while watching a presentation online or playing a PowerPoint slideshow in a kiosk. It would be the preferred format if you plan to upload your video presentation to YouTube or Vimeo, and have higher quality. The main drawback is that the presentation video file size will be bigger and more bandwidth may be required.

Why You Should Convert a PowerPoint to a Video Format?
Converting a PowerPoint to a video format can have several advantages. From making intuitive videos to engaging your audience to address complex topics in just a few minutes.
Create a Video Slideshow
You can use the converted video file to create a video slideshow for display at an event or edit the content of the video to generate a video presentation.
Create Presentations and Tutorials
PowerPoint enables users to export their videos with voice-over narration and animations. This can help create extensive presentations for an audience
Use Professional Editing Software to Create Engaging Videos
Adding a voice-over, additional graphics, and some footage can help create a professional-looking presentation by using a video editing application. Similar to how you use Instagram tools to convert images into a stunning video, some famous video editing apps that can help you make the most out of your converted PowerPoint file to a video format include Adobe Premiere Pro, Camtasia Studio, iMovie, Final Cut Pro, etc. If you are a Windows user, you can look into alternatives to Final Cut Pro like Lightworks, Movavi Video Editor, and Shotcut.
Create a Video Instead of Using PowerPoint
You can convert PowerPoint to video by simply letting your slides play out, making the presentation easy to play for end users without the need to have PowerPoint installed. This approach can also be helpful if you intend to present your slides using a video player instead of PowerPoint, as the latter might not be available everywhere, whereas video players often come with all types of desktop and mobile operating systems.
Upload a Video Online
Many presenters also like to upload their presentations online for an audience. A teacher might be interested in making his/her presentation available for students, or an industry expert might wish to share a concept with others in the industry by uploading a video to a YouTube channel. Either way, converting your PowerPoint to a video can help make the content easily shareable via video streaming platforms like YouTube and Vimeo. Such a video can also be shared privately via file-sharing apps like Box, Dropbox, OneDrive, Google Drive, etc.
How To Convert PowerPoint to Video (Windows)
Step 1 – go to file > export.
The first step to save a PowerPoint presentation as a HD video go to File -> Export and then click Create a Video button.

Step 2 – Choose Video Resolution
Now, select a resolution to export your video. Other than the Standard (825×480) resolution, the high-definition resolution options include HD (Medium 1280×720), Full HD (Large 1920×1080), or Ultra HD 4K (Largest file size 1920×1080). If you are using an older version of PowerPoint, you might have limited options to select between HD resolutions, since versions older than PowerPoint 2013 only supported HD videos (1280×720).

Optional Step: Save Narrations, Laser Pointer Gestures & Recorded Timings in the Video Exported from PowerPoint
Aside from saving the PowerPoint presentation as an HD video, you can also save a video file that incorporates all the recorded timings during a rehearsal, narrations, and even laser pointer gestures.
In case you have recorded narrations for your slides, you can use them or select Record a Video option to instantly start narrating your slides. The Preview Timings and Narrations option in the same drop-down menu does what it says, it enables you to check and ensure that your narrations are correctly timed with your slides, so you can make necessary edits before finalizing your video.

Optional Step: Select Slide Duration
Choose the default time spent on each slide (in seconds) and whether to save the narrations, timings, and gestures. By default, 5.00 seconds are spent on each slide unless you have a different timing recorded for the presentation slideshow.

Step 3 – Select Video Format and Create a Video Presentation
Click Create Video button and choose the destination folder and output file name. For end users wondering how to convert ppt to MP4, this is the step where you can select MP4 as your output format. PowerPoint supports saving slide decks to MP4 or WMV video formats. Once you confirm, wait a few seconds in order for the file is being saved on your hard disk. Presentations with a lot of slides may require a longer wait time.

Something good about saving presentations as a video file is that all animations, transitions, and media are preserved.

How to Convert PowerPoint to Video (Mac)
How to Convert PPT to Video in Mac? If you’re wondering how to make a PowerPoint into a video on Mac, the steps are quite similar to how you would export PowerPoint to video on a PC, with a few minor differences.
To convert PowerPoint to video on Mac, go to File -> Export.
Step 2 – Choose Video Format
If you have been wondering how to save PowerPoint as MP4 on Mac, this is the step where you can pick a video file format to save your presentation as a video, including MP4 and MOV.
The difference between the PC and Mac during this step is the difference in the availability of video conversion options. The PC version, along with MP4, allows saving a video in the Windows Media Video (WMV) format, unlike Mac, which offers QuickTime video format (MOV) instead.
Step 3 – Select Video Resolution and Create Video
The new version of PowerPoint for Mac allows saving a presentation in HD (Medium 1280×720), Full HD (1920×1080), or Ultra HD 4K (1920×1080) format. The higher the resolution, the higher the file format, so make sure you have enough disk space to save a very heavy file, especially if you opt for Ultra HD 4K resolution.
Save Narrations, Laser Pointer Gestures & Recorded Timings (Optional)
To save narrations, recorded timings, and laser point gestures, select the Use Recorded Timings and Narrations option.
Select Slide Duration (Optional)
To precisely time how long each slide is presented in the video, select the time duration. The default duration is 5.00 seconds, unless you have specified time for each slide separately in the presentation.
Select Export to create your video. Depending on the resolution you have selected, it might take several minutes before the video is converted. Higher resolutions take more time to conversion.
Saving videos from PowerPoint can help you at the time you need to share a presentation slideshow online (for example, uploading it via YouTube or Vimeo, or any other online video platform ), but you can also use this technique to prepare a PowerPoint presentation for a kiosk, make interactive PowerPoint presentations or create a self-running presentation. PowerPoint presentations saved as videos can also be easily run from mobile devices without the need for PowerPoint to be installed on the device. If you wish to save your PowerPoint to video in a format easily accessible, you can opt for PowerPoint save as MP4 instead of using WMV or MOV file formats that are not supported by all types of video players.
Alternatively, check our article about how to insert a video into PowerPoint .
Like this article? Please share
mp4, Presentation Ideas, Presentation Videos, Video, Windows Media Video, wmv Filed under PowerPoint Tutorials
Related Articles

Filed under Business • July 24th, 2024
How to Create a Demo Presentation
Discover the secrets behind successful demo presentations and what they should contain with this article. Recommended PPT templates included.

Filed under Design • July 3rd, 2024
ChatGPT Prompts for Presentations
Make ChatGPT your best ally for presentation design. Learn how to create effective ChatGPT prompts for presentations here.

Filed under Design • July 1st, 2024
Calculating the Slide Count: How Many Slides Do I Need for a Presentation?
There’s no magical formula for estimating presentation slides, but this guide can help us approximate the number of slides we need for a presentation.
6 Responses to “How To Convert a PowerPoint Presentation to a HD Video in 3 Steps”
Can’t believe no one has commended you for this helpful tutorial! We want to mount several TVs in the lobby and exam rooms of our veterinary hospital to run informational presentations for our clients about pet care, our services, and helpful products. Recording a PowerPoint as a video and then putting it on a USB thumb drive to connect to the TV seems like it will be an effective, inexpensive way to get that accomplished. Thank you so much!
I second the above comment. Thank You
how to present a power point presentation on a smart tv..and having it loop over to continuous display..keep running.
This was very helpful. I had no clue that this could be done. I dedicated a PC to running the Power Point presentation for our lobby. Having it run on the TV via USB will free up that resource for us.
I haven’t dug into it yet, but is there a way to make it loop?
I keep getting this audio data not supported. Is there anyway to remove this?
Send us your issue to [email protected] we might be able to help you.
Leave a Reply
Unsupported browser
This site was designed for modern browsers and tested with Internet Explorer version 10 and later.
It may not look or work correctly on your browser.
- Presentations
Why Make Your PowerPoint Into a Video ?
PowerPoint isn't marketed as a video tool. There are many advanced video tools out there like Adobe Premiere or Final Cut Pro X. With all of these options, you might be wondering why you would use PowerPoint to create a video file.
Here are four great reasons to use PowerPoint to create video presentations:
- The device you want to show your PowerPoint file on doesn't support PowerPoint files (think Smart TV's or handheld game consoles).
- You already have a finished PowerPoint presentation and don't have the time to recreate it from scratch in a video editor.
- Your recipient doesn't have PowerPoint installed on their device, but can open it in a standard video player app.
- You don't have the time to learn a new piece of video editing software to create a presentation video.
How to Quickly Convert Your PowerPoint to Video (Watch & Learn)
Let's walk through how to convert a PowerPoint (PPT) file into a video. In the quick, two minute screencast below, you can watch me cover the process step-by-step:

Keep scrolling to see more tips for making videos with PowerPoint, including compression tips that weren't mentioned in the video.
How to Export Your PowerPoint to Video
Start off by opening your PowerPoint presentation. Exporting a PowerPoint presentation to a video file should be the last step of your process. This is because you'll need to convert the PowerPoint presentation to video each time you make changes.
As I mentioned earlier, PowerPoint will export animations and transitions when you export the file as a video.
To begin the export, go to the File > Export > Create a Video menu option.

From this menu, there are several key settings to choose before you export your finished video. The dropdown boxes on the right side control the quality and timing of your presentation.
Here are the key choices you'll need to make before converting your PowerPoint to video:
1. Set PowerPoint Video Quality
Choose a quality setting from the dropdown to find the sweet spot between file size and video quality.
The better the quality setting you choose, the larger the finished file will be. If you're going to upload the video online to a service like YouTube, it's fine to export at the highest quality and let them handle the compression.

If you're sharing this video with a colleague via email or posting it on your own server, a smaller file size might be the right choice. Here are my recommendations for when to use each of the settings:
- Presentation Quality. When keeping the file size small is no object, use Presentation Quality. It will render a video that looks extremely close to your original presentation alongside a large file.
- Internet Quality. This is ideal if you want to upload quickly to a social service like Facebook or Twitter. Using Internet Quality is a good middle ground between file size and clarity.
- Low Quality. This is the right choice when you're trying to save space, such as when you'll attach a video to an email.
Choose a quality setting from the dropdown option to make your selection.
2. Control PowerPoint Slide Timings
Now, you need to set timings, the runtime for each slide in your video. There are two options for timings on the dropdown menu:
- Don't use Recorded Timings and Narrations. Simply set a length of time for each slide to show in the video, such as 5 seconds each.
- Use Recorded Timings and Narrations. Setup specific lengths of time for each slide to show, and optionally record narrations for the video version.

Basically, these two options let you choose between setting specific timings or using the same runtime for each slide.
For this example, let's leave the option set to Don't Use Recorded Timings and Narrations.

When you choose this option, you'll need to set the Seconds spent on each slide option. This is how long each slide will show in the video version. The default is 5 seconds as you can see in the screenshot above.
3. Create Your PowerPoint Video
Finally, click on Create Video. PowerPoint will open up a Save As window, and you'll need to set a folder and filename for your finished video.

You can also choose between an MPEG-4 video (.MP4 file) or Windows Media Video (.WMV) file when exporting, so choose the appropriate format if your device has any limitations. I typically leave this set to MP4.
How to Record Timings in PowerPoint
In the example above, we used the same amount of time spent on each slide (a flat 5 seconds in the example shown.) However, you can setup timings and narrations for your slide to customize how long each slide should show.
To setup timings and narrations, choose Record Timings and Narrations from the timings dropdown.

Then, a dropdown menu will appear. There are two options here:
- Slide and animation timings. Leave this box checked to record the amount of time
- Narrations, ink, and laser pointer. Leave this box checked if you want to record audio from your computer's default microphone.
Voiceovers are very helpful if you want to send a slide deck to a colleague and share your commentary while they watch the video.

Once you press Start Recording, PowerPoint will go into a fullscreen view of your presentation. Leave each slide on screen for the length of time it should show in the video.
Basically, PowerPoint is recording a live version of your presentation. If you leave a slide on a screen for 10 seconds, it will appear for 10 seconds in the video version.

You can use the arrow keys to advance the slides and change slides. When you reach the end of the presentation, PowerPoint will exit to the menu.

Now, you can save your finished video presentation with your own timings and narrations. The finished video will use the same timings you used while rehearsing.
Create Powerful Video Presentations Fast With the iSpring Suite
If you need to make video-based presentations that are more robust from within PowerPoint, then why not use a quality tool designed for this? Plug the iSpring Suite into your PowerPoint setup today.
With iSpring Suite, you can start recording video and audio directly from within the PowerPoint environment. Also, go one step further. Make use of a variety of iSpring Suite’s next-level eLearning presentation components. Then export to common video formats like MP4.

Take Your Video Presentations to the Next Level
Add more robust eLearning components into your presentation videos with iSpring Suite. Here are some of the advanced iSpring Suite capabilities you can tap into:
- Edit your video right from within PowerPoint. You can trim, add titles, transitions, audio, graphics and merge your presentation videos.
- Record screencasts and software tutorials with voiceovers. Or create a webcam video that's directly embedded into your PowerPoint presentation.
- Create full video-based courses. Take lectures and combine them with video slides and iSpring’s tools to quickly make your online course material.
- Build interactive assessments. You can pair your video material with a full assortment of quizzes. Use quiz templates, branching, and flexible scoring.
- Translate your text to speech to add professional voice-overs and localize courses in 42 languages.
- Take advantage of iSpring Suite’s adaptive player. It allows you to play your presentation on all devices seamlessly.

Quickly Add Videos and eLearning Components to Your Presentations
iSpring Suite will transform PowerPoint into a more powerful toolset. With it you can add videos to your presentations and edit them from within PowerPoint.
Pair these videos with so much more. Turn your presentations into full courses, with quizzes, eLearning interactions, and interactive role-plays. Then export your presentation into common video format or deploy as fully interactive mobile-ready courses.
The best way to get started is to sign up for the 14-day free trial , so that you can check out all the features at your own pace, without paying anything upfront.
Recap and Keep Learning More About PowerPoint
Maybe you're converting your PowerPoint presentation to go online, or maybe you're trying to make it easy for a co-worker that doesn't have PowerPoint installed. Either way, there are plenty of reasons to convert a PowerPoint file to a video for easy watching.
Don't stop here. There's much more to learn about PowerPoint. Check out these tutorials to do just that:
We also have plenty of professional PowerPoint templates with great design options, if you need a quick start to making your presentation. Browse through these curated collections:

What are your favorite tips for converting PowerPoint presentations? Let me know in the comments below.

Critical PowerPoint Shortcuts – Claim Your FREE Training Module and Get Your Time Back!
How to Convert PowerPoint to Video (Step-by-Step)
- PowerPoint Tutorials
- Shortcuts & Hacks
- October 22, 2019
In this article you’ll learn how to convert PowerPoint to video, and the different options you have.

While most people know how to use PowerPoint to present their products and services live, few people know how to turn a PowerPoint into a video that runs on its own.
And while that might sound complicated, it’s in fact pretty easy, as you will see below.
There are two different ways to turn your PowerPoint presentations into video, the first of which gives you the most options, as discussed below.
But before you start the conversion process, here are some thoughts about why you should consider doing it in the first place.
Why Convert PowerPoint to Video?
It keeps your presentation the way it was intended.
Exporting your presentation as a video keeps all elements safely locked in place. That way you can email it to your colleagues or clients without worrying that something will shift, or that timings be messed up.
Video is more accessible and shareable
While most people have PowerPoint on their computer, we shouldn’t assume that they do. Convert your PowerPoint to video and the receiver can open it even if they don’t have a Microsoft subscription. They will have to have a media player though!
It’s also easier to view videos on a mobile device, so busy clients can check out your presentation while on the move.
Furthermore, it’s also easier to share videos on multiple platforms. They can be posted to YouTube, on your company blog, and on social media and video sharing networks.
People love videos!
With more than 75 million people watching online videos every day across the United States alone, you know you’re onto a good thing. According to marketing gurus, just mentioning the word ‘video’ in the subject line of an email increases the click-through rate by 19%.
We human beings naturally love a good story because it conveys a message on an emotional level; and videos are very effective for storytelling, especially in contrast to written text or even images.
Since people’s decision-making process is often based on emotions, turning your presentation into a video can be very convincing.
What is an MP4?
MP4 is short for MPEG-4 Video, and is a universal video format that plays on any device.
When converting PowerPoint to video, you can choose between the MPEG-4 Video file format (MP4) or the Windows Media Video file format (WMV), as discussed below.
The two main advantages of MP4 for your videos are:
- It’s a pre-compressed and compact file type format (so it’s small)
- It plays on just about any device
When converting PowerPoint to video, I highly recommend using the MP4 format unless you have a specific reason not to.
To learn more of the advantages of the MP4 format, see this Quora thread here .
Option #1. Convert PowerPoint to video

To convert your PowerPoint presentation into a video, simply:
- Click the File tab
- Select Export
- Select Create Video
- Choose your Video Quality and Recorded Timings and Narrations (see details below)
- Click Create Video
Choose where to save the video on your computer and click Save .

As a result, your PowerPoint presentation is converted into video, based on the Recorded Timings and Narrations you selected, or the preset seconds per slide you set (all discussed below).
You can even add music and loop it throughout your video if you want to. To learn how to add music to PowerPoint, read our guide here .
Video quality
Video quality determines not only the quality of your video output, but also how large the video file will be, as you can see in the image below.

For most situations, the Full HD (1080p) is a great choice.
That said, if you are showing your video on a large overhead projector and size isn’t an issue, you can improve the quality of your video by using the Ultra HD (4K) format.
Below you can see the different video quality options you have in the Create a Video dialog box.

If file size is an issue or you are just showing your video on a smaller laptop screen, you can save a lot of space with the HD (720p) or HD (480p) formats.
HD (720p) is supported on most websites and video platforms such as YouTube and Facebook. The HD (480p ) option is the best option for mobile devices.
Setting recorded timings and narrations

Recorded Timings and Narrations are important when converting PowerPoint to video as they not only dictate how long your video will be, but determine when things happen in your presentation.
There are a variety of ways you can set yourRecorded Timings or Narrations (all detailed below), but in short, your options are:
- Automatically set how many seconds you want per slide
- Set your own Rehearsal Timings (no audio or video) by clicking through your presentation
- Narrate your PowerPoint with voice and/or video, which automatically sets the slide timings for you
If you use the Record Slide Show dialog box to narrate your entire presentation, you can simply use the Save As dialog box (discussed next) to save your PowerPoint as a video, as your narrations will take care of everything in your video.
To learn everything you need to know about narrating a PowerPoint presentation, read our guide here .
Properly using PowerPoint animations
If you have animated sequences in your presentation and are going to use a pre-set number of seconds per slide, I recommend setting all your animations to After Previous.

To set an animation to trigger automatically as your slide changes, simply:
- Select your animated object
- Open the Animations tab
- Open the Start drop down
- Select After Previous
This ensures that your animations will trigger after the previous action, whether that is an animation or advancing to the next slide.
If you leave your animations set to On Click , they can add a delay of as much as 10 seconds to your video. This is especially if you are using the second conversion method (see the section below here on saving PowerPoint as a video).
Option #2. Save PowerPoint as Video
The fastest way to convert your PowerPoint presentations into a video format, is to use the Save As dialog box.
This works best when you have narrated your PowerPoint presentation using the Record Slide Show dialog box, and just want the Full HD (1080p) quality for your video.

That’s because all of your slide timings, actions and animated sequences are saved within your narration, so all PowerPoint then has to do is save itself as a video using the default settings.
If you are not narrating your presentation, then I recommend using the first method discussed above.

To save your presentation as a video from inside PowerPoint, simply:
- Hit F12 or Ctrl + Shift + S to open the Save As dialog box
- Choose a location to save your video
- Change the file type to either MPEG-4 Video (recommended) or Windows Media Video
- Click Save
Depending on the size of your presentation, it might take a minute or two to save your presentation as a video, so just hang tight.
When it is finished, your PowerPoint will be saved as a video in the Full HD (1080p) format. If you want a different video quality, you will need to use the Create a Video dialog box (see the first method discussed above).
After you save your presentation as a video, you can then embed it in other presentation if you want to. To learn how to embed a video in PowerPoint, read our guide here .
Note: I highly recommend saving your presentation in the MPEG-4 (MP4) file format as it is more universally accepted than the Windows Media Video (WMV) file format.
How to Record and Set Timings for Your Video
When converting PowerPoint to video, the timings not only determine the length of your video, they also determine the timing in which your animated sequences are triggered.
If you have a lot of animated sequences in your presentation, I don’t recommend using a set number of seconds per slide.
That’s because you can’t control the lag between the animated sequences and your content. Instead, I recommend using the Rehearse Timings command.
Here are the 4 different ways you can set and adjust slide timings for your presentation, from easiest to slowest.
1. Set a default number of seconds per slide

To use a standard number of seconds per slide for your slide timings, simply:
- Navigate to the File tab
- Click Export
- Select Create Video
- Set the number of seconds
The more seconds you set per slide, the longer your video will be in total.
2. Set transition timings to advance your slides
PowerPoint transitions are another great way to not only make flipping between your slides less abrupt, but also to automatically advance your slides.
Using the Transitions tab, you can both set a default number of seconds for all of your slides, as well as adjust the time spent on individual slides.

For example, to set a Fade transition and slide timings of 3 seconds per slide, simply:
- Navigate to the Transitions tab
- Click the Fade transition
- Under the Effect Options , choose Through Black
- Deselect On Mouse Click
- For After , input 3 seconds (and make sure there is a check mark next to After )
- Click Apply to All
As a result, all the slides in your presentation will now have a Fade transition and will automatically advance after 3 seconds.
You can also adjust the duration of the transitions between your slides if you want to get specific, but I think the default is usually fine.
3. Use the Rehearse Timings command
If you want to control the flow of your timings by manually clicking through your presentation, you can use the Rehearse Timings command.
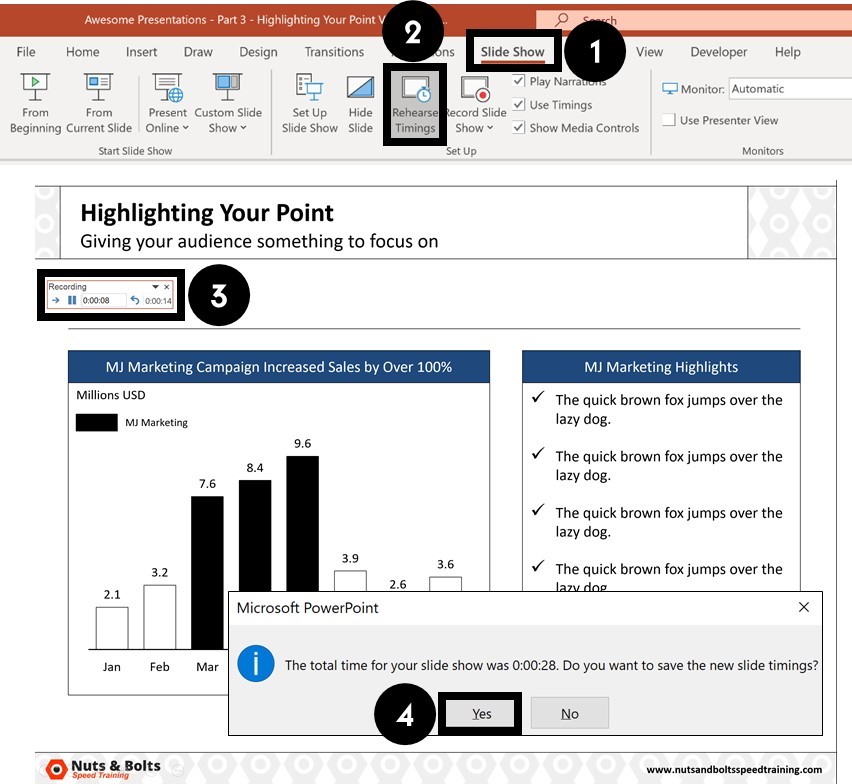
To set your slide timings with the Rehearse Timings command, simply:
- Navigate to the Slide Show tab
- Click the Rehearse Timings command
- Use the Rehearse Timings dialog box to click through your presentation
- When you are finished, click Yes to save the slide timings
Here is a quick run through of the commands on the Rehearse Timings dialog box.

Clicking Repeat starts the rehearsal timing over for the current slide you are on. That means you can restart the timing without having to start the presentation over from scratch.
4. Use the Record Slide Show command
The Record Slide Show command is the NEWEST and best way to add audio and video narrations to your presentations.
The advantage of using this tool to narrate your PowerPoint presentation, is that all of your slide timings, animations and actions are recorded for each slide.
That means you can simply use the Save As dialog box to quickly convert your narrated PowerPoint into a video.

To use the Record Slide Show command to narrate your presentation from the beginning, simply:
- Navigate to Slide Show tab
- Open the Record Slide Show drop down
- Select Record from Beginning
To learn how to use the Record Slide Show command to narrate your PowerPoint (and all the options you have), read our guide here.
Note: If you just click the Record Slide Show button (instead of opening the drop down), you will begin recording your narration from your current slide.
So that’s how to turn PowerPoint into a video, either by exporting your video using the Create a Video command, or by saving your PowerPoint presentation as a video using the Save As dialog box.
If you narrate you presentation using the Record Slide Show command, the Save As dialog box is the fastest way to turn your presentation into a video.
And while PowerPoint gives you two different video file types to choose from, I recommend using the universal MP4 video file format. That’s because it ensures that your video will play on any device (computer, tablet, or phone) that people may have.
If you enjoyed this article, you can learn more about our PowerPoint training courses and other presentation resources by visiting us here .
What’s Next?
Related articles, about the author.

This Post Has One Comment

Very useful tips. Many thanks!
Comments are closed.
Popular Tutorials
- How to Strikethrough Text (l̶i̶k̶e̶ ̶t̶h̶i̶s̶) in Word, Excel & PowerPoint
- How to Make Animated Fireworks in PowerPoint (Step-by-Step)
- Strikethrough Shortcut (l̶i̶k̶e̶ ̶t̶h̶i̶s̶) for Word, Excel & PowerPoint
- How to Create a Flash Card Memory Game in PowerPoint (Like Jeopardy)
- Keyboard Shortcuts Not Working: Solved
PowerPoint Tutorial Categories
- Strategies & Opinions
- Presentation Design
- Pictures, Icons, Videos, Etc.
- New Features
- Miscellaneous
- Charts & Data Viz
We help busy professionals save hours and gain peace of mind, with corporate workshops, self-paced courses and tutorials for PowerPoint and Word.
Work With Us
- Corporate Training
- Presentation & Template Design
- Courses & Downloads
- PowerPoint Articles
- Word Articles
- Productivity Resources
Find a Tutorial
- Free Training
- For Businesses
We help busy office workers save hours and gain peace of mind, with tips, training and tutorials for Microsoft PowerPoint and Word.
Master Critical PowerPoint Shortcuts – Secure Your FREE Training Module and Save Valuable Time!
⌛ Master time-saving expert techniques.
🔥 Create powerful presentations.
🚀 Propel your career to new heights.
We value your privacy – we keep your info safe.
Discover PowerPoint Hacks Loved by Industry Giants - KKR, AmEx, HSBC!
Over 114,880 professionals in finance, marketing and sales have revolutionized their PPT skills with our proven methods.
Gain FREE access to a full module of our premium PowerPoint training program – Get started today!
We hate spam too and promise to keep your information safe.
You are currently viewing a placeholder content from Facebook . To access the actual content, click the button below. Please note that doing so will share data with third-party providers.
How To Turn a Powerpoint Presentation Into a Video
The quick and easy was as well as expert tweaks
Powerpoint is a popular tool used to present and showcase a product or message. It comes with many layouts, themes, and tools to help you build professional presentations. What if you spend a lot of time creating a visually appealing and well laid-out presentation and you want to share it with someone who doesn’t have Microsoft Office?
The short answer is you can’t. However, if you turn it into a video it can be easily viewed by most people with an Internet connection. Another benefit of turning Powerpoint into a video is it is a great way to repurpose your content into another format. Video is quickly becoming a huge part of businesses’ digital marketing strategy.

Even though Powerpoint is not marketed as a video tool, and there are many video tools, apps, and platforms available, you might be thinking why should you use Powerpoint?
A few good reasons are:
- As mentioned above, you can’t share your presentation with someone who doesn’t have Powerpoint installed on their computer.
- You have already spent a lot of time creating a fully automated Powerpoint presentation and don’t want to start from scratch with a video.
- Video creation is not in your arsenal of skills, and you don’t want to learn how to use a new tool.
The Quick & Easy Way
If your presentation is complete with automatic timings, transitions and animations, you might be shocked to learn how easy it is to convert it into a video.
- Open your Powerpoint presentation.
- Click on File , select Save As , and from the drop-down menu, choose MPEG-4 Video (*.mp4). (available in Powerpoint 2010 and above).

Too easy? It actually is. But keep in mind this only works for presentations that are already completely set up and ready to show to viewers.
Use The Export Option
- Another way to convert to a video file is to click on File , choose Export , and click on Create a Video .

- There are a few options for you to select that will affect how your final video turns out. Start by selecting quality.

The choice you make will affect the clarity, resolution, and video file size. The higher the quality, the larger the file.
I generally use Full HD (1080p), but if you have a slow Internet upload speed or the file size is an issue, HD (720p) will also produce a high-res HD video.
Choose The Timings
The next option controls how long each slide stays on the screen or the timings of your video.

- If you choose Don’t Use Recorded Timings and Narrations , each slide will be shown for the same amount of time. When you use this option, you can select the number of seconds you want each side to stay before moving onto the next one.

- Now let’s click Create Video and save your file to your computer.

- Find the location where you saved your video and play it. It will open in your default video player or app. The slides will play for the length of time you set above.
- You may wish to do this to allow viewers to read slides with longer text. This can be accomplished by choosing a different timing setting. Select Record Timings and Narrations.

- This option enables you to customize how long each slide lasts on the video and gives you the option to record a voiceover. If you want to record a voiceover, you have several options. To change your microphone, look under settings .

- You can also include a box of yourself recording the video by selecting the Camera option from the settings shown above.
- To start your voiceover, click on the red Record button. Powerpoint will give you a few seconds to get ready while it counts down 3, 2, 1.

- While you are recording your voice, your Powerpoint is also recording the timings. The amount of time you spend on each slide before moving to the next will set the timing.
- To move to the next slide, use the arrow keys. When you get to the end, “X” out of the recording screen. You will then be taken back to the settings page with the timings you recorded.
- Click on Create Video and save it to your computer. Each slide in your video will now last as long as it took you to talk about it when recording.
How To Set Up Powerpoint Presentations With Transitions, Animations & Timings
If you would prefer to set the animations, timings, and transitions before creating the video, below are a few examples of how to do so. This way, you can use the quick and easy way to convert it into a video described above.
What Are Transitions?
Have you ever seen a Powerpoint presentation that does something flashy or catches your eye between slides? Those special effects are called transitions.
There are three categories of transitions you can choose to use in your presentation. They are:
- Subtle : Basic and simple movement from one slide to another.
- Exciting: More elaborate and more interesting than subtle.
- Dynamic: When used between two slides that are similar in layout, this transition will only move the placeholders, not the slides.

When applied in moderation, transitions can add a professional and visually appealing effect to your presentation.
If you use too many transitions, the results can be confusing, erratic, and distracting.
Apply a Transition
- Select the slide from the Slide Navigation panel where you want to apply the transition. This slide will appear after the transition you choose.
- Click on Transitions from the top navigation. Note that the default is None . Click on More or the down arrow to see all the available options.

When you click a transition, you will automatically see a preview of what it will look like if selected. You can either use the transition for a single slide or click Apply to All to use the same transition for all the slides in your presentation.

Customize The Direction Of The Transition
Each transition has different effect options.
- To choose the one you want to use, click on Effect Options , select one, and watch Powerpoint automatically show you a preview of your selection.

Change The Duration Of a Transition
- Choose the slide you want to change the time for and look for the Duration field. In this example, the side is set to 01.00 .

- Let’s increase the time to .025 to make the transition a little slower. You can choose to set the duration for the selected slide only.
- Click Apply to All to use the same transition duration for all the slides.
Add Sound To The Transition
- Click on the dropdown menu next to Sound from the top bar navigation. Choose a sound, then preview it.

- To preview the sounds, from the top bar navigation click Slide Show and then From Current Slide .

How To Move To The Next Slide
If you are doing a live presentation in front of an audience, you usually would press the spacebar or click your mouse to advance to the next slide.
However, as we are converting the presentation to a video, you want to use the Advance Slides setting to automate the process.

- Now you want to remove (deselect) the checkmark next to On Mouse Click . In the After field, enter the amount of time you want the slide to be displayed before moving onto the next one. In the example above, the slide will last 00:03.36 .
Custom Animations
Animations in Powerpoint add motion to different elements in your presentation. The purpose is to draw attention to the key points, such as specific text, shapes, tables, images, and other objects.
Using animations in Powerpoint videos makes it more engaging and exciting to watch. Some of the types of motion you can add to your slides are:
- Changing the color or size of an image or text.
- Causing an image to appear or disappear.
- Moving an object around your slide.
Add An Animation
- Start by selecting an object to animate, click on Animations , and choose an option. If you don’t see the Animation Pane , click on it to open it.

- Now click on Effect Options and choose one. Different animations have different options.

To start an animation, click on the drop-down menu next to Start and choose from one of the options below:
- On Click will start the animation when you click a slide.
- With Previous will start the animation at the same time as the previous animation on the previous slide.
- After Previous will play it immediately after the previous animation completes.
Click on Duration to set how long you want the animation to last. If you want to add a delay before an animation starts, use the Delay option.
To add more effects, click on Add Animation and choose the one you want to use. If you want to change the order an animation appears on the slide, click on the animation marker.

- Choose Move Earlier or Move Later to change the order the animation appears in the sequence.
Add An Animation To a Group
- Press control on your keyboard and select the objects you want to include in the group.
- Next click on Shape Format , then Group , and Group again.

- Then select Animations and choose the one you want to use.
Animate Text
- Highlight the text where you want to add an animation.
- Click Add Animation and choose an option. You will see it in the Animation Panel on the right side.

- The next step is to click the drop-down menu next to the animation you just added. This is another place where you can decide when you want it to start. Choose from Start On Click , Start With Previous , or Start After Previous .
- Click the drop-down again next to the text animation, and this time select Effect Options.

Here is where you will set the direction, timing, and other specific animation options.
There are a lot of special effects you can add to Powerpoint. With practice, you will be able to create an engaging presentation using automatic animations and transition timings.
Once you are finished completing the above steps, you can use the simple way described at the beginning of this content to turn a Powerpoint presentation into a video. In just a few minutes, you will have a compelling, engaging, and visually appealing video to share with others.

David has a background in small business and lives in Australia. He is a WordPress and Ubuntu Developer who enjoys design, CSS and tech tool integration. Read David's Full Bio
Read More Posts:
Leave a Reply
Your email address will not be published. Required fields are marked *
PowerPoint to MP4
Convert PowerPoint presentations to MP4 online; free

319 reviews

Convert PowerPoint to mp4 video online
Converting PowerPoint to mp4 is now super easy—with VEED! You can convert your PowerPoint slide shows to videos in just a few clicks, and you can do it straight from your browser. You can even record yourself while presenting your slides using our free screen and webcam recorder.
Upload your Microsoft PowerPoint slides and record your webcam, audio, and screen. Easily customize your layout, background, and camera feed. Add annotations, scenes, and even soundwaves for audio recordings.
How to Convert PowerPoint to mp4:
Select layout
Select from our list of layouts; in this case—Slides or Slides and Camera (you may need to click to ‘ Allow ’ permission to access your screen, camera, or microphone). You can record just your screen, your webcam, or both at the same time!
Start recording
Click the red button to start recording! You'll see a countdown before the recording starts. Don't worry if you mess up. You have unlimited time and unlimited retakes. You can navigate to other pages, and don't worry, you are still recording.
Review, edit, and export
You can playback your recording to review it, click ‘Share’ to share with friends and colleagues, or ‘Edit’ to edit your video (perfect for adding text, subtitles, and professional touches to your screen recording)
‘PowerPoint to MP4’ Tutorial

A versatile, free, PowerPoint to MP4 converter
It’s never been easier to convert your PPTX presentations to mp4. VEED is a powerful and versatile screen and webcam recorder that lets you create videos out of your slide shows. It also features multiple layouts that you can choose from. You can record your screen and audio at the same time, record your slides and camera or slides only. After recording, give your PowerPoint presentations a new look! Add annotations, images, text, and more.
Edit, personalize, and localize
After converting your PPTX to MP4, you can edit it to make it look professional using our complete suite of video editing tools. Personalize your presentation to suit your business needs. Add scenes, text, your logo, fonts, and so much more. You can also localize your video by adding subtitles and translating them to different languages—perfect for businesses with international teams. Our automatic translation tool is available to premium subscribers. Check our pricing page for more info.
The best video editor for businesses
Our screen and slides recorder allows your team to record important business messages, create explainer videos, presentations, and more. Share, comment, review, and collaborate on videos online—no software to download. You can even add subtitles automatically and translate them to different languages! Plus, you can add your logo and brand colors using our brand kit—available to pro users.
How do I convert PPT to MP4?
It’s super easy! Upload your PPT slides to VEED and start recording. You can also choose to record your webcam while presenting your slides. Edit your recording and export it as an mp4 video!
How do I edit the video?
Just click ‘Edit’ when the recording is finished, and you will be taken into VEED’s video editor. Here you will be able to add subtitles, text, annotations, music, sound effects, and much more. Just hit the ‘Export’ button when you’re finished, to save your new edited recording.
Is PowerPoint MP4 format?
When you save your PowerPoint presentation, it doesn’t automatically save as an mp4. The best way to convert your PPTX presentations to MP4 is by using VEED!
How long does it take to convert PPT to MP4?
It really depends on your screen recording time. VEED lets you record your screen and webcam while presenting your slides. When you’re done recording, exporting your PPTX to mp4 only takes a few minutes.
Discover more
- Convert Slides to Video
Convert PPT to Video. PowerPoint (PPT, PPTX, PPSX) to Video Converter.
Convert powerpoint to video. ppt to mp4. ppt to video. ppsx to mp4. powerpoint to mp4. powerpoint to video., powered by aspose.com and aspose.cloud ., * by uploading your files or using our service you agree with our terms of service and privacy policy ..
| Service | Free | Free (registered users) | Premium | Business |
|---|---|---|---|---|
| File Size Limit | 5 Mb | 10 Mb | 50 Mb | Custom |
| Batch Files Max Count | 5 | 10 | 100 | Custom |
| Uses Per Day | 5 | 10 | Unlimited | Custom |
| Send Results via Email | ||||
| Instant Download Results | ||||
| Ad-Free App Experience | ||||
| Dropbox & Google Drive Integration |
Send the download link to
Press Ctrl + D to save this page as a bookmark.
We've already processed ??? files with a total size of ??? Mbytes.

How to convert PPT to video
- Click Drop or upload your files .
- Select the PowerPoint file you want to convert to video on your computer.
- Specify your preferred parameters for the conversion—the slides to be converted, duration for each slide, video resolution, transition, and audio. Or you can use the default parameters.
- Click the CONVERT button.
- Wait for your presentation to get converted to an MP4 video.
- Click the DOWNLOAD NOW button. Or you can type in an email address and click the message icon. The email address will receive a download link.
Aspose.Slides PPT to Video converter is a free online service for converting PowerPoint presentations to videos. Slides : Convert all slides in your PowerPoint to video. Or you can select specific slides or a range of slides for conversion. Slide duration : Specify the time that is spent showing each slide in the video. Video resolution : Select the resolution that determines the amount of detail in the video. If you plan to display the video on a big screen, you will do well to select HD. However, in such case, FullHD or QHD is probably even better. Transition : Select the transition that is played between slides in the video. PowerPoint transitions give life to presentations. They provide additional on-screen movement and interest for your audience. Audio : Your presentation can seem brand-new with audio. You can use the audio from the original presentation, upload your own, or select it from the drop-down option. The presentation to video converter is a free service powered by Aspose.Slides .

Aspose.Slides PPT to Video
- Convert PPT to video.
- Export PPT to video.
- Save PowerPoint PPTX and PPT as video.
- Convert presentation to video.
- Create video from PowerPoint.
- Add audio and transition effects to your video.
- Convert PPTX to MP4.
- Convert PPT to MP4.
- Convert PowerPoint to MP4.
- Download PowerPoint video. Open video. Share video.
- How do I convert PPT to video? Upload your PowerPoint presentation, specify your preferred parameters for the conversion operation or leave the default options intact, and then click CONVERT .
- What are the advantages of converting PowerPoint to video? By converting your PowerPoint to video (MP4), you end up with a more convenient file. A video is easier to share than a PowerPoint. A video can be opened on any device or platform.
- Is Aspose PPT to Video Converter free? Yes. The PowerPoint PPT to video converter is completely free to use.
- How long does it take to convert PPT to video? The time required for the PowerPoint to video export operation is dependent on the number of slides involved.
- What is the format of the resulting PowerPoint video? MP4 is the resulting format.
- How do I save my PPT as MP4? Use the PPT to Video converter on this page.
- How can I open the video created from a PowerPoint? You can open the video in any video player. The MP4 video file can be played on any laptop (Windows, Mac, Linux) or smartphone (iPhone or Android device).
- How do I save my PowerPoint as a video? Use the PowerPoint to video converter on this page.
- How do I convert PowerPoint to MP4 for free? Use the converter on this page. It is FREE.
- Are there limits on uploaded files? For a single presentation, the maximum file size is 35 MB and the maximum number of slides is 50. If you must convert a presentation that exceeds 35 MB or contains more than 50 slides, we recommend you use Aspose PowerPoint Splitter to divide the slides into multiple presentations. You can then convert the presentations you obtained individually.
Fast, Easy, and Secure Conversion
Convert from Anywhere
High Quality Conversion
Other supported conversions.
You can use other tools to convert PPT, PPTX and PPSX files. Please see the list below.
- PDF to video (PDF to MP4)
- Images to Video (Images to Video Converter)
- PowerPoint to YouTube video (PowerPoint Presentation)
- MP4 to MP3 (MP4 to MP3 Converter)
- MP4 to WAV (MP4 to WAV Converter)
- MP4 to WEBM (MP4 to WEBM Converter)
Oops! An error has occurred.
Error has been reported successfully..
You have successfully reported the error, You will get the notification email when error is fixed. Click this link to visit the forums.
� Aspose Pty Ltd 2001-2022. All Rights Reserved.
- Accessories
- Entertainment
- PCs & Components
- Wi-Fi & Networks
- Newsletters
- Digital Magazine – Subscribe
- Digital Magazine – Info
- Smart Answers
- Best laptops
- Best antivirus
- Best monitors
- Laptop deals
- Desktop PC deals
When you purchase through links in our articles, we may earn a small commission. This doesn't affect our editorial independence .
How to make a PowerPoint presentation into a video

Looking to turn your PowerPoint slides into a video? Well, you’re in luck. Microsoft PowerPoint has a built-in feature that lets you convert the presentation. This is especially useful if you want to share the presentation with someone, especially if they don’t have PowerPoint.
To get started, open the PowerPoint presentation you would like to turn into a video and click the “File” tab in the top-left corner of the window.

IDG / Marshall Gunnell
Next, click “Export” in the left-hand pane, and then select “Create a Video” under the Export options.

Now it’s time to pick the video quality and the recorded timings and narrations . There are four different options to choose from when it comes to video quality:
- Ultra HD (4K) : The largest file size available with ultra-high quality.
- Full HD (1080p) : A large file size with full high quality.
- HD (720p): A medium file size with moderate quality.
- Standard (480p): The smallest file size with the lowest quality.
Once you’ve selected the video quality, use the option below it to choose if you want to include recorded timings and narrations or not.

Next, you can adjust how many seconds each slide should be shown during the video. The default is 5 seconds. Click the up or down arrow to increase or decrease the timing by 1-second increments. When ready, click “Create Video.”

Finally, choose a location to save the video on your computer. Once selected, PowerPoint will then begin the conversion. The amount of time required to convert the presentation to video depends on the size of the presentation and the quality of the video you selected.
You can monitor the progress of the conversion at the bottom of the PowerPoint presentation. You’ll receive a notification when the conversion is complete.
Author: Marshall Gunnell
Recent stories by marshall gunnell:.
- How to add the Developer tab to the Microsoft Office Ribbon
- How to block (and unblock) someone in Gmail
- How to enable dark mode in Microsoft Office
Free All-in-One Office Suite with PDF Editor
Edit Word, Excel, and PPT for FREE.
Read, edit, and convert PDFs with the powerful PDF toolkit.
Microsoft-like interface, easy to use.
Windows • MacOS • Linux • iOS • Android

- Articles of PPT
How to Export PowerPoint to Video (3 Easy Ways)
PowerPoint is a popular software for presentations. However, sometimes users want to convert their PowerPoint presentations to videos so that they can be watched offline or shared with others. This article will introduce a guide on how to convert PowerPoint to video with audio, loop, and transitions.
Part 1: How to Export PowerPoint to a Video?
Converting your PowerPoint presentation into a video format on Windows is a straightforward process. By following these steps
Step 1 : Save Recent Work
Before you begin, make sure all your recent changes are saved in your PowerPoint presentation format (.pptx). Go to the File menu and select "Save" to ensure your progress is preserved.
Step 2 : Access Export Options
Click on the "File" tab located at the top-left corner of the PowerPoint interface.
From the dropdown menu, choose "Export," and then click on "Create a Video." Alternatively, if you're on the Recording tab of the ribbon, you can directly click "Export to Video."
Step 3 :
In the "Create a Video" heading, find the first dropdown box.
Select the video quality that suits your needs:
Ultra HD (4K): 3840 x 2160 (largest file size) - Ideal for large monitors. (Available on Windows 10.)
Full HD (1080p): 1920 x 1080 (large file size) - Great for computer and HD screens.
HD (720p): 1280 x 720 (medium file size) - Recommended for internet and DVD playback.
Standard (480p): 852 x 480 (smallest file size) - Suitable for portable devices.
Step 4 : Select Narration and Timings
In the "Create a Video" heading, locate the second dropdown box.
Choose based on your narration and timing preferences:
If you haven't recorded timed narration, the default value is "Don't Use Recorded Timings and Narrations."
If you've recorded timed narration, the default value is "Use Recorded Timings and Narrations."
Step 5 : Adjust Slide Duration (Optional)
If needed, adjust the time spent on each slide. Find the "Seconds to spend on each slide" box.
Click the up arrow to increase or the down arrow to decrease the default 5-second timing.
Step 6 : Initiate Video Creation
Click the "Create Video" button to start the process of creating your video from the PowerPoint presentation.
Step 7 : Save the Video File
A "Save As" dialog box will appear. Enter a descriptive name for your video in the "File name" box.
Browse to choose the folder where you want to save the video file. Click the "Save" button.
Step 8 : Choose Video Format
In the "Save as type" box within the dialog, select either "MPEG-4 Video" or "Windows Media Video" to determine the format of your exported video.
Tip : You may schedule a lengthy film to be made overnight. That way, it will be ready for you the next morning.
Exporting your PowerPoint presentation to a video format on Mac is also a straightforward process. Follow these steps to create a video from your presentation:
Step 1 : Select "File" from the top menu, and then click on "Export."
Step 2 : Choose Video Format
In the "Export" menu, open the "File Format" list. Select the video format you prefer: MP4 or MOV.
Note: Availability of these options may vary based on your PowerPoint version. Refer to the "Requirements" section for more information.
Step 3 : Select Video Quality
Choose the video quality that suits your needs:
Presentation Quality: Ideal for maintaining high visual fidelity.
Internet Quality: Balanced quality suitable for online sharing.
Low Quality: Reduced quality for smaller file sizes.
Step 4 : Timing and Narrations
If you've recorded timings and want to include them in the video, ensure the checkbox next to "Use Recorded Timings and Narrations" is checked.
You can also adjust the time the video spends on each slide if you don't have recorded timings.
Step 5 : Export
After configuring your preferences, click the "Export" button.
By following these steps, you'll be able to seamlessly export your PowerPoint presentation to a video format on your Mac.
Part 2: How to Export PowerPoint to a Video with Audio?
In this section, we'll guide you through the process of exporting your PowerPoint presentation to a video format while retaining audio
Follow these steps to convert your PowerPoint presentation into a video format while preserving audio on a Windows operating system:
Step 1 : Open Your PowerPoint Presentation
Launch Microsoft PowerPoint and open the presentation you want to convert to a video with audio.
Step 2 : Access the Export Option
Click on the "File" tab in the upper-left corner of the PowerPoint interface. Select "Export."
Step 3 : Choose "Create a Video"
From the Export menu, click on "Create a Video." This option will enable you to export your presentation as a video with audio.
Step 4 : Select Video Quality
A list of video quality options will appear. Choose from different resolutions, including 4K, 1080p, 720p, or 480p. Note that 4K quality might not be available in PowerPoint 2013.
Step 5 : Add Timings or Audio
You'll need to decide whether to include timings or audio in your video. This feature is especially useful if you want to add narration to your PowerPoint presentation, enhancing its engagement.
Step 6 : Record Your Audio (Optional)
If you choose to include audio in your video, you can record your audio narration before proceeding with the conversion process.
Step 7 : Set Slide Timings (Optional)
If you've opted for timings, you can set the duration for each slide in the video.
Step 8 : Save Your Video
After configuring your preferences, click the "Create a Video" button to initiate the conversion process.
Exporting your PowerPoint presentation with audio on a Mac is a similar process. Here's how to do it:
Open the PowerPoint presentation on your Mac device.
Click on the "File" menu at the top of your screen.Choose "Export."
Step 3 : Choose Video Format
In the Export menu, you'll find the option to select the file format for your video.
Mac users can choose between MOV or MP4 formats for their video.
After choosing the file format, you'll have the option to select the video quality.
Step 5 : Add Narration (Optional)
If you wish to include your own narration in the background of the video, you can do so.
Record your audio narration and click on "Use Recorded Timings and Narrations."
Step 6 : Adjust Slide Timing
You can also adjust the duration of each slide in the video to fit your preferences.
Step 7 : Export the Video
Click on the "Export" button to start the process of creating and downloading the video.
Part 3: How to Export PowerPoint to a Video with a Loop?
If you plan to play a PowerPoint presentation in a loop, either in its native file format or as a video, here's how to set it up:
Step 1 : Looping a PowerPoint Presentation for Playback:
Open the "Slide Show" tab.Click "Set Up Slide Show."
Step 2 : Loop Continuously Settings:
Check "Loop Continuously Until ESC."Ensure "Using Timings, If Present" is selected.
Step 3 : Start Loop:
Click "OK." Return to "Slide Show" tab and click "Play from Start" to start the loop.
Step 4 : Prevent Interruptions:
Turn off screensavers and power-saving functions.
Step 5 : Save a PowerPoint Presentation for Video Playback:
Click "File" > "Export." Select MP4 or MOV video format.
Step 6 : File Naming and Quality:
Choose a file name and location. Pick export quality (presentation, internet, or low quality).
Part 4: Free Alternative Office Software - WPS Office
Are you looking for a versatile and efficient office suite that can enhance your working experience on your iOS device? Look no further than WPS Office. With its user-friendly interface and a range of powerful features, WPS Office provides a seamless and comfortable environment for your document-related tasks.
Writer : WPS Writer is a powerful word processor that can be used to create documents, letters, reports, and more. It includes features such as spell checking, grammar checking, and a variety of formatting options.
Spreadsheets : WPS Spreadsheets is a spreadsheet program that can be used to create and edit spreadsheets. It includes features such as formulas, charts, and pivot tables.
Presentations : WPS Presentation is a presentation program that can be used to create and edit presentations. It includes features such as templates, animations, and transitions.
PDF : WPS PDF Viewer is a PDF viewer that can be used to open, view,edit and print PDF files.
Other features : WPS Office also includes a number of other features, such as a file converter, a cloud storage service, and a task manager.
WPS Office offers a free version and a premium version prices of the premium version vary depending on the platform and the subscription length.
Use Word, Excel, and PPT for FREE, No Ads.
Edit PDF files with the powerful PDF toolkit.
Microsoft-like interface. Easy to learn. 100% Compatibility.
Boost your productivity with WPS's abundant free Word, Excel, PPT, and CV templates.
When I export the ppt to video, do the transitions and animations include in the video?
Yes, when you export a PowerPoint presentation to a video, transitions and animations you've applied to your slides will be included in the video. However, some complex animations might be simplified or adjusted during the conversion process.
Does the video formats are .mpa or .wmv only?
No, the video format options are not limited to .mpa or .wmv. You can export PowerPoint presentations to various video formats, such as .mp4, .mov, .wmv, and more. The available formats might vary depending on your PowerPoint version and platform.
Can all the PowerPoint versions export the ppt to a video?
PowerPoint 2007 and earlier versions do not have the built-in capability to directly export presentations to video formats. This feature was introduced in later versions of PowerPoint. Therefore, if you are using PowerPoint 2007 or an earlier version, you won't be able to export your presentation to video directly within the application.
In conclusion, this guide simplifies the process of exporting PowerPoint to videos, catering to diverse needs while ensuring audio, looping, and transitions are seamlessly incorporated. Whether you're a Windows or Mac user, this guide equips you with the tools to transform your presentations into captivating videos.
If you seek a free alternative, WPS Office stands out as a worthy contender. With its user-friendly interface and compatibility across different platforms, WPS Office empowers you to delve into a realm of creativity, offering a dynamic canvas to craft presentations that captivate and resonate with your audience.
- 1. How to Record PowerPoint as a Video (Easy Steps)
- 2. How to Export PowerPoint to Video on Mac (Step-by-Step)
- 3. 3 Effective Ways to Export PowerPoint to Word on Mac
- 4. Why Can’t Export PowerPoint to Video on Mac? 2 Practical Solutions
- 5. How to Export Tableau to PowerPoint (2 Easy Ways)
- 6. Easy Ways to Export Canva to Powerpoint

15 years of office industry experience, tech lover and copywriter. Follow me for product reviews, comparisons, and recommendations for new apps and software.
Convert To PDF Online
This online pdf converter allows you to convert, e.g., from images or word document to pdf. convert all kinds of documents, e-books, spreadsheets, presentations or images to pdf..
To get the best results, select all languages that your file contains.
Fix crooked images.
Stay connected:
How to convert to PDF online?
- Upload your image or document.
- Choose "Use OCR" if you want to extract text from an image (optional).
- Choose a language (optional).
- Click on "Start".

PDF Online Converter for free and wherever you want
Easily convert to pdf.
After uploading your file to PDF2Go via drag & drop, Dropbox, Google Drive or by an upload from your computer, you can choose the conversion method.
If you want to convert to PDF, you will get the option to use OCR. If you have a scanned page or image, you can use OCR to extract text from your file and paste it into the new PDF document. That way, you can easily convert from image to text.
Afterwards, click on "Save Changes" and leave the hard work to us!
Use An Online Converter
If you find a free converter to turn your files into PDF documents, you should always make sure that your computer or mobile device is safe. By using an online converter, you can be sure that you won't have to download and install any suspicious programs.
Say good-bye to worrying about malware, viruses or storage space when converting to PDF. On PDF2Go, you only download your edited file and nothing else.
Why Convert Files To PDF
PDF is a wide-spread and common document format. It's main features are print optimization and a fixed formatting that allows PDFs to look exactly the same on any device.
This is, for many, enough reason to use a free PDF converter to convert from Word to PDF. With OCR, you can even extract text from images, for example if you convert from JPEG to PDF. Simply check the "Use OCR" option in this case.
Conversion That's 100% Safe!
If you have safety concerns you will find them eased. PDF2Go's PDF converter handles your files 100% securely.
We do not obtain the right of your file and there will be no manual checking. After a certain amount of time, the files will be deleted from our servers.
For more information, feel free to have a look at our privacy policy.
Possible Conversions To PDF
DOC, DOCX, ODT, RTF, TXT and more
AZW, EPUB, MOBI and more
GIF, JPG, PNG, SVG, TIFF and more
ODP, PPT, PPTX
CSV, ODS, XLS, XLSX
PDF2Go does exactly what the name implies: the online PDF converter works from any device, online, without installation of any additional software. Just use your browser.
Furthermore, PDF2Go provides a free PDF converter. This means there are no costs for you!
Rate this tool 4.5 / 5
You need to convert and download at least 1 file to provide feedback
Feedback sent
Thank you for your vote
Blog & Articles

Are My Files Safe Using PDF2Go?
Everything you need to know about the security of your files when using our online service

How to Efficiently Use the PDF2Go Chrome Extension
The article explains how to efficiently use the PDF2Go chrome extension
PDF2Go Web or Desktop – Which should I use?
The article offers a comparison between PDF2Go Desktop App and Web App.
Dictionary & File Formats
PDF is short for Portable Document Format. PDF documents can contain formatted text, different fonts, hyperlinks, images, and even media such as sounds and videos.
A JPG (or extended JPEG, Joint Photographic Experts Group file) is an image file format.
OCR is short for Optical Character Recognition. This process is used to recognize the visual representation of text, for example in an image.
Specify a downloader that fits your task
Turn your PPT or PPTX files into a PDF document instantly.
Select converter:, how to convert ppt to pdf free.
- Select your PowerPoint from your computer.
- Our online PPT to PDF converter will turn your PPT or PPTX into a PDF in seconds.
- Download your new PDF and save it to your computer. When the conversion is done, your PPT, PPTX, and PDF files will be automatically deleted.
The Best PPT to PDF Converter
Our free PDF converter is the best solution for converting PowerPoint to PDF files. With our easy-to-use PowerPoint to PDF converter, you can quickly convert your PowerPoint presentations to PDF format while preserving the precise formatting and layout of your slides.
A suite of useful tools
Our easy-to-use tools make it possible to merge PDFs, split PDFs, compress PDFs, and even delete PDF pages. With several helpful online tools ready for you to use, editing your files has never been easier.
Consider a membership
You can continue to use our online PowerPoint to PDF converter for free, or sign up for a paid subscription for instant and limitless access to our full suite of tools. Added benefits include converting multiple PPT or PPTX files at the same time and unlimited file sizes.
Easy online access
As long as you can access the Internet, you can turn PPT and PPTX files to PDF whenever you need them, and you can access our other file conversion tools, too. Additionally, our PowerPoint to PDF converter works on any device or OS, like Mac or Windows, that can upload and download files.
All PPT, PPTX, and PDF files uploaded to our server will be encrypted using 256-bit SSL Encryption at the time of download. This is done to help combat against anyone who may want to view your data. Additionally, we will not share or sell your data to anyone else.
Automatic file deletion
After your PowerPoint file has been successfully converted, our PPT to PDF converter automatically deletes any remaining PPT, PPTX, or PDF documents, just in case you forgot to delete them manually to ensure your data remains secure.
- Faster conversions
- Unlimited conversions
- Unlimited file size
- Advanced features
Please wait or sign up to convert the next file.
You need the PRO version to use the full functionality of the PDF Converter.
How-To Geek
How to add a video to a microsoft powerpoint presentation.

Your changes have been saved
Email Is sent
Please verify your email address.
You’ve reached your account maximum for followed topics.
Is Your Employer Monitoring Your Activity? Here's How to Check
Building a pc here's how to save on the cpu, i put all my online ai tools in a folder (here’s why you should, too), quick links, embedding videos versus linking to videos, supported video formats in powerpoint, how to insert a video into a powerpoint presentation, manage an embedded video's playback in powerpoint.
Videos can make presentations even more interesting or exciting. If you're looking to add a video to your Microsoft PowerPoint presentation, it's easy to do so. We'll show you how.
In PowerPoint, you can either embed a video or link to a video from your presentation. If you embed a video, your video becomes part of the presentation, which increases the overall size of the presentation file.
Related: How to Send PowerPoint Presentations With an Embedded Video
If you link to a video, PowerPoint only adds a reference to that video in your presentation. The downside of this method is that you need to send the video file separately if you share your presentation with someone. We have written a guide on how to send PowerPoint presentations with videos , so check that out.
In this guide, we'll focus on embedding a video in your presentation so you don't have to worry about sending separate files. And, if you're looking to add a YouTube video to your presentation , there's a way to do that, too.
Related: How to Embed a YouTube Video in PowerPoint
PowerPoint supports multiple video formats, including ASF, AVI, MP4, M4V, MOV, MPG, MPEG, and WMV. If your video is already in one of these formats, you can quickly add that to your presentation.
If your video is in another format, you can convert it to a supported format and then add it to your presentation.
Related: How to Use Handbrake to Convert Any Video File to Any Format
First, make sure the video you want to add to your presentation is saved on your Windows or Mac computer. Then, open your presentation with PowerPoint on your computer.
On the PowerPoint window, in the left sidebar, click the slide in which you want to add a video.

At the top of the PowerPoint window, click the "Insert" tab.

In the "Insert" tab, under the "Media" section (which is to the extreme right side of the interface), click "Video."

You'll now see an "Insert Video From" menu. Here, select "This Device."

Your computer's standard "open" window will open. In this window, access the folder that has your video file. Then double-click your video file to add it to your presentation.

You'll see your selected video in your presentation. To resize this video, click it and use the handles around the video to change its size. Then drag the video to place it at its desired location in your slide.

If you'd like to test the video, at the bottom-left corner of the video, click the play icon.

And you're all set.
Now that you have added a video to your presentation, you might want to change how it plays in your slides. In PowerPoint, you have multiple ways to change your video's playback.
To access these playback options, first, click your video in your presentation. Then, at the top of the PowerPoint window, click "Playback."

In the "Playback" tab, under the "Video Options" section, you will find various options to manage your video's playback.

For example, to change how your video starts to play in your presentation, click the "Start" drop-down menu and select one of these options:
- In Click Sequence : This plays your video in the click sequence. This means if you press the button for the next slide, your video will play.
- Automatically : This option automatically plays your video when the slide with your video opens.
- When Clicked On : Select this option to play your video only when you click it.

The other options are "Play Full Screen," which opens your video in full screen, and "Loop Until Stopped" that plays your video over and over again until you manually stop it.
Before you close PowerPoint, make sure you save your presentation so that your embedded video is saved with it. Do this by clicking File > Save in PowerPoint's menu bar.

And that's how you make your PowerPoint presentations even more engaging by including videos in them. Exciting!
If you don't want to add a video but you do want audio, you can add music to your presentations . This also helps enhance your presentation quality.
Related: How to Add Music to Your PowerPoint Presentation
- Microsoft Office
- Microsoft PowerPoint
July 23, 2024
How to create a PowerPoint presentation step by step
New to Microsoft PowerPoint? Our guide walks you through how to create a presentation in PowerPoint so you can get the ball rolling on your slideshow.
Have you been tasked with presenting a slideshow? If you have Microsoft PowerPoint and are ready to get started, we’ll walk you through how to create a PowerPoint presentation.
With two different methods, one for using Plus AI with PowerPoint and another for using PowerPoint alone, you have terrific options for building the slideshow.
Build a presentation with Plus AI for PowerPoint
If you’re looking for the simplest and quickest way to create a PowerPoint presentation, look no further than Plus AI. Using Plus AI for PowerPoint , you just pick a template, provide a description, and receive your slideshow in a snap.
- Open PowerPoint , select New on the left, and pick Blank Presentation on the right.

- Go to the Home tab, select Plus AI in the ribbon, and choose New presentation in the sidebar.

- You can then start with a template or the content per your preference.
Because Plus AI offers an attractive collection of templates , so we’ll choose the Metro design to get started.

- To add the content, pick Use a prompt , Upload a file , or Slide by slide . For our example, we choose Use a prompt to show you the power of Plus AI’s content generation.

- With the prompt option , you then simply pick the presentation type, enter a description, and let artificial intelligence create an outline for you. Optionally, pick the language, number of slides, and include Plus tips.
- Click Generate Outline to review the slides.

- When the outline displays, you can edit, rearrange, or remove slides or use the Regenerate Outline option for a fresh outline. Click Generate Slides when you’re ready.

You’ll see your new PowerPoint presentation pop right up, complete with text, images, colors, and formatting!

From there, you can change anything you like and take advantage of Plus AI’s edit features. Insert a slide, rewrite content, or remix to get a new slide layout.

Don’t forget to save your new slideshow! Go to File > Save As , pick a location, enter a filename, and hit Save .

Creating a PowerPoint presentation with Plus AI is not just a huge time-saver but can perform research to obtain the content you need, offer suggestions for expanding the slides, and add useful items like timelines and charts. Plus, you get a visually pleasing slideshow with slides that look good !
Check out Plus AI on the web for a complete list of features, to view the template gallery, and to start your free trial!
Build a presentation in the PowerPoint application
Maybe you’re new to PowerPoint and would like instructions for creating a presentation from scratch in the application instead. While it can take much longer than using Plus AI, it does give you an opportunity to learn about PowerPoint’s basic setup steps.
Open PowerPoint and move through the following sections to create your slideshow. Keep in mind that verbiage and features may vary slightly depending on your platform and PowerPoint version.
1. Create a presentation
To start a new slideshow in PowerPoint, you can begin with a blank presentation or choose a built-in Microsoft template.
Select New on the left side and pick the option you want to the right:
- Blank presentation : With a blank presentation, you start with a completely empty canvas. This allows you to pick the designs, formatting, colors, and other elements from yourself.
- Microsoft template : Using a template, you’ll receive a theme that includes slides, styles, formatting, colors, and other design elements that can give you a jumpstart on your slideshow. However, you can edit or change anything you like.

Once you have your presentation in view, it’s time to start adding the slides. For the purposes of this tutorial, we’ll use the Blank Presentation .
2. Add a slide
Regardless of the presentation type you select; you’ll receive a title slide. Add your slideshow title and optionally a subtitle. Next, you’ll add more slides.

- Go to either the Home or Insert tab and open the New Slide menu in the ribbon.
- Choose the layout you want to use for the slide. You’ll see many options that include titles, headers, content, and more. You can also pick a Blank layout to add the content yourself.
- When the slide displays, you can start inserting or adding your slide elements.

Note : When you add a new slide, it’s placed after the currently selected slide by default. But you can rearrange the slide order per your preference at any time.
3. Insert and format text
Even though a slideshow is a visual tool, you’ll almost certainly want to include text. Whether a title or subtitle, bullet or number list, or paragraphs, you can add it easily using a text box.
- To add a text box to your slide, go to the Insert tab and select Text Box in the ribbon.
- Use your cursor to draw the text box, but keep in mind that you can resize and move the box as you like.

- Enter your text inside the text box. You can use the Font section of the ribbon on the Home tab to change the font style, size, color, and format.
Tip : Check out how to apply superscript or subscript in PowerPoint !

- Shape Styles : Choose a design, pick the fill or outline color, or add an effect like a shadow or reflection.
- Arrange : Send the text box forward or back in relation to other elements, align or distribute the box, or rotate it.
- Size : Change the size of the box. Alternatively, you can drag a corner or edge of the box in or out to resize it.
You can also use the WordArt Styles section of the ribbon to spruce up the font as an alternative to the tools on the Home tab.

4. Include and format image
Another slide element you’ll likely include is an image. Whether a photo, illustration, or logo, you can add and format an image easily in PowerPoint.
- To add an image to your slide, go to the Insert tab and open the Pictures menu.
- Choose This Device , Stock Images , or Online Pictures and then follow the prompts to locate, select, and insert the image.

- Adjust : Remove the background, add an artistic effect, apply transparency , or use a correction tool.
- Picture Styles : Choose a design, pick a border, add an effect, or select a layout.
- Arrange : Send the image forward or back in relation to other elements, align or distribute the image, or rotate it.
- Size : Change the size of the image. Alternatively, you can drag a corner or edge of the image in or out to resize it.

5. Add other types of slide elements
If you want to insert other types of media or slide elements, you have many options in PowerPoint. You can add things like shapes, charts, spreadsheets, tables, videos , screen clippings, and audio .
One way to add an item is to insert a New Slide and pick a layout containing a Content box. Then, click the type of content inside that box that you want to add.

The other way to add a slide element is to use the Insert tab. You’ll see all sorts of items you can insert including those mentioned above. Simply open the corresponding menu for the item and follow the prompts.

Again, remember to save your new presentation by going to File > Save As , picking a location, entering a filename, and selecting Save .
Setting up a PowerPoint presentation isn’t necessarily difficult but does take time. So, be sure to check out the extensive and robust feature set that Plus AI has to offer for creating your presentation.
And, review some of our additional articles on giving a great presentation along with how to end a presentation so that you’re prepared when your slideshow is ready to go.
How do I begin a PowerPoint presentation?
You can start your slideshow by heading to the Slide Show tab. Pick From Beginning to start at Slide 1 or From Current Slide to start with the current active slide.
Look at our tips for how to start a presentation when the time comes!
What should be the first slide of a presentation?
Normally, the first slide is a title or cover slide. It should include the presentation topic or title and optionally a subtitle. But, you can also include an image, the company name, a brief description, or a welcome message.
How do you create a PowerPoint presentation from a Word document?
While there are common ways to transform a Word document into a PowerPoint slideshow , you can take advantage of Plus AI’s file upload tool for a quick start. On the Home tab, select Plus AI and pick New presentation in the sidebar. Pick Upload a file > Choose file and select your Word document.
Alternatively, you can use Plus AI’s free converter. Open the Convert Word to PPT page in your browser and follow the simple steps to transform your Word document.
Latest posts
Latest post.

PowerPoint Karaoke: Rules, tips, and free slide decks
Overview of PowerPoint Karaoke, rules, and free slide decks for PowerPoint Karaoke

How to use ChatGPT to create a PowerPoint
Looking for ChatGPT for PowerPoint? Here's a step-by-step guide to using AI in PowerPoint and Google Slides

AI glossary: 130+ AI terms that you should know
Here are 130+ understandable definitions of the most important AI terms

Plus AI vs. Copilot for PowerPoint: In-depth comparison, pricing, and recommendations
Plus AI and Copilot, which is the best AI for PowerPoint? Read our in-depth review and find the best tool for you!
More resources
How to make a signup sheet in Google Forms
Need an easy way for people to sign up for an event? We’ll show you how to make a signup sheet in Google Forms

Ideas for your next PowerPoint Night
The best, funniest, and most thought-provoking prompts for your next PowerPoint night
250 unique presentation ideas
Need inspiration for unique presentation topics that are not boring? Here's 250 of our favorite ideas
How to Compress Videos in PowerPoint for Smaller File Size
Learn how to effectively compress videos in PowerPoint without losing quality. Get tips on optimizing file size... read more

#ez_toc_widget_sticky--1 .ez-toc-widget-sticky-container ul.ez-toc-widget-sticky-list li.active{ background-color: #ededed; } Steps To Follow
Get Trainings
Advance your Microsoft Excel & Office Skills with the MyExcelOnline Academy!

In today’s fast-paced digital world, efficient communication is key, and that includes the way we prepare and share presentations. With the growing trend of remote work and digital collaboration, the need for small-sized presentations has surged. This is not just to accommodate the varying bandwidth limitations faced by individuals but also to optimize for mobile device compatibility where every byte counts. Smaller PowerPoint file sizes mean quicker load times, easier sharing via email or cloud services, and ultimately, a smoother presentation experience for both the presenter and the audience.
Key Takeaways
- Open your PowerPoint file and go to the “File” menu, then choose “Save As.” Click on the “Tools” menu within the “Save As” dialog box and select “Compress Media” to initiate the compression process.
- By knowing how to compress videos in PowerPoint, you reduce file sizes, making the videos easier to share via email or online platforms, and the files occupy less storage space on your computer or hard drive.
- Compressing media in PowerPoint helps enhance performance and ensures your presentation is more likely to be compatible with different devices and platforms, while also considering the balance between compression and maintaining video quality.
Compressing Videos in PowerPoint
Compressing videos within PowerPoint is like giving your presentations a performance boost. It cuts down on unnecessary bulk, ensuring your slides glide smoothly from one to the next without the dreaded loading lag or compatibility issues. Imagine not having to worry about video playback stuttering during an important pitch or educational session. That’s the value of understanding video compression in PowerPoint. Below, I’ll walk you through the straightforward process of reducing your video size without compromising the impact of your visual aids. Whether you’re preparing for a boardroom presentation or a classroom lecture, mastering this skill can make a world of difference.
Table of Contents
The Art of Reducing Video Size in PowerPoint
Review the quality of your images and videos.
Reflecting on the quality of the images and videos embedded in our presentations is a step we must not overlook. As we endeavor to compress them, reviewing their current state is crucial as it serves as our benchmark for post-compression results. By scrutinizing the resolution, frame rate, and audio clarity, we gain insights into what the audience will experience. A resolution that’s too low can render imagery pixelated, frame rate drops may disrupt smooth playback, and poor audio can overshadow the visual narrative.
It’s important to note how compression affects each element. Compressing your video files too much might lead to a fuzzy picture or muffled sound, which can detract from the overall impact. We must ensure the final version maintains a professional polish—it should look crisp on a big screen and clear through a projector—but not at the expense of file portability. Hence, it’s about striking that sweet balance.
Inserting Videos Directly vs. Linking to External Sources
When considering how to incorporate videos into a PowerPoint presentation, we’re faced with a crucial choice: embedding the videos directly into the slideshow or linking to external sources. Both methods have their merits, and the decision hinges on various factors such as the presentation’s purpose and the audience’s access to the internet.
Embedding videos ensures that the presentation is self-contained. There’s no reliance on internet connectivity which means zero buffering issues during playback. However, this comes with a significant increase in file size. On the other hand, linking to external sources, such as YouTube, helps maintain a slender file size. Accessibility becomes contingent on an active internet connection, which may not be ideal in all scenarios.
My recommendation is clear. If you are not transferring the presentation elsewhere or if internet access is reliable, link to the videos. Doing so is quite straightforward: under the Insert tab, click on the Video button and explore your options. But if you need a presentation that works offline, then consider embedding and compressing your videos. Remember, a presentation should not only capture the audience’s attention but also be approachable and sharable with ease.
Step-by-Step Instructions to Compress Videos
Accessing compression features in powerpoint.
STEP 1: First, embed a video into your PowerPoint slide.

Fine-Tuning Compression Settings for Optimal Results
Fine-tuning compression settings in PowerPoint is akin to being a skilled artist carefully mixing paint—it’s all about getting those details right for the perfect finish. Once you’re in the ‘Compress Media’ options, you’ll see choices such as ‘Presentation Quality,’ ‘Internet Quality,’ and ‘Low Quality.’ These settings are your paintbrushes for crafting the desired output.
‘Presentation Quality’ preserves the highest video quality suitable for, say, large screens and projections—it’s your go-to for a boardroom presentation. ‘Internet Quality’ strikes a reasonable balance, understandable for online sessions where file size matters but quality can’t be sacrificed. And ‘Low Quality’ minimizes the file size, a feasible option when sharing via email or other restrictions.
Remember to carefully experiment with these settings. If you choose a setting that’s too low, your video may seem a tad impressionistic when full resolution is needed. But a setting that’s too high can result in a bulky file, impeding easy sharing and playback.
After the compression, we must verify the output. Play the video to ensure the quality still conveys your message effectively, and remember, this isn’t a ‘set it and forget it’ task. Every video, every audience and every presentation may demand a different setting. Keeping this in mind, we can master the fine art of compression, ensuring our presentations are both visually stunning and remarkably optimized.
Tips and Tricks for Efficient PowerPoint Compression
Converting images to jpeg format before insertion.
Before dropping images into our PowerPoint masterpiece, consider this: format plays a huge role in the file size. I’ve found that converting images to JPEG format before insertion can significantly reduce the overall size of the presentation. JPEG is ideal for detailed photographs, and its compression algorithm excels in maintaining an acceptable level of quality with a smaller file footprint.

Do Image Edits Outside PowerPoint for Smaller Files
Taking the time to edit images outside of PowerPoint is a game-changer for keeping files lean. I’ve observed many of us tweak pictures directly in the presentation software, perhaps for convenience. However, it’s worth noting that PowerPoint retains all the original data of the edited images, which can bloat your file size considerably.
To avoid this, I strongly recommend using a dedicated image editor—be it Photoshop for the pros or simpler tools like Paint or GIMP for basic adjustments. Make all your crops, color adjustments, resizes, or filters there. Only once you’re satisfied with the image, bring it into PowerPoint.
This practice has a two-fold benefit. First, it preserves the optimal quality of your visuals because dedicated editors offer finer control over the edits. And second, it keeps your PowerPoint file size in check, as the software only stores the final version of your image.
Let’s remember to tell PowerPoint to discard all excess editing data once the images are in place. It’s an additional precaution to ensure our presentations remain as lightweight as possible.
Alternate Methods for Slashing PowerPoint File Size
Turning a bulky ppt into a compressed pdf or zip file.
When all else fails and you’re still grappling with a sizable PowerPoint file, consider flipping the script—turn that bulky PPT into a compressed PDF or ZIP file. The process is straightforward and can drastically reduce your file size, making it manageable for email and online sharing.
Transforming your PowerPoint into a ZIP file is essentially archiving it. Archive by right-clicking on the file, selecting ‘Send to’, and then choosing ‘Compressed (zipped) folder’. By doing this, you can reduce the size of the entire project, which is particularly useful when it’s chock-full of media and other hefty elements.
Another clever move is to convert the PPT to a PDF, especially when it’s heavy on text and static images. By using online PDF conversion tools like Adobe Acrobat, the process is a breeze. The resultant file is not only lighter but also more secure against unwanted modifications, and it maintains a consistent format across devices.
Here’s what to remember: subsequent compression of the PDF can further slim it down if needed. In essence, these techniques are the ace up our sleeve for sharing content-rich presentations without the bulk.
Real-world Applications for Compressed PowerPoint Files
When is compressing a powerpoint file beneficial.
Compressing a PowerPoint file is not just a best practice; it’s a strategic move that’s advantageous in myriad scenarios. For instance, when you’re gearing up to email a presentation, size limits can be your nemesis. A compressed file slips elegantly under those maximum capacity ceilings that email services impose.
Another situation where it shines is in facilitating smoother collaboration—think cloud storage and file sharing platforms. When working in teams, especially with bandwidth discrepancies, a smaller file ensures swift uploads and downloads, making the flow of ideas seamless.
Moreover, for those of us constantly on the go, a compressed PowerPoint is a must. Aside from freeing up valuable space on mobile devices, it also opens the door to remote accessing without painful waiting times. It’s an all-around win, enhancing accessibility, preserving quality, and boosting productivity. Whether presenting in person, sharing for review, or archiving, a lighter PowerPoint file is often the smarter choice.
Strengthening Your Presentation Profile with Reduced File Sizes
Reducing the file size of your presentations can significantly beef up your presentation profile. In a world where digital competency is paramount, being known for sleek, efficient, and easy-to-handle presentations can set us apart. A compressed PowerPoint lifts the burden on the recipient’s storage, conveys professionalism, and displays an understanding of digital etiquette.
Moreover, it can underline your skills in creating impactful presentations without overloading them with unnecessary data. This streamlining can directly affect your audience’s engagement and ensure smooth delivery whether you’re presenting in person or virtually.
By keeping your file sizes compact, you show a respect for people’s time and bandwidth limitations. Not to mention, smaller files are less likely to encounter compatibility issues, ensuring your content reaches your audience just as you intended—intact and effective.
Compressing PPT Files on Different Operating Systems
Differences between macos and windows compression techniques.
Navigating the maze of presentation file compression reveals one stark truth: the methods can differ greatly between operating systems, specifically macOS and Windows. Knowing these differences is not only empowering, it’s practically essential for achieving optimal results.
macOS users typically leverage built-in tools like iMovie and QuickTime Player to compress their media files before integrating them into PowerPoint. The advantage here lies in the seamless ecosystem of Apple products. However, macOS PowerPoint has a limitation—it doesn’t allow users to compress music or video files directly within the application, unlike on Windows.
On the Windows side, PowerPoint comes equipped with a dedicated ‘Compress Media’ option that’s highly intuitive and doesn’t require external tools. It’s just a few clicks within PowerPoint’s interface to shrink videos to your desired quality. This built-in functionality caters well to users who prefer a one-stop solution without toggling between different software.
Having this cross-operating system awareness when it comes to compression is not trivial, as it nudges us toward tailored approaches rather than one-size-fits-all solutions. Being adept at using the specific techniques of both macOS and Windows ensures we are versatile presenters, capable of smart file management no matter the platform.
Cross-Platform Tools for Universal File Reduction
In the quest for universal file reduction, cross-platform tools are our knights in digital armor. These stalwarts bridge the operating system divide, making video compression a cinch whether you’re a macOS devotee or a Windows warrior.
One such savior is HandBrake, an open-source video transcoder available for both macOS and Windows. HandBrake shines with its ability to convert video from nearly any format to a selection of modern, widely supported codecs. It’s a favorite for its granular control over compression settings, plus it’s free.
Then there’s the stalwart Adobe Premiere Pro, recognized for professional-grade video editing and compression capabilities, with consistent performance across both platforms. It’s a bit more advanced, and while it might be overkill for simple compression tasks, it offers unparalleled fines autonomy for those desiring the highest precision.
Tools like these dispel the friction sometimes encountered when sending presentations across different OS environments. By adopting a cross-platform mindset, we take a significant step towards creating universally accessible PowerPoint files without worrying about file bloat or compatibility issues.
Achieving Stunning Presentations without Compromising Quality
Achieving stunning presentations without compromising on quality may seem like a balancing act, but it’s definitely within reach with careful planning and understanding of compression techniques. The goal is to create slides enriched with media that captivate your audience while ensuring the file remains manageable and functional.
Here are some indispensable tips to hit that sweet spot: consider the resolution of your images and tailor them to your presentation medium, use video clips judiciously, and compress only to a level that maintains professional quality. Optimization tools in PowerPoint, such as the ‘Compress Media’ feature, should become your allies in this endeavor.
Remember, a high-quality presentation isn’t solely defined by pixel counts or decibels—it’s about coherence, relevance, and delivery. By striving for a harmony between visual excellence and file efficiency, we can craft presentations that are both visually impressive and technically sound.
Exploring More Resources and Articles on File Compression
As we venture further into the digital realm, expanding our knowledge on file compression becomes crucial. Fortunately, the landscape is abundant with resources and articles that delve into the intricacies of compressing PowerPoint files effectively.
For those looking to deep dive, Adobe’s blog offers a treasure trove of insights about file compression. Websites like TechRepublic or Computerworld often publish tips and tricks on handling large files. Additionally, Microsoft’s own support pages provide guides tailored specifically for PowerPoint users.
It’s essential to stay abreast of the latest discussions in forum sites like Stack Exchange or Reddit, where tech enthusiasts and professionals frequently share their real-world experiences and hacks.
By making use of these resources, we not only hone our technical skills but also enrich our understanding of best practices, ensuring our presentations are the epitome of efficiency and engagement.
Frequently Asked Questions About Video Compression in PowerPoint
What’s the most effective way to compress powerpoint videos without losing quality.
The most effective way to compress videos in PowerPoint without losing discernible quality is by using the built-in ‘Compress Media’ feature. Rather than compressing blindly, I recommend choosing ‘Internet Quality’, which retains a high level of visual fidelity while significantly reducing the file size. This strikes a good balance between clarity and manageability, which is ideal for most situations. Always preview the video post-compression to ensure it meets your expected standard.
Are There Any Free AI PPT Tools to Help with Video Compression?
Yes, there are free AI-powered tools like Winxvideo AI that can help with video compression for PowerPoint. These tools leverage AI to maintain quality while dramatically reducing file size, sometimes by up to 90%. This is especially useful when dealing with large videos, as the AI can intelligently optimize frames and audio to keep the essence of the video intact despite the size reduction.
How to reduce File size in PowerPoint?
To reduce file size in PowerPoint, compress your media files via the ‘Compress Media’ feature under the File and Info tab. Also, resize and edit images externally, saving them as JPEGs before inserting, and where possible, link to videos instead of embedding them. Don’t forget to remove unnecessary fonts, animations, and transitions that can add to the file size.
How do I send a compressed powerpoint file via email?
To send a compressed PowerPoint file via email, first reduce its size by using the ‘Compress Media’ feature in PowerPoint. If it’s still too large, turn the file into a ZIP by right-clicking and selecting ‘Send to Compressed (zipped) folder’ (Windows) or ‘Compress [file name]’ (macOS). Attach the ZIP file to your email as you would with any other document. If the file still exceeds your email provider’s limit, upload it to a cloud service and share the link instead.
John Michaloudis
John Michaloudis is a former accountant and finance analyst at General Electric, a Microsoft MVP since 2020, an Amazon #1 bestselling author of 4 Microsoft Excel books and teacher of Microsoft Excel & Office over at his flagship MyExcelOnline Academy Online Course .
Related Articles
How to Mail Merge in Outlook
The Ultimate Guide to Adding PowerPoint Exponents – Subscript/Superscript Guide
How to Enable/Disable Outlook Conversation View in Inbox
Get Video Training
Dramatically Reduce Repetition, Stress, and Overtime! Exponentially Increase Your Chances of a Promotion, Pay Raise or New Job! Learn in as little as 5 minutes a day or on your schedule.
How can I efficiently convert a PDF document into an engaging PowerPoint presentation for sales enablement?
July 26, 2024 /
Efficiently Converting a PDF Document into an Engaging PowerPoint Presentation for Sales Enablement
Transforming a static PDF document into a dynamic and engaging PowerPoint presentation can significantly enhance your sales enablement efforts. Here’s how you can efficiently achieve this:
1. Understand the Content and Structure of Your PDF
The first step is to thoroughly review your PDF document. Identify key sections, important data points, and any visual elements that are crucial for conveying your message effectively in the presentation.
2. Use Conversion Tools
There are several tools available that can help convert PDFs directly into PowerPoint slides:
- Adobe Acrobat Pro DC: This tool allows you to export PDFs as PPT files with ease.
- Smallpdf or Zamzar: Online converters like these offer quick conversion services without needing software installation.
- Pandoc: For more tech-savvy users, Pandoc offers command-line conversions with extensive customization options.
3. Optimize Slide Design for Engagement
A direct conversion often results in basic slides that need further enhancement to be truly engaging:
- Add Visuals: Incorporate high-quality images, infographics, charts, and videos where applicable to make the content visually appealing.
- Create Consistent Branding: Ensure all slides adhere to your company’s branding guidelines including colors, fonts, logos, etc.
- Simplify Text: Break down complex information into bullet points or short paragraphs making it easier for audiences to digest during presentations.
- How can I convert a PDF document into a PowerPoint presentation?
Popular Posts

Common Challenges in Tailoring Presentations—and Solutions

Dos and Don’ts of Pre-Seed Pitch Deck Creation

How to Write a Teaser Pitch Deck that Captivates

Tips for a Persuasive How It Works Slide

What Not to Do When Presenting Funding History

Why Raising Funds Without a Pitch Deck Can Backfire
IMAGES
VIDEO
COMMENTS
On the File menu, select Save to ensure all your recent work has been saved in PowerPoint presentation format (.pptx). Select File > Export > Create a Video. (Or, on the Recording tab of the ribbon, select Export to Video .) In the first drop-down box under the Create a Video heading, select the video quality you want, which pertains to the ...
To turn a PowerPoint presentation into a video, first, open your presentation with the PowerPoint app on your Windows or Mac computer. In the top-left corner of PowerPoint, click the "File" option. From the sidebar that opens after clicking the "File" option, select "Export." In the "Export" menu, click "Create a Video."
PPT (Microsoft PowerPoint Presentation File) PPT is the binary file format for Microsoft Office PowerPoint 97-2007. Presentations using PowerPoint can include images, text, audio, video, charts, graphs, hyperlinks, and animation to provide presentations created for students and businesses.
Watch this video to learn how to convert your PowerPoint presentation into a video. When you make a recording of a presentation, all its elements (narration,...
In this step-by-step tutorial, I show you how to turn your Powerpoint Presentation into a .mp4 or .mov video file which you can share with others, play for a...
In the Seconds spent on each slide box, select the default time you want to spend on each slide. Select Create Video. Enter a file name and then browse to the location you want to save your video. In the Save As type box, select if you want to save the video as a MPEG-4 Video or Windows Media Video. Tip: The MPEG-4 Video format is recommended ...
Learn how to publish your own video using Microsoft PowerPoint with narration, annotations, animations, and timings. As full disclosure, I work at Microsoft ...
Step 3 - Select Video Format and Create a Video Presentation. Click Create Video button and choose the destination folder and output file name. For end users wondering how to convert ppt to MP4, this is the step where you can select MP4 as your output format. PowerPoint supports saving slide decks to MP4 or WMV video formats.
To begin the export, go to the File > Export > Create a Video menu option. Go to File > Export > Create a Video to choose the export settings for your PowerPoint presentation video. From this menu, there are several key settings to choose before you export your finished video.
Free online PowerPoint to video converter. VEED lets you convert your PowerPoint presentations to videos in just a few clicks, straight from your browser. You can even record yourself while presenting your slides using our free screen and webcam recorder. Upload your slides and record your webcam, audio, and screen.
To convert your PowerPoint presentation into a video, simply: Click the File tab. Select Export. . Select Create Video . Choose your Video Quality and Recorded Timings and Narrations (see details below) Click Create Video. Choose where to save the video on your computer and click Save.
The Quick & Easy Way. If your presentation is complete with automatic timings, transitions and animations, you might be shocked to learn how easy it is to convert it into a video. Open your Powerpoint presentation. Click on File, select Save As, and from the drop-down menu, choose MPEG-4 Video (*.mp4). (available in Powerpoint 2010 and above).
It's never been easier to convert your PPTX presentations to mp4. VEED is a powerful and versatile screen and webcam recorder that lets you create videos out of your slide shows. It also features multiple layouts that you can choose from. You can record your screen and audio at the same time, record your slides and camera or slides only.
Browse to the location where you want to save the file and give it a name then press "Save.". While the video is being created, you will see the small progress bar at the bottom of your PowerPoint window. Wait till this is done and then go to your video. Now you can double-click your video file and it will automatically play with your video ...
Aspose.Slides PPT to Video converter is a free online service for converting PowerPoint presentations to videos. Slides: Convert all slides in your PowerPoint to video.Or you can select specific slides or a range of slides for conversion. Slide duration: Specify the time that is spent showing each slide in the video. Video resolution: Select the resolution that determines the amount of detail ...
Launch PowerPoint and open the presentation file you want to turn into a video. If that file is open, ensure that the latest version is saved by selecting File > Save or by selecting Save on the Quick Access Toolbar. Select File > Export . If you use PowerPoint 2010, select Save & Send. Select Create a Video .
To get started, open the PowerPoint presentation you would like to turn into a video and click the "File" tab in the top-left corner of the window. Next, click "Export" in the left-hand ...
Click on the "File" tab in the upper-left corner of the PowerPoint interface. Select "Export." File Tab. Step 3: Choose "Create a Video". From the Export menu, click on "Create a Video." This option will enable you to export your presentation as a video with audio. Create a cideo. Step 4: Select Video Quality.
After you've created your Presentation click on File to access Backstage view. Then click on Save & Send. Now under the File Types section select Create a Video. Now choose the size of the video, whether to use recorded narrations for the presentation, seconds to spend on each slide, the click Create Video. Select a location to save the video.
You will learn how to convert a PowerPoint presentation to a videoIn this video, I show you how to save a PowerPoint presentation with audio and video. It is...
Do you want to convert your files to PDF format without installing any software? PDF2Go offers you a free and easy way to do it online. Just upload your file, choose the output format, and download the converted PDF. You can also adjust the quality, size, and orientation of your PDF file.
With our easy-to-use PowerPoint to PDF converter, you can quickly convert your PowerPoint presentations to PDF format while preserving the precise formatting and layout of your slides. A suite of useful tools. Our easy-to-use tools make it possible to merge PDFs, split PDFs, compress PDFs, and even delete PDF pages. ...
3. Video Lectures. Another thing that instructors will enjoy is combining a presentation with an audio narration or talking-head video. You can easily record yourself, sync the video with slides, and create a complete video lecture that can be uploaded to YouTube or your website.
I am converting my PowerPoint to video. Everything runs fine on the PowerPoint presentation. Once I convert it to a video, the audio seems to get hung up in spots. I have tried MP4, MOV and created it through PowerPoint and nothing seems to work.
On the PowerPoint window, in the left sidebar, click the slide in which you want to add a video. At the top of the PowerPoint window, click the "Insert" tab. In the "Insert" tab, under the "Media" section (which is to the extreme right side of the interface), click "Video." You'll now see an "Insert Video From" menu.
Go to either the Home or Insert tab and open the New Slide menu in the ribbon.; Choose the layout you want to use for the slide. You'll see many options that include titles, headers, content, and more. You can also pick a Blank layout to add the content yourself.
Learn How to turn a PowerPoint Presentation into Video with the narration. Record your presentation going through the slides and PowerPoint will pick up the ...
Remember, a presentation should not only capture the audience's attention but also be approachable and sharable with ease. Step-by-Step Instructions to Compress Videos Accessing Compression Features in PowerPoint. STEP 1: First, embed a video into your PowerPoint slide. STEP 2: For the most current versions of PowerPoint, click on the File tab.
Identify key sections, important data points, and any visual elements that are crucial for conveying your message effectively in the presentation. 2. Use Conversion Tools. There are several tools available that can help convert PDFs directly into PowerPoint slides: Adobe Acrobat Pro DC: This tool allows you to export PDFs as PPT files with ease.
In this video, you will learn how to convert a PowerPoint presentation to a video easily with Wondershare DemoCreator. Free Download it on PC: https://bit.ly...