Your current User-Agent string appears to be from an automated process, if this is incorrect, please click this link:

How to Present PowerPoint Slides in Microsoft Teams

Your changes have been saved
Email is sent
Email has already been sent
Please verify your email address.
You’ve reached your account maximum for followed topics.
Count Cells With Specific Text in Excel Using the COUNTIF Formula
How to convert text in excel: upper case, lower case, and more, how i organize my to-do lists in apple reminders.
A successful PowerPoint presentation extends beyond just the content—its delivery is just as important, especially in a virtual space like Microsoft Teams.
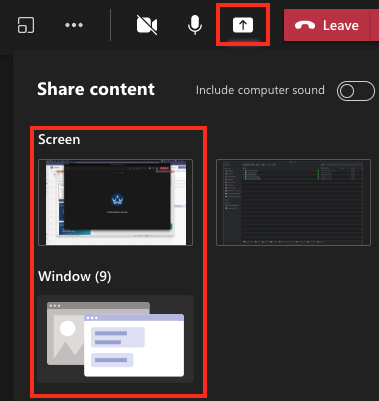
In Microsoft Teams, you can choose to present your slide deck by sharing your entire screen, PowerPoint window, or using the Microsoft Teams' PowerPoint Live feature. Let's explore how you can use each of these three methods and discuss their pros and cons.
Method 1: Share Screen
Sharing your screen in Microsoft Teams is pretty easy and straightforward. It's best to minimize or close unnecessary tabs before joining the Microsoft Teams meeting to avoid exposing sensitive information. Once you're confident in your screen's content, follow the steps below:

- A red border appears around your desktop, indicating you're sharing your screen.

- Present your PowerPoint slideshow.

Sharing your screen is a straightforward method, especially when you want to present other documents besides your PowerPoint slideshow. However, the downside is that you may accidentally reveal sensitive information.
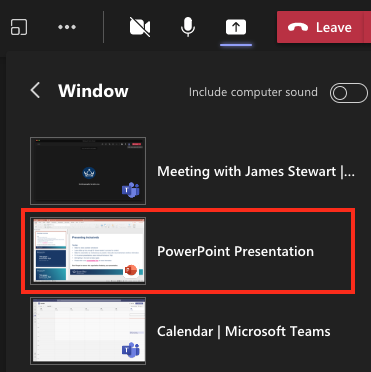
Method 2: Share PowerPoint Window
If you want only to present your PowerPoint slide deck, it's best to share just that window. Here's how:

- A red border will appear around your PowerPoint window, indicating you're sharing just that window.
- Launch your slides in slideshow mode and start presenting.
- Open the Microsoft Teams window and click Stop sharing when you're done presenting.
Sharing just your PowerPoint window prevents accidental display of sensitive desktop content. Even if you switch windows, viewers only see the PowerPoint presentation.
However, this method also has its limitations. One of the main limits is that you can't view your PowerPoint speaker notes without the audience seeing them as well. You also can't access Microsoft Teams features like the chat and reactions during your presentation.
Additionally, If your network connection has low bandwidth or slow upload speed , sharing your screen can result in a blurry and stuttering presentation for the audience. Thankfully, the PowerPoint Live feature provides the solution to these issues.
Method 3: Use PowerPoint Live
Presenting with the PowerPoint Live feature is easy and provides additional benefits. Your audience only sees the slides, while you get to see all the extra controls that come with the presenter view. When using the presenter view in your presentation, you have a few helpful tools at your disposal:
- You can easily adjust the font size of your slide notes to make them more readable.
- To navigate between slides, simply click on the corresponding thumbnail.
- You can use the laser pointer, pen, or highlighter tools to draw attention to specific areas of a slide.
- Use the Standout layout to place your camera feed on the slide without the background.
- Use the Cameo layout to insert yourself into the slide, provided you've set up Cameo to record customized camera feeds .
Here's how you can use PowerPoint Live to share your presentation:
- When it's your turn to present, click Share .

- When you're done presenting, click Stop sharing in the top toolbar.
The PowerPoint Live feature tackles the limitations of sharing your entire screen or PowerPoint window. It also comes with really cool features like co-presenting and allowing attendees to click on links in the presentation.
Your Audience's View When Using PowerPoint Live
In addition to the main slide view, your audience also has access to the slide navigation, grid, and more options controls (the three dots icon below the slides).

This means they can navigate the slides at their own pace and change specific slide settings to suit their preference without affecting your view and that of others. If you find this non-ideal for delivering an engaging presentation , you can disable the audience's navigation control. To do so, enable Private view in the top toolbar.
By default, each meeting attendee joins as a presenter. This means they can share their own content or control someone else's presentation. If that's not what you want, you can change each person's meeting roles in Microsoft Teams to prevent it.
Deliver a Seamless Presentation Experience in Microsoft Teams
Presenting your PowerPoint slides in Microsoft Teams might seem tricky at first, but once you get the hang of it, it's a piece of cake. Practice makes perfect. So before your next Teams presentation, familiarize yourself with your chosen method to ensure an effective delivery.
- Productivity
- Microsoft Teams
- Microsoft PowerPoint
How to Share Your Screen in Microsoft Teams
Only available on the desktop app
Microsoft Teams has a robust screen-sharing and presentation tool. You can share your entire desktop screen or a specific application in video calls or conference meetings. We’ll show you how to share your screen on Teams for Windows and macOS.

Microsoft Teams Presenter Modes Explained
Microsoft Teams has three presenter modes: Standout , Side-by-side , and Reporter . Sharing your screen with “Presenter modes” allows meeting participants to see you (the presenter) and your screen. Use presenter mode when sharing your screen in a work or school presentation.
Standout Mode
In Standout mode, meeting participants see you or whoever’s speaking in the bottom corner of the presentation. The screen or app window you’re sharing becomes the presentation background.

Side-by-Side Mode
This mode puts you (the presenter) and the content of your screen in a side-by-side grid layout.

Reporter Mode
Teams puts you (the presenter) and your shared screen on a custom background.

Share Your Screen in Microsoft Teams (Windows)
Microsoft Teams has two versions for Windows devices. We’ll show you how to share your screen in “Teams for Home/Small Business” and “Teams for Work/School.”
If you’re wondering about the differences, Teams for work/school has presenter modes while Teams for home/small business doesn’t.

Share Screen in Teams for Home/Small Business
- Open the meeting window and select Share (or Share content ) in the meeting controls.

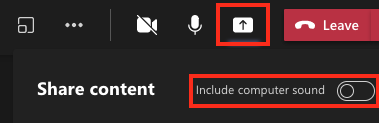
- Toggle on Include computer sound to share your computer’s audio and display. Leave the option disabled if you don’t want to share your computer’s audio.

- Choose Screen to share everything on your computer’s display in the meeting. Alternatively, select Window to share a specific app.

To share an app, select the app window to proceed. Window sharing isn’t available on the Microsoft Teams Linux app—Linux users can only share their entire desktop screen.

Microsoft Teams adds a red border around your computer’s display or the app you’re sharing. You won’t see this red border on a Linux computer.

When sharing your entire screen, meeting participants see everything on your display except app and system notifications.
Share Screen in Teams for Work/School
- Open the meeting window and select Share or press Ctrl + Shift + E .

- Toggle on Include computer sound to allow Teams to capture your device’s audio.

- Select your preferred presenter mode if you’re making a presentation. If you choose the Side-by-side or Reporter mode, select Add background to choose or customize your presentation background.

- Choose if you want to share your entire screen or a specific window.

Pro Tip: To quickly share an app in a meeting, hover your cursor on the app icon on the taskbar and select Share this window .

- You’ll see a red border around your screen or the app you’re presenting. Select the top of your computer’s screen to reveal the presenter toolbar.

- Select the Pin icon in the right corner to keep the toolbar on your screen while presenting.

On the toolbar, you can stop presenting, switch presenter modes, and give control to another participant in the meeting.
Share Your Screen in Microsoft Teams (Mac)
On Mac computers, you must grant Microsoft Teams access to record your screen and audio to use screen-sharing in meetings.
- Select the Share icon in the meeting window or press Command + Shift + E .

- Select Open System Settings (or Open System Preferences ) on the “Screen Recording” window to proceed.

You can also grant Teams screen recording permission from your Mac’s system settings. Head to System Settings (or System Preferences ), select Privacy & Security on the sidebar, and choose Screen Recording .

- Toggle on Microsoft Teams to grant it access to record the content of your screen.

- Use Touch ID or select Use Password and enter your Mac’s password to proceed.

- You’ll get a prompt to close and reopen Microsoft Teams. Select Quit & Reopen and proceed to the next step when your Mac reopens Teams.

- Restart or join your meeting and select Share in the upper-right corner to share your screen.

- Choose your preferred present mode and toggle on Include computer sound to also share your computer audio.

- Select a screen-sharing option— Screen shares your entire screen while Window shares a specific app/window.

Stop Sharing Your Screen in Teams
Open Teams and select the Stop sharing icon to stop sharing your screen.

Alternatively, press Ctrl + Shift + E on your keyboard to stop sharing your screen. Use the Command + Shift + E keyboard shortcut to stop screen-sharing on your Mac computer.
You can select Stop presenting in the presenter toolbar to stop sharing your screen or window.

Can’t Share Your Screen in Teams? Try These Quick Fixes
Are you having trouble sharing your screen in Teams? Does Microsoft Teams display a black or blank screen when presenting in meetings? The troubleshooting methods below could fix the issue.
1. Update Microsoft Teams
Screen sharing might malfunction in older versions of Microsoft Teams. Update the app to the latest version and try sharing your screen again.
Open Microsoft Teams, select the three-dot icon next to your profile icon/picture, and select Check for updates .

Wait for Teams to install available updates and select Please refresh now to restart Microsoft Teams.

To update Teams for Home or Small Businesses, select the three-dot menu icon , choose Settings , and select About Teams .

Microsoft Teams will automatically download the latest version available for your computer.
2. Force Stop and Restart Teams
Force close and reopen Teams if the app’s screen-sharing functionality doesn’t work on your computer.
In Windows, press Ctrl + Shift + Esc to open the Task Manager, right-click Microsoft Teams , and select End task .

If you use a Mac, press Command + Option + Esc to open the “Force Quit Applications” window. Select Microsoft Teams and select Force Quit to terminate the Microsoft Teams app.

3. Clear Microsoft Teams Cache
Corrupt Microsoft Teams cache files can also lead to various problems in the app. Clear Teams cache if it crashes or fails to share your screen—deleting Teams cache won’t delete the app data. Refer to our tutorial on clearing Microsoft Teams cache for step-by-step instructions.
4. Reboot Your Computer
Rebooting your computer can also get Teams screen sharing functionality working correctly again. We also recommend updating your computer’s operating system to the latest version.
Share Screen in Microsoft Teams Meetings
Screen sharing in Microsoft Teams is exclusive to the desktop apps. You can’t share your screen from Teams web or mobile (Android or iPhone) apps. However, if you’re a meeting attendee, you can view a screen-sharing presentation from any device.

Sodiq has written thousands of tutorials, guides, and explainers over the past 4 years to help people solve problems with Android, iOS, Mac, and Windows devices. He also enjoys reviewing consumer tech products (smartphones, smart home devices, accessories, etc.) and binge-watching comedy series in his spare time. Read Sodiq's Full Bio
Read More Posts:

Nate Chamberlain, Microsoft MCT
Microsoft 365 training and content for modern digital workplaces
How to share your screen during a Microsoft Teams meeting
The process used when sharing your screen in Teams depends on whether you’re using the Teams desktop app or web app. I’ll cover both methods in this post, and provide a video demonstration for each.
Share your screen using the Microsoft Teams desktop app
Using the desktop app (installed on your machine), you can share your screen during a meeting in just a few clicks:
- Once inside the meeting, select the Share icon (rectangle with an arrow) in the upper right corner next to the Leave button.
- Screen (one of your monitors and everything you see on it, even if you change windows/apps)
- Window (one specific window or app – prevents accidentally sharing things like your email)
- If you’ll be sharing video audio or music, toggle the button to include computer sound
- When finished sharing, use the same Share button to stop sharing.
If you’ll be sharing a PowerPoint presentation, consider using PowerPoint Live as opposed to just screen sharing the full-screen presentation. This enables your attendees to benefit from individual features that won’t affect others including:
- Moving forwards and backwards through slides for a refresher or more time to consume the content
- Changing slides to high contrast for better visibility
- Translating slides to a language of choice
- Click on links directly on slides (such as social media, references, survey, or company hyperlinks)
Watch the desktop version video demonstration to see these steps performed, including PowerPoint Live:
Share your screen using the Microsoft Teams web app
The web app is entirely browser-based, meaning you don’t need to have anything installed on your device to use it. You can access it anytime from any device with web access by navigating to https://teams.microsoft.com in your browser of choice.
In the web app, you can share your screen during a meeting by following these steps:
- Once inside the meeting, select the Share icon (rectangle with an arrow) from the lower central area menu. If the menu has disappeared, simply move your cursor around the meeting space to make it reappear.
- Entire screen : A whole monitor/screen and everything that becomes visible on it.
- Window : A single app or window (prevents accidentally sharing things like your email)
- Microsoft Edge tab : A single browser tab (similar to the app/window option, this prevents accidentally switching to a sensitive app or tab)
- If you’ll be sharing video audio or music, check the box to Share system audio
- PowerPoint (PowerPoint Live): Select a recent presentation, or click Browse to find a presentation and utilize this feature.
- When finished sharing, use the same Share button to stop sharing or one of the Stop sharing dialogs you may see.
Watch the web version video demonstration to see these steps performed, including PowerPoint Live:
Spread the word:
Leave a reply cancel reply.
This site uses Akismet to reduce spam. Learn how your comment data is processed .
Discover more from Nate Chamberlain, Microsoft MCT
Subscribe now to keep reading and get access to the full archive.
Type your email…
Continue reading
Code of Conduct - Terms and Conditions - Privacy Policy
7 Things to Know About Screen Sharing in Microsoft Teams

Mehvish Mushtaq is a computer engineer by degree. Her love for Android and gadgets led her to develop the first Android app for Kashmir. Known as Dial Kashmir, she won the prestigious Nari Shakti award from the President of India. She has been writing about technology for 6+ years and her favorite categories include how-to guides, explainers, tips and tricks for Android, iOS/iPadOS, social media, and web apps.

Atish is a seasoned tech enthusiast fueled by caffeine and a Computer Science engineering degree. He stumbled into the blogging world in 2015 and hasn't looked back. Over 2000+ articles later, his work has been featured on sites like Gizbot, Firstpost, PhoneArena, GSMArena, and IBTimes. At GT, he's your go-to guy for how-tos, invaluable tips, and troubleshooting guides that actually work. He's also an SEO and digital marketing whiz and content strategist, so his tech takes are always on point and ethical.
- Don’t share your entire screen if you’re only presenting a specific program or document.
- Utilize Whiteboard for brainstorming sessions or real-time annotations during screen sharing.
- Decide if you want to share your computer’s audio alongside the screen share. This can be useful for presentations with sound effects or videos.
1. What Happens When You Share Screen
Like other apps, Microsoft Teams’ screen sharing lets you share your screen content with others. When you hit the button to share the screen, you will be asked to choose whether you want to share a screen or a window.
2. What Can Be Shared on Teams
On Microsoft Teams, you can share your desktop, a single window, a presentation, or a Whiteboard.

When you share your desktop, everything in the foreground of your screen is visible to others. However, when you switch to the Window option, you can keep the focus on a single window.
3. How to Know What’s Being Shared
The currently shared screen on Teams will have a red outline around it.

4. How to Share System Audio While Sharing Screen
Whether you are playing a video or a file with audio, other participants cannot hear the audio by default.
To share the system audio, click on the share screen button during a call > check the box next to Include system audio .

5. How to Stop Sharing in MS Teams
You will see the floating window with a cross mark at the bottom-right corner of the options toolbar > tap on the stop-screen sharing icon.

Launch the Teams app > tap on the Stop Presenting button at the bottom.
6. How to Switch Between Windows While Sharing Screen
There are two ways to switch between multiple windows while sharing a screen.
Method 1 : If you have selected Window mode, you need to stop sharing. Then, select the window you want to share again.
Method 2 : If you have selected Desktop mode, you can easily switch between any window, and the participants can see that.
7. How to Stop Others From Sharing Screen
The default setting grants presenter rights to all participants, giving them the same capabilities as the organizer.
To change the role of participants to Attendee on Desktop, click on the participants ‘ icon > click on the three-dot icon next to the participant’s name > select Make an attendee .

Step 1 : During the meeting, tap on the participants’ icon .
Step 2 : Tap and hold the participant’s name .
Step 3 : Finally, select Make an attendee .
If you have any queries we missed addressing, check out the FAQ section below.
No, your camera doesn’t automatically turn on when you share your screen in Microsoft Teams. You can control your camera and screen sharing independently.
Only one person can share their screen at a time in a Microsoft Teams meeting. This prevents confusion and ensures everyone can focus on the same content.
Was this helpful?
Last updated on 10 May, 2024
The above article may contain affiliate links which help support Guiding Tech. However, it does not affect our editorial integrity. The content remains unbiased and authentic.
Leave a Reply Cancel reply
Your email address will not be published. Required fields are marked *

The article above may contain affiliate links which help support Guiding Tech. The content remains unbiased and authentic and will never affect our editorial integrity.
DID YOU KNOW

More in Internet and Social

6 Ways to Fix Firefox Using a Lot of Memory on Windows Device

How to Disable Google Smart Lock on Android and Chrome
Join the newsletter.
Get Guiding Tech articles delivered to your inbox.
How to Do IT
Information Technology Explained

Learn How to Share Screen on Microsoft Teams: Step-by-Step Guide

Table of Contents
Screen sharing on Microsoft Teams is a valuable feature that allows users to share their screen with others during meetings, presentations, or collaborative sessions. Sharing your screen can enhance communication and collaboration by providing a visual aid and allowing others to follow along in real-time. Whether you need to present a document, demonstrate a process, or showcase a presentation, screen sharing on Microsoft Teams is a useful tool. In this article, we will guide you through the process of sharing your screen on Microsoft Teams, provide tips for effective screen sharing, and offer troubleshooting solutions for any potential issues you may encounter. By harnessing the power of screen sharing, you can maximize your productivity and engagement during virtual interactions on Microsoft Teams.
Key takeaway:
- Screen sharing on Microsoft Teams maximizes collaboration: Sharing your screen allows for effective communication and collaboration during meetings, enabling participants to visually share information, presentations, or documents in real-time.
- Benefits of screen sharing on Microsoft Teams: Screen sharing can enhance productivity by providing a visual aid that assists in explaining complex ideas, troubleshooting issues, or conducting remote training sessions. It improves engagement and understanding among team members.
- Effective screen sharing on Microsoft Teams: To ensure a successful screen sharing experience, use high-quality audio and video setups, minimize background noise and distractions, and take precautions to protect confidential information during sharing sessions.
Why would you want to share your screen on Microsoft Teams?

Photo Credits: Www.Howto-Do.It by Nicholas Rivera
There are several reasons why you would want to share your screen on Microsoft Teams:
- Collaboration: Sharing your screen allows you to collaborate with others in real-time by displaying documents, presentations, or other relevant content. It enables everyone in the meeting to see and interact with the same information simultaneously.
- Presentation: When giving a presentation or conducting a training session, screen sharing allows you to share your slides, visuals, or any other materials directly from your computer. This helps to ensure that your audience is viewing the same content you are discussing.
- Troubleshooting: Screen sharing is useful for troubleshooting technical issues. If you encounter a problem with a software application or a website, sharing your screen with technical support or colleagues can help them understand the issue better and provide appropriate guidance.
- Demonstration: If you need to demonstrate a process, software functionality, or any other task, screen sharing allows others to observe your actions step-by-step. This is particularly helpful for training sessions or remote assistance.
- Collaborative Editing: When working on a document or project together, screen sharing enables multiple participants to make edits or provide input simultaneously. It promotes teamwork and streamlines the editing process.
- Remote Work: In remote work scenarios, screen sharing helps bridge the physical distance between team members. It allows for effective communication and collaboration, as if everyone were in the same room.
- Visual Explanation: Sometimes, it’s easier to explain complex ideas or concepts visually. By sharing your screen, you can use diagrams, charts, or other visual aids to enhance your explanations and ensure better understanding among participants.
- Review and Feedback: When seeking feedback or reviewing a document, design, or any other work, screen sharing enables all participants to view and discuss the content simultaneously. This facilitates efficient feedback and eliminates the need for multiple email exchanges.
With these benefits in mind, screen sharing on Microsoft Teams becomes a valuable tool for effective collaboration, communication, and problem-solving in various professional settings.
How to Share Your Screen on Microsoft Teams

Photo Credits: Www.Howto-Do.It by Larry Davis
Looking to share your screen on Microsoft Teams ? Look no further! In this section, we’ll explore the step-by-step process of how to share your screen seamlessly during your Teams meetings. From starting or joining a meeting to navigating the share screen option, we’ll guide you through each stage of the process. Get ready to enhance your collaboration and communication with these easy-to-follow tips and tricks. Let’s dive in and make your Microsoft Teams experience even more productive !
Step 1: Start or Join a Microsoft Teams Meeting
To start or join a Microsoft Teams meeting, follow these steps:
- Firstly, open the Microsoft Teams application on your device.
- Next, log in to your Microsoft Teams account using your credentials.
- In the main Teams interface, locate and click on the Calendar tab situated on the left-hand side of the screen.
- On the Calendar page, select the meeting you want to start or join.
- If you wish to start a new meeting, click on the “New Meeting” button located at the top-right corner of the Calendar page.
- After accessing the meeting details, carefully review the meeting date, time, and attendees to ensure accuracy.
- To join the meeting, simply click on the “Join” button. If you want to start a new meeting, click on the “Start” button.
- If prompted, choose whether you want to join the meeting with both audio and video or solely with audio.
- Wait for the meeting to load, and you will be connected to the Microsoft Teams meeting with your audio and video enabled.
By following these steps, you will be able to easily start or join a Microsoft Teams meeting and collaborate with your colleagues or friends.
Step 2: Navigate to the Share Screen Option
To navigate to the Share Screen option on Microsoft Teams, simply follow the provided steps:
Start or join a Microsoft Teams meeting .
In the meeting window , locate the toolbar at the bottom.
Look for the Share Screen icon, represented by a computer screen image , positioned in the middle of the toolbar.
Click on the Share Screen icon to access a menu displaying various screen sharing options .
Select the option that suits your needs, whether it’s sharing your entire screen, a specific application window, or a PowerPoint presentation .
If prompted, choose the specific screen or window you want to share.
To commence sharing your screen with other meeting participants, simply click on the “ Share ” button.
By following these steps, you will easily navigate to the Share Screen option on Microsoft Teams and be able to share your screen during meetings or presentations. It’s important to ensure that you have the necessary permissions and enabled settings to successfully share your screen. If you encounter any issues, try updating Microsoft Teams and restarting your device, and also ensure a stable internet connection with sufficient bandwidth for a smooth screen sharing experience.
Step 3: Choose What to Share
- To select what to share on Microsoft Teams, follow these steps:
- Step 1: Begin or join a Microsoft Teams meeting.
- Step 2: Go to the Share Screen option.
- Step 3: Click the “Choose what to share” button.
- Step 4: A menu will appear containing various options to choose from.
- Step 5: Pick the specific application or screen you wish to share.
- Step 6: If you want to share a particular file or document , select the “Files” tab and locate the file.
- Step 7: Once you have made your selection on what to share, click the “Share” button to commence screen sharing.
By following these steps, you can easily determine what you want to share during a Microsoft Teams meeting. Whether it’s an application , your entire screen , or a specific document , you have full control over the displayed content for participants. Remember to choose wisely to ensure only relevant information is shared and to maintain privacy and confidentiality when necessary.
Step 4: Start Sharing Your Screen
- Ensure that you have started or joined a Microsoft Teams meeting.
- Navigate to the Share Screen option within the meeting interface.
- Choose what you would like to share on your screen. You can select your entire desktop, specific applications, or even a single window.
- Once you have made your selection, click on the Start Sharing Your Screen button.
Following these steps will allow you to easily share your screen with other participants in the Microsoft Teams meeting. It is important to remember that when sharing your screen, you should be mindful of what information is displayed to ensure confidentiality and privacy .
To ensure a smooth screen sharing experience, here are a few suggestions:
- Use a good audio and video setup to ensure clear communication and visibility.
- Minimize any background noise or distractions that could interfere with the meeting.
- Be mindful of any confidential information that may be visible on your screen and take appropriate measures to protect it.
By following these recommendations, you can enhance your screen sharing experience on Microsoft Teams and have effective collaborative meetings.
Tips for Effective Screen Sharing on Microsoft Teams

Photo Credits: Www.Howto-Do.It by Donald Hill
When it comes to sharing screens on Microsoft Teams, we want to ensure a seamless and effective experience. So, here are some valuable tips to enhance your screen sharing game. From setting up optimal audio and video quality to minimizing background noise and distractions, we’ve got you covered. Plus, we’ll shed light on the importance of safeguarding confidential information during screen sharing. Let’s dive in and make your Microsoft Teams meetings a productive and secure environment!
Use Good Audio and Video Setup
When utilizing Microsoft Teams for screen sharing, it is crucial to utilize a good audio and video setup to guarantee a smooth and effective communication experience. Here’s how you can utilize a good audio and video setup:
- Make sure to use a good audio and video setup to ensure optimal communication.
- Prior to starting a Microsoft Teams meeting, test your microphone to ensure that it is picking up your voice clearly.
- Adjust the volume levels of your microphone if necessary to prevent distortion or low audio levels.
- If using an external microphone , position it near your mouth for better sound quality.
- Ensure that your webcam is correctly positioned to capture a clear and well-lit image.
- Check the video settings in Microsoft Teams and select the appropriate camera if you have multiple options.
- If you are using a built-in microphone and webcam , ensure that there are no obstructions that could impact their performance.
- For better audio quality and reduced background noise, consider using a headset or headphones with a built-in microphone.
- To avoid interruptions or delays during the meeting, verify the stability of your internet connection .
By following these steps and utilizing a good audio and video setup, you can enhance the quality of your communication when sharing your screen on Microsoft Teams.
Minimize Background Noise and Distractions
- Find a quiet location to minimize background noise and distractions during your Microsoft Teams meeting. Avoid areas with loud noises, such as loud appliances or construction outside.
- Mute yourself when not speaking: When you are not speaking, make sure to mute yourself to eliminate any background noise from your end and minimize distractions for other participants.
- Close unnecessary applications: Close any unnecessary applications or programs on your computer that may generate noise or distractions during the screen sharing session. This will help create a more focused and professional environment by minimizing background noise and distractions.
- Use a headset or headphones: To minimize background noise and distractions, it is recommended to use a headset or headphones. They can provide clearer audio for both you and the other participants, improving communication during the screen sharing session.
- Inform others around you: If you are in a shared space or working from home with others, inform them that you will be in a Microsoft Teams meeting and request them to minimize noise and distractions to help minimize background noise and distractions during that time.
Be Mindful of Confidential Information
When screen sharing on Microsoft Teams, it is essential to be mindful of confidential information. It is important to share sensitive or private data cautiously , as it can jeopardize security. Here are the key steps you should follow:
1. Carefully review the content: Prior to sharing your screen, carefully examine the displayed information to ensure that no sensitive or confidential data is visible. Take the necessary steps to remove or hide any personal documents, files, or tabs that should not be viewed by others.
2. Verify the recipients: Before sharing your screen, confirm that you are only sharing it with the intended audience. Double-check the participants in the meeting or call and ensure that unauthorized individuals do not have access to the screen sharing session.
3. Stay focused on relevant information: Avoid sharing unrelated or personal information accidentally during the screen sharing session. Make sure you remain focused on the topic at hand.
True story: In a recent team meeting, Sarah was discussing a sensitive project with her colleagues, unaware that she had accidentally left her email inbox open on her screen. As she shared her screen, everyone in the meeting could see her personal and work emails, which included confidential client information . This incident resulted in a breach of confidentiality and required immediate action to rectify the situation.
Remember, being mindful of confidential information while screen sharing on Microsoft Teams is crucial for maintaining data security and trust within your team or organization. Always double-check your content and recipients to avoid potential privacy breaches.
Troubleshooting Screen Sharing Issues

Photo Credits: Www.Howto-Do.It by Harold Carter
Encountering screen sharing issues while using Microsoft Teams? No worries, we’ve got you covered with troubleshooting tips! In this section, we’ll explore practical solutions to common problems you may face. From checking your permissions and settings to updating the Teams app and restarting your device , along with ensuring a stable internet connection and sufficient bandwidth , we’ll help you get your screen sharing up and running flawlessly. Say goodbye to disruptions and hello to seamless collaboration in no time!
Check Your Permissions and Settings
To ensure a smooth and secure screen sharing experience on Microsoft Teams, regularly check your permissions and settings . Follow these steps:
Open Microsoft Teams and sign in to your account .
Join or initiate a meeting where you intend to share your screen.
Click on the “Share” button located at the bottom of the meeting window.
Make sure to select the “ Screen ” option from the menu.
If prompted, grant the necessary permissions for screen sharing.
Once you have shared your screen, verify your settings to ensure optimal audio and video quality.
Ensure a good quality audio and video setup.
Create a noise-free environment and minimize distractions by choosing a quiet meeting space .
Exercise caution when sharing your screen and avoid displaying sensitive content .
Fact: Checking your permissions and settings regularly is crucial for a confident and effective collaboration experience on Microsoft Teams. It enables you to share information and collaborate seamlessly with colleagues and clients during meetings.
Update Microsoft Teams and Restart Your Device
To ensure you have the most up-to-date version of Microsoft Teams and to fix any potential issues with screen sharing, follow these steps:
- Close Microsoft Teams by clicking on the X in the top right corner of the application.
- Go to the start menu and click on the “Settings” icon.
- In the Settings menu, select “Update & Security.”
- Click on “Windows Update” in the left sidebar.
- Click on the “Check for updates” button to search for any available updates for Microsoft Teams.
- If there are updates available, click on “Download and install” to update Microsoft Teams.
- Once the update is complete, restart your device by clicking on the “Start” button and selecting “Restart.”
- After your device has restarted, open Microsoft Teams again and you will have the latest version installed.
Updating Microsoft Teams and restarting your device can help optimize your screen sharing experience. It’s important to regularly update Microsoft Teams to access the latest features and improvements. Additionally, restarting your device periodically can resolve temporary issues that may affect screen sharing and other functionalities.
Ensure Sufficient Bandwidth and Stable Internet Connection
To ensure a stable internet connection and sufficient bandwidth for screen sharing on Microsoft Teams, follow these steps:
- Check your internet speed: Ensure that your upload speed is sufficient for screen sharing by using an online speed testing tool.
- Close unnecessary applications and tabs: Free up bandwidth for screen sharing by closing any applications or browser tabs that may be using your internet bandwidth unnecessarily.
- Connect to a stable network: For a more stable internet connection, make sure you are connected to a reliable and stable Wi-Fi network or use a wired Ethernet connection.
- Move closer to the Wi-Fi router : If your Wi-Fi signal is weak, improve the connection strength by moving closer to the router.
- Limit other devices on the network: Before your screen sharing session, ask others connected to the same network to limit their internet usage, especially for streaming or downloading large files.
- Upgrade your internet plan: If you frequently experience slow internet speeds or interruptions during screen sharing, consider upgrading to a higher speed or more reliable internet package.
Pro-tip: If you still experience issues with your internet connection, try restarting your router or contact your internet service provider for further assistance.
Some Facts About How To Share Screen on Microsoft Teams:
- ✅ Over 155 million users rely on Microsoft Teams for screen sharing during meetings. (Source: Our Team)
- ✅ Users can choose to share their entire screen or a specific window or app in Microsoft Teams. (Source: Our Team)
- ✅ Including computer sound in the shared screen is possible when sharing videos, audios, or music on Microsoft Teams. (Source: Our Team)
- ✅ PowerPoint Live in Microsoft Teams offers additional features for sharing PowerPoint presentations, such as navigating slides and translating content. (Source: Our Team)
- ✅ Microsoft Teams provides screen sharing capabilities on both the desktop app and web app, with slight variations in the steps. (Source: Our Team)
Frequently Asked Questions
Can i use microsoft teams on office365.
Microsoft Teams is a prominent collaboration tool that falls under the suite of understanding office365 features . It allows individuals and teams to communicate and collaborate efficiently. By integrating with Office365, Teams offers seamless access to shared files, documents, and other resources. With its user-friendly interface, Microsoft Teams enhances productivity and enables effective remote communication and teamwork.
How do I share my screen on Microsoft Teams?
To share your screen on Microsoft Teams, click on the “Share content” button during a meeting. From there, you can choose to share your entire screen, a specific app, a PowerPoint presentation, or a whiteboard.
How do I stop sharing my screen on Microsoft Teams?
To stop sharing your screen on Microsoft Teams, simply click on the “Stop sharing” button. This will immediately stop the screen sharing session and return your screen to its normal view.
Can I share audio during a screen sharing session on Microsoft Teams?
Yes, you have the option to share your computer audio during a screen sharing session on Microsoft Teams. When selecting what to share, make sure to toggle the button to include computer sound if you want the meeting participants to hear audio from your screen.
Can Linux users share their screens on Microsoft Teams?
Yes, Linux users can share their screens on Microsoft Teams. However, it is important to note that Linux users will not see the red border surrounding what they are sharing, and window sharing is not available for Linux users.
What are the different options for sharing content on Microsoft Teams?
When sharing content on Microsoft Teams, you have several options to choose from. You can share your screen, a PowerPoint presentation, a whiteboard, or a specific app. Each option allows you to share different types of content and collaborate effectively during meetings.
How do I share a PowerPoint presentation on Microsoft Teams?
To share a PowerPoint presentation on Microsoft Teams, select the “Share content” button and choose the “PowerPoint Live” option. This will enable you to share your PowerPoint presentation with additional features such as moving through slides, translating slides, and clicking on links directly on the slides.
- About the Author
- Latest Posts

Janina is a technical editor at Text-Center.com and loves to write about computer technology and latest trends in information technology. She also works for Biteno.com .
- Pandora NMS vs. Icinga: An Unbiased Comparison
- Sensu vs. Cacti: Network Monitoring Showdown
- Sensu vs. Pandora NMS: A Comparative Guide
Similar Posts
Learn How to Easily Count Emails in Outlook & Improve Productivity
Effortlessly Remove Attendees from Outlook Meetings with This Simple Guide
Mastering Excel: Learn How to Lock Rows in Excel for Easy Data Management
Quick and Easy Guide: How to Move a Row in Excel for Efficient Data Organization
Effortlessly Edit Categories in Outlook for Streamlined Organization

Understanding Microsoft Excel: What is Excel and its Best Features?
Technology Enhanced Learning Team
Sharing a powerpoint presentation in teams.

For: Staff Application: MS Teams Tagged: Microsoft Teams , web conferencing
To share an online presentation, you can either share your screen with PowerPoint open on your PC or upload your presentation directly into Teams . There are several options for screen sharing and configuring your PowerPoint files when presenting online. You can choose to display your entire desktop or just a specific application on your PC. You can also configure Teams to utilise multiple displays to host a presentation (where multiple monitors are available).
This guide covers:
Share your screen in teams, powerpoint presentations with multiple displays, upload a presentation file into teams.
During a Teams meeting, select the Share Content icon at the top of the window to initiate screen sharing. You will be presented with a window displaying all the available options for sharing. This window will list any displays connected to your device (i.e., Desktop 1, Desktop 2), which will broadcast everything on the selected desktop.
Sharing your entire screen may be the best option if you intend to switch between applications during your presentation. When sharing media, like a video or audio clip, toggle the option to Include computer sound .
Teams will also list options for sharing any specific windows currently open on your PC, allowing you to only broadcast a specific application and hiding the rest of your desktop from view. If you want to only display your presentation file, ensure the PowerPoint presentation is open prior to clicking the Share Screen button .
Upon sharing your screen, the Teams interface will minimise so you can better view your shared content. There will be a small Teams window at the bottom of your screen where you can see the active speaker and use basic meeting controls.
There will also be a bar at the top of the screen allowing you to give control of the presentation to another participant or Stop presenting . If this bar disappears, hover your cursor at the top of your screen and it will unhide. Click the ‘ Pin ’ icon to keep the bar visible at all times.
Please note: If you are sharing your web browser, Teams will broadcast any tab open on your screen to participants. Keep this in mind if you need to access personal information such as your email account.
When delivering a Teams presentation with multiple displays (i.e., two monitors connected to a PC or a laptop with external monitor), you may want to take advantage of the second display to monitor participants. By adjusting your PowerPoint settings to disable ‘Presenter View’ , you can utilise an additional display to open the Chat and Participants windows, or to view participant videos.
To disable Presenter View, open PowerPoint and select the Slide Show tab and then click Set Up Slide Show .

In the options window, under Show type , select Browsed by an individual (window) , and click OK .
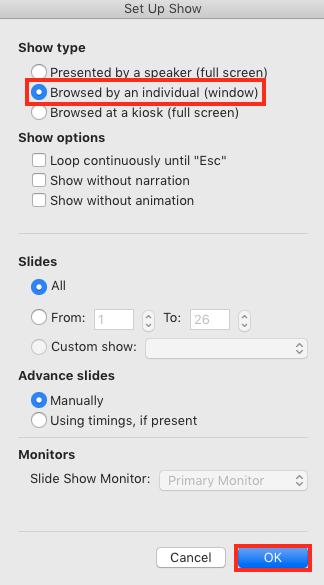
When ready to present, click Play from Start to expand your presentation view. Rather than taking over both displays, your presentation will now display in a window that can be expanded and moved between your screens.
Select Share content in Teams and select your PowerPoint presentation from the list of windows to share . Open the main Teams meeting window after sharing your screen and move it to your second display. You can now monitor the chat and manage participants whilst presenting.
If you do not want to share your PC screen when presenting, you can upload and share a PowerPoint file directly in Teams. This can be advantageous when you do not have a strong internet connection or if you have multiple presenters who will need to control the slides during the session.
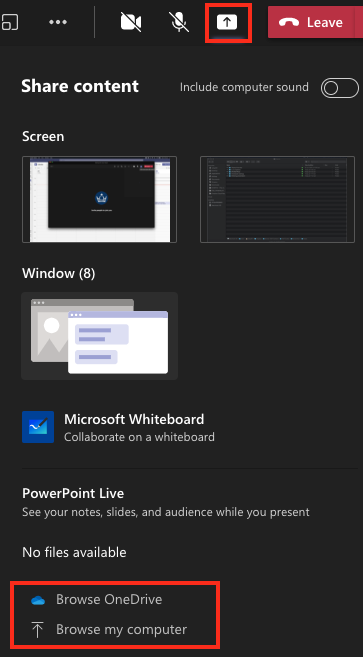
Click the Share content icon at the top of the meeting window and select Browse my computer to upload a file (or select Browse OneDrive if your presentation is located in your QMUL Office 365 account).
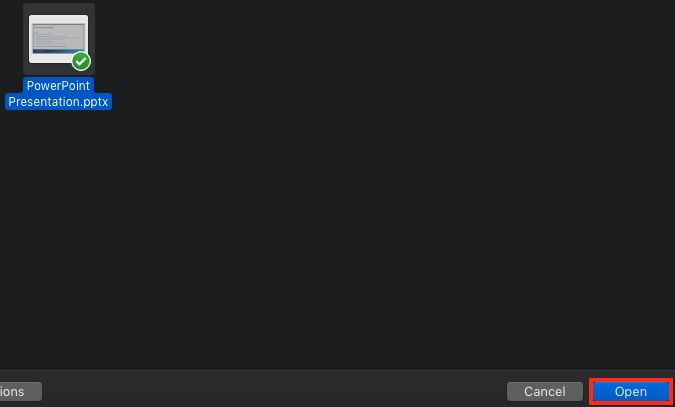
In the file browser , locate the presentation file on your PC and click Open . It may take a few moments for Teams to upload and convert your presentation file.
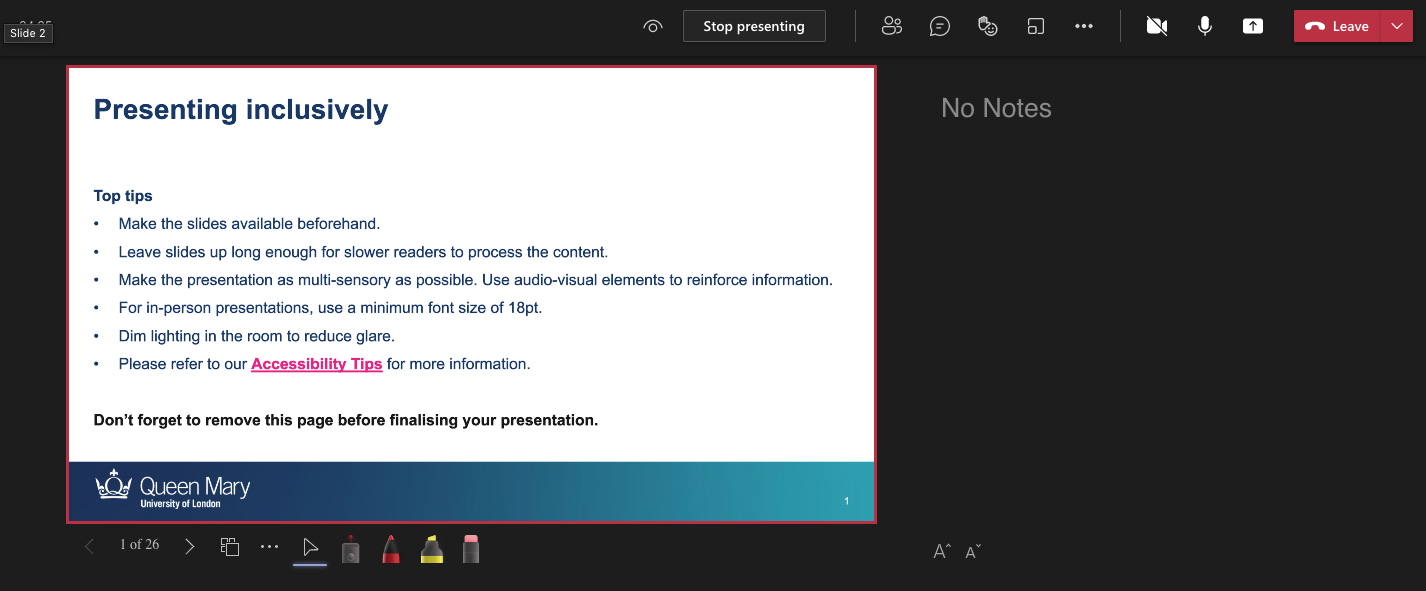
When the presentation has been shared, you will have a set of PowerPoint controls at the bottom of your slides. Use these options to move between slides , open grid view to quickly jump between slides, select a laser pointer , or one of the pen tools to annotate your slides.
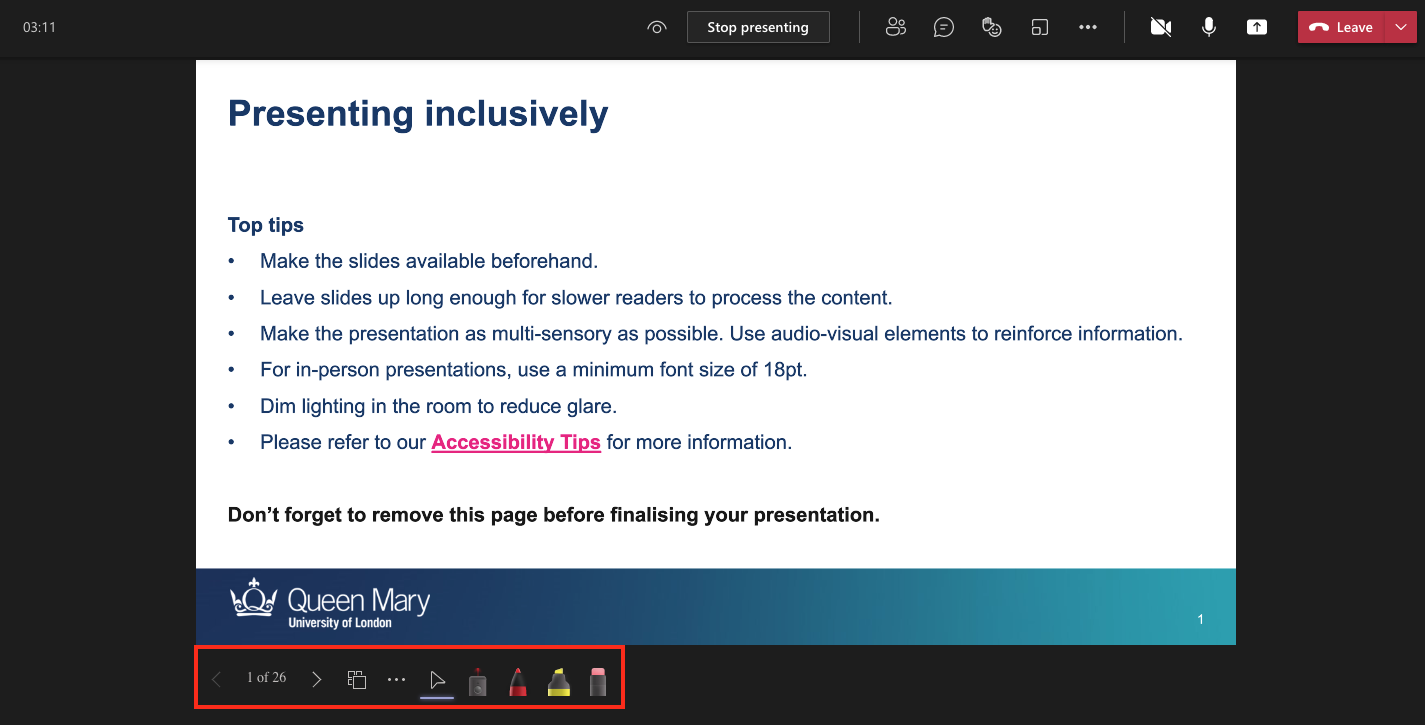
Click the ‘ … ’ More actions icon to switch between single slide and presenter view, or to view the slides in high contrast mode (which may be helpful in certain instances for accessibility purposes).
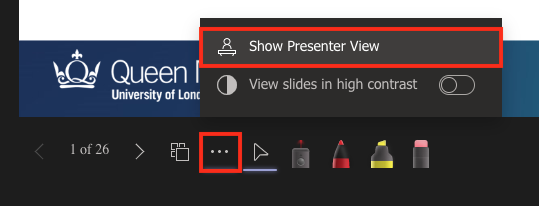
In presenter view, you will see any presenter notes displayed on the right side of your presentation.
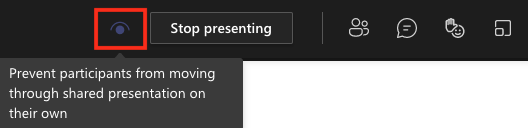
At the top of the window, there is a ‘eye’ icon which you can click to toggle to allow or prevent participants from moving through your shared presentation on their own . Click Stop presenting to end the presentation.
Did this answer your query? If not, you can raise a ticket on the online Helpdesk or email: [email protected] . Alternatively you can also request a particular guide or highlight an error in this guide using our guides request tracker.

Related items
- Automate the creation of Teams for teaching sessions
- Using Mentimeter polling in Microsoft Teams
- Uploading a profile picture in Teams

How-To Geek
How to share your screen in microsoft teams.

Your changes have been saved
Email is sent
Email has already been sent
Please verify your email address.
You’ve reached your account maximum for followed topics.
Quick Links
Table of contents, how to screen share in microsoft teams on desktop, how to screen share in microsoft teams on mobile.
Microsoft Teams makes it easy to share your desktop or mobile device's screen in your online meetings. You can even choose between sharing your device's entire screen or just a specific app window. Here's how.
Related: What Is Microsoft Teams, and Is It Right for My Business?
- Share Your Screen in Microsoft Teams on Desktop
- Share Your Screen in Microsoft Teams on Mobile
On a Windows, Mac, Linux, or Chromebook computer, you can use Teams web version or the app to share your screen in a meeting.
To start, first, launch Microsoft Teams on your computer and join a meeting.
In the meeting, at the top of the Teams interface, click the "Share Content" option (an up-arrow icon).

You will see a "Share Content" section to the right of the Teams interface. To share your computer's entire screen, then in this section, click "Screen." To share a specific app's window, click the "Window" option instead.

If you select the "Screen" option, Teams will start presenting your desktop's screen in the meeting. You will see a red border around your screen indicating the screen is being shared.
On Linux, you will not see the red border around your screen when it's shared. You also can't share a specific app's window on Linux.

If you choose the "Window" option, select the app window that you'd like to share.

When you've finished your meeting and you want to stop screen sharing, then at the top of the Teams interface, click "Stop Presenting."

And that's all there is to screen-sharing in Teams on desktop. Very useful!
Like Teams, you can also share your screen in Zoom and Google Meet meetings .
Related: How to Share Your Screen in a Zoom Meeting
On an iPhone, iPad, or Android phone, you can use the official Teams app to share your phone's screen in your online meetings, similar to sharing mobile screens in Skype .
To do so, first, launch the Microsoft Teams app on your phone. In the app, join the meeting where you'd like to present your phone's screen.
In the meeting, from the bottom bar of the Teams app, select the three dots.

From the three-dots menu, select "Share."

Choose the "Share Screen" option. To include the audio in your screen share, toggle on the "Audio" option.

If you're on Android, you will see a "Display Over Other Apps" page. Here, find "Teams" and tap it. Then enable the "Allow Display Over Other Apps" option.

If you're on an iPhone or iPad, tap the "Start Broadcast" option.

Tap the back button to get back to the Teams screen. There, in the prompt that opens, select "Start Now."

A red border will appear around your phone's screen, which indicates your screen is currently being shared. To stop sharing your screen, tap "Stop Presenting."

And that's how you make explaining various concepts and ideas easier by sharing your screen with Microsoft Teams!
Did you know you can use a whiteboard in a Teams meeting ?
Related: How to Use a Whiteboard in a Microsoft Teams Meeting
- Microsoft Office
- Microsoft Teams
Home Blog PowerPoint Tutorials How to Share a PowerPoint Presentation on Microsoft Teams
How to Share a PowerPoint Presentation on Microsoft Teams

In recent years many remote meeting tools like Microsoft Teams and Zoom have become the norm for regular remote meetings. If you’re new to Microsoft Teams, the chances are you are still finding your way around various options. One of the most common questions a Microsoft Teams newbie might ask is how to share PowerPoint on Teams.
What is Microsoft Teams?
Microsoft Teams is a messaging app by Microsoft for online collaboration and remote meetings that comes integrated with Microsoft 365. It provides a real-time workspace where end users can collaborate via chat, Teams Channels, Live calls, etc. Microsoft Teams also integrates with other Microsoft products like PowerPoint and OneDrive, enabling instant file sharing via the cloud.
Why use Microsoft Teams to Present Your PowerPoint Presentations?
Many organizations use Microsoft Teams for online collaboration and remote meetings. Organizations with integrated Microsoft products like its Windows operating system, Microsoft Office, and Azure Active Directory prefer Teams as the primary internal and external communication app. Organizations use Microsoft Teams to provide secure accounts to employees, with two-factor authentication and data encryption. These accounts are integrated into the Active Directory, providing scalability and control for IT administrators to offer people within an organization an online collaboration platform that can be securely used within the limits of the organization’s data protection policies.
While there are many alternatives to Microsoft teams, such as Zoom and Google Meet, the integration of teams with other Microsoft products, such as Azure, Microsoft Office apps, and OneDrive, makes it attractive within a secure enterprise environment.
How to Present PowerPoint in Teams?
How to present your PowerPoint slides on Microsoft Teams, let us tell you there are at least two methods for sharing presentations. This includes sharing a PowerPoint file directly and presenting your slide deck before one or more meeting participants, or perhaps PowerPoint templates or Google Slides templates to help a colleague design a slide deck.
How to Attach and Share Your PowerPoint Slides on Teams
To share a PowerPoint file on teams, go to an ongoing conversation or meeting window and click Attach files . This will provide you with the option to either fetch a file via OneDrive or from your device. This option can be used for sharing PowerPoint files and other types of files, such as documents, spreadsheets, videos, compressed files, etc.

When sharing a file, you can add a message optionally before hitting Send .

The recipient and the sender can download the file, open it in a browser, or copy the file link for further sharing.

How to Present Your PowerPoint Slides on Teams
Method #1: use the share button in powerpoint.
You can also directly present your slide deck via Microsoft Teams by sharing your screen to start a Live presentation during a remote meeting instantly. Suppose your organization uses Microsoft Teams regularly. In that case, the chances are you will be using it for presentations during remote meetings; therefore, it’s essential to know how to use the screen-sharing option to present online.

Method #2: Share Screen to Present a PowerPoint Presentation
Another way to present a PowerPoint presentation on Teams is by sharing the screen with your audience. If you share your screen, this will show the audience whatever is visible on the entire screen on your device.

Pros of sharing your screen with the audience to present a presentation:
- It is easier to activate
- You can easily switch to other windows besides the PowerPoint presentation and also share them with the audience
Cons of sharing your entire screen on Teams for presenting:
- If you have confidential data in other windows, you may want to avoid switching the windows and keep only the Slideshow window in front.
- You may accidentally switch to other windows, and your audience can lose focus of the presentation.
Method #3: Share PowerPoint Window to Present Your Slides
If you intend to hide parts of your screen, you can simply share the relevant PowerPoint window so that your audience can only view the presentation. During a Live call, click the Share button and select your screen or window to share.

5 Features to Make the Most from Your Microsoft PowerPoint Presentation Sharing in Teams
Microsoft Teams offers a wide array of features that make it a robust remote meeting and online collaboration app since it leverages the full force of Microsoft 365 and other Microsoft products.
1. Translate Slides into a Different Language
This is a private feature that individuals can use to translate slides in their language instantly. As a presenter, you can ask your audience to use this feature if they deem it convenient to help bridge a gap that might exist due to a language barrier.
Slides can be viewed in a different language via More actions > Translate Slides . From the drop-down list, you can pick a preferred language.

2. Use Live Captions
Microsoft Teams supports Live Captions / Closed Captions (CC) to help persons with disabilities, including those suffering from hearing impairment. Closed Captions can also be helpful for people to translate or view text in a preferred language.
Turn on Live Captions: To enable Live Captions on Teams, go to More options > Turn on live captions . Translate Spoken Language: To translate Live Captions, go to Captions settings > Change spoken language .

Turn Off Live Captions: You can turn off Live captions anytime via More actions > Turn off live captions .

3. View Slides in High Contrast
Viewing slides in high contrast on Teams can have several benefits. For example, it helps you focus on the content and is also helpful for people with visual impairment. To configure your slides to appear in high contrast, follow the steps below:
1. Launch your PowerPoint presentation.
2. Click on the Present tab at the top of the window.3. Go to More action > View slides in high contrast .

4. Annotate your Slides in Real Time
Like any standard remote meeting app, Microsoft Teams also provides a number of handy annotation options to help you make the most out of your PowerPoint presentations. You can click on Start annotation when sharing your full screen during presentations to start annotating slides.
Powered by Microsoft Whiteboard, this powerful feature enables one or more meeting participants or the presenter to annotate presentations. It can also be a helpful feature when you’re looking to collaborate online during a Live presentation.
5. Pop Out the Window
You can separate the presentation window from the Teams window to make it easier to work with the two. This feature can be handy when working with multiple monitors or separating the two windows from uncluttering your screen. You can use this option by clicking on the Pop-out option from the toolbar during a screen-sharing session.

How to Stop Presenting on Teams
When presenting your slide deck, you can also present your PowerPoint presentation using any view, be it as a SlideShow or in Normal view. Once you’re done presenting, click Stop Presenting to conclude your session. Furthermore, you can also choose to enable or disable your camera and computer sound when presenting your slides.

To turn off screen sharing during a remote meeting, you can click Stop Sharing .

Present in Teams Button in PowerPoint is Missing. How to Fix it?
Some users might have used the Present in Teams option to share a PowerPoint presentation during a meeting. Suppose you are wondering why the Present in Teams button in PowerPoint Presentations is missing. In that case, this option isn’t available for anyone using the free version of Teams, as only users with a paid subscription, such as a Business Standard or Business Premium Plan. Furthermore, you must share your PowerPoint presentation with OneDrive to use this option. To use the Present in Teams option, upload your PowerPoint presentation to OneDrive. You can do this via File > Save As > OneDrive .

Once done, the Present in Teams button will become available to instantly launch your presentation for sharing during a Teams call.

5 Tips to Make your Presentation a Success on Microsoft Teams
Presenting PowerPoint in Teams can require being mindful of a number of things. This includes accounting for brevity to ensure your presentation does not take more than its designated time, using slides that are suitable for remote meetings. Below is a list of 5 tips to make your presentation successful using Microsoft Teams.
1. Check Your Audio and Video Settings
One of the most annoying problems faced during remote meetings is technical failures such as no or low audio quality. This becomes even more annoying when the meeting organizer or a presenter during their session faces the issue, wasting precious time. This is why you must check your audio and video settings beforehand to ensure everything works correctly. If you need to play a video during your session, make a test call with a colleague and get feedback if the sound and video quality are up to the mark.
2. Make Sure Your Slides are Clear and Concise
Presentations delivered via Microsoft Teams will often take place during scheduled remote meetings. This means that you will have to account for the designated time given for your session, which is why you must ensure that your slides are clear and concise.
3. Use Animations and Transitions Sparingly
Since remote meetings will be attended by participants using different types of computers and mobile devices, some animations and transitions might not be suitable. This is because they can cause Teams to slow down, or the slides might not display appropriately via screen sharing. For example, 3D animations , GIF animations , and objects with elaborate PowerPoint animated sequences might cause issues when displayed via Teams.
4. Keep Your Slides on Topic
One of the banes of remote meetings is how a discussion can go off-topic very quickly. This is why it’s best to ensure that your slides remain focused on the topic and additional discussions are discouraged during the presentation session.
5. Use Team Members’ Names Sparingly to Call Out Specific Points
Calling out team members for their opinion or advice during a remote meeting can quickly lead to a very lengthy and off-topic discussion. This is why it’s best to call out team members’ sparingly. If you have been using Teams or other remote meeting apps long enough, you would have learned by now that for some topics, it’s best to ask participants to schedule a separate meeting so that the ongoing discussion remains on track.
Other Issues to Troubleshoot while presenting a PowerPoint presentation on Microsoft Teams
Someone has already set up Teams for your organization’s error
If you’re using a premium subscription for Microsoft Teams managed by your organization’s IT team, you might get an error when logging in to Teams. In such a case, you might get the following error:
“Someone has already set up Teams for your organization.”
If you see the error message mentioned above, this means that your account isn’t ready yet, and you need to contact your organization’s IT team to ask when your account might be ready for use.
We’re sorry–we’ve run into an issue error.
Another prevalent issue is when the following error message appears:
“We’re sorry–we’ve run into an issue.”
This is a generic message, and usually, it can be resolved by clicking the Restart button that appears below the error. In case the issue isn’t resolved after restarting the Teams app, ensure your Internet connection is working. More often than not, the issue is associated with the Internet connection. If the issue persists, you can clear your cache , reinstall Teams or contact your IT support team. The error can also occur if there is an outage affecting Microsoft products or if there is a configuration issue for Microsoft 365 accounts associated with your organization.
Final Words
Using Microsoft Teams to share a presentation file is easy enough. However, when presenting a PowerPoint presentation in Teams, you must decide how to present your slide deck. If you need to switch back and forth between your slides and another document, spreadsheet, or browser window, it might be best to share your entire screen. However, if you wish to focus only on the slide deck, sharing your Window can help you avoid sharing the rest of your screen with the audience.
Like this article? Please share
Meeting, Microsoft Teams, Share Filed under PowerPoint Tutorials
Related Articles

Filed under Business • July 28th, 2022
What is an All Hands Meeting?
The proper meeting format can boost your company’s transparency and help employees align with its core values. In this article, we will introduce the All Hands Meeting model and why it’s a resource you should consider from now on.

Filed under Business • February 17th, 2022
A guidebook to set Meeting Objectives by taking Effective Meeting Notes
Make an impact in your meetings by applying the science of note-taking. Capture all the valuable information you require by taking effective meeting notes.

Filed under Business • May 20th, 2021
Quick Guide to Project Kick Off Meetings
Every time a team must begin a project an essential set of meetings must happen to ensure the success of the project. In this blog post we discuss the Project Kick Off Meeting and why it´s so important at the beginning of any new project.
Leave a Reply
- How to Login
- Use Teams on the web
- Join a meeting in Teams
- Join without a Teams account
- Join on a second device
- Join as a view-only attendee
- Join a breakout room
- Join from Google
- Schedule a meeting in Teams
- Schedule from Outlook
- Schedule from Google
- Instant meeting
- Add a dial-in number
- See all your meetings
- Invite people
- Meeting roles
- Add co-organizers
- Hide attendee names
- Tips for large Teams meeting
- Lock a meeting
- End a meeting
- Manage your calendar
- Meeting controls
- Prepare in a green room
- Present content
- Share slides
- Share sound
- Apply video filters
- Mute and unmute
- Spotlight a video
- Multitasking
- Raise your hand
- Live reactions
- Take meeting notes
- Customize your view
- Laser pointer
- Cast from a desktop
- Use a green screen
- Join as an avatar
- Customize your avatar
- Use emotes, gestures, and more
- Get started with immersive spaces
- Use in-meeting controls
- Spatial audio
- Overview of Microsoft Teams Premium
- Intelligent productivity
- Advanced meeting protection
- Engaging event experiences
- Change your background
- Meeting themes
- Audio settings
- Manage attendee audio and video
- Reduce background noise
- Voice isolation in Teams
- Mute notifications
- Use breakout rooms
- Live transcription
- Language interpretation
- Live captions
- End-to-end encryption
- Presenter modes
- Call and meeting quality
- Meeting attendance reports
- Using the lobby
- Meeting options
- Record a meeting
- Meeting recap
- Play and share a meeting recording
- Delete a recording
- Edit or delete a transcript
- Customize access to recordings or transcripts
- Switch to town halls
- Get started
- Schedule a live event
- Invite attendees
- organizer checklist
- For tier 1 events
- Produce a live event
- Produce a live event with Teams Encoder
- Best practices
- Moderate a Q&A
- Allow anonymous presenters
- Attendee engagement report
- Recording and reports
- Attend a live event in Teams
- Participate in a Q&A
- Use live captions
- Schedule a webinar
- Customize a webinar
- Publicize a webinar
- Manage webinar registration
- Manage what attendees see
- Change webinar details
- Manage webinar emails
- Cancel a webinar
- Manage webinar recordings
- Webinar attendance report
- Get started with town hall
- Attend a town hall
- Schedule a town hall
- Customize a town hall
- Host a town hall
- Use RTMP-In
- Town hall insights
- Manage town hall recordings
- Cancel a town hall
- Can't join a meeting
- Camera isn't working
- Microphone isn't working
- My speaker isn’t working
- Breakout rooms issues
- Immersive spaces issues
- Meetings keep dropping

Engage your audience with presenter modes in Microsoft Teams
Meeting participants tend to be more focused and have a better experience when they see a presenter along with a presentation. An interactive presenter also helps guide an audience along with visual cues while reducing information overload. By using a presenter mode such as Standout , Side-by-side , or Reporter in a Teams meeting instead of sharing screen or window content only, you become a more engaging and integral part of your presentation. The following examples show how each presenter mode appears to an audience:

Use a presenter mode

Under Presenter mode , choose the mode that you want. Also, be sure that your camera is turned on.

To start your presentation, choose to share your S creen or Window on your PC or device.
Note: Using interactive presenter modes with PowerPoint Live will soon be available.

Note: Presenter mode customization is available as part of the public preview program and might undergo further changes before being released publicly. To get access to this and other upcoming features, switch to Teams public preview .
Presenter modes also allow presenters to customize how their content will be oriented on screen and adjust the size of the video to better fit the presentation.
Customize video display
1. Use the Position buttons in the preview window to direct where videos will appear in relation to the content.

2. Enlarge or reduce video size using the Size slider. Slide the circle to the left to reduce the size of a video, or to the right to enlarge the size of a video.

More things to know
Interactive presenter modes are only available for the desktop version of Teams.
Meeting attendees using the mobile or online versions of Teams will see a shared window or screen and presenter video separately.
When you use an interactive presenter mode, a small, moveable picture-in-picture window pops up to show you what your audience sees. If you close this window and need it again, restart the presenter mode.
Related links
Meetings in Teams Schedule a meeting in Teams Share content in a meeting Introducing PowerPoint Live in Teams

Need more help?
Want more options.
Explore subscription benefits, browse training courses, learn how to secure your device, and more.

Microsoft 365 subscription benefits

Microsoft 365 training

Microsoft security

Accessibility center
Communities help you ask and answer questions, give feedback, and hear from experts with rich knowledge.

Ask the Microsoft Community

Microsoft Tech Community

Windows Insiders
Microsoft 365 Insiders
Was this information helpful?
Thank you for your feedback.

May 9, 2024
Teams enhancements to the Presenter window while screensharing
Teams Public Preview team
- Add our blog to your RSS feed reader" href="/rss/blog.xml" data-bi-name="RSS Subscription" data-bi-id="rss_feed" data-bi-bhvr="120" data-bi-socchn="RSSSubscription" title="Microsoft 365 Insider Blog RSS" target="blank" class="d-inline-block">
Hi, Microsoft 365 insiders! We’re excited to announce new enhancements to the Presenter window you can use while screensharing.
Have you ever wanted to see what’s happening in a meeting when you’re sharing your screen? Now you can with the new Presenter window. It shows up to four meeting participants, both video and audio, as well as active speakers, raised hands, reactions, and a preview of shared content.
Meeting notifications are also easier to see, appearing in the center of your screen so you can act on them.
These enhancements help you stay aware of what’s happening in your meeting and make it easier to engage with other attendees while you’re screensharing. You can also manage actions in your meeting such as lowering raised hands and muting participants.
How it works
- Join a Teams meeting.

- If you’re sharing your screen or window and have your camera turned on, you can expand the self-video tile at the bottom of the presenter window by clicking the arrow button. After it’s expanded, you can minimize the self-video tile again to free up space on the shared screen.
- If you’re using presenter modes while sharing your screen, the self-video tile gives you the option to change the presenter layout during the screen share.
Availability
To use this feature, you must be a member of the Teams Public Preview or Microsoft 365 Targeted release and use the new Teams client for Windows or macOS. Other meeting participants aren’t required to be members of the Teams Public Preview.
To enable your Teams client for the Public Preview, IT administrators must enable Show preview features in their update policy. Learn more
For Targeted release, global admins can go to the Microsoft 365 admin center and give access to a select set of individuals or the entire organization. Learn more
Feedback
We want to hear from you! Select Settings and more > Help in the top right corner of the Teams app, and then select either Give feedback or Suggest a feature to share your thoughts about this feature.
Sorry, JavaScript must be enabled to use this app.
IMAGES
VIDEO
COMMENTS
To present content in a meeting: Select Share in your meeting controls. Choose to present your entire screen, a window, a PowerPoint file, or a Whiteboard. Select Stop sharing in your meeting controls when you're done. Note: In Teams for web, you can share your screen using Google Chrome or the latest version of Microsoft Edge.
Present your slides. If you're already in a Teams meeting, select Share and then under the PowerPoint Live section, choose the PowerPoint file you're wanting to present. If you don't see the file in the list, select Browse OneDrive or Browse my computer. If your presentation is already open in PowerPoint for Windows or Mac, go to the file ...
The seven options are: Share your entire screen/desktop. Share the Slide Show window. Share the editing window with a clean look. Run the Slide Show in a window and share that window. Use the PowerPoint sharing option in Teams. Use Presenter View to show the audience your slides while you see Presenter View. Present with your video beside your ...
Show others your entire desktop or just one thing, like a browser window, app, or presentation. Improve communication . Answer a question or clarify a point by sharing your screen, so everyone can see the same content. ... To screen share in Teams, select the screen sharing icon in the upper right of your meeting controls. Then choose to ...
In Microsoft Teams, you can show your desktop, a specific app, a whiteboard, or a presentation in a meeting. In your meeting controls, select Share . Turn on the Include sound toggle to share your computer audio. Screen lets you show everything on your screen. Window lets you share an open window on your screen, like a browser page.
Method 2: Share PowerPoint Window. If you want only to present your PowerPoint slide deck, it's best to share just that window. Here's how: Click Share and select Window when it's your turn to present. Enable Include computer sound if you have a video or to share and select your presentation from the list.
Microsoft Teams has a robust screen-sharing and presentation tool. You can share your entire desktop screen or a specific application in video calls or conference meetings. We'll show you how to share your screen on Teams for Windows and macOS. Microsoft Teams Presenter Modes Explained Microsoft Teams has three presenter modes: Standout, Side-by-side, and Reporter.
To get started, simply launch a Teams meeting. Then, instead of opening a PowerPoint deck and sharing your screen, unlock the benefits of PowerPoint Live by picking a file under the PowerPoint Live section of the new and improved Share content in Teams. (Note: this new and improved Share content experience is coming soon). Share content in ...
Using the desktop app (installed on your machine), you can share your screen during a meeting in just a few clicks: Once inside the meeting, select the Share icon (rectangle with an arrow) in the upper right corner next to the Leave button. When finished sharing, use the same Share button to stop sharing.
If you're leading a presentation and need to share your PowerPoint slides during a Microsoft Teams meeting, here's how: • Once your meeting is active, select...
Learn how to share your screen properly in a Microsoft Teams meeting and avoid common mistakes. Watch this video for the best tips and tricks.
Present your slides. If you're already in a Teams meeting, select Share and then under the PowerPoint Live section, choose the PowerPoint file you're wanting to present. If you don't see the file in the list, select Browse OneDrive or Browse my computer. If your presentation is already open in PowerPoint for Windows or Mac, go to the file ...
Method 1: If you have selected Window mode, you need to stop sharing. Then, select the window you want to share again. Method 2: If you have selected Desktop mode, you can easily switch between ...
Open Microsoft Teams and sign in to your account. Join or initiate a meeting where you intend to share your screen. Click on the "Share" button located at the bottom of the meeting window. Make sure to select the " Screen " option from the menu. If prompted, grant the necessary permissions for screen sharing.
To share an online presentation, you can either share your screen with PowerPoint open on your PC or upload your presentation directly into Teams. There are several options for screen sharing and configuring your PowerPoint files when presenting online. You can choose to display your entire desktop or just a specific application on your PC ...
From the three-dots menu, select "Share." Choose the "Share Screen" option. To include the audio in your screen share, toggle on the "Audio" option. If you're on Android, you will see a "Display Over Other Apps" page. Here, find "Teams" and tap it. Then enable the "Allow Display Over Other Apps" option. If you're on an iPhone or iPad, tap the ...
Method #3: Share PowerPoint Window to Present Your Slides. If you intend to hide parts of your screen, you can simply share the relevant PowerPoint window so that your audience can only view the presentation. During a Live call, click the Share button and select your screen or window to share.
Select 'Allow' to let Microsoft Teams use your camera and microphone. Next, click the 'Share' button in the call. In the pop-up window, choose what you want to share - 'Entire Screen', 'Window', or 'Chrome Tab'. Here you can choose to share a particular tab on your browser instead of the whole browser.
Here is an example of PowerPoint slides in Reading View beside the Teams app on a single screen when shared in a Teams meeting. To stop sharing the window, use the stop sharing button in the Teams control bar. Teams allows you to see participant videos while sharing content. When you are sharing content in a Teams meeting, open the full Teams ...
Present your slides. If you're already in a Teams meeting, select Share and then under the PowerPoint Live section, choose the PowerPoint file you're wanting to present. If you don't see the file in the list, select Browse OneDrive or Browse my computer. If your presentation is already open in PowerPoint for Windows or Mac, go to the file ...
Solution 2: If you want to see participants' faces on the large gallery view during screen sharing as well as the chat. In this case, you need to use both a web browser & MS Team desktop app at the same time to access MS Team, the following approach will be even much better if you have 2 monitors. - Use a web browser to screen share & to see ...
Use a presenter mode. After your meeting starts, at the upper-right corner of Teams, select Share content to choose a Presenter mode and other options. Meeting presenter modes and options. Under Presenter mode, choose the mode that you want. Also, be sure that your camera is turned on. Before starting the presentation, select Customize and ...
Join a Teams meeting. Select Share > Screen or Window, and notice that the new Presenter window appears, showing up to 4 participants and that you can move the Presenter window around on your screen or minimize or maximize the window. If you're sharing your screen or window and have your camera turned on, you can expand the self-video tile at ...