Enjoy 2 months of free hosting with an annual WordPress plan. 30-day money-back guarantee.

How to Change the Author in WordPress (5 Methods)

There are many circumstances in which you might find yourself needing to change the author of a post in WordPress. However, the platform doesn’t make it immediately clear how to accomplish this task.
Fortunately, there are several methods you can use to change, update, and edit the author of a WordPress post. All you need to know is where to look and which strategy is best suited to your particular situation and needs.
In this post, we’ll discuss some of the circumstances that might lead you to attribute a post to someone other than the original author. Then we’ll walk you through five different ways to do so, and explain when to use each method. Let’s get started!
Why You Might Need to Change a Post’s Author in WordPress
While this may seem like a rarely-needed task, changing a post’s author in WordPress may be necessary in a variety of different situations. This is especially true if you run a large, multi-author content hub .
Many content-heavy sites with more than one author consider posts the property of the publication, rather than individuals. If a writer chooses to leave your site for any reason, you may want to change their posts’ author to the name of a content creator who is still associated with your site.
Similarly, a change in user status may warrant updates to a post’s author. If your screening process involves initially publishing posts under an editor’s name, but you eventually decide to bring the writer on board, you might want to attribute the posts to their creator after the fact.
In other cases, you may want to remove or hide author names altogether. This can give your site a more cohesive identity, as your posts will appear to come from a single source. Plus, single-author sites can benefit from less-cluttered looking posts when the author names are invisible.
Finally, there may be times when you need to change an author’s display name in WordPress. Whether they have undergone a name change, wish to publish their posts under a pen name, or something else entirely, this is a courteous way to respect your authors’ preferences regarding how they’re presented online.
As you can see, the need to change a post’s author in WordPress comes up more frequently than you might expect. Learning how to address all of these situations will help your site run smoothly, and better equip you to maintain its identity and presentation.
How to Change the Author of a Post in WordPress (5 Methods)
Just as there are many reasons you may need to change a post’s author in WordPress, there are also many ways to accomplish the task. Below we’ll cover five methods and discuss the situations they’re each best suited to.
If you like, you can use the following links to jump directly to the section you’re most interested in:
- Change a post’s author to another existing user
- Add a new author and assign existing posts to them
- Remove or hide the author name on your WordPress posts
- Update an author’s display name in WordPress
- Bulk change post authors on your site
1. Change a Post’s Author to Another Existing User
If you’re using the new WordPress Block Editor , changing a published post’s author couldn’t be easier. First, access the post by navigating to Posts > All Posts and clicking on the relevant title.
In the post editor, select the Document tab in the sidebar. Under the Status & Visibility heading, you should see Author followed by a drop-down menu:

From here, you can select the name of any author with an existing account on your WordPress site. It’s important to note that you cannot create a new author from this screen – we’ll cover how to do that later in this post.
Once you’ve selected the new author’s name from the drop-down menu, select Update to make the change live:

If you’re still using the Classic Editor , the process will look a little different. First, you’ll need to expand the Screen Options menu above the editor:

Under Boxes , select the checkbox next to Author :

Then scroll down to the bottom of the editor. Here, you’ll see that there’s now a drop-down menu similar to the one in the Block Editor:

Select the name of the post’s new author, and then click on the Update button to make it official:

Regardless of which editor you use, you can also change a post’s author using the Quick Edit function in the Posts list. Simply select the Quick Edit option under the post’s title, and then choose the new author from the relevant drop-down menu and click on the Update button:

This method works well if you have a single post you need to reattribute because the original author left your site, or you otherwise have reason to credit a different existing user for the post. Changing a post’s author to a new user, on the other hand, will require a few extra steps.
2. Add a New Author and Assign Existing Posts to Them
In WordPress, you can only attribute a post to an existing author. In other words, there’s no way to create a new author for a post from either of the content editors.
So, let’s say you’re bringing in a new Contributor or Author , and you wish to more accurately attribute posts they’ve written that were published under the name of an Editor or Administrator . You’ll first need to create a user account for the new writer .
It’s worth noting that if you allow frontend user account creation, the post’s new author may already have an account. However, you’ll still need to follow these steps to give them the proper permissions, in order to credit them on their posts.
To handle this task, you’ll need Administrator status on your website. If you’re not a site Administrator , you’ll need to contact one to carry out these steps for you.
Then, navigate to the Users area of your WordPress dashboard . If you’re creating a new user, click on the Add New button at the top of the screen. If you’re editing a user’s permissions, you can simply select Edit beneath their username:

For new users, fill out the required fields and any others you wish to include. Make sure their role is set to Author or Contributor , depending on which is more appropriate:

To edit a user account created on the frontend, you can simply change their role by scrolling down to the relevant drop-down menu on the Edit User screen:

In either case, make sure to save your changes. Once the user has been added and has the proper role, you can attribute posts to them as described in the first method above.
3. Remove or Hide the Author Name on Your WordPress Posts
In some cases, it makes more sense to leave the authors’ names off of your WordPress posts. If you are the only author, removing the name eliminates redundancy and makes your posts less cluttered.
As for multi-author sites , leaving out authors’ names minimizes individuality on your site. You’ll present a more cohesive identity for your site and brand, which could be beneficial in business blogs where you want readers to see your content as originating from the company rather than specific writers.
There are two ways to go about hiding author names. To manually remove author information from your posts, you’ll need to edit your site’s theme . Navigate to Appearance > Customize in your dashboard, and then scroll down to the Additional CSS area of the Customizer :

In the field provided, you can add the following code :
If that doesn’t do the trick, you can also delete your theme’s metadata code . However, the location of this information varies from theme to theme . You may need to contact the theme’s creator in order to find it. Even then, editing theme files directly is always risky .
Instead, you might want to consider using a plugin that can remove metadata such as author names from your blog posts without touching a line of code. WP Meta and Date Remover is a sound option if you choose to take this route:

Once you’ve installed and activated the plugin , all you have to do is choose whether to hide meta information from the frontend, the back end, or both. Save the settings, and you’ll have a site that appears to be crafted by a single author, even if it isn’t.
4. Update an Author’s Display Name in WordPress
In some cases, what you really need is not to change a post’s author name. Rather, the user who wrote the post in question may simply wish for the posts attributed to them to display a different name than the one that’s currently listed.
This may occur in a variety of situations, including:
- If you want to display a full name instead of a username, to make your posts look more professional.
- When an author has legally changed their name and wants to update their posts to reflect that.
- Instances where an author has decided to use a new name for their posts on your site, in order to maintain consistency across content platforms or to differentiate between them.
- Cases in which you or an author wishes to use a pen name for their posts.
These scenarios warrant a change to the user’s account, rather than to the posts themselves. You can provide the instructions below to any user wishing to make a change to their name or follow these steps yourself for any other user’s account if you have Administrator status.
Access the user’s account settings, by navigating to Users in your WordPress dashboard. Under Name , you’ll see the author’s username as well as fields for their first, last, and nickname:

Fill in or change whichever of these fields you like (although you can’t change your username from this page. Here’s how you can change username .). Then, use the drop-down menu beside Display name publicly to select either the username, nickname, first, last, or full name.
Don’t forget to save your changes afterward. This will automatically change the author’s name on all of their posts, using the new display name instead. Often, updating the user’s profile can be the most efficient way to change a post’s author.
5. Bulk Change Post Authors on Your Site
Let’s say you have a situation similar to the one we described in Method #1, i.e. an author has left your site and you wish to reassign their posts to someone who still writes for you. However, instead of a single post, the ex-user has several.
While you could change the author for each individual post your previous contributor left behind, it’s much more efficient to use WordPress’ bulk editing capabilities. This way, you can change the name across all relevant posts with the click of a button.
To do this, navigate to your Posts list in WordPress and select the checkbox next to each of the posts you need to attribute to a new author. Then select Edit from the Bulk Actions drop-down menu:

This will open a window much like the one you see when using the Quick Edit function:

Select the appropriate name from the Author drop-down menu, and then click on the Update button. This will update the name of the author on all the posts you selected and make the changes live on your site:

As with the first method, this will only work if you’re attempting to attribute the posts to an existing author. If you want to add a new user to take over the former user’s posts, you’ll first need to follow the steps in Method #2 to create a new user account with the appropriate role.
Additionally, you can’t select multiple authors for the posts you’re bulk editing. So if you want to divide a former contributor’s posts among more than one user, you’ll need to bulk edit the relevant posts for each new author.
How to Change the Author Archive Slug in WordPress
Before we wrap things up, let’s talk about one more tangential aspect of changing authors in WordPress. Sometimes, instead of switching the actual author name, you might just want to change the author ‘slug’ that shows up in the URL for their archive page:

To do this, you can use a free plugin called Edit Author Slug . After installing and activating the plugin, head over to Users > All Users and open up the editing interface for the user you want to work with. Then, scroll to the bottom and find the Author Slug options:

Enter your desired author slug into the Custom box, and then click on Update User . The plugin will automatically update all links pointing to that author’s archive page, using the new slug.
You can also change the default base for your site’s author slug by going to Settings > Edit Author Slug . Enter your desired base into the Author Base box, and select Save Changes at the bottom of the page:

Just be aware that doing this will change every single author URL on your site. This could affect your Search Engine Optimization . As with any time you change your WordPress site’s URL structure , it’s a good idea to implement redirect rules if you change the default base author slug.
There are a variety of reasons why you may find yourself needing to change the author of a post in WordPress. There are also many ways to do so, which can present its own challenges. You’ll need to determine which method is the best choice for your situation.
To help you decide, we’ve looked at five different routes you can take to update an author’s name for one or more posts in WordPress:
- Change a post’s author to another existing user.
- Add a new author and assign existing posts to them.
- Remove or hide the author name from your WordPress posts.
- Update an author’s display name in WordPress.
- Bulk change post authors on your site.
Related Articles

8 Best Headline Analyzer Tools Compared (Deep Dive into How to Use Them)

19 Proofreading Tips for Bloggers (Write Better Content)

5 Things More Important for Your Content Than Content-Length
How to Add a Professional Bio in WordPress with About Author
Having professional bios or author information displayed in WordPress can be very important. It allows you to showcase an author and gives them credit for the work that they have done. This is handled several ways in WordPress, one of which is by using the About Author plugin.
There are a number of different ways to display author information in WordPress. You can use Gravatar , another WordPress authors plugin, or build full bio pages from scratch using the WordPress editor.
Today, I am going to show you how to use a smooth plugin in order to fill out display detailed author profiles on any WordPress post or page.
Why Display Authors in WordPress?
Displaying authors in WordPress has a few different benefits. Not only are you properly giving credit to the author of the post, but you are also allowing them to get their name and information out there for readers to see.
Oftentimes, website owners who hire writers to write content will allow them to submit an author bio that includes things like:
- Website URL
- Social Media Profiles
- Links to Content
Of course, these are just some examples of what can be included in an author’s bio. More complex author bios in WordPress may include a full page of information, background, photos, work history, and much more.
You can create these bios using several different methods as described above. However, today I am going to show you how to do it using a plugin. Let’s dig right in.
About Author

About Author allows you to build full author profiles and display them anywhere on-site using shortcodes that are generated each time you build a profile.
You can build small, compact profiles and show them at the end of articles. However, you can also build full, stylish profiles and add those to any post or page as well.
The plugin allows you to use multiple shortcodes on multiple posts and pages. So, if you want to list several author profiles in one spot, or on one page, then this plugin has you covered. You can also use multiple widgets to display authors in a sidebar or other widget area of your WordPress website.
It is lightweight and will not slow your website. The plugin has quite a bit of functionality built-in. Some of that includes features like:
- Complete Author Profile
- Author Name
- Description of Author
- Author Website
- 2 Author Templates Built-In
Simply put, this plugin gives you everything you need to create customized bios with tons of features and easily display them on your WordPress website.
Note: The plugin does have a pro version. It does include quite a bit more functionality. If this is something you are interested in, then feel free to give it a look. However, the tutorial below is based on the free version of the plugin.
How to Add a Bio in WordPress
Step 1: install and activate the plugin.
In order to use the plugin, you first need to install and activate it. You can do this by jumping over to the Plugins page of the WordPress admin dashboard.
Simply use the search field provided on that page and search the plugin by name. Once you see it pop up, install and activate it from there.

Step 2: Go to Author Settings
Once the plugin has been installed and activated, you need to access the main settings page before you add your first bio in WordPress.
To do this, click on About Author > Author Settings, located on the left-side menu area of the dashboard.

You see that this is now an available option for you after the plugin has been installed and activated.
Step 3: Configure the About Author Settings
At this point, you should be on the main settings page for the plugin. There are just a few things to configure how you want.

Go ahead and make your author selections and template layout configurations here. These are pretty basic and simply lay the groundwork for using the plugin.
Click the “Save” button when you are finished to apply all the changes.
Step 4: Add a New Author
Now you are ready to add a new author. This will be the first of many you add. Click on the “Add New” tab that is located on the left-side menu under the main plugin menu area.

This takes you to the author bio page where you can add a new bio and create your first shortcode to display it.
Step 5: Configure Your Author Bio
You can see that there are several great options available to you on the author bio editor page. Let’s get started.
First, add a bio title and select a template.

Now, scroll down a little and select the profile image you want to use, along with the layout.

Scrolling down a little more will take you to layout settings, color options, and name text settings.

Now go ahead and add the Website Text and Description Text for the bio. This is where a lot of the meat of the bio is handled.

Almost finished.
Scrolling down a little more, you will see the social link settings, colors, and size. Go ahead and fill those out appropriately based on what you want to be displayed.

Finally, if you know how to add custom CSS and want to do that, you can use the box at the bottom of the page to do so.

When you are satisfied with how you built your bio, go ahead and publish it to make it live.
That’s it! You have built your first bio. Go ahead and repeat this process as many times as you want to create other bios.
Note: All of your bio shortcodes that are generated will be house under the “All Shortcodes” section of the plugin.

To add a bio anywhere on the site, simply copy and paste the relevant shortcode where you want that bio to display. Easy as that.
What Additions Does About Author Pro Plugin Add?
As I stated above in a brief note, this plugin does have a pro version. The free version does have plenty of options, as we showed above. However, in many cases, the pro version may give you a little something extra that is important to what you are doing.
The main additions to the pro version of this plugin include:
- A Responsive Design
- 10 Author Templates
- 12 Social Media Profiles
- Over 500 Google and Generic Fonts
- Multiple Author Image Layouts
- Tons of Display Options For All Content
- Multiple Widget Display Options
- Live Preview in Admin Dashboard
So, if these are some things you feel are important, then go ahead a take a quick peek at the pro version.
Final Thoughts
Displaying author profiles and bios does not have to be a difficult process. There are multiple solutions, but the About Author plugin makes it simple, easy, and fun. You can build as many author bios as you want and easily display them on a post or page using a generated shortcode .
I hope this tutorial showed you how easy it is to add a professional bio in WordPress using the plugin above. It has everything you need in one place to properly display content.
Have you tried building author bios using different methods? Did you find that using the editor alone was more difficult?
Related Posts
How to install wordpress – the complete guide to wordpress installation, how to create a new category and move a post to a different category in wordpress, leave a comment cancel reply.
Your email address will not be published. Required fields are marked *
This site uses Akismet to reduce spam. Learn how your comment data is processed .
WordPress Author Pages: How to Make Custom Author Pages

WordPress author pages: they’re essential for website contributors to get credit for work, and publications use them to add a smiling face to their content. Author pages link from author bios (at the end/beginning of blog posts) and often display information about the contributor, their photo, and which articles they’ve written on the website.
In this article, we break down the true definition of an author page , clear up 🧹 some confusion on what some people think are author pages, and walk you through steps 👣 on how to add WordPress author pages .
What’s an author page?
In contrast to an author website , author pages are not full websites for novelists and writers, but rather, simple informational segments of any website that has a blog.
Author pages are:
- Individual pages that display information about the author of a post.
- Often linked to from author bios in blog posts:

- Filled with some background about the author, maybe a photo, and a list of articles for which they contributed:

Here are some of the benefits of WordPress author pages:
- Contributors can quickly find their past work and put it in a portfolio.
- Articles appear more credible and from a real person, seeing as how author pages can showcase a photo and description of the author.
- Brands seeking writers can find posts they like, then click through to the author page to find background and contact information on that contributor.
- Site visitors can feel more confident in what they’re reading, seeing that it’s from a writer with industry experience.
Author pages vs. author galleries
Many people confuse author pages with author galleries.
An author page, at least in terms of how WordPress defines it, is a single page meant for one author’s information and blog archives. You can set global styling so that every author on your website has a place to list their recent blog posts, author information, and even social media links:

An author gallery (or listing) page, features multiple contributors from one website, as a sort of showcase of all writers and content creators for visitors to click on and view more information about:

Theoretically, an author gallery would lead to author pages after visitors click on the author links.
Overall, WordPress author pages help all parties, making them ideal for improving the credibility and humanization of blog posts. And they’re easy to implement! So, keep reading to learn all about how to make WordPress author pages.
How to make WordPress author pages
By default, WordPress provides author pages, but they’re limited to whatever design was included with your current theme.
For instance, you may have something simple like this, where you see an author name, bio, and list of articles:

Or you may see nothing at all, as many theme developers leave out author pages altogether.
So, there’s a good chance you want at least some creative control over the author page, or you want to add one since your theme doesn’t have any.
You can use one of these methods to add/customize a WordPress author page:
Method 1: Use a plugin (easy)
- Method 2: Use a page builder with custom archive templates (easy)
Method 3: Manually create an author page in your theme files (hard)
Before anything.
Before attempting any of these methods, make sure the user information for at least one author is filled in. This way, you can test to see if elements like photos and descriptions appear correctly when customizing the author page.
To complete user information, go to the Users tab on WordPress. Select a user, then fill in important fields like:
- Display Name Publicly As
- Website (some themes show this in the author page):

- Biographical Info
- A Profile Picture:

Finally, click the Update Profile button.
⚠ Note: If you have multiple contributors to a blog, you must have each of them complete their own User profile information; only then will the content show on their author page.
One way to customize elements of your WordPress author page is with a plugin. There’s no specific author page plugin, but several membership plugins allow you to create rich profiles for each of your contributors.
Install the plugin
For this method, we’ll use the Ultimate Member plugin. To begin, download and install the plugin to your WordPress site:

Author(s): Ultimate Member
Current Version: 2.8.6
Last Updated: May 22, 2024
ultimate-member.2.8.6.zip
Create core pages
After activation, Ultimate Member displays a button at the top of the dashboard to Create Pages . Click on that to generate user profile pages (so you don’t have to do it manually):

This brings you to the automatically generated pages, which you can leave as they are.
The User page (with the User selection) is designated as the author page, so all of your WordPress author pages will now look a little different:

Access author page
To view the changes, go check one of your current author pages (by clinking through the author’s name on a blog post). You’ll now see a module from the Ultimate Members plugin with author information:

It may show up in a slightly different area depending on your theme:

Customize author page content
Some of the information typed into the WordPress User page may appear, but you can better customize the author page by clicking on the Gear icon. After that, choose Edit Profile :

Here, we recommend that you:
- Upload a profile photo
- Add a cover photo
- Customize the author bio
Click Update Profile when you’re done:

The results are instantaneous, but you may notice that there’s an empty space below the bio and author menu, where it says, “Your profile is looking empty.” To add content to that section, move to the next step:

Add content to author page
Go to Ultimate Member > Forms in WordPress, then select the Profile Form button.
This is where you add extra fields that authors can fill out to complete their author pages.
Click the + box underneath the first tab:

Decide from whichever fields you want to add. Some ideas include:
- Website URL
- Email Address
- Social media links like Facebook, Twitter, and LinkedIn:

Once you’ve inserted the new fields , you’ll see them in the form builder.
Click Update to proceed:

Now, when an author navigates to their author page, they can click on the Gear icon and choose Edit Profile to fill in the new fields:

As you can see, each author page is now customizable with Website URL, Facebook, Twitter, and LinkedIn fields:

After clicking Update Profile , the author page shows links to the fields:

Finally, to view posts from that author, the user simply has to click on the Posts tab (pencil icon) for a list of post archives:

Method 2: Use a page builder (easy)
Many page builders plugins , like Elementor , Divi, and Brizy , let you fully customize every detail of your WordPress author pages by using Blog Archive templates. The Blog Archive templates are simply lists of past blog posts under a certain author. You can then add more details with the drag and drop editor.
👉 For this tutorial, we’ll use Elementor. Keep in mind, however, that you must have the Pro version of Elementor for this to work.
With Elementor Pro installed, go to Templates > Theme Builder in the WordPress dashboard.
The Theme Builder shows several templates to choose from. Pick the Archive tab, and click on one of the Add New icons:

Elementor offers a large collection of pre-made templates for archive pages. If you’d rather start from scratch, simply click on the X-out button to get rid of the template library.
Otherwise, select a layout that’s suitable for your author pages:

To start building the WordPress Author page, search for the Author Box module in the Elements section of Elementor. Drag and drop the Author Box module wherever you want it to appear on your author page:

Make sure you set the Source as Current Author .
Other than that, you can customize the Author Box however you please.
Consider including:
- Profile pictures
- Links to websites
- Biographies:

If you selected an archive template, you should already see the list of this author’s blog posts underneath the Author Box . If not, search for the Archive Posts element and drag it onto the page:

Click the Publish button when you’ve finalized the design of your author page.
Before the author page gets published, Elementor displays a popup window to specify where you want to display the template.
Click Add Condition , then select Author Archive . To activate this template as the Author Archive page for every author on your site, pick the All option.
Finally, click Save and Close to finish the process:

Now go and check one of your author pages to see the results! 🤩 You may have to go back and edit some of the design to get it just right. Otherwise, your author pages are ready to go, as long as every author completes their User page on WordPress:

This method offers complete control over the styling of the WordPress author page, but it’s limited to those who can handle editing theme or child theme files .
👉 To use this method, follow these steps:
- You must first connect to your website’s server with an FTP Client like FileZilla .
- Once connected, use the FTP Client to navigate to /wp-content/themes/(thenameofyourcurrenttheme)/ .
- Create a file called author.php in the current theme folder. (Use the current one if there’s already an author.php file):

Here’s some code you can paste into the new author.php file, which adds a nice author box and the author’s written posts to the page:

The main reason for using this method is to have full control over the styling. So, you can go to Appearance > Customize > Additional CSS to add CSS code for the Author page.
Here’s some example CSS you can try (feel free to customize it):
Create your WordPress author pages today 🚀
In this article, we explained:
- What a WordPress author page is, and why it’s so important for contributors, site owners, and site visitors.
- That WordPress automatically comes with built-in author pages, but there’s limited customization, and many themes change their display.
- How to use a plugin to customize the WordPress author page.
- Using a page builder (like Elementor) to customize the WordPress Author page.
- Manually creating and editing an author page with custom code in the theme files.
Do you have any questions about any of these methods on how to make a WordPress author page? If so, share your thoughts in the comments!
By Joe Warnimont
Themeisle contributor.
Joe Warnimont is a seasoned writer with more than 10 years of experience covering topics such as WordPress, web hosting, eCommerce platforms, and social media. His educational background paved the way for a multifaceted marketing and web design career at talent agencies, production studios, and a software company specializing in golf courses. Joe resides in Chicago, writing for tech brands and publications like Themeisle and HostingAdvice.
Updated on:
You can check also:.

WordPress Redis Cache: Step-by-Step Tutorial to Set It Up

How to Import Amazon Products to WooCommerce in 4 Steps

How to Delete WordPress Site Permanently (All Scenarios)

Dynamic Content in Gutenberg (Block Editor): How to Get It Easily

How to Backup a WordPress Site for Free (In 3 Steps)

How to Fix “The Link You Followed Has Expired” WordPress Error

How to Download WordPress: A Complete Beginner’s Guide

Elementor Not Loading? 8 Ways to Fix It Immediately

A DNS_PROBE_FINISHED_NXDOMAIN Fix That Works

How to Hide Featured Image in WordPress (3 Easy Methods)

How to Fix “Updating Failed. The Response is Not a Valid JSON Response”

How to Add Custom JavaScript to WordPress (3 Methods)

How to Increase WordPress Memory Limit: 4 Easy Methods

How to Fix XAMPP Error “Apache Shutdown Unexpectedly”

HTTP 500 Internal Server Error: How to Fix It in WordPress

What Is Gated Content (Real Examples) and How to Create It on WordPress

How to Switch From Squarespace to WordPress in 2024 (7 Steps)

How to Change Font in WordPress (Works in All Themes)
Or start the conversation in our Facebook group for WordPress professionals . Find answers, share tips, and get help from other WordPress experts. Join now (it’s free)!
- Privacy Policy
Most Searched Articles
10 best free blogging sites to build your blog for free in 2024: tested, compared and reviewed.
Starting a blog without spending a penny is absolutely possible, and you’re in the right place to find out how to do it. Over the years, I’ve experimented with dozens of different blogging sites and tested how they perform for various purposes ...
How to Create and Start a WordPress Blog in 15 Minutes or Less (Step by Step)
Ready to create a WordPress blog? You've made an outstanding choice! Learning how to start a blog can be your path to an exciting new adventure. Lucky for you, WordPress is an excellent tool you can use for that. It's free, user-friendly, powerful, ...
The Complete Personal Blog Guide: How to Start a Personal Blog on WordPress
In this tutorial, we will lead you through all the steps you need to take in order to start a personal blog that is cheap, effective, good-looking, and that will set you up for future success. This is your ultimate guide to a personal WordPress blog ...
Handpicked Articles
How to make a wordpress website: step-by-step guide for beginners.
Even though it might not seem like so at first, knowing how to make a website from scratch is a must-have skill for today's small business owners. The following guide takes you by the hand and shows you all the steps to getting the job done with ...
7 Fastest WordPress Hosting Companies Compared (2024)
The web host you choose to power your WordPress site plays a key role in its speed and performance. However, with so many claiming to offer the fastest WordPress hosting out there, how do you decide which company to use? In this post, we'll look at ...
How to Install XAMPP and WordPress Locally on Windows PC
Installing XAMPP and WordPress to set up a local development site is a smart move when you need a private space for testing or experimenting. XAMPP allows you to host a website right from your own Windows PC. Once installed, launching a new ...
- Free Themes
- Premium Themes
- Free Course
How to Add an Author Bio to Your WordPress Posts

Disclosure: This post may contain affiliate links. Purchasing a product through one of these links generates a commission for us at no additional expense to you.
Give yourself some credit!
A bio is an excellent addition to your posts and will boost your personal brand and build your influence online.
If you regularly have guest posters, an author bio box after the content is a great way to reward them with a place to promote their own offers and social profiles. It also makes it clear who wrote each post on your site.
In this post, you’ll learn how to add an author bio to the posts in your WordPress site using the Simple Author Box plugin.
How to add an author box
If you’d rather watch a video than read the instructions, watch this video tutorial from our Youtube channel:
Subscribe to Compete Themes on Youtube
The first step is to install and activate the Simple Author Box plugin.

What’s great about Simple Author Box is that it’s easy to configure, and the templates look nice with most themes.
To get started, search for “simple author box” via the Plugins menu to locate and install it.

Once you install the plugin, you’ll find a new Simple Author settings menu added to your admin dashboard.

In the settings menu, you can see a preview of how the box will look. It’s using fake filler content by default, including all of the available social icons. Up top are links to edit your profile, change your avatar, and edit the social icons.
Below the author box preview, you’ll find settings to control where it displays on your site and customization options for the colors, typography, and general appearance.
Here’s a close-up of the display settings:

And here’s a quick look at the color options available:

Before you adjust any settings, the author box already looks good.

Style options are nice, but the most important thing to update is the bio displayed in the box.
How to edit your bio
What I like about Simple Author Box is that it doesn’t create its own system for managing bios. Rather, it integrates with the options already built-into WordPress.
To edit the info in the author box, you can visit the Users > Your Profile menu. Scroll down a bit, and you’ll find the Biographical Info section included in all WordPress sites.

While WordPress normally requires you to use Gravatar for your profile image, the Simple Author Box plugin also adds a custom image uploader for your avatar.
You can also see above the social media icons section, where you can quickly add links to any social profiles you’d like to promote in your author box.
Once you’ve entered a custom bio, uploaded a profile image, and added links to your social profiles, your author box will be complete.
Author bio added
While some themes, like Challenger , include an author box, most themes don’t have this feature. In this case, you can easily add an author bio to your posts with a plugin like Simple Author Box.
Once you’ve got Simple Author Box installed, it takes only a few minutes to fill out your profile.
If you want to keep improving your site, follow our ultimate guide on WordPress site customization .
I hope this guide helped you get a beautiful bio displaying on your WordPress website, and thanks so much for reading.
Get a beautiful beginner-friendly theme
Browse our collection of free WordPress themes
Running smoothly on thousands of websites right now.
How To Add an Author Bio Box to Your WordPress Posts
- February 29, 2020
- Tony Teaches Tech

Hey there! Some links on this page may be affiliate links which means that, if you choose to make a purchase, I may earn a small commission at no extra cost to you. I greatly appreciate your support!
In this quick tutorial, you’ll learn how to add an author bio box to the bottom of your WordPress blog posts. This can be something as simple as a short blurb about who you are to introduce yourself to your readers.
By doing this, you’ll increase engagement by automatically linking to other pages on your website.
Install the Ad Inserter Plugin
You’ll need to install the Ad Inserter plugin by Igor Funa . You can also find the plugin from your WordPress dashboard by going to Plugins > Add New > and search for “ad inserter”.
If you are using the GeneratePress theme , you don’t need to install a plugin. Instead, you can add a Hook under Appearance > Elements > Add New Element and paste in the HTML code below.
While this isn’t specifically an author bio box plugin, it does exactly what we need it to do. Plus, it’s smart to limit the number of WordPress plugins you install so your website runs fast. The Ad Inserter plugin allows me to not only add an author bio box, but also insert affiliate disclosures .
After installing and activating, find Ad Inserter in your list of plugins and go to the plugin’s settings page.
Meet the Author Bio Box
Within the large text box on the plugin’s settings page, copy and paste the following code. Modify the title between the <b> tags and your author info between the <p> tags as necessary.
The above code generates a “meet the author” box that looks like this.

The great thing about this chunk of code is that it’s mobile friendly. If necessary, you can also change the max-width value from 623px to whatever your mobile breakpoint is set to. If you’re not sure, just play around with how the author bio box looks on various screen sizes.
Ad Inserter Plugin Setting
Next, we need to configure a few settings to make sure the author box shows after the content of your blog post. There are four setting we need to change according to the screenshot below:

- Rename the block of code to Author bio
- Enable PHP code execution
- Select After content for the insertion type
- Save Settings 1 – 16
Now, you can go to a blog post and see the meet the author box below the last paragraph of your article. You can change where the box shows up by selecting a different insertion location.
Choose Your Headshot Image with Gravatar
The final step is to choose your headshot image. We do this with Gravatar which is built into WordPress.
From the upper-right corner of your WordPress dashboard, click where it says Howdy > Edit My Profile > and in the Profile Picture section, click the link that says You can change your profile picture on Gravatar .
Here, create a Gravatar account with your WordPress admin email address and upload your headshot. It might take a few minutes, but eventually when you refresh your blog post, you’ll see your headshot appear in your WordPress author bio box.
For more cool ways to use the Ad Inserter plugin, check out my tutorial on inserting affiliate disclosures to your blog posts .
If you have any questions about the Ad Inserter plugin or adding an author bio box to your website, let me know in the comments below.
- WordPress Plugin

With a strong software engineering background, Tony is determined to demystify the web. Discover why Tony quit his job to pursue this mission. You can join the Tony Teaches Tech community here .
3 Responses
How to make this for many authors? There are many names and bio
The author avatar/picture is dynamic and will work for multiple authors. A more complete example can be found here https://www.wpbeginner.com/wp-tutorials/how-to-add-an-author-info-box-in-wordpress-posts/
Is it possible to make one word of the text in the affiliate disclosure into a link – to take the reader to the blog disclaimer page? Thank you in advance!!
Leave a Reply Cancel reply
Your email address will not be published. Required fields are marked *
Save my name, email, and website in this browser for the next time I comment.
- WordPress Hosting
- Domain Names
- Website Builder
- Create a Blog
- Professional Email
- Website Design Services
- Course Maker
- Enterprise Solutions
- WordPress Themes
- WordPress Plugins
- WordPress Patterns
- Google Apps
- WordPress.com Support
- WordPress News
- Website Building Tips
- Business Name Generator
- Discover New Posts
- Popular Tags
- Blog Search
- Daily Webinars
- Learn WordPress
- Plans & Pricing
How to Create a Link in Bio WordPress Site That Gives You Total Control

For content creators and creative professionals, organizing your web presence can be challenging. Between your website , newsletter , and social platforms (the list goes on), you need somewhere to consolidate all your content. One place where your audience can find everything you do, on every platform where you’re active.
This is where having a Link in Bio page is invaluable. In this article, you’ll learn:
- Which platforms and tools you can use to create your page.
- How to personalize your page so it’s unique to you.
- Ways to promote your new page and maximize its value.
While these simple websites may seem basic, we’ll go through everything you need to know, including some tips you might not have heard. With a little bit of strategy and creativity, you can not only launch your new page in minutes, but also promote it effectively to reach more people.
In this article:
So … What Exactly is a Link in Bio Page?
Own your home on the web, grow your audience, drive more traffic and engagement, increase your revenue, who uses link in bio pages, what should you add to your link in bio page, why create a link in bio site with wordpress, create your w.link account, preview and launch your site, changing your w.link site design with patterns, examples of link in bio patterns you can use with w.link, changing your background color, link color, and text color, changing your typography, editing link in bio on instagram, editing link in bio on tiktok with a business account, editing link in bio on other platforms, keep your page updated with fresh links, share your link in bio page everywhere you can, get creative with your link button copy, write creative social media bios and post captions, measuring performance in wordpress with jetpack, measuring performance with google analytics, you’re ready to rock with a link in bio site.
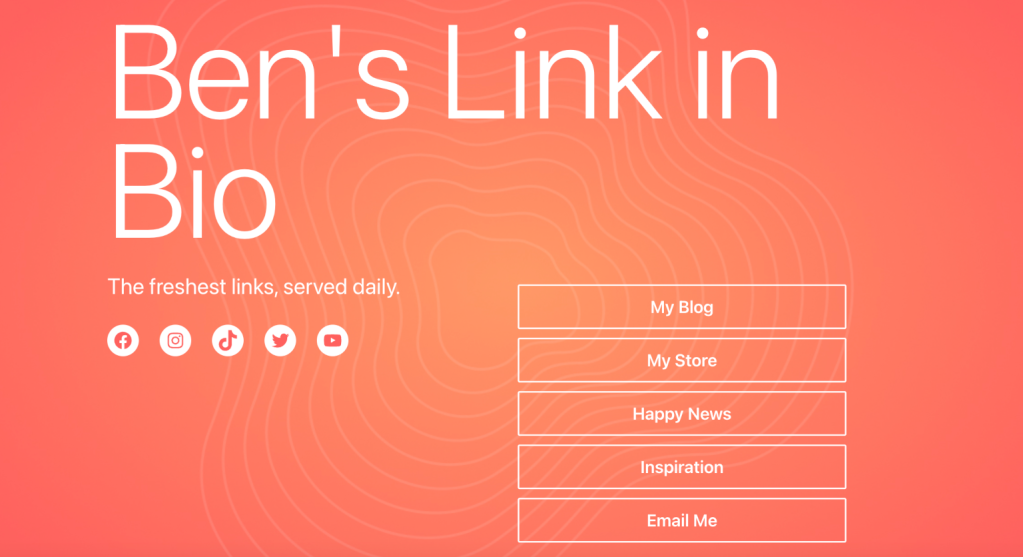
Link in Bio pages are one-page websites where you can promote links to other sites and platforms. The phrase “link in bio” was originally a common reference on Instagram, where links can only be added to the bio field of a profile, and not in individual posts.
Instagram users responded by adding links to their bio and then adding the phrase “link in bio” to post captions, rotating in their newest links. This created the market for “Link in Bio” tools, which allow for multiple links to be added to one single site, which can then be placed in your Instagram bio (and lots of other places too).
Why Do Content Creators Need a Link in Bio Site?
Having a Link in Bio page makes it easy to consolidate your web presence and promote your content in one single location. This makes sharing your work more convenient, but beyond saving time, what does this actually mean for your growth as a creator?
When you create your site with WordPress, you own your site (not a third-party or other social media platform). No matter what happens to your social networks and other platforms, you will always have full control over the content on your site.
Visitors who discover you on one platform might not know you’re active on other platforms as well. For example, if you have a podcast, a newsletter, and a YouTube channel, you could add all three of those links to your page, and cross-promote each channel everywhere. This means more subscribers and followers, everywhere that people can find you.
Growing your audience also means growing your traffic and engagement. Every post you create and piece of content you publish becomes more valuable as you’re able to reach more people (and you can easily prioritize your most important links first).
If you’re monetizing your content, then having a larger audience and more traffic naturally leads to more revenue. You can also add donation links or an online store.
All kinds of content creators and creative professionals use Link in Bio pages to promote themselves. Here are some examples (see if you can find yourself):
- Videographers
- Newsletter Writers
- Influencers
- Entrepreneurs
- Anyone creating content they want to share with the world
If you fit one (or even more) of these categories, then a Link in Bio site can be an essential tool to maximize the value of everything you’re creating.
Links may seem like an obvious answer. But what type of links? Here are some ideas:
- Your latest content that you’ve published.
- Top-performing posts that you want to promote.
- Signup pages on other platforms.
- Limited-time content.
- Partner content and products you’re promoting.
There are some other items to consider too, including:
- Profile photo that captures your personality.
- Short and sweet bio summarizing who you are and what you do.
Simple enough, right?
Choose a Link in Bio Page Builder
The first step is deciding which tool to use. There are several on the market, such as:
- w.link (this is our Link in Bio page builder, and we think you’ll like it a lot)
- ContactInBio
- Campsite.bio
We’ll be referring to w.link for demonstration purposes throughout the rest of this article, but scope out your options and choose one that speaks to you.
w.link sites come with the full power of WordPress. This means you’ll enjoy the following benefits:
- You own your site and your content.
- You can own your own domain and create a brand under it.
- You have access to amazing designs tailored to use for Link in Bio.
- Free analytics for site traffic, locations, and more to optimize your reach.
- No code needed , easy setup.
- Unlimited links to support your needs across platforms.
- Mobile and web-optimized designs.
- Ability to grow your Link in Bio page by adding an online store, donations, and more.
Create Your Own Link in Bio Page With w.link
Done reading background information? Cool, because we’re not going to make you read any more (but hopefully, it was helpful). Now, let’s build your site by walking through the following steps:
- Creating your account
- Choosing your design
- Adding your personal details
- Picking a domain
- Selecting a w.link plan
- Editing and customizing your site
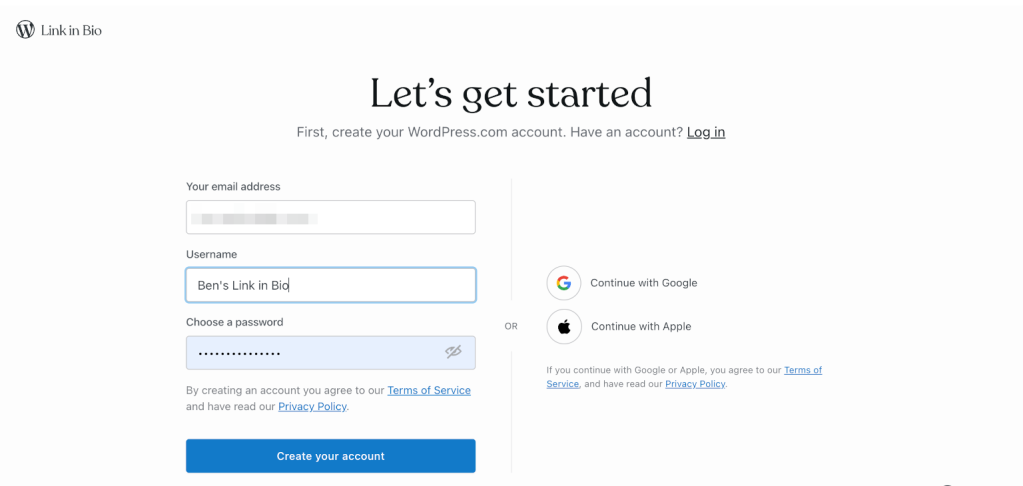
Start here to create your account. You’ll see a page that looks like this (and that three-minute promise is real):

Next, you’ll see a simple account signup page:
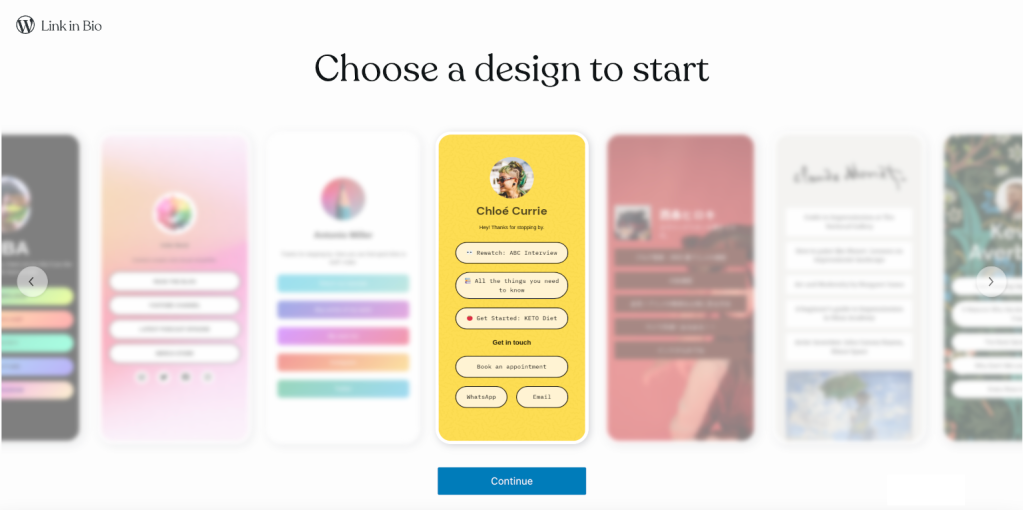
Then, you’ll choose a design to start (don’t worry if you want to change it later; switching designs is easy):
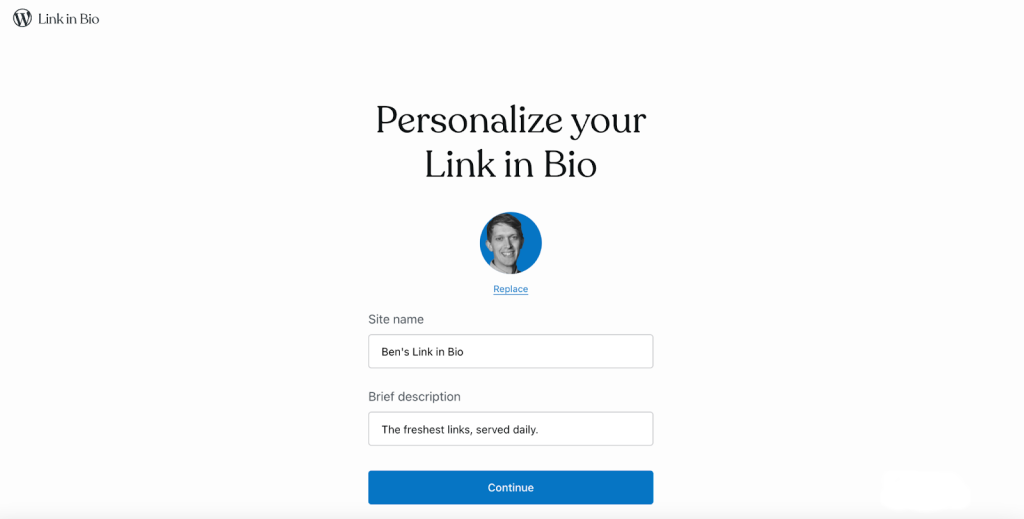
Once you’ve chosen a design, add your photo, site name, and a short description:
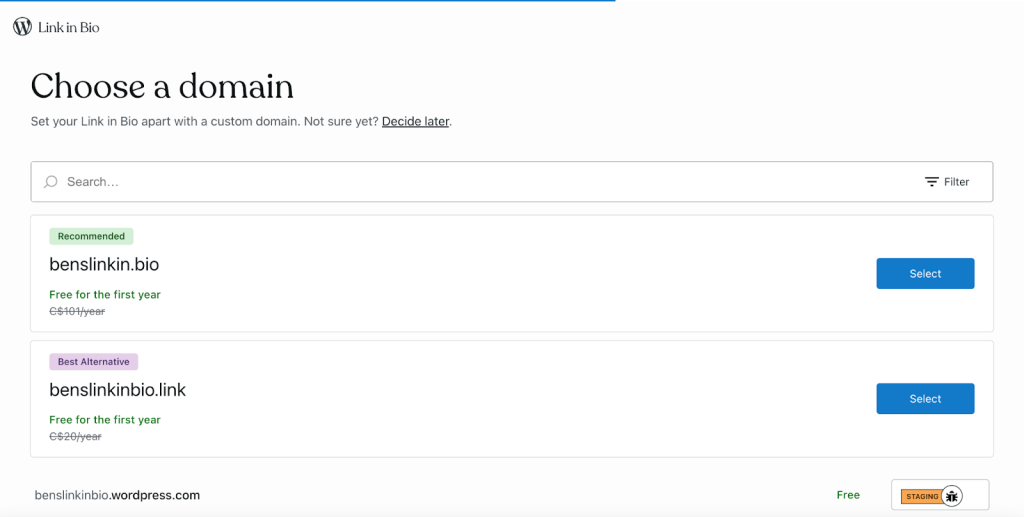
Now it’s time to choose a domain (you can select either a one-year paid domain or a free w.link subdomain):
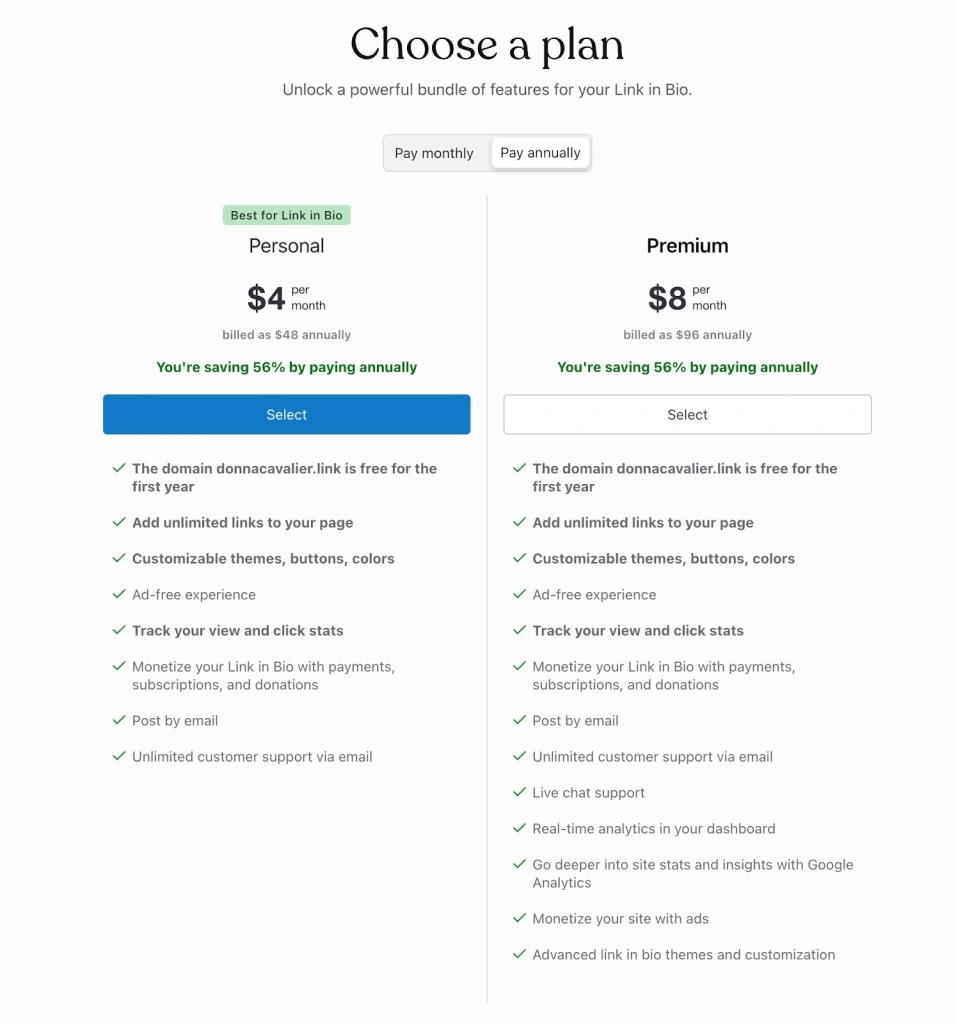
If you choose the Personal plan, you’ll get some awesome benefits, like unlimited links, advanced analytics, monetization features, and more:
Click on “Add Links” to add your URLs:
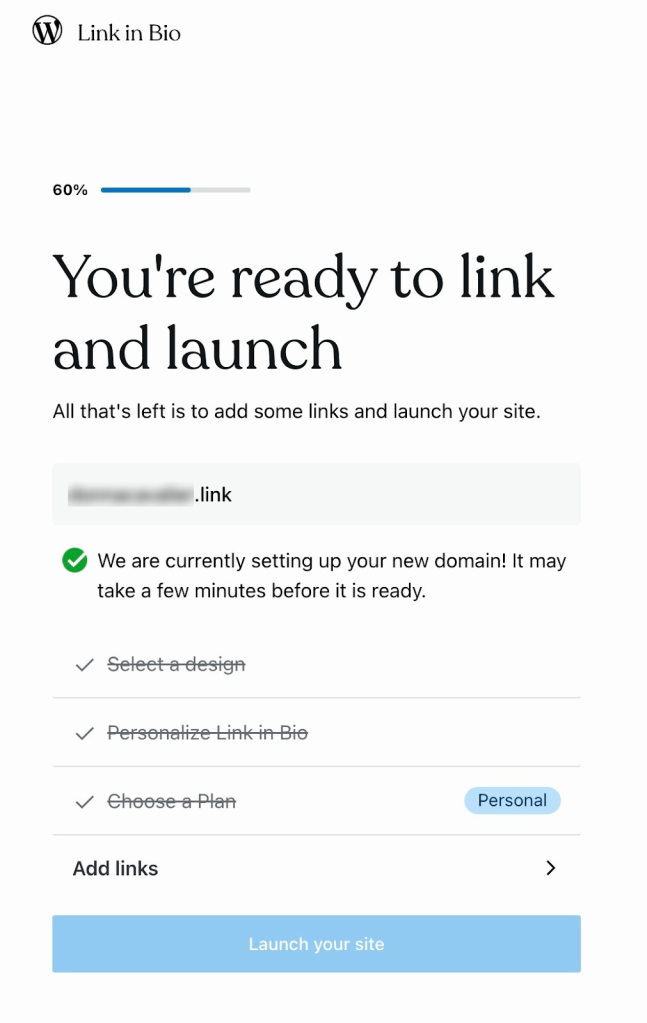
Take a moment to add your links (and preview how your page will look on mobile and desktop). You can fully customize your links and how they’re labeled. Start by clicking on a link block, then clicking on the link icon. repeat this process until you’re happy with your site, then click Save in the upper right-hand corner.
To see how your site looks, click View > View site in the upper right-hand corner. If everything looks good, click “Launch site” above your profile image, then click Launch Site. If you’d like to make some changes, then click Edit Page, or Change Theme to pick a different design. Accidentally closed out the View Site window? No worries. Just find your way back to launch your site (this is where you’ll find the Launch Site button).
w.link sites give you all the power and customization of WordPress.com (and that means you can make your site look exactly how you want it to look). If you’re new to WordPress, you might need a little bit of help finding your way around all the settings and options that are available.
One of the first things you might like to try is changing the overall design and appearance of your site. Fortunately, this is simple to do by selecting a new Pattern (keep in mind that switching designs will require you to re-add your links). Start by clicking on the plus icon in the top left-hand corner of your screen (this button is called the Block Inserter). You’ll then see selectors for Patterns and Blocks appear:
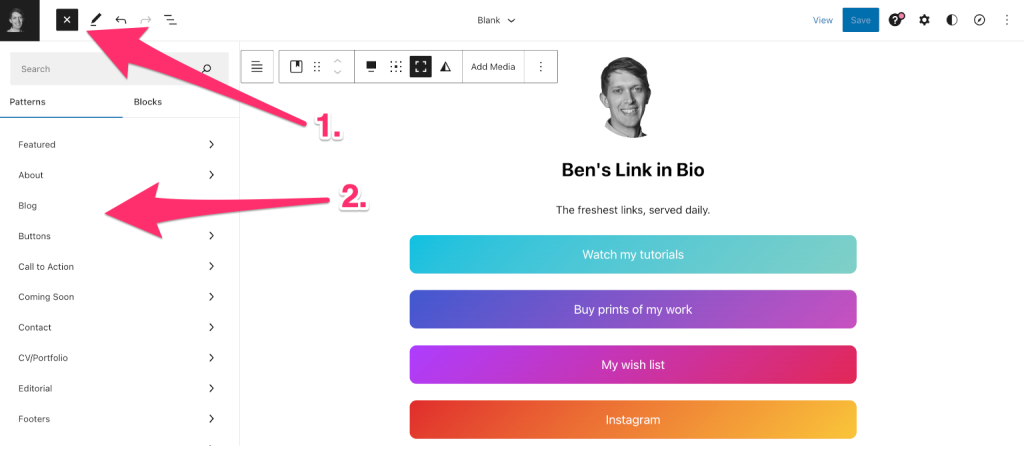
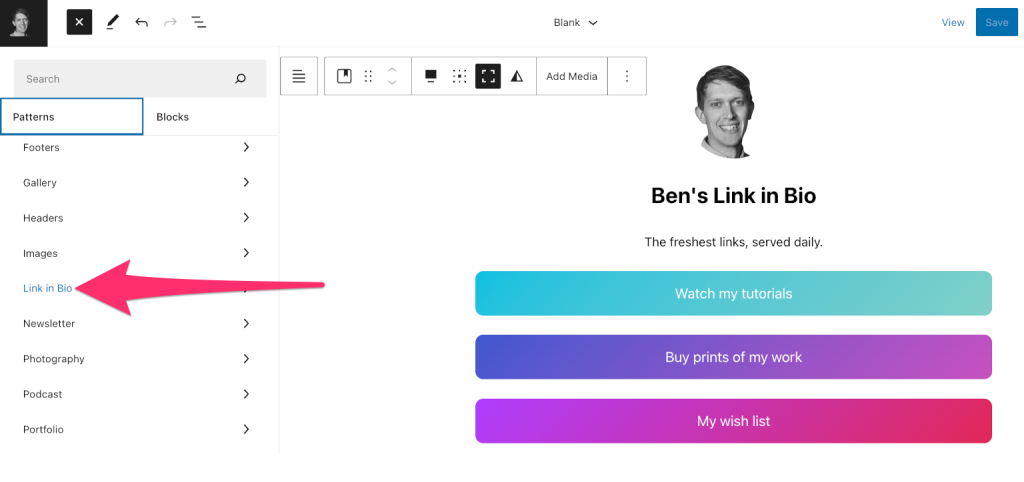
Scroll down under the Patterns column and find Link in Bio:
You’ll see tons of different design options for your site:
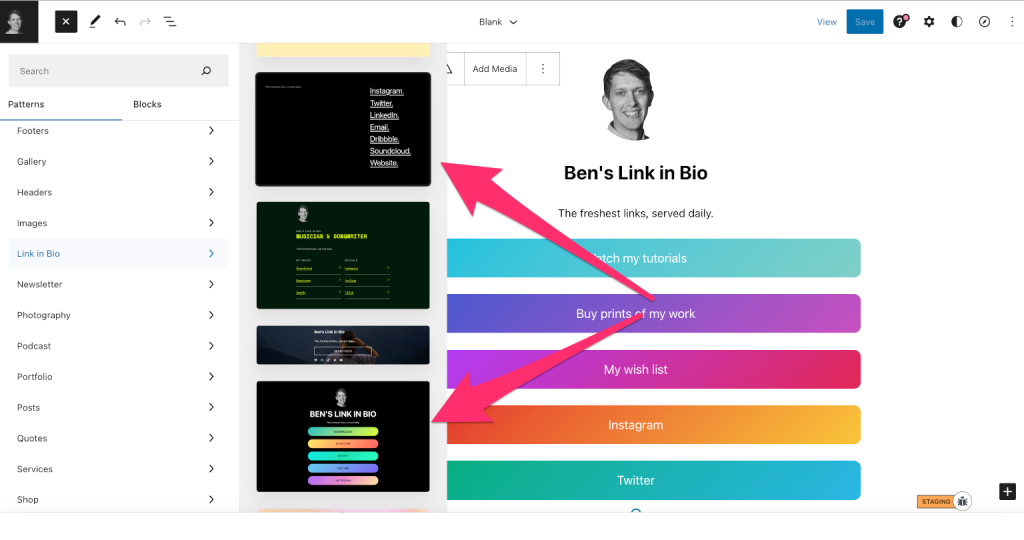
Clicking on a pattern will insert it into your site as a block. This gives you an opportunity to see how the new pattern looks compared to your previous one. If you’d like to use the new pattern instead, click into the block containing your previous pattern, and delete it.
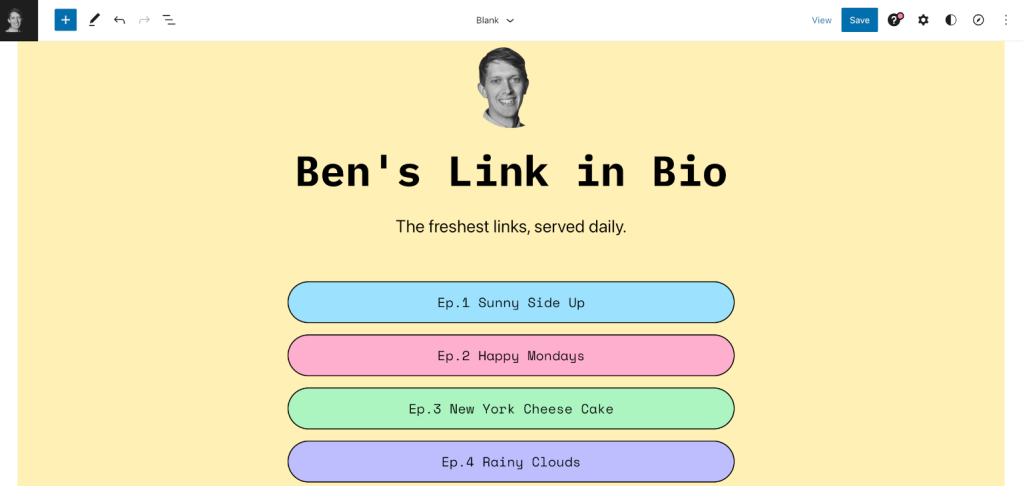
You’ll now have a site with a whole new look (as a quick reminder, you’ll need to replace your links, and it’s best to think of this process as starting over from scratch):
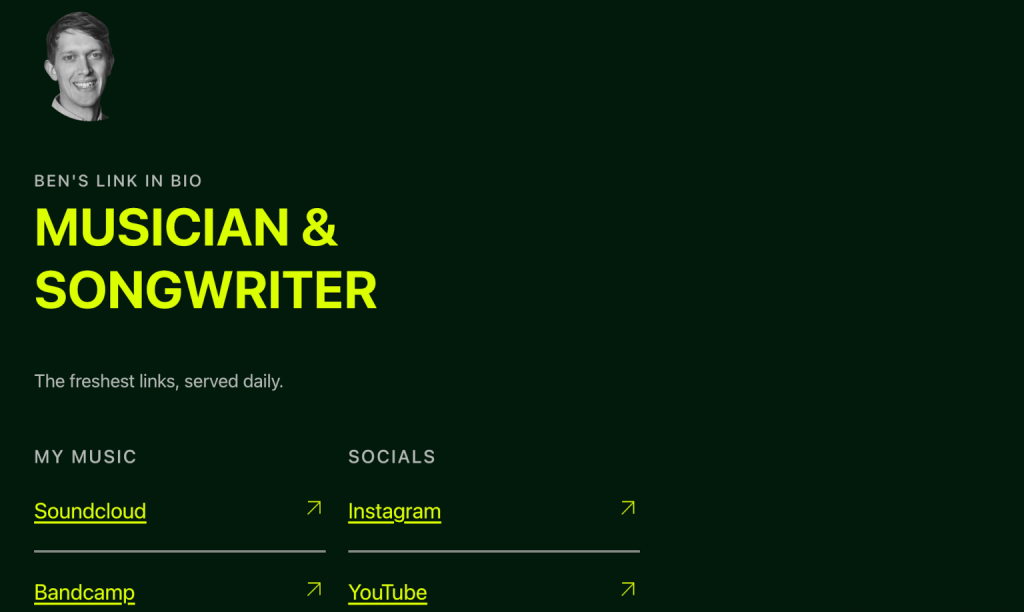
Now that you know how to choose patterns, let’s take a look at some available pattern options. Maybe you’re a musician or songwriter:
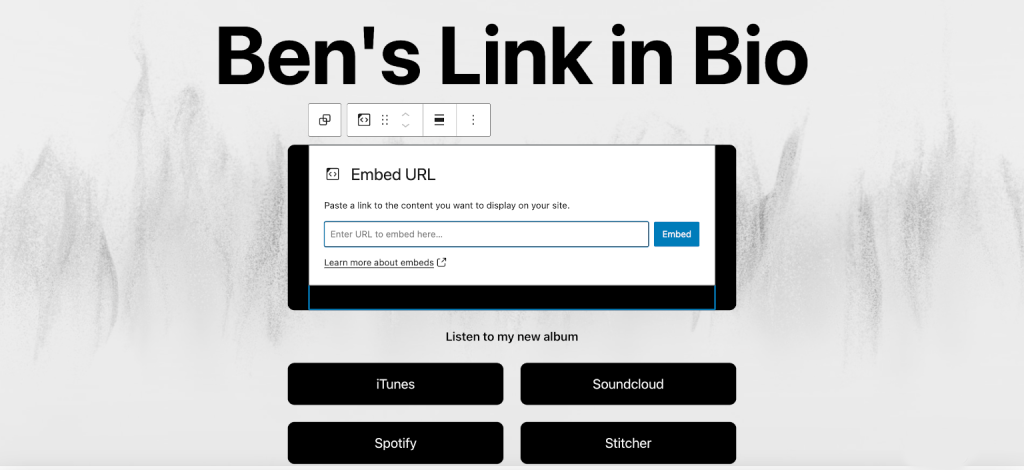
And another musician-oriented pattern, this one with a built-in album embed block:
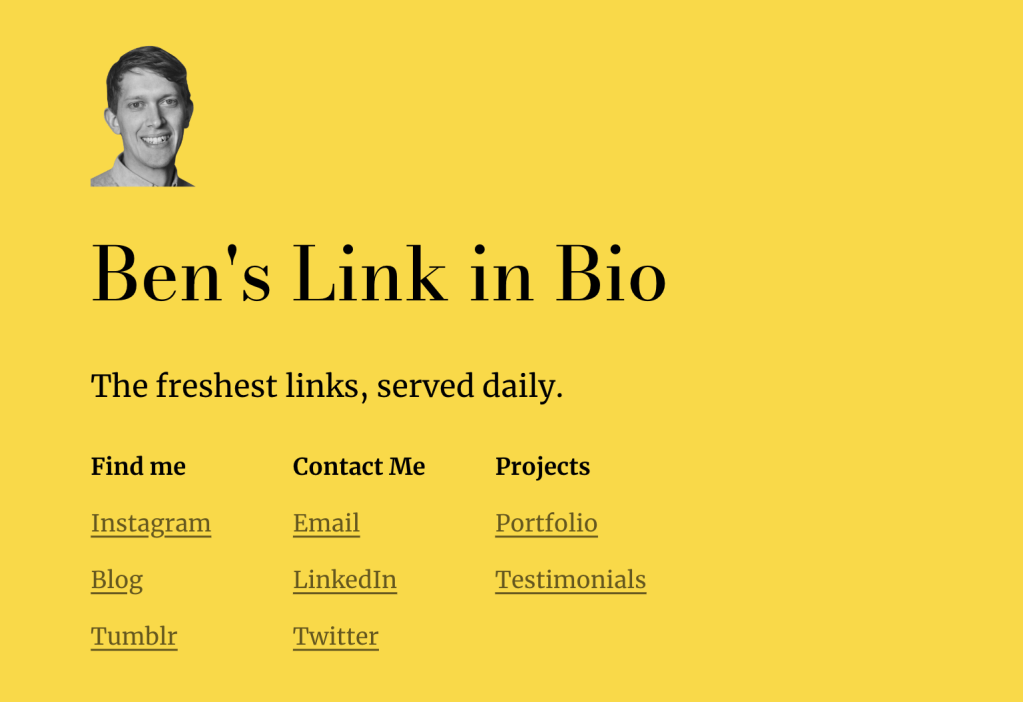
Or maybe you want a clean layout with some simple columns:
Here’s a more modern and minimalist look:

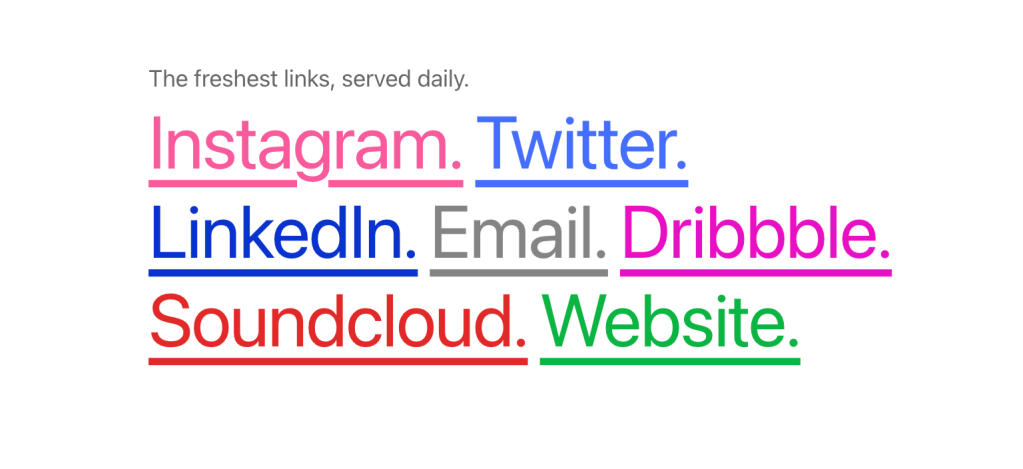
And one with a splash of color:
A custom photo could add some inspirational flair to your page:

Or maybe bright colors and bold fonts are more your style:
These are just some of the built-in options you can choose from. You can even add dynamic backgrounds to jazz up your Link in Bio. Plus, WordPress.com gives you the power to customize and personalize your site to reflect your own brand and style, so you’re not limited to default patterns and designs.
Customizing Your w.link Site
WordPress.com, like any WordPress host or website builder , gives you tons of flexibility to customize every aspect of your site. That includes your w.link website.
Want to switch the colors on your website? Click into the Block tab and use the Text, Background, and Link color selectors to select the colors you would prefer:
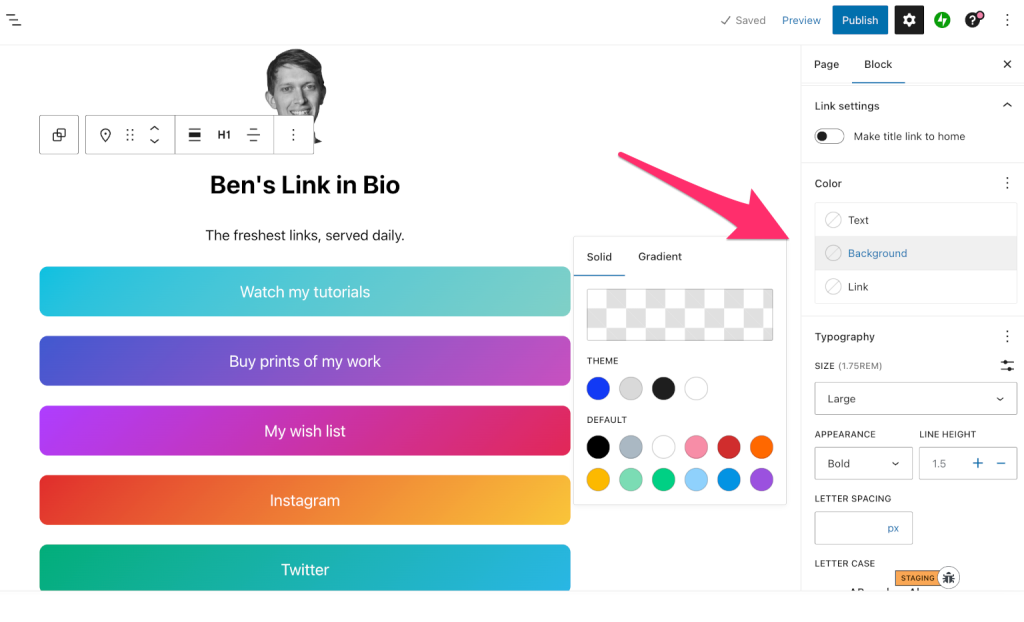
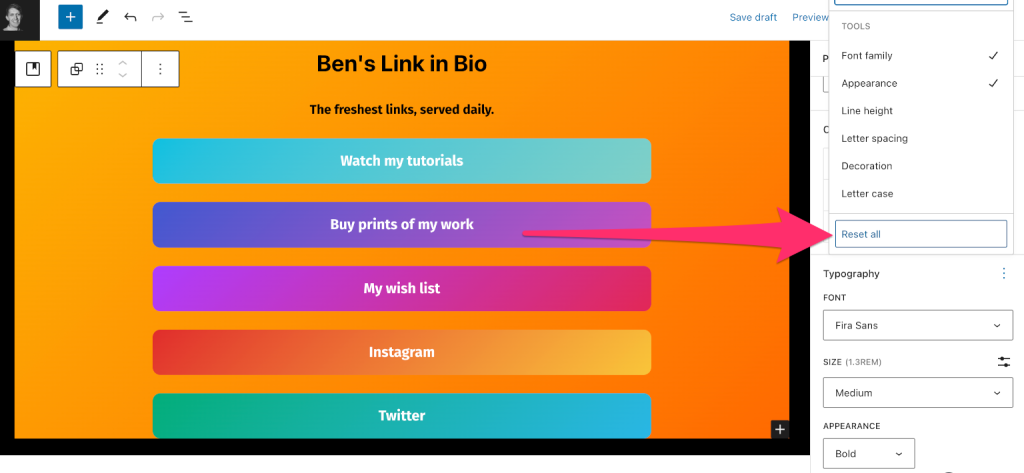
If you decide you don’t like the changes you’ve made, and you want to start over, that’s not a problem. Click the three dots next to Color, then click Reset to reverse changes made to individual elements of your site (text, background, or link), or Reset All to reverse all changes.
It’s easy to edit your typography too. Just below your controls for color options, you’ll find settings for font size, appearance, line height, letter spacing, and letter case.

Take some time to play around with your options. There are tons of different fonts and combinations of settings that are possible. You can also reset your changes by clicking the three dots next to Typography in the admin panel:
How to Use Your New Link in Bio Site
It’s easy to add Link in Bio URLs to your Instagram or TikTok profile and call it a day. However, that might not be enough to drive clicks by itself. Plus, there are also more places where you can add your page to cross-promote your links and content.
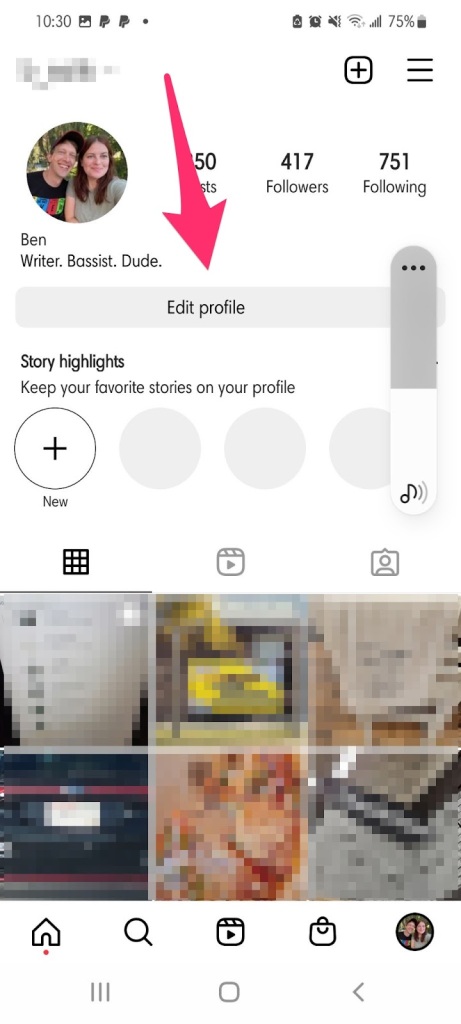
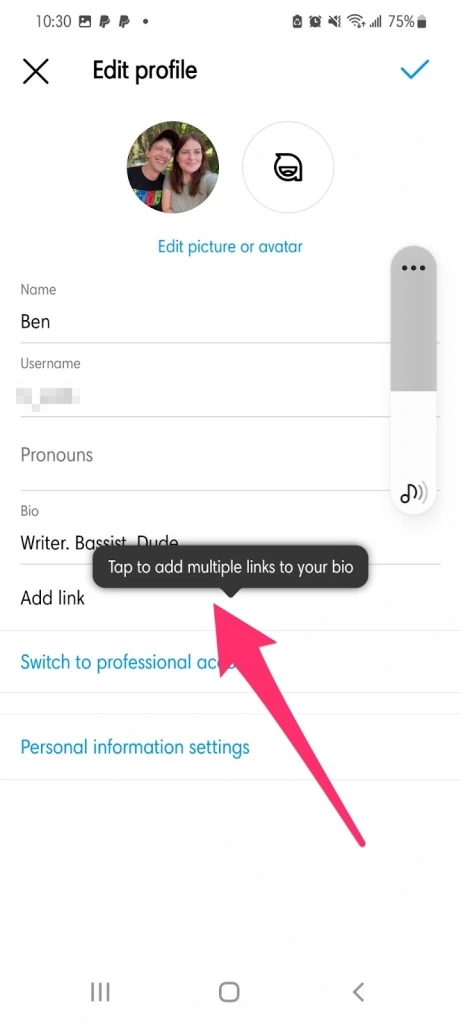
Adding a website to your Instagram profile only takes a couple of clicks. On your mobile device (links can only be edited on mobile), visit your profile and tap Edit Profile:
Then add the URL for your Link in Bio site:
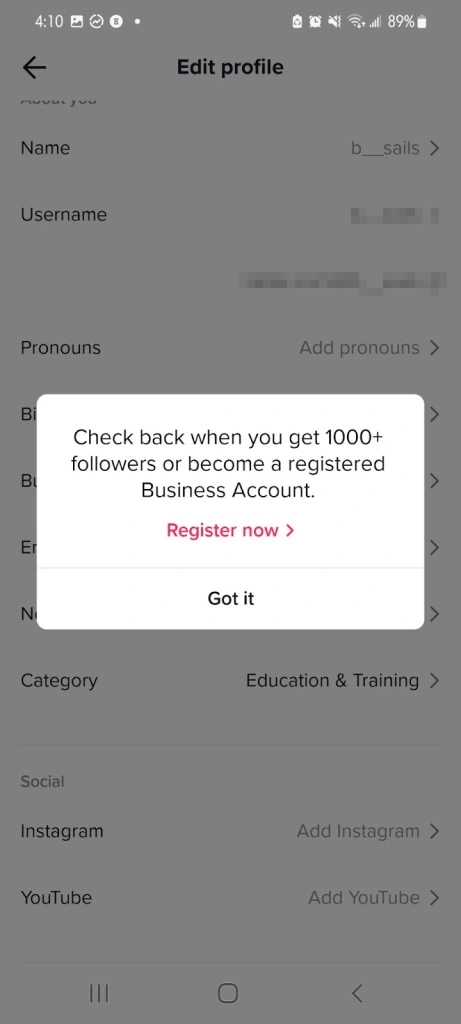
Business accounts on TikTok allow creators to add a link to an actual Link in Bio profile section. Follow these directions to get started:
- Switch from Personal to Business account
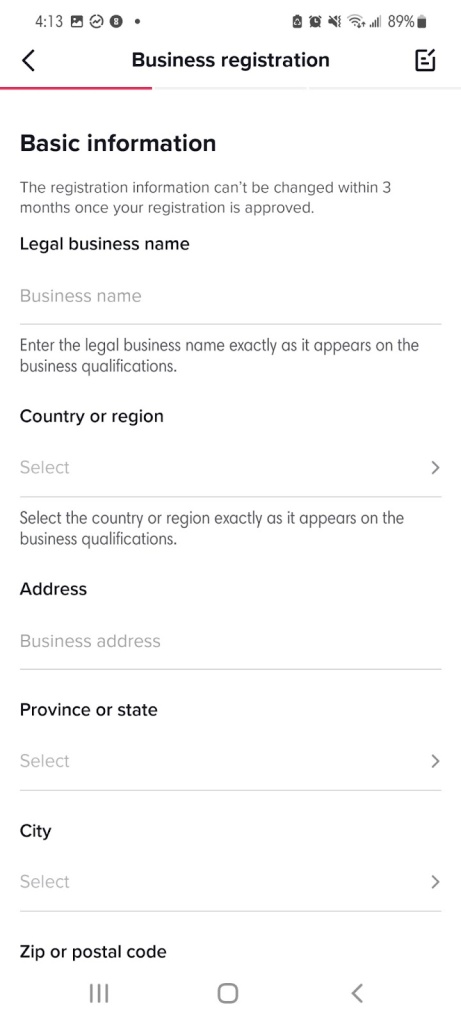
- Grow your audience to 1,000 followers or register your business profile by clicking through Edit Profile > Add Business Phone Number (this will generate the necessary prompt):
- Add your business information:
- Return to your profile and add your Link in Bio website URL.
Looking to drive more traffic from other sites? Here’s a short list of links with instructions for several popular platforms:
- Gmail (in your email signature)
How to Drive Traffic With Your Link in Bio Site
Once your site is set up, it’s time to make it work for you. Here are some tips to start driving more traffic and engagement from your page.
You might have evergreen links you want to share (meaning links that are relevant year-round). But if you’re consistently creating content, mix it up with your latest stuff, too.
Instagram and TikTok might be two obvious places to share your page, but the other sites and platforms mentioned in the previous section are worth considering too. Get creative and add your page wherever you think it might add value for visitors.
It’s easy to default to basic link button text like “Click Here” or “Visit Website.” Sometimes straightforward copy is best because it avoids confusing users about your links.
However, it’s also true that a little bit of creativity can help catch people’s attention. Here are some examples (with a generic option followed by a more engaging version of the same idea):
- Visit Store > Check out our goods
- Follow Us > Let’s be friends
- Sign Up > Join the cool club
You get the idea. Test some different variations and see what works best for you.
If you’re using your page on Instagram (where there is no ability to natively share links), you’ll need to give people a good reason to navigate away from the app to view your content. If you’re looking for social media writing advice, we’d defer to the following folks:
- The Ultimate Guide to Writing Good Instagram Captions from Later
- 264 Creative Instagram Captions from Hootsuite
- The Art and Science of Writing Good Instagram Captions from Foundr
Measuring Your Link in Bio Site’s Performance
How can you know whether people are clicking your links and engaging with your site? By using w.link’s robust analytics (which. like all WordPress.com websites are powered by Jetpack ) and/or connecting your website to Google Analytics .
Your website should help you achieve your goals. You can track your site’s performance by clicking on Stats in your dashboard:
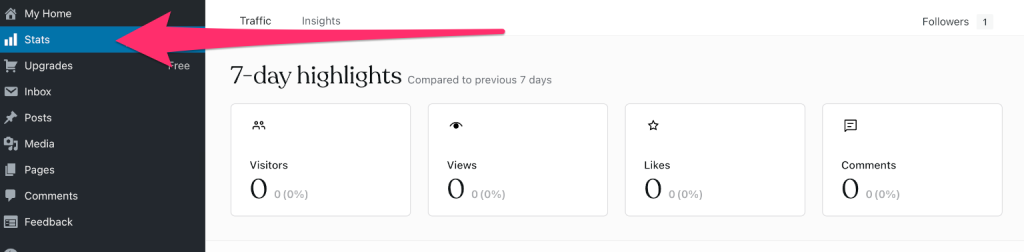
There are a lot of different stats you can track and view. Some of them are useful for Link in Bio sites, while others are more useful for other types of sites you might create with WordPress.
Here are the stats we recommend monitoring for a Link in Bio site:
- Visitors: The number of unique individuals who have visited your site.
- Views: The total number of times your page has been visited.
- Clicks: The number of times users click a link on your page.
- Referrers: Which other websites are sending traffic to your site.
- Countries: You can find where your audience lives to tailor your language and offerings to the area.
This is a short and sweet list of the metrics that matter most for our purposes here.
You can also access in-depth performance statistics and insights using Google Analytics. Here are some supporting resources you can check out to get started:
- Implementation Guide
- Tutorials and courses from Google
No matter what type of content creator you are, or what type of business you’re running, building an engaged audience online is a challenge. Fortunately, now that you know how to build and use a Link in Bio site, you can give yourself an edge with a centralized home for all your links and content. Ready to get started? Create your w.link site now .
Want more tips? Get new post notifications emailed to you.
Type your email…
Share this:
About the author.
Ben Sailer is the Director of Inbound Marketing for WordPress.com at Automattic. His areas of expertise include content strategy, search engine optimization, marketing analytics, and more. He is also a freelance journalist, covering underground rock music and video games. When he's not working, you can find him playing guitar and getting outdoors with his wife Rachel and their dog Audrey.
More by Ben Sailer
Design your portfolio. Open a store. Launch a business.
You can. you will. we’ll help..
Invent the world’s greatest cat food, save a rainforest, start a needlepoint club. Whatever it is, it’s going to need a website—that’s where we come in.

WordPress.com
- WordPress Hosting
- Domain Names
- Website Builder
- Create a Blog
- Professional Email
- P2: WordPress for Teams
- Website Design Services
- Enterprise Solutions
- WordPress Themes
- WordPress Plugins
- WordPress Patterns
- Google Apps
- WordPress.com Support
- WordPress Forums
- WordPress News
- Website Building Tips
- Business Name Generator
- Logo Maker
- Discover New Posts
- Popular Tags
- Blog Search
- Daily Webinars
- Learn WordPress
- Developer Resources
- Remove Subscriptions
- Terms of Service
- Privacy Policy
- Do Not Sell or Share My Personal Information
- Privacy Notice for California Users
Mobile Apps
- Download on the App Store
- Get it on Google Play
Social Media
- WordPress.com on Facebook
- WordPress.com on X (Twitter)
- WordPress.com on Instagram
- WordPress.com on YouTube
- Already have a WordPress.com account? Log in now.
- Subscribe Subscribed
- Copy shortlink
- Report this content
- View post in Reader
- Manage subscriptions
- Collapse this bar
- Use the old theme
Home / Plugin: Ultimate Member – User Profile, Registration, Login, Member Directory, Content Restriction & Membership Plugin / How to add field Biography for account page
How to add field Biography for account page

(@blackstar1991)
8 months, 1 week ago
I need to add biography field textarea into Account page. That user can change this information on this page. How to do it ?

I tryed like this
but it dosen’t work
Find right answer. Used incorect field.
After saving the changes to the form, for some reason a warning began to appear –
Can you explaine why, and how to fix it ?

(@andrewshu)
Hello @blackstar1991
Sorry, but customizations are not included in our support.
8 months ago
Hi @blackstar1991
This thread has been inactive for a while so we’re going to go ahead and mark it Resolved.
Please feel free to re-open this thread if any other questions come up and we’d be happy to help. 🙂
- The topic ‘How to add field Biography for account page’ is closed to new replies.
- Ultimate Member – User Profile, Registration, Login, Member Directory, Content Restriction & Membership Plugin
- Frequently Asked Questions
- Support Threads
- Active Topics
- Unresolved Topics
- In: Plugins
- 2 participants
- Last reply from: andrewshu
- Last activity: 8 months ago
- Status: resolved
- Do Not Sell My Personal Info

- ⋅
Core Web Vitals: WordPress, Wix, Squarespace, Joomla, Duda, & Drupal
One CMS has the best Core Web Vitals score but something strange affected the performance of nearly all of them

The Core Web Vitals technology report shows that five out of six of the most popular content management systems performed worse in April 2024 when compared to the beginning of the year. The real-world performance data collected by HTTPArchive offers some clues about why performance scores are trending downward.
Core Web Vitals Technology Report
The rankings for Core Web Vitals (CWV) are a mix of real-world and lab data. The real-world data comes from the Chrome User Experience Report (CrUX) and the lab data is from an HTTP Archive public dataset (lab data based on the websites included in the CrUX report).
The data is used to create the Core Web Vitals technology report which can be sliced and diced to measure the mobile and desktop performances for a wide variety of content management systems in any combination, as well as provide data on JavaScript, CSS HTML and image weight data.
The data reported in the Search Engine Journal articles are based on measurements of mobile data. The scores are in the form of percentages which represent the percentages of website visits that resulted in a good Core Web Vitals (CWV) score.
This is the background on the HTTP Archive scoring for CWV:
“Core Web Vitals There may be different approaches to measure how well a website or group of websites performs with CWV. The approach used by this dashboard is designed to most closely match the CWV assessment in PageSpeed Insights”
This is the background information about the HTTP Archive lab data:
“HTTP Archive measures individual web pages, not entire websites. And due to capacity limitations, HTTP Archive is limited to testing one page per website. The most natural page to test for a given website is its home page, or the root page of the origin.”
Source of quotes, HTTP Archive .
Top Core Web Vitals Performance
The highest performing content management system (CMS) of the six CMS under comparison is Duda, a closed-source website builder platform that is used by agencies and developers for creating and managing large portfolios of client sites. 71% of website visits resulted in a good core web vitals score. Duda’s score is 13 percentage points ahead of the second place winner, Squarespace, another closed source website building platform.
Sites built with Duda consistently have higher CWV performance rates than any other CMS, by a wide margin. Squarespace, Drupal and Wix are bunched together with similar performance scores, with the Joomla and WordPress scoring in fifth and sixth place.
WordPress Is Faster But Other Factors Slowing It Down
Although WordPress is ranked in sixth place, it’s performance did not drop as much as the other leading content management systems, quite possibly reflecting the many performance improvements in present in each new version of WordPress. WordPress 6.5, released in early April 2024, featured over 100 performance improvements to the backend and the front end.
The performance score for WordPress was slightly lower in April 2024 than in the beginning of the year, but less than one percentage point. However, that percentage drop is lower than the top ranked CMS, Duda, which experienced a drop of 5.41 percentage points.
Chrome Lighthouse is an automated tool for measuring website performance. The Lighthouse scores for WordPress in January of this year was 35%, which means that 35% of measured WordPress sites had a good Lighthouse CWV score. The CWV score took a dip in February and March but it zipped back to 35% in April, perhaps reflecting the many performance improvements in WordPress version 6.5.
The scores for the average Page Weight is likely where the performance lagged. Page Weight is the average number of bytes sent over the network, which could be compressed. The average Page Weight of WordPress sites started out at 568.48 in January and increased to 579.92, an increase of 11.44.
The average download size of images when compared from January to April 2024 increased by 49.5 Kilobytes but that’s something that has more to do with how publishers use WordPress and not how WordPress is being used. These could be contributing to the essentially flat performance change this year. But again, virtually no change in performance is better than what’s going on with other content management systems which experienced larger drops in their performance rates.
Top CWV Performance By CMS
The list of CWV performance represents the percentage of sites using a given CMS that has a good CWV score. Here is the list of the top performers with their respective percentage rates:
- Squarespace 58%
- WordPress 38%
Performance Drops By CMS
Comparing the performance drop by CMS shows a weird trend in that four out of six content management systems had relatively high drops in performance. The following is a comparison of performance drops by percentage points, indicated with a minus sign.
List By Performance Change
- Joomla -2.84
- Drupal -2.58
- WordPress -0.71
As can be seen above, WordPress had the lowest drop in performance. Wix and Duda had the steepest drops in performance while Squarespace was the only CMS with an increase in performance, with a positive score of +3.92.
Interaction To Next Paint – INP
What probably happened to the scores, a likely reason, is that Interaction To Next Paint became an official Core Web Vital, replacing First Input Delay (FID). FID had limitations to the breadth of what it was measuring (the first input) whereas INP covers the entire user experience better. INP became an official Core Web Vital in March 2024 and that may play a role in the dips in CWV seen in some of the scores.
Core Web Vitals Scores – Takeaways
Duda is clearly the Core Web Vitals performance champ, outscoring every content management system in this comparison. Squarespace, Wix and Drupal are close behind in a tight pack. Out of the six platforms in this comparison only Squarespace managed to improve their scores this year.
All of the other platforms in this comparison scored less well in April compared to the beginning of the year, possibly due to increases in page weight, particularly in images but there might be something else that accounts for this anomaly that isn’t accounted for in the HTTP Archive reports.
The WordPress performance team continues to score notable improvements to the WordPress core and the slight performance drop of less than one percent may be because of how publishers are using the platform.
It’s safe to say that all the platforms in this comparison are winners because all of them show steady improvements in general.
Explore the HTTP Archive Core Web Vitals report here .
Featured Image by Shutterstock/Roman Samborskyi
I have 25 years hands-on experience in SEO and have kept on top of the evolution of search every step ...
Subscribe To Our Newsletter.
Conquer your day with daily search marketing news.

Pete Buttigieg Ridiculed for Joe Biden's $7.5 Billion 'Massive Failure'
U .S. Transportation Secretary Pete Buttigieg was pressed on Sunday about the low number of electric vehicle (EV) charging stations the Biden administration has rolled out across the country over the past three years, with his response garnering criticism and ridicule among social media users.
President Joe Biden signed the Bipartisan Infrastructure Law in November 2021, allocating $7.5 billion for electric vehicle charging. Of this, $5 billion is dedicated to building a network of chargers along major highways, called the National Electric Vehicle Infrastructure program.
While appearing on CBS News' Face the Nation on Sunday, host Margaret Brennan asked Buttigieg, "The Federal Highway Administration says only seven or eight charging stations have been produced with a $7.5 billion investment that taxpayers made back in 2021. Why isn't that happening more quickly?"
Buttigieg responded: "So the president's goal is to have half a million chargers up by the end of this decade. Now, in order to do a charger, it's more than just plunking a small device into the ground. There's utility work and this is also a new category of federal investment. But we've been working with each of the 50 states, every one of them is getting formula dollars to do this work."
He then reiterated Biden's EV goal, "Again, by 2030, 500,000 chargers. And the very first handful of chargers are now already being physically built. But again, that's the absolute very, very beginning stages of the construction to come."
Newsweek has reached out the Department of Transportation's director of public affairs for comment via email on Sunday.
Following Buttigieg's comments, he was mocked on X, formerly Twitter , on Sunday.
Chief White House correspondent at Today News Africa in Washington, Simon Ateba, wrote in an X post, "BREAKING- MASSIVE FAILURE BY BIDEN -- Only 7 EV charging stations produced in 3 years instead of 50,000 per year to meet goal."
RNC Research, an X account managed by the Republican National Committee (RNC), posted the video segment of Buttigieg's response and wrote, "Pete Buttigieg has a VERY tough time trying to explain why 'only 7 or 8 [electric vehicle] charging stations have been produced with the $7.5 BILLION investment that taxpayers made back in 2021.'"
J Hans, who, according to his X biography, is a combat veteran, Libertarian, and Make America Great Again (MAGA) supporter, replied to the RNC Research's post, and asked, "Does Pete do anything well?"
Several other X users reposted the video with their own captions, including independent journalist Nick Sortor, who wrote, "Guarantee it doesn't cost Tesla $1B each. Why does Pete still have a job?"
Steve Guest, Senator Ted Cruz 's former communications adviser, posted on X, "CBS's Margaret Brennan laughs in Pete Buttigieg's face when he is unable to explain why only 7 or 8 electric vehicle charging stations have been built despite the Biden admin spending $7.5 BILLION to build chargers."
Related Articles
- Justice Samuel Alito's 'Dumb' Flag Flying Rebuked by Federal Judge
- Marjorie Taylor Greene Wants to Invest in Democratic Stronghold
- Byron Donalds Reacts to MSNBC Host Calling Him 'Fake Proof'
Start your unlimited Newsweek trial

13 Tips for Choosing the Perfect Domain Name
Published: May 27, 2024
Choosing the right domain name for your company is so important — ultimately, it’s how your audience will find and remember you.

The best domain is a custom domain that works for you. Sometimes, the best domain name for you might break some best practice rules. I’ve got websites built on domains that follow best practices, including those with keyword-rich domains, and other domains break the best practice rules big time; they’re even hard to spell.
With over 700 million domain names registered , it can be hard to find one that’s unique and functional. But, in this article, I’ll help you find a custom domain that will help your website stand out from the crowd and possibly even boost your SEO. I’ll help you choose and buy a domain while sharing the insights and tips I’ve learned along the way.

Table of Contents
What Makes A Good Domain Name?
How to choose a domain name for your business, how to choose a domain name for your blog, domain name generator, establish brand identity by picking the perfect domain name.
The best domain names balance memorability, longevity, and sometimes SEO. There’s a lot to think about when choosing the right domain name, but before I get into all those steps, let’s first identify what makes a good domain.
Ideally, you’ll pick one domain name you’ll stick with forever. This might seem scary, and it’s okay to change your domain later, but it’s better if you don’t — so don’t take this decision lightly.
The reason why longevity matters is because you want a domain name that’s stable to avoid confusing your audience.
There’s another lesser-known reason, and it’s related to SEO: a domain name builds authority. Basically, an older domain with high-quality content becomes trusted by Google and is theoretically easier to rank. The longer you spend with a domain and the more you build it up, the bigger the potential loss if you change it.
Again, you can change your domain, and there are lots of things you can do to protect that built authority, but the absolute best practice is to choose a domain that you can stick with.
SEO Considerations
As well as authority, your domain name can help bolster your SEO efforts. Domains including a keyword can help websites rank.
You want to balance the benefits of using the keyword in the URL against using a brand keyword. I’ll discuss the nuances of choosing keyword-rich domains later including when I think it’s appropriate and when to stay with the brand name.
Memorability
Your domain name is how your audience will find and remember you. The best domain names are memorable to your audience so they can easily find you again.
If you are ready to establish a presence online for your business, you’ll want to choose a domain name that matches your brand. This way, customers can easily find and trust your site. There are a few steps you can keep in mind when choosing your domain name.

Free Website Design Inspiration Guide
77 Brilliant Examples of Homepages, Blogs & Landing Pages to Inspire You
- Agency Pages
- Ecommerce Pages
- Tech Company Pages
You're all set!
Click this link to access this resource at any time.
4. Stay unique, specific, and on-brand.
With all of these things to keep in mind, it can be hard to brainstorm a domain name that is clear and concise while also remaining unique and true to your business.
But it’s certainly doable. Keep your business name and what you sell at the forefront of your mind, and dig into your niche to ensure that your domain name attracts the online audience you want.
I always find it hard to come up with domains. I usually have to go through a few versions of ideas and get knocked back a lot by the time I’ve searched its availability to find it’s taken.
Nowadays, I use ChatGPT to help me brainstorm domain name ideas. Using a fake scenario, here’s an example of what I’d ask ChatGPT.
I asked ChatGPT, “Can you help me come up with the best domain name for a new blog? I want to share my budget travel adventures.”
ChatGPT came up with some great starting points.

Domain names are hot commodities, but they are also pretty affordable. As long as your idea isn’t trademarked or already in use, grab it before it’s gone! You can always change it later if you decide it just isn’t working.
I understand that this is a lot to digest. But just as there are generators to help you find excellent hashtags and keywords, there are also tools to help you find domain names (in addition to using ChatGPT).
You can take some of the keywords and brand-related words you’ve brainstormed through the above tips and add them to a domain name generator, which will use those words and related words to create lists of available domain names.
Even if you don’t pick a domain name exactly from the generator, it can help inspire your team to find a domain name that is perfect for your business or blog. Here are some of the top domain name generators to try.

Don't forget to share this post!
Related articles.

The Best Web Hosting for Small Business Sites in 2024: 12 Favorites

Best Video Hosting Sites: The Top 11 Sites in 2023

Domains and Domain Names: What They Are and 10+ Examples

Everything You Need to Know about Custom Domains

The 13 Best Blog Hosting Sites to Launch a Winning Blog in 2024

14 Best Domain Registrars to Consider This Year

Serverless Functions: Your Website's New Best Friend

The Ultimate Guide to Web Hosting

What Is a CDN? Understanding Content Delivery Networks

10 Best Windows Web Hosting Platforms for 2024
Launch your WordPress website with the help of this free guide and checklist.
CMS Hub is flexible for marketers, powerful for developers, and gives customers a personalized, secure experience
IMAGES
VIDEO
COMMENTS
Simply use the quick links below to jump straight to the method you want to use. Method 1: Adding Author Info Box Using Your WordPress Theme Settings. Method 2: Adding Author Info Box in WordPress Using a Free WordPress Plugin. Method 3: Display Author Info Box in WordPress Sidebar Widget Area.
4. Fill in the information for the plugin name and description. If you go to your plugin list, you should see this new one in the list. Next, we'll add some information to the plugin file. When we are finished, the bio box will appear below posts. Here's the information we're going to display: Author's name.
Go to Appearance > Customize > Layout > Single Post. Then, scroll down to the Author Box section and make your selections. Next, return to your dashboard and go to Users > All Users: Find the User (i.e., the author) for which you'd like to add an author bio. Then, hit the Edit link under their username.
In this article. The Post Author Biography block allows you to embed a user's biography from the About Yourself section in Users > Profile into your page or post. In order to add a Post Author Biography block, click on the Block Inserter (+) icon. You can also type /Post Author Biography and hit enter in a new paragraph block to add one quickly.
Author drop-down menu. Select the name of the post's new author, and then click on the Update button to make it official: Update author in Classic Editor. Regardless of which editor you use, you can also change a post's author using the Quick Edit function in the Posts list.
Step 4: Add a New Author. Now you are ready to add a new author. This will be the first of many you add. Click on the "Add New" tab that is located on the left-side menu under the main plugin menu area. This takes you to the author bio page where you can add a new bio and create your first shortcode to display it.
What a WordPress author page is, and why it's so important for contributors, site owners, and site visitors. That WordPress automatically comes with built-in author pages, but there's limited customization, and many themes change their display. How to use a plugin to customize the WordPress author page.
To use a different author photo, click on the 'Custom image' radio button. Once you've done that, click on 'Select Image.'. You can now choose any image from your WordPress media library, or upload a new image. Then, just click on the 'Update' button. Your website will now use this new image as the author's photo.
1. Choose a WordPress Theme with Author Boxes. One of the easiest ways to include author boxes on your website is to choose a theme that offers the option as a built-in feature. This is especially important if you have more than one author, as most themes only enable you to display boxes for a single writer.
To get started, search for "simple author box" via the Plugins menu to locate and install it. Once you install the plugin, you'll find a new Simple Author settings menu added to your admin dashboard. In the settings menu, you can see a preview of how the box will look. It's using fake filler content by default, including all of the ...
There are four setting we need to change according to the screenshot below: Rename the block of code to Author bio. Enable PHP code execution. Select After content for the insertion type. Save Settings 1 - 16. Now, you can go to a blog post and see the meet the author box below the last paragraph of your article.
This video shows how to edit your author biographical section on your Wordpress Website/Blog
Select the post you want to change the author of, and select Edit. Click the gear icon in the top right of the post editor screen. Navigate to Post → Status and Visibility in the sidebar. Find Author and select a new username from the drop-down list. Click Update to save your changes.
Step-by-Step Guide to Changing Author Name. First, log in to your WordPress dashboard and navigate to the "Users" section. From there, select the user whose name you want to change. Next, click on the "Edit" button next to the user's name. This will take you to a page where you can edit the user's profile information.
AllAbout Writing and Displaying a WordPress Blog Bio. February 26, 2014. Having a solid bio or about section on your WordPress site is a must. It doesn't matter what industry you're in — you need a bio to let people know who you are, what you do, and why you do it. Even if you're in business ( especially if you're in business), you ...
First, you need to open up the post or page where you want to change the author's name. Once you are there, you must make sure that the 'Post' tab is selected in the right-hand sidebar. Next, find the 'Author' option in the 'Summary' section, where you will see a list of available authors to choose from. From here, simply select ...
But it's a simple form/confirmation to add an email. To add the WordPress author bio image using Gravatar, click Add a New Image (1). The next screen prompts you to upload an image (3). Click on Upload New (3) to start the process. Just as a reminder, Gravatar images are square, so when you choose your author bio image for WordPress, make ...
To add a new author: Navigate to People →Add in your My Sites menu. Type in the user's email address or WordPress.com username. Assign them a role. You can also enter a brief message letting them know that you're inviting them to be an author on your blog. Click the Send Invitation button.
In this article, we'll learn how to beautifully create an author bio section into your blog posts page for free using the WP Author Bio WordPress plugin in a...
You can add or update the following optional fields in your profile: Profile photo: An image representing you or your brand. If you add a profile photo, you get a Gravatar profile. You can update your profile photo by moving your mouse over your current photo and clicking "Click to change photo." First name: Your first name. Last name: Your last name. ...
I have been using Connections since creating my site in 2014 and am very happy with its function and your support. A person listed in the directory has asked me to change some information shown in her details under the heading "Bio" and I cannot find that field in the "Manage" section under Connections!
Preview and Launch Your Site. To see how your site looks, click View > View site in the upper right-hand corner. If everything looks good, click "Launch site" above your profile image, then click Launch Site. If you'd like to make some changes, then click Edit Page, or Change Theme to pick a different design.
After saving the changes to the form, for some reason a warning began to appear - Warning: Undefined array key "mode" in D:\LocalProjects\test-dev\app\public\wp-content\plugins\ultimate-member\includes\core\class-fields.php on line 2782
WordPress Hosting Plan: Think of web hosting as your blog's home on the internet. It stores all of your website files and makes them accessible to visitors. There are different types of WordPress hosting available, but don't worry, we'll discuss those in a later step. WordPress Theme: Think of this as your website's outfit or look. It ...
Duda is clearly the Core Web Vitals performance champ, outscoring every content management system in this comparison. Squarespace, Wix and Drupal are close behind in a tight pack. Out of the six ...
President Joe Biden signed the Bipartisan Infrastructure Law in November 2021, allocating $7.5 billion for electric vehicle charging. Of this, $5 billion is dedicated to building a network of ...
3. Avoid hyphens, numbers, and double letters. Each of these elements is another hurdle for users to attempt to jump just to access your website. It's not exactly intuitive to keep these characters in mind, and double letters can make the domain name messy and hard to read.
Free Tools. Business Name Generator Get business name ideas for your new website or project.; WordPress Theme Detector Free tool that helps you see which theme a specific WordPress site is using.; Free Keyword Generator Keyword research easy. Get 300+ keyword ideas about your topic from Google. 27+ Free Business Tools See all other free small business tools our team has created.
Harris recently celebrated the 10th anniversary of his book "10% Happier," a No. 1 New York Times bestseller. Dan Harris/Harper Collins Publishers. Harris is now a meditation expert himself. "I ...
GlycoNex, Inc. May 30, 2024, 06:00 ET. NEW TAIPEI CITY, Taiwan, May 30, 2024 /PRNewswire/ -- GlycoNex, Inc. (4168, hereinafter referred to as GNX), a clinical stage biotechnology company focused ...