Set and Check User Rights Assignment via Powershell
You can add, remove, and check user rights assignment (remotely / locally) with the following powershell scripts..
Posted by : blakedrumm on Jan 5, 2022


Local Computer
Remote computer, output types.
This post was last updated on August 29th, 2022
I stumbled across this gem ( weloytty/Grant-LogonAsService.ps1 ) that allows you to grant Logon as a Service Right for a User. I modified the script you can now run the Powershell script against multiple machines, users, and user rights.
Set User Rights
How to get it.
All of the User Rights that can be set:
Note You may edit line 437 in the script to change what happens when the script is run without any arguments or parameters, this also allows you to change what happens when the script is run from the Powershell ISE.
Here are a few examples:
Add Users Single Users Example 1 Add User Right “Allow log on locally” for current user: . \Set-UserRights.ps1 -AddRight -UserRight SeInteractiveLogonRight Example 2 Add User Right “Log on as a service” for CONTOSO\User: . \Set-UserRights.ps1 -AddRight -Username CONTOSO\User -UserRight SeServiceLogonRight Example 3 Add User Right “Log on as a batch job” for CONTOSO\User: . \Set-UserRights.ps1 -AddRight -Username CONTOSO\User -UserRight SeBatchLogonRight Example 4 Add User Right “Log on as a batch job” for user SID S-1-5-11: . \Set-UserRights.ps1 -AddRight -Username S-1-5-11 -UserRight SeBatchLogonRight Add Multiple Users / Rights / Computers Example 5 Add User Right “Log on as a service” and “Log on as a batch job” for CONTOSO\User1 and CONTOSO\User2 and run on, local machine and SQL.contoso.com: . \Set-UserRights.ps1 -AddRight -UserRight SeServiceLogonRight , SeBatchLogonRight -ComputerName $ env : COMPUTERNAME , SQL.contoso.com -UserName CONTOSO\User1 , CONTOSO\User2
Remove Users Single Users Example 1 Remove User Right “Allow log on locally” for current user: . \Set-UserRights.ps1 -RemoveRight -UserRight SeInteractiveLogonRight Example 2 Remove User Right “Log on as a service” for CONTOSO\User: . \Set-UserRights.ps1 -RemoveRight -Username CONTOSO\User -UserRight SeServiceLogonRight Example 3 Remove User Right “Log on as a batch job” for CONTOSO\User: . \Set-UserRights.ps1 -RemoveRight -Username CONTOSO\User -UserRight SeBatchLogonRight Example 4 Remove User Right “Log on as a batch job” for user SID S-1-5-11: . \Set-UserRights.ps1 -RemoveRight -Username S-1-5-11 -UserRight SeBatchLogonRight Remove Multiple Users / Rights / Computers Example 5 Remove User Right “Log on as a service” and “Log on as a batch job” for CONTOSO\User1 and CONTOSO\User2 and run on, local machine and SQL.contoso.com: . \Set-UserRights.ps1 -RemoveRight -UserRight SeServiceLogonRight , SeBatchLogonRight -ComputerName $ env : COMPUTERNAME , SQL.contoso.com -UserName CONTOSO\User1 , CONTOSO\User2
Check User Rights
In order to check the Local User Rights, you will need to run the above (Get-UserRights), you may copy and paste the above script in your Powershell ISE and press play.

Note You may edit line 467 in the script to change what happens when the script is run without any arguments or parameters, this also allows you to change what happens when the script is run from the Powershell ISE.
Get Local User Account Rights and output to text in console:
Get Remote SQL Server User Account Rights:
Get Local Machine and SQL Server User Account Rights:
Output Local User Rights on Local Machine as CSV in ‘C:\Temp’:
Output to Text in ‘C:\Temp’:
PassThru object to allow manipulation / filtering:
I like to collaborate and work on projects. My skills with Powershell allow me to quickly develop automated solutions to suit my customers, and my own needs.
Email : [email protected]
Website : https://blakedrumm.com
My name is Blake Drumm, I am working on the Azure Monitoring Enterprise Team with Microsoft. Currently working to update public documentation for System Center products and write troubleshooting guides to assist with fixing issues that may arise while using the products. I like to blog on Operations Manager and Azure Automation products, keep checking back for new posts. My goal is to post atleast once a month if possible.
- operationsManager
- troubleshooting
- certificates
Stack Exchange Network
Stack Exchange network consists of 183 Q&A communities including Stack Overflow , the largest, most trusted online community for developers to learn, share their knowledge, and build their careers.
Q&A for work
Connect and share knowledge within a single location that is structured and easy to search.
How to list windows privileges for any user
I am trying to write a script to list the privileges (eg SeShutDownPrivilege etc) of all user accounts. I'd prefer it if my script could be run as a standard user, but I can run it as an admin account if I had to. Here are the approaches I have tried so far:
using tokensz (from https://blogs.technet.microsoft.com/askds/2007/11/02/whats-in-a-token/ ): works ( tokensz /compute_tokensize /dump_groups ) for the currently logged in user. But when logged in even as a domain administrator, when trying for another user ( tokensz /compute_tokensize /dump_groups /user:[another.user] ), I get the error SEC_E_LOGON_DENIED
whoami /all works but only for the currently logged in user
ntrights.exe doesn't appear to be able to list privileges, only add and remove.
secedit /export /areas USER_RIGHTS /cfg out.txt : lists all privileges and the SIDs that have that privilege, but that list appears incomplete; the output from tokensz shows a user John.Smith with SeShutdownPrivilege , but the output from secedit for SeShutdownPrivilege lists groups that John.Smith is not a member of.
I can use portable executables (eg tokensz.exe , ntrights.exe ) and built in utilities but will not be able to install applications or extensions
- windows-domain
- I believe your last proposal should really be secedit /export /mergedpolicy /areas USER_RIGHTS /cfg out.txt : this way it should list all the privileges that the security database will apply, should they come from the machine policies (as you got) as well as those granted through the Active Directory policies ("GPOs") – AntoineL Oct 29, 2016 at 21:26
2 Answers 2
You can use AccessChk in accomplish this task.
Accesschk “domain\user” -a * will list all the permissions of a given domain user.
You can call this program within a PowerShell script, concatenate the results into a text file, then filter out just the permissions you want to know about.
For anybody looking for a PowerShell script, this ought to do it:
It gets the list of users who have a profile on the local machine , determines their names from the SID, and invokes accesschk - as recommended by Ramhound - on them. Each user's record starts with the username in DOMAIN\user format, contains each right on a line, and ends with a blank line. (SID translation courtesy of this article .) You can dump its stuff to a file with the redirection operator, > .
A caveat of AccessChk is that it seems to produce an empty list for domain users that don't have local admin rights. Therefore, this version that produces the above information for every known user in the domain and on the machine is a little lame, but may become useful with a future version of the tool:
If you're wondering what secedit is talking about, it's just getting the list of principals (in SID form) to which the rights have been assigned in User Rights Assignment (see secpol.msc ). Therefore, you'll usually see the SIDs for groups like Users or Administrators rather than specific people.
- I approve of this answer. – Ramhound Apr 13, 2016 at 17:17
- My accesschk.exe does not list a -q option. Seems to be silently ignored. What is it supposed to do? – StackzOfZtuff Jun 26, 2017 at 11:04
- @StackzOfZtuff -q removes the banner with the name, version, copyright, and description of the tool, so accesschk only prints the stuff we need. I see it listed here on Accesschk v5.2, but somewhere along the way to v6.1 it seems to have been renamed to -nobanner . – Ben N Jun 26, 2017 at 13:56
You must log in to answer this question.
Not the answer you're looking for browse other questions tagged windows-7 powershell windows-domain vbscript privileges ..
- The Overflow Blog
- Between hyper-focus and burnout: Developing with ADHD
- Featured on Meta
- Our Partnership with OpenAI
- Imgur image URL migration: Coming soon to a Stack Exchange site near you!
Hot Network Questions
- Is it incorrect terminology to say "confidence interval of a random variable"?
- Which cognitive psychology findings are solid, that I can use to help my students?
- How to use DOUBLE as a verb
- Does Licensing open-source prevent me from selling the product?
- Java interpreter
- How many rolls are sufficient to ensure, with probability 99%, that the sum is greater than 100?
- Fully electric flamethrower
- What is this fuzzy green plant with spikes? (UK gardening)
- Taking the inverse (not the reciprocal) of both sides of an inequality
- How to disassemble this part of the lens?
- Meaning of gold border around Steam achievement
- Can Vecna’s Rotten Fate ability kill a player outright?
- What Do The New Geometry Nodes Pink Colored Rotation Sockets in 4.1 mean?
- A post-apocalyptic novella, where water disappears and earthquakes eventually finish mankind off. Probably originally in French
- Does metal roofing need to extend past the drip edge?
- How can I save a dating relationship when I am promoted and she will be in my vertical reporting chain?
- Is the largest root of a random polynomial more likely to be real than complex?
- How to specify the position of Arrowhead in Graph's EdgeShapeFunction?
- tcolorbox and logic formats
- Why didn't the 70 elders prophesy again
- Why do physicists refer to irreducible representations as "charges" or "charge sectors"?
- Does the axis of spin of a particle also rotate?
- Calculating structural stability of a doped plane
- What exactly does a rest mean?
WinSecWiki > Security Settings > Local Policies > User Rights
User Rights Assignments
Although in this section they are called user rights, these authority assignments are more commonly called privileges.
Privileges are computer level actions that you can assign to users or groups. For the sake of maintainability you should only assign privileges to groups not to individual users. Each computer has its own user rights assignments. In particular this means you should be cognizant of rights assignments on member servers which may easily differ from the rights assignments you find on your domain controllers. To centrally control user rights assignments on computers throughout your domain use group policy.
- Logon rights
- Admin equivalent rights
- Tracking user rights with the security log
- User rights in-depth
- Access this computer from the network
- Act as part of the operating system
- Add workstations to domain
- Adjust memory quotas for a process
- Allow log on locally
- Allow logon through Terminal Services
- Back up files and directories
- Bypass traverse checking
- Change the system time
- Create a pagefile
- Create a token object
- Create global objects
- Create permanent shared objects
- Debug programs
- Deny access to this computer from the network
- Deny logon as a batch job
- Deny logon as a service
- Deny logon locally
- Deny logon through Terminal Services
- Enable computer and user accounts to be trusted for delegation
- Force shutdown from a remote system
- Generate security audits
- Impersonate a client after authentication
- Increase scheduling priority
- Load and unload device drivers
- Lock pages in memory
- Log on as a batch job
- Log on as a service
- Manage auditing and security log
- Modify firmware environment values
- Perform volume maintenance tasks
- Profile single process
- Profile system performance
- Remove computer from docking station
- Replace a process level token
- Restore files and directories
- Shut down the system
- Synchronize directory service data
- Take ownership of files and other objects
Child articles:
- Logon Rights
- Admin Equivalent Rights
- Tracking User Rights with the Security Log
- User Rights In-Depth
Back to top

Stack Exchange Network
Stack Exchange network consists of 183 Q&A communities including Stack Overflow , the largest, most trusted online community for developers to learn, share their knowledge, and build their careers.
Q&A for work
Connect and share knowledge within a single location that is structured and easy to search.
Which permissions/rights does a user need to have WMI access on remote machines?
I'm writing a monitoring service that uses WMI to get information from remote machines. Having local admin rights on all these machines is not possible for political reasons.
Is this possible? What permissions/rights does my user require for this?
- permissions
- remote-access
9 Answers 9
The following works on Window 2003 R2 SP 2, Windows Server 2012 R2
- Add the user(s) in question to the Performance Monitor Users group
- Under Services and Applications, bring up the properties dialog of WMI Control (or run wmimgmt.msc ). In the Security tab, highlight Root/CIMV2 , click Security; add Performance Monitor Users and enable the options : Enable Account and Remote Enable
- Run dcomcnfg . At Component Services > Computers > My Computer, in the COM security tab of the Properties dialog click "Edit Limits" for both Access Permissions and Launch and Activation Permissions . Add Performance Monitor Users and allow remote access, remote launch, and remote activation.
- Select Windows Management Instrumentation under Component Services > Computers > My Computer > DCOM Config and give Remote Launch and Remote Activation privileges to Performance Monitor Users Group.
- As an alternatively to step 3 and 4, one can assign the user to the group Distributed COM Users (Tested on Windows Server 2012 R2)
- If the user needs access to all the namespaces, you can set the settings in 2. at the Root level, and recurse the permissions to the sub-namespaces via the Advanced window in Security
- 4 I've found steps 2 and 3 aren't necessary if you add the user to Distributed COM Users. – Nexus Feb 12, 2010 at 0:53
- Working on WinXP and Win7, I was not able to add the "Distributed COM Users" group - maybe this group is only accessible on servers? It would not resolve during name lookup when trying to add to the permissions. Also, I found that I had to set permissions for WMI on "Root" as well as "Root/CIMV2" and that I had to go into advanced permissions and apply the permission for the subnamespaces as well as the namespace. – Shannon Wagner Aug 3, 2012 at 20:26
- Works also for Windows 8! Also, does somebody know how to do the same from powershell or some other shell? – Bunyk Mar 24, 2014 at 9:02
- 2 In the case that you want a user to be able to access all the namespace, you can grant the permission to Root and all the sub-namespaces by selecting Root, opening Security then Advanced and setting up the recursion. By default these settings apply only to the selected object and do not cascade. – Thomas BDX Aug 22, 2014 at 20:23
- that doesn't work for MSCluster namespace – John Jan 13, 2016 at 8:52
All I did on Windows 8 was added user to group "Remote Management Users", and remote WQL requests worked.
By default, only the local Administrators group has remote permissions to WMI. You will have to customise the WMI "Remote Enable" permissions.
You may also have to grant "DCOM remote access permissions" and/or "DCOM remote launch and activation permissions" depending on what exactly you are trying to do. This MSDN article gives the step-by-step procedures.
Nothing here worked for me. I found a YT vid in conjunction with an arbitrary comment that solved it for me (& hopefully for you, too), but only when using invoke-command (ex. invoke-command -ComputerName MyRemoteComputer -ScriptBlock {Get-Process -Name explorer} ).
On the PC you want to remotely access (on same domain):
- [Right-click Start ] > Run > lusrmgr.msc (on Domain Controllers: dsa.msc )
- [Select the Groups folder] (on Domain Controllers: Builtin folder)
- [Right-click Distributed COM Users ] > Add to [a] group... > Add...
- [Search the user/group you want to grant WMI access to] > Check Names (to confirm it's the right group/user) > OK
Why does adding the user/group to the Distributed COM Users group help? Well, that group has privileges to launch applications & objects remotely under COM Security settings. You can view these privileges with: [Right-click Start ] > Run > DCOMcnfg > Component Services > Computers > [Right-click My Computer ] > Properties > COM Security > Edit Limits...
- In an elevated PowerShell: Set-PSSessionConfiguration -ShowSecurityDescriptorUI -Name Microsoft.PowerShell
- Add... > [Search the user/group you want to grant WMI access to] > Check Names (to confirm it's the right group/user) > OK
- Under the Allow column under Permissions for MyUser , I only selected the Read(Get,Enumerate,Subscribe) and Execute(Invoke) options (since I was granting these privileges to all Domain Users ).
- Apply > OK
- [Right-click Start ] > Run > services.msc
- [Right-click] > Restart both Windows Management Instrumentation and Windows Remote Management (WS-Management) .
- (Set each of these services' Startup type s to Automatic --if not already--in [Right-click] > Properties .)
- (If still doesn't work) Open Windows Defender Firewall with Advanced Security and [Right-click] > Enable each Windows Management Instrumentation Inbound Rule .
The following worked for me in a 2012 r2 domain environment although I only managed to do it per server and not the entire domain:
1) Add user to Performance Log Users Group. 2) Run wmimgmt.msc, right click "WMI Control (LOCAL), goto Security tab and grant the appropriate user "Enable Account" and "Remote Enable" on the desired namespace (usualy CIMV2).
If I manage to get it done for the entire domain I'll come back and update.
Based on the chosen answer, I modified the script from Microsoft to set the WMI security. My test user was a non-administrative domain user who was a member of the "Remote Management Users" on the local system for reasons not related to this issue. After granting my user the EnableAccount, RemoteEnable, and ExecuteMethods permissions on the target namespace, I was able to access WMI.
So, I did not add my user to the Performance Monitor Users or Distributed COM Users local groups.
A couple of notes regarding the script:
- You must specify the full path of the namespace. In my case, the namespace was Root/Microsoft/SqlServer
- Inheritance was wrong. Because there are no leaf objects you can't use $OBJECT_INHERIT_ACE_FLAG
- I got rid of the embedded function because it was too small and it was only used once.
The script is below. I named it Set-WMINamespaceSsecurity.ps1
If you are trying to access WMI there are two protocols available: DCOM and WinRM. Which protocol you are using will depend on the tools or API being used. For example, when you are using PowerShell, the 'older' Get-WmiObject cmdlet uses DCOM, whereas the 'newer' Get-CimInstance cmdlet uses WinRM.
To access WMI as a non-administrator using DCOM you need the following groups / permissions
- Distributed COM Users
- 'Remote Enable' permissions under WMI control for the namespace you want to access (you can either assign these manually , or with a script / Group Policy )
- Performance Monitor Users (for accessing certain performance metrics via WMI e.g. CPU usage via the Win32_Processor LoadPercentage value)
To access WMI as a non-administrator using WinRM you need the following groups / permissions
- Remote Management Users OR WinRMRemoteWMIUsers_ (notwithstanding the Microsoft official documentation they seem to function the same - and in later versions of Windows only the first is available)
Also to do any of this remotely, make sure you have the 'Windows Management Instrumentation' rules enabled in Windows Defender Firewall for the relevant scope.
(You can also use the 'Performance Log Users' group to assign DCOM and WMI performance metric permissions instead of 'Distributed COM Users' and 'Performance Monitor Users', but this will grant additional privileges that may not be appropriate from a security perspective. As suggested in other answers, you can also set up the DCOM Remote Launch and Activation Permissions manually , but that seems overly complicated since both 'Distributed COM Users' and 'Performance Log Users' are already assigned those permissions by default.)
- The gist script you shared saved my day. Almost applied all the steps suggested in this and other answers but I was getting "-2147217405 = WBEM_E_ACCESS_DENIED - Access Denied: Current user does not have permission to perform the action." through winrm+non admin+VBScript(cscript). I may have missed one the manual steps. – caltuntas Aug 14, 2023 at 12:03
We did this for PRTG: We created a new domain user: Created a GPO Dit to put his user in the group "Performnce Log Users" and used a powershell script to add this user to WMI Control. thanks to:
https://live.paloaltonetworks.com/t5/Management-Articles/PowerShell-Script-for-setting-WMI-Permissions-for-User-ID/ta-p/53646
- Please include relevant information directly in your answers. Answers posted should be able to stand alone, and just use links for reference. – Cory Knutson Jun 2, 2017 at 18:47
You must log in to answer this question.
Not the answer you're looking for browse other questions tagged windows permissions remote-access wmi ..
- The Overflow Blog
- Between hyper-focus and burnout: Developing with ADHD
- Featured on Meta
- Our Partnership with OpenAI
- Imgur image URL migration: Coming soon to a Stack Exchange site near you!
Hot Network Questions
- Program: human-like species, they are terrified of some sort of monster, that is themselves in next stage of their lifecycle
- What Do The New Geometry Nodes Pink Colored Rotation Sockets in 4.1 mean?
- How to draw such a sphere with mesh
- Creating list of adjacent polygons in QGIS
- Is science value-free?
- Fully electric flamethrower
- How to disassemble this part of the lens?
- Reproduce Knuth's circle and triangle examples
- How to move a layer to a group using Python code in ArcGIS Pro?
- Should David have killed Saul?
- Why didn't the 70 elders prophesy again
- Taking the inverse (not the reciprocal) of both sides of an inequality
- 4 term exact sequence diagram, surjective map
- Pixel Vignetting
- Meaning for chromatography terms linear velocity and volume flow rate
- Existence of finite powerset
- Best way to drive multiple LED strips at distinct times with one LED driver
- Is it incorrect terminology to say "confidence interval of a random variable"?
- Allow commercial use, but require removal of company name
- How many rolls are sufficient to ensure, with probability 99%, that the sum is greater than 100?
- How did White lose all their pieces?
- Optional chaining - change
- Apartment from non-US parent abroad
- Calculating structural stability of a doped plane
- NIST 800-53
- Common Controls Hub
Windows Server 2022 Allow log on locally user right must only be assigned to the Administrators group.
- About the Authors
Managing “Logon As a Service” Permissions Using Group Policy or PowerShell
“ Log on as a service ” is a security policy in Microsoft Windows operating systems that specifies which user accounts or groups are allowed to start and run Windows services. Services are programs running in the background and performing various tasks without user interaction. They are essential components of the Windows operating system and are used for networking, hardware management, and system monitoring tasks.
When a service starts, it must run under a specific user account, either a built-in system account or a custom user account. The “Log on as a service” policy defines which accounts or groups have the privilege to be assigned as the login credentials for these services. This policy is crucial for maintaining security and preventing unauthorized access to system resources.
Configuring the “Log on as a service” policy involves assigning specific accounts or groups the right to log on as a service. By default, only certain built-in accounts and groups have this privilege. Suppose an application or service requires a specific user account to function correctly. That account needs to be explicitly added to the “Log on as a service” policy to ensure it has the necessary permissions.
“Log on as a service” Rights vs. Privileges User Account
Assigning a specific user account to run Windows services using the “Log on as a service” privilege offers several advantages over using the built-in Local System account or other privileged user accounts:
- Principle of Least Privilege: The principle of least privilege suggests that users, processes, and services should have only the permissions necessary to perform their tasks. Assigning a dedicated user account to run a service allows you to grant precisely the required permissions for that service, reducing the risk of unintended actions or security breaches.
- Isolation of Services: By using individual user accounts for each service, you can isolate the privileges and resources associated with each service. This isolation helps prevent one compromised service from affecting other services or system components.
- Auditability: Using separate user accounts for services makes it easier to track and audit the activities of each service. In the event of security incidents or unauthorized access, it’s simpler to identify the responsible service when services are associated with distinct user accounts.
- Controlled Access: Assigning specific accounts to services allows you to control who has access to run those services. You can restrict the accounts with the “Log on as a service” privilege, reducing the attack surface and improving overall security.
- Password Management: Services associated with dedicated user accounts can manage their passwords separately. This is especially useful in scenarios where password changes are required periodically or when following password management policies.
- Compatibility: Some applications and services are designed to work best under a specific user context rather than the Local System account. Running them as the Local System might lead to compatibility issues or limited functionality.
- Granular Permissions: User accounts assigned to services can have finely tuned permissions. This is particularly important when services interact with specific network resources, databases, or other systems. Assigning the appropriate permissions ensures smooth service operation without granting excessive privileges.
- Debugging and Troubleshooting: When services run under a specific user account, troubleshooting issues becomes easier. You can log in with that account to test and diagnose problems directly, which can be more challenging when using the Local System account.
While there are definite benefits to using dedicated user accounts for services, managing these accounts effectively is essential. Proper management includes maintaining strong passwords, adhering to password policies, and ensuring that the accounts themselves are not susceptible to unauthorized access.
In some cases, certain services may require more extensive privileges, making using the Local System account necessary. But, when possible, using the “Log on as a service” privilege to assign specific user accounts to services is a recommended security practice that enhances control, accountability, and overall system security.
Managing “Log on as a service” Rights Assignments via Group Policy
You can configure the “Log on as a service” rights assignment via the local or domain group policy.
Note . When you deploy the “Log on as a service” policy via Group Policy Object (GPO), the policy settings you define in the GPO will overwrite the existing list of accounts on the target computers. The GPO settings for “Log on as a service” will replace any existing accounts or groups granted the privilege.
- If deploying via GPO, open the Group Policy Management console ( gpmc.msc ) and open the group policy object to modify or create a new one.
- If modifying the local machine’s group policy, open the local group policy editor ( secpol.msc )

Note . The “NT SERVICESERVICES” group is added to the “ Log on as a service ” policy by default on Windows Server 2016, Windows 10, and later.

- THEITBROS\CA IT Ops — domain group
- THEITBROS\jmiller — domain user
- PCX\localadmin01 — local user

Related post . Configure NTP Time Sync Using Group Policy
Managing “Log on as a service” Rights Assignments via PowerShell
Managing the “Log on as a service” rights assignments in the command line is beneficial for systems without a desktop environment, such as Windows Server Core, and when managing computers during remote PowerShell sessions.
There are no native PowerShell cmdlets to manage the “Log on as a service” policy as of this writing. The only native command line tool that can modify the local security policies is the secedit.exe tool.
Download the “Log on as a service” Management Scripts
So, we created three PowerShell script wrappers for secedit.exe that you can download from the following links:
- [ PS-Manage-Log-On-As-A-Service ] — The public GitHub repository.
- [ Get-ServiceLogonRight.ps1 ] — A script to retrieve the local machine’s current “Log on as a service” rights.
- [ Add-ServiceLogonRight.ps1 ] — A script to add a user and group to the “Log on as a service” policy.
- [ Remove-ServiceLogonRight.ps1 ] — A script to remove a user or group from the current “Log on as a service” policy.
Download the above scripts and store them in a folder on your computer. Then open an elevated PowerShell session (run as admin), and change the working directory to where you saved the scripts.

List the Current “Log on as a service” Rights Assignments
To list the current accounts in the “Log on as a service” policy, run the below script.

Add Users and Groups to the “Log on as a service” Policy
To add a user or group to the “Log on as a service” Policy, follow the below example commands.
# Add a local group .\Add-ServiceLogonRight.ps1 -UserOrGroup <local group>
# Add a domain user account .\Add-ServiceLogonRight.ps1 -UserOrGroup <DOMAIN\user>
# Add a domain group .\Add-ServiceLogonRight.ps1 -UserOrGroup <DOMAIN\group>

Confirm that the new users and groups were added to the “Log on as a service” policy.

What happens if you add a non-existing group or user to the “Log on as a service” policy? You’ll get this message.

Remove Users and Groups from the “Log on as a service” Policy
When a group or user is no longer viable for the “Log on as a service” policy, you can remove it using the Remove-ServiceLogonRight.ps1 script.
# Remove a local group .\Remove-ServiceLogonRight.ps1 -UserOrGroup localadmingroup02
# Remove a domain user .\Remove-ServiceLogonRight.ps1 -UserOrGroup ‘THEITBROS\ebrown’
# Remove a domain group .\Remove-ServiceLogonRight.ps1 -UserOrGroup ‘THEITBROS\CA Server Admins’

Run the .\Get-ServiceLogonRight.ps1 script to confirm that the users and groups have been removed.

What happens if you remove a user or group not existing in the “Log on as a service” policy? You’ll get the following message.

While there are scenarios where services necessitate greater privileges and the use of the Local System account, assigning specific user accounts through the “Log on as a service” policy is recommended to enhance control, accountability, and overall system security.
This article has also covered methods for managing “Log on as a service” rights assignments via Group Policy and PowerShell.
For PowerShell users, the article introduced scripts using the secedit.exe tool to manage these rights assignments. These scripts include Get-ServiceLogonRight.ps1 to retrieve current rights, Add-ServiceLogonRight.ps1 to add users or groups, and Remove-ServiceLogonRight.ps1 to remove them.
Lastly, minimizing the number of user accounts to which you grant the “Log on as a service” permissions is advisable. To reduce security risks, you should turn off interactive and remote interactive sessions for service accounts.
Our newsletter is full of great content!
Subscribe TheITBros.com newsletter to get the latest content via email.

Cyril Kardashevsky
I enjoy technology and developing websites. Since 2012 I'm running a few of my own websites, and share useful content on gadgets, PC administration and website promotion.
Understanding ProxyAddresses Attribute in Active Directory
How to use get-acl and set-acl cmdlets when managing ntfs permissions for a file or folder with powershell.

Thank you. Literally NO ONE in Enterprise IT understands this about most of the stuff in the USer Rights Assignment of Group Policy. I’ve fixed so many outages due to admins settings this via GPO across many servers and overwriting what’s already set in there by x, y, z application that was installed who put accounts in there. Admins just blindly follow along application documentation or posts like this. I’m so tired of it.
– Angry Sr. Systems Admin LOL

Been like this for 20 years now.
Microsoft really needs to add switches for append, remove and replace for setting group policy objects, or just remove these from GPO management altogether as it’s half baked.

Please follow this up with how to set Logon As a Service for a user or group policy on Windows Server 2016 Core – there is no GUI, no control panel, no gpedit.msc, no gpmc.msc, no services.msc, etc etc.
For example, to setup Jenkins requires a user account with Logon As a Service enabled. Thank you
Leave a Comment Cancel Reply
Save my name, email, and website in this browser for the next time I comment.
This site uses Akismet to reduce spam. Learn how your comment data is processed .
Edit Local Security Policy Settings on Windows Server Core
(modified
The Gist Of IT
This section shows the work flow in condensed form. If you prefer a more detailled explanation skip to the next section.
If you needed to edit the local Security Policy Settings on Windows Server Core you may have noticed that the Microsoft Management Console (MMC) is not available on Server Core.
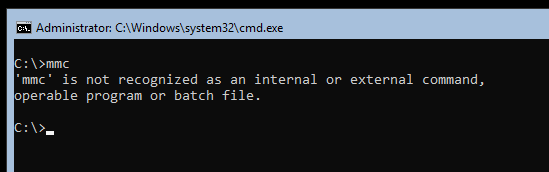
You may know that installing the Server Core App Compatibility Feature on Demand (FOD) adds the MMC (including a bunch of other basic features) back to Server Core. But unfortunately, although you can now open the MMC and add the Local Computer Policy snap-in ( gpedit.msc ), the Security Settings section is still unavailable.
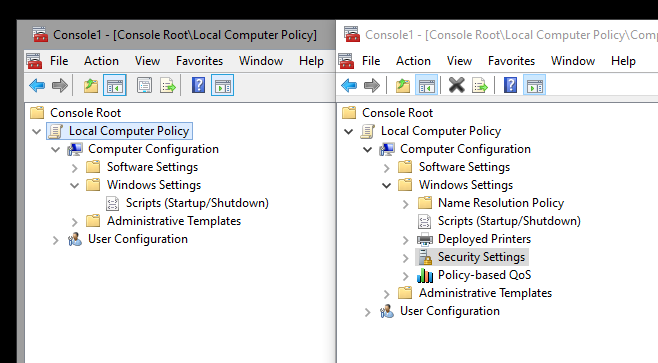
This means you need to use secedit.exe to edit the local security policy settings. This can be a bit daunting if you’re new to Windows Server Core. With the help of an example, I would like to show you how it works. In our example, we want to grant a domain account the privilege to log on as a service . On the Desktop edition, you would add the account as shown below.
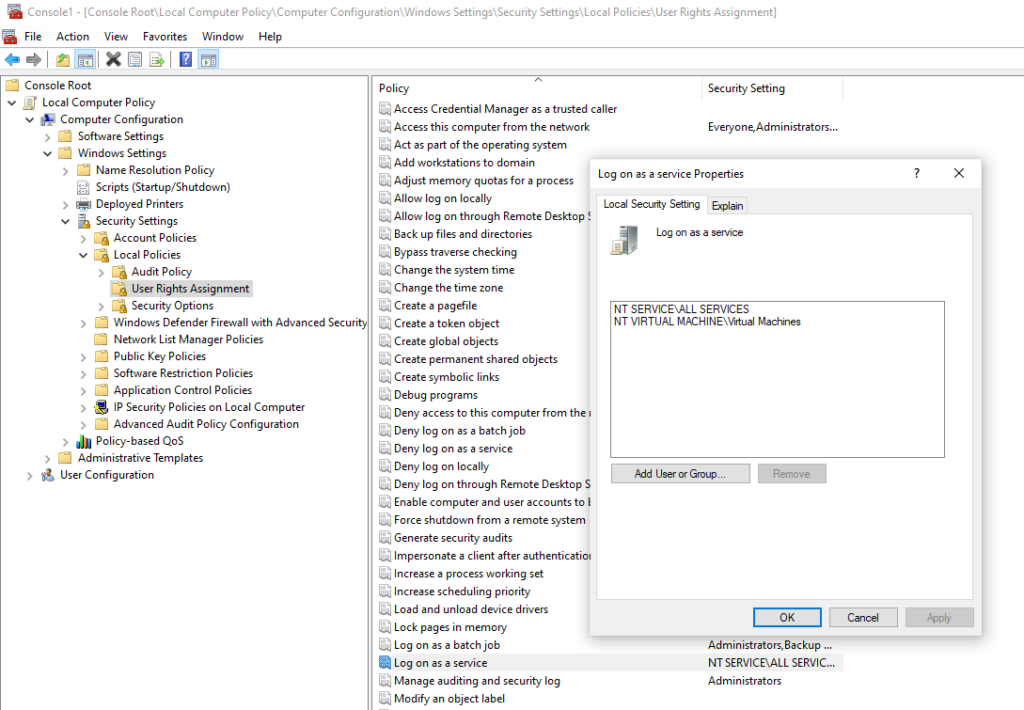
First, we need to find the constant of the privilege we want to assign. We can look this up in the Security Policy Settings Reference ( User Rights Assignment / Log On As A Service ). There it says, the constant is SeServiceLogonRight .
After we identified the constant, create a new temporary working directory, then export the current security settings with: secedit /export /cfg hisecws.inf . We can scope the command to export only the user rights assignments: secedit /export /cfg hisecws.inf /areas USER_RIGHTS . If we inspect the export, we should see something similar to this.
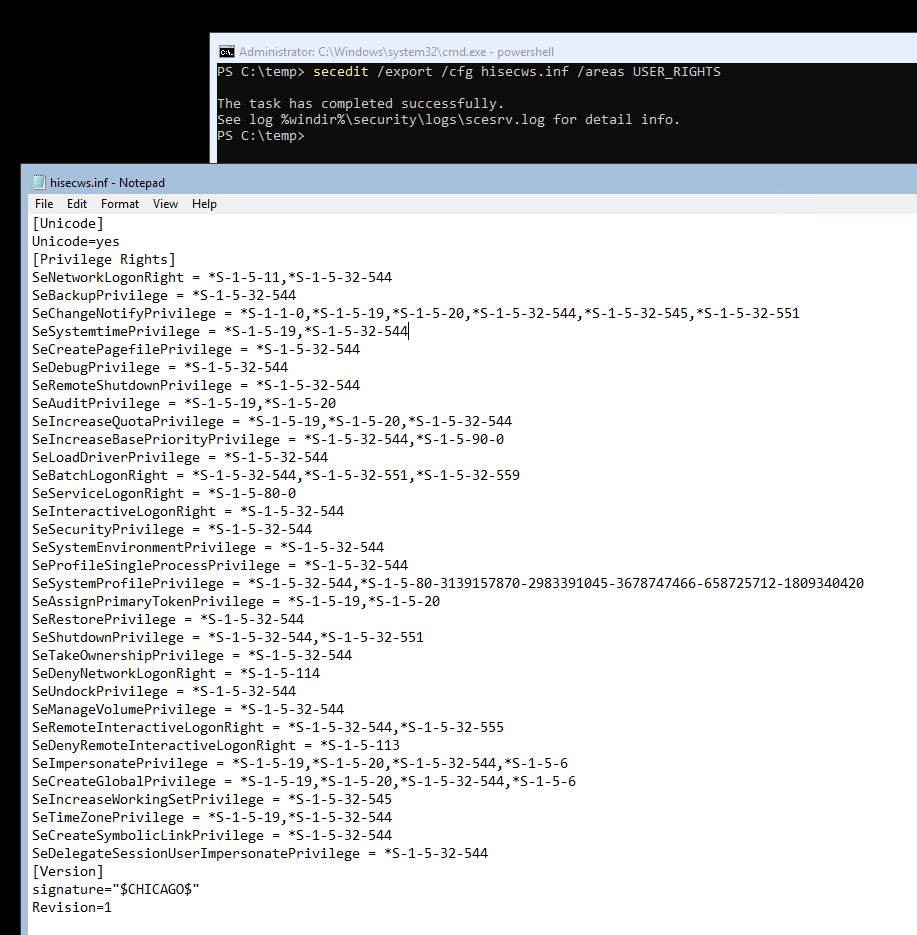
It is a good idea to keep a backup of this file until you verified that your applied changes work as expected. We would revert the changes simply by applying this configuration in the same way we would apply the new configuration, which I will explain next.
In this exported configuration file, each privilege is applied to one or more SIDs, separated by commas. Privileges that are currently not applied to any SID are not listed in the file. Find the line that starts with SeServiceLogonRight and append the SID you want to grant privilege to. Remember to prepend the SID with an asterisk. You may also remove any other privileges that should remain untouched to prevent unintentional changes. The final file would look similar to this:
Before we apply this configuration, we want to validate it: secedit /validate hisecws.inf . It is important to mention that this validates only the configuration file structure, not the values.
To finally apply the new configuration run this command: secedit /configure /db hisecws.sdb /overwrite /cfg hisecws.inf /areas USER_RIGHTS /log hisecws.log . This imports the configuration into a new database file before applying the database configuration to the system settings. This is a mandatory step as it is not possible to apply a configuration file directly to the system settings. The /overwrite parameter forces secedit to purge any data from the database file, if it already exists in the local folder. Unless you are configuring advanced scenarios, I recommend to overwrite it to not import unintended changes. We also scoped the import to the user rights assignments, although this was not strictly necessary as the imported configuration only contained one setting anyway.
When done check the log files for abnormalities, then restart your system. (Restarting the system is not always required, but getting into this would be out of scope for this article.) After you confirmed that the configuration changes work as expected, you may remove all files that you created during the change.
One response to “Edit Local Security Policy Settings on Windows Server Core”
Thank you for the clear, clean and concise instructions. Just what I was looking for.
Leave a Reply Cancel reply
Your email address will not be published. Required fields are marked *
Save my name, email, and website in this browser for the next time I comment.
This browser is no longer supported.
Upgrade to Microsoft Edge to take advantage of the latest features, security updates, and technical support.
Log on as a service
- 1 contributor
- Windows 11
- Windows 10
This article describes the recommended practices, location, values, policy management, and security considerations for the Log on as a service security policy setting.
This policy setting determines which service accounts can register a process as a service. Running a process under a service account circumvents the need for human intervention.
Constant: SeServiceLogonRight
Possible values
- User-defined list of accounts
- Not Defined
Best practices
- Minimize the number of accounts that are granted this user right.
Computer Configuration\Windows Settings\Security Settings\Local Policies\User Rights Assignment
Default values
By default this setting is Network Service on domain controllers and Network Service on stand-alone servers.
The following table lists the actual and effective default policy values. The policy's property page also lists default values.
Policy management
This section describes features, tools, and guidance to help you manage this policy.
A restart of the computer isn't required for this policy setting to be effective.
Any change to the user rights assignment for an account becomes effective the next time the owner of the account logs on.
Group Policy
The policy setting Deny logon as a service supersedes this policy setting if a user account is subject to both policies.
Group Policy settings are applied in the following order, which will overwrite settings on the local device at the next Group Policy update:
- Local policy settings
- Site policy settings
- Domain policy settings
- OU policy settings
Security considerations
This section describes how an attacker might exploit a feature or its configuration. It explains the countermeasure. And it addresses the possible negative consequences of the countermeasure.
Vulnerability
The Log on as a service user right allows accounts to start network services or services that run continuously on a computer, even when no one is logged on to the console. The risk is reduced because only users who have administrative privileges can install and configure services. An attacker who has already reached that level of access could configure the service to run with the Local System account.
Countermeasure
By definition, the Network Service account has the Log on as a service user right. This right isn't granted through the Group Policy setting. Minimize the number of other accounts that are granted this user right.
Potential impact
On most computers, the Log on as a service user right is restricted to the Local System, Local Service, and Network Service built-in accounts by default, and there's no negative impact. But if you have optional components such as ASP.NET or IIS, you might need to assign the user right to the additional accounts that those components require. IIS requires this user right to be explicitly granted to the ASPNET user account.
Related topics
- User Rights Assignment
Additional resources
IMAGES
VIDEO
COMMENTS
They include account policies, local policies, user rights assignment, the Windows firewall, software restrictions, and so on. There are several ways to configure security policy settings. The most common are: Group policy objects (GPO) - Used in Active Directory domains to configure and regularly reapply security settings to multiple computers.
User rights are managed in Group Policy under the User Rights Assignment item. Each user right has a constant name and a Group Policy name associated with it. The constant names are used when referring to the user right in log events. You can configure the user rights assignment settings in the following location within the Group Policy ...
In this article. Method 1: Use Group Policy. Method 2: Use Security Templates. This article describes how to grant users the authority to manage system services in Windows Server. By default, only members of the Administrators group can start, stop, pause, resume, or restart a service. This article describes methods that you can use to grant ...
Personal File Server - Get-UserRights.ps1 Alternative Download Link. or. Personal File Server - Get-UserRights.txt Text Format Alternative Download Link. In order to check the Local User Rights, you will need to run the above (Get-UserRights), you may copy and paste the above script in your Powershell ISE and press play.
1 Press the Win + R keys to open Run, type secpol.msc into Run, and click/tap on OK to open Local Security Policy. 2 Expand open Local Policies in the left pane of Local Security Policy, and click/tap on User Rights Assignment. (see screenshot below step 3) 3 In the right pane of User Rights Assignment, double click/tap on the policy (ex: "Shut down the system") you want to add users and/or ...
undefined. User Rights Assignment is one of those meat and potatoes features of the operating system that we all have a cursory understanding of but rarely think about in depth. User rights include logon rights and permissions. Logon rights control who is authorized to log on to a device and how they can log on.
9. You can use AccessChk in accomplish this task. Accesschk "domain\user" -a * will list all the permissions of a given domain user. You can call this program within a PowerShell script, concatenate the results into a text file, then filter out just the permissions you want to know about. Share.
User Rights Assignments. Although in this section they are called user rights, these authority assignments are more commonly called privileges. Privileges are computer level actions that you can assign to users or groups. For the sake of maintainability you should only assign privileges to groups not to individual users.
Navigate to Local Computer Policy >> Computer Configuration >> Windows Settings >> Security Settings >> Local Policies >> User Rights Assignment. If any accounts or groups are granted the "Enable computer and user accounts to be trusted for delegation" user right, this is a finding. For server core installations, run the following command:
Share the main folder with domain users, assign full rights. subfolders only assign groups that need to access each sub. I just configured new Windows Server 2012 R2, moved all data and it is ready for production. Well, it isn't ready for production if the permissions are wrong, but compare the settings on this server with those on the old ...
Windows 11; Provides an overview and links to information about the User Rights Assignment security policy settings user rights that are available in Windows. User rights govern the methods by which a user can log on to a system. User rights are applied at the local device level, and they allow users to perform tasks on a device or in a domain.
The following works on Window 2003 R2 SP 2, Windows Server 2012 R2. Add the user(s) in question to the Performance Monitor Users group; Under Services and Applications, bring up the properties dialog of WMI Control (or run wmimgmt.msc).In the Security tab, highlight Root/CIMV2, click Security; add Performance Monitor Users and enable the options : Enable Account and Remote Enable
Open the Local Users and Groups tool and navigate to the Groups tab. Select the Windows Admin Center Readers group. In the Details pane at the bottom, select Add User and enter the name of a user or security group that should have read-only access to the server through Windows Admin Center.
2. I'm new to PowerShell (PS). Currently I'm using windows server 2012 and I'm interested to know whether there is any way to export User Rights Assignment into a txt file. I tried. secedit /export /areas USER_RIGHTS /cfg d:\policies.txt. The above should should export it. So, I get this: Current Output.
Navigate to Local Computer Policy >> Computer Configuration >> Windows Settings >> Security Settings >> Local Policies >> User Rights Assignment. If any accounts or groups other than the following are granted the "Allow log on locally" user right, this is a finding: - Administrators For server core installations, run the following command:
Any change to the user rights assignment for an account becomes effective the next time the owner of the account logs on. ... If running Windows Server or Azure Stack HCI Failover Clustering, don't remove Authenticated Users from the Access this computer from the network policy setting. Doing so may induce an unexpected production outage.
Navigate to Security Settings → Local Policies → User Rights Assignments and double-click the " Log on as a service " policy. Click Add User or Group. Note. The "NT SERVICESERVICES" group is added to the " Log on as a service " policy by default on Windows Server 2016, Windows 10, and later. Specify the groups or users (domain ...
In the console tree, click Computer Configuration, select Windows Settings, and then select Security Settings. Do one of the following: Select Account Policies to edit the Password Policy or Account Lockout Policy. Select Local Policies to edit an Audit Policy, a User Rights Assignment, or Security Options. In the details pane, double-click the ...
First, we need to find the constant of the privilege we want to assign. We can look this up in the Security Policy Settings Reference ( User Rights Assignment / Log On As A Service ). There it says, the constant is SeServiceLogonRight. After we identified the constant, create a new temporary working directory, then export the current security ...
User-defined list of accounts; Not Defined; Best practices. Minimize the number of accounts that are granted this user right. Location. Computer Configuration\Windows Settings\Security Settings\Local Policies\User Rights Assignment. Default values. By default this setting is Network Service on domain controllers and Network Service on stand ...