
How to Write an Effective Presentation Outline
Key Takeaways:
- A presentation outline is a structured plan that helps you organize and deliver a well-structured presentation.
- Creating an outline is important for organizing your ideas, ensuring clarity, and engaging your audience.
- Identify your objective, gather content, organize ideas, add supporting details, create an introduction, develop the body, and summarize with a conclusion.
- Tips for creating a compelling outline include keeping it concise, using bullet points, visualizing with headings and subheadings, including engaging elements, and practicing and revising.
What Is a Presentation Outline
A presentation outline is a structured plan that helps you organize and deliver a well-structured and engaging presentation. It serves as a roadmap, guiding you through the content, flow, and key points of your presentation. By creating an outline, you can ensure that your ideas are organized, your message is clear, and your audience remains engaged.
Importance of Presentation Outline

A presentation outline plays a crucial role in ensuring the success of your presentation. Here are some key reasons why having a well-crafted outline is important:
- Organization: A presentation outline will help you structure your thoughts and ideas in a logical and coherent way. It ensures that your presentation flows smoothly and that your main points are effectively conveyed to the audience.
- Clarity: By outlining the main ideas and supporting details of your presentation, you can clarify your message and avoid confusion. It helps you stay focused and deliver a clear and concise presentation.
- Engagement: An outline allows you to plan engaging and interactive elements , such as visual aids, examples, and audience participation. It helps you maintain your audience’s interest throughout the presentation.
Without an outline, your presentation may lack coherence and direction, leaving your audience confused and disengaged. By creating an outline, you can strategically plan the flow of information, ensuring that each point builds upon the previous one.
Elements of an Effective Presentation Outline
A well-crafted presentation outline consists of several key elements. In this section, we will discuss the essential components that make up an effective outline, including the introduction, body, and conclusion. Discover how to structure your outline to create a cohesive and impactful presentation.
- Introduction: The introduction sets the stage for your presentation and grabs the attention of your audience. It should include a compelling opening statement, an overview of what will be covered, and a clear thesis statement that highlights the main purpose of your presentation. By crafting a strong introduction, you can captivate your audience from the start.
- Body: The body of your presentation outline is where you will present your main ideas, supporting evidence, and arguments. Break down your content into logical sections or subsections, making it easy for your audience to follow along. Each point should be clearly articulated and supported by relevant examples or data. Use headings and subheadings to create a structured flow of information.
- Conclusion: The conclusion is your opportunity to wrap up your presentation and leave a lasting impression on your audience. Summarize the main points discussed in the body of your presentation and reiterate your key message. You can also provide a call to action or offer a thought-provoking question that encourages further reflection or engagement. A strong conclusion ensures that your presentation ends on a high note.
Tips for Creating a Compelling Presentation Outline

Crafting a presentation outline requires careful consideration of various elements. To enhance your outline and ensure a compelling presentation, it’s important to organize your ideas effectively, incorporate visual content strategically, and engage your audience from start to finish. Here are some practical tips and techniques to help you create an outline that captivates your audience:
Outline Organization
Start by identifying your main points and structuring your presentation in a logical order. Use headings and subheadings to create a clear hierarchy of ideas. This will help your audience follow along and comprehend the flow of your presentation.
Structure your Content
With your main ideas and supporting evidence in hand, it’s important to structure your content in a logical and coherent manner. This can be done by organizing your ideas into sections or segments that flow smoothly from one to the next.
“A well-structured presentation will capture the attention of your audience and keep them engaged throughout.” – John Smith, Speaker and Presentation Expert
Incorporate Visual Content
Visuals can significantly enhance the impact of your presentation. Consider using images, graphs, charts, and videos to support your key points. Visual content not only adds interest but also helps reinforce your message and make it more memorable.
Engage Your Audience
A successful presentation is interactive and engages the audience throughout. Incorporate interactive elements such as polls, Q&A sessions, or group activities to encourage participation. This will not only keep your audience engaged but also make your presentation more memorable and impactful.
“A well-structured presentation outline acts as a roadmap to guide both the presenter and the audience. It helps maintain a logical flow of ideas and ensures that key messages are effectively communicated.” – Jane Smith, Presentation Expert
Learn from Presentation Outline Examples
Take inspiration from real-life examples of effective presentation outlines. Analyze how others have organized their content, used visuals, and engaged their audience. By studying successful presentation outlines, you can gain valuable insights and ideas to enhance your own.
Pay Attention to Color and Design
Creating a presentation outline is crucial when it comes to making a good presentation. Start by brainstorming ideas on color and design that will create an impact. Using a presentation outline template helps in organizing your thoughts and structuring the main body of your presentation. When creating your outline, make sure to include a slide for each point you want your audience to take away. Consider the font and design of your presentation slides to ensure your audience stays engaged.
Including a Call to Action
To ensure your presentation design is on point, you should make a presentation outline that includes a call to action. When you have created your presentation outline, you can use presentation templates to help you make a presentation that is both visually appealing and engaging for your audience.
When writing a presentation outline for a new product, it’s a good idea to answer these questions:
What should be included in your outline to make a creative presentation? How can you make a presentation that leaves a lasting impact on your audience? By including a call to action as a part of your outline, you can create an effective presentation that encourages your audience to take action after the presentation is over.
Review, Revise, and Refine
Once you have created your initial outline, review it carefully. Ensure that it aligns with your presentation goals, effectively communicates your message, and maintains a logical flow. Revise and refine as needed, keeping your audience’s perspective in mind.
Step-by-Step Guide to Create an Effective Presentation Outline

Creating a presentation outline is an essential step in delivering a successful and impactful presentation. A well-structured outline helps you organize your thoughts, maintain a logical flow, and ensure that you cover all the key points you want to communicate to your audience.
Brainstorm and Define Your Objectives:
Start by brainstorming ideas and determining the main objectives of your presentation. Consider what information you want to convey, the key messages you want to deliver, and the desired outcomes you want to achieve.
Identify Your Main Points:
From your brainstorming session, identify the main points you want to address in your presentation. These should be the key ideas or concepts that support your objectives and help you effectively convey your message to the audience.
Organize Your Thoughts:
Once you have identified your main points, organize them in a logical sequence that flows naturally. Consider using headings and subheadings to create a hierarchical structure that guides your audience through the presentation.
Add Supporting Content:
Think about the supporting content that you need to include for each main point. This can be facts, statistics, examples, case studies, or visuals that help reinforce your message and provide additional context to your presentation.
Summarize Key Takeaways:
At the end of each main point or section, summarize the key takeaways or messages you want your audience to remember. These should be concise and impactful statements that leave a lasting impression.
Review and Refine:
Once you have created a draft of your presentation outline, take the time to review and refine it. Ensure that the structure is clear, the content is well-organized, and the flow is logical. Make any necessary adjustments or additions to improve the overall effectiveness of your outline.
1. What is a presentation outline?
A presentation outline is a roadmap or blueprint that helps you organize your ideas and content for a presentation. It outlines the structure, flow, and key points of your presentation, ensuring a logical and cohesive delivery.
2. How can I engage my audience throughout my Business presentation?
To engage your audience throughout your presentation, consider using storytelling techniques , interactive elements, or thought-provoking questions. Encourage audience participation through activities, discussions, or Q&A sessions. Use visual aids, such as images, videos, or graphs, to enhance understanding and maintain interest. Finally, deliver your content with enthusiasm, clarity, and confidence.
3. What are the three basic parts of a presentation outline?
When creating a presentation outline, it is crucial to include three essential components. The first part is the introduction, which sets the stage for the presentation and provides background information. Following the introduction is the body, where the main points and supporting details are discussed in depth. Finally, the outline should include a conclusion that summarizes the key points and reinforces the main message.
4. What are the 5 pieces of presentation Outline? The 5 key pieces of an outline include the introduction, main points, supporting information, visuals, and conclusion. Each section plays a vital role in delivering a clear and impactful message to the audience.
Execute Your Presentation Outlines With PREZENTIUM
Are the endless hours crafting presentation outlines leaving you exhausted and your slides less than stellar? PREZENTIUM is set to change your presentation game.
Our Overnight Presentation Service ensures that your basic presentation outline submitted in the evening is transformed into an impressive final presentation by the next business day.
Impressive Presentations: Dazzle your audience with our top-tier templates and meticulously designed slides. Dedicated Expertise: Our adept team is on standby to join meetings, refine your notes into presentations, and ideate designs that make your message shine. Solid Content: We’re committed to problem-solving, structuring your presentation, and crafting content that engages and connects with your audience.
Bid farewell to the drudgery and embrace effectiveness. Craft an impressive presentation with PREZENTIUM now!
- Learn center
- Strategy & planning
How to make a presentation outline: a step-by-step guide

Georgina Guthrie
April 07, 2021
Whether you’re building a house, baking a cake, or writing an essay — having all the necessary pieces in place before you begin will make the task much easier.
It may seem counterproductive to spend time sorting things out when you’re in a rush… After all, why spend time organizing when you could dive straight in? But the fact is, the opposite is true: Planning saves time, and the same goes for creating a business presentation. Start with a presentation outline.
A presentation outline is a bare-bones version of your talk. It should take the general direction of your pitch, plus summaries of your key points. Its purpose is to help you shape your thinking, organize your thoughts, and make sure your material is presented logically.
In this article, we’re going to take a closer look at what a presentation outline is, how storytelling can help engage your audience, and how to create a flawless outline of your own. Let’s get stuck in.
What’s the purpose of your presentation?
This is the foundation on which you will build your whole presentation — so make sure you know the answer to this question. A good starting point is to think about the overall purpose. There are six possible purposes your presentation might have:
- Inspire action
- Inspire or motivate
In a business setting, it’ll usually be ‘to inform,’ along with one or two others. If you’re there to talk about quarterly results, then you’ll want to inform and motivate. If you’re a business coach, your goals will likely be to inspire, motivate, and entertain.
Once you’ve worked this out, you’ll be one step closer to working out the purpose of your pitch. Here are some questions to help you find an answer to this question:
- What do I want people to take away from my presentation?
- How will what I talk about help others in the room?
- What do I want people to do after my meeting?
Note down your ideas and start creating a topline summary of your presentation purpose. Summarize it into one or two sentences, then put that on your first slide. You can change it later, but this is a good starting point.
Create a story arc for your presentation
As humans, we love a good story. We’ve been doing it since, well, forever. The earliest cave paintings helped the painters and those who saw the paintings make sense of the world.
Interesting things happen when you start telling a story. Your brain’s auditory cortex (aka the bit that helps you listen) switches on. This helps you imagine the activities being described. Meanwhile, the frontal and parietal cortices are fired up, which helps us emotionally engage with what’s being said.

Stories have been, and will always be, a powerful tool for bringing people together. Great stories persuade and inform; the best stories inspire and stay with us. But we don’t often see this happening in the boardroom, where graphs and quarterly results preside.
Stats and numbers suck the life out of a presentation. We think these details will speak for themselves. But… they don’t because, well… they’re boring, and they make us switch off. If you want to inspire your audience, you need to weave those stats into a story . But where do you begin, and how do you start?
Storytelling isn’t something only a few select people are good at. Anyone can master the art with a little practice. It doesn’t even require heaps of creativity because the truth is, stories are formulaic, and once you’ve got the formula down, the rest runs on autopilot.
Let’s look at how to build your notes and ideas into a compelling story using one of the formulas below.
1.Fact and Story
Mixing storytelling with facts works in a kind of mutually supportive cycle. Facts add substance to the story; the story adds interest to the facts.
In this structure, you weave the two together and move back and forth between the two.
- Start with a ‘what if’ question. For example, if you were pitching a vacuum cleaner, your initial sales pitch might be ‘what if you didn’t have to lose suction?’
- From here, work in facts that illustrate the way things currently are. To continue with our example, it might be current stats on traditional vacuums losing suction. Keep alternating facts with fiction throughout the body of your presentation.
- End on a high note that makes the listeners feel like they learned something and want to move to action because of it. For example, to invest in your new product, or to sponsor your new app .
2. The hero’s journey
From Odysseus to Chihiro , adventure stories typically feature a hero who goes on a journey fraught with peril and learns a vital lesson at the end of it. It’s a formula employed by thousands of writers — and you can draw from it to add some drama to your presentation.
This structure works really well for inspirational personal stories, or tales about a company from its humble beginnings to the success it is today.
- Begin somewhere neutral. The situation is neither ideal nor unbearable.
- Introduce a challenge — one that needs to be solved.
- Present a worsening situation. The problem is being addressed, but things are still getting worse.
- Talk about rock bottom. The situation seems impossible; there is apparently no way forward and all seems lost. Until…
- Talk about a new discovery that offers hope.
- Armed with your new abilities, you can tackle the issue head-on.
- Talk about resolving the problem, but instead of returning to the way things were before, the hero (you) discovers an even better way of living.
- Finish with a lesson, which you can share to inspire your audience.
3. The Pitch
The ‘pitch’ style of presentation is commonly used by salespeople. The goal is to show how a product or idea can help an individual overcome a hurdle toward a positive outcome. The story should be relatable, so the audience can picture themselves in the situation and, therefore, benefitting from the solution.
- Start with a summary of the way things are in a way that’s easy to relate to.
- Introduce the problem or hurdle that you need to solve. Make it relatable to further help your audience put themselves in the situation.
- The solution: give your audience a glimpse into a possible solution.
- The fork in the road: Give your audience a couple of options for solving the problem. Offer an average option first, then follow up with a better one.
- Close: Choose the better option and explain why that’s the best one (and only real suitable choice).
- Finish up by telling the audience exactly how to solve the problem, step by step.
- But that’s not all: Before you finish, talk about extra benefits that extend beyond simply solving the problem. Finish on an uplifting high.
4. The explanation
This presentation format is for when you want to teach your audience something — whether that’s a process, a new skill, or a way to overcome a problem. It has similarities with the fact and story structure, insomuch as facts should weave into the story.
- Explain how things are at the moment, what the goal looks like, and how you plan to get there. You can even start with a story to add emotional interest from the get-go.
- Take your first step on the journey toward the final destination.
- Add more steps that build on this.
- Take a moment to recap on the points you’ve covered so far while tying them into the main point. This will help your audience visualize the ground you’ve covered and see where you’re heading.
- Add the finishing pieces to the puzzle and lead your audience to the end.
- By the end of your journey, your audience should feel as though they’ve learned something new.
5. The Opportunity
A close relative of the pitch, this three-part structure swaps a hurdle for an opportunity. Here, you want to show your audience that a problem they thought they had actually has an easy fix.
- Start with the situation as it is now.
- Next, add a ‘but’ — this could be a small hiccup that stops things from being as good as they could be. For example, our chocolate pudding company is doing really well. But we could be doing better if we changed supplier.
- Talk about the opportunity, with as many facts and stats as possible to make it feel achievable and real.
- Add a conclusion.
- Explain why the product or service meets the challenges raised. Add more stats and facts to support your point.
How to plan your presentation
Now you’ve worked out your structure, it’s time to start building your presentation, pulling in all your points and forming them into a story.
Storyboarding is the best way to do this. Directors use storyboards to map out their films scene-by-scene — you’re going to use it to map out your presentation, slide-by-slide.

(Don’t worry, you can do stick people and squiggles if drawing isn’t your strong point.) Image Source
The trick here is to use broad strokes without adding too much detail. Make it too wordy and you’ll lose your top-level view, which is important for assessing the arc of your story. Ideally, have one or two sentences on each slide summarizing what each one will address.
You can do this with pen and paper, but when it comes to final drafts and editing, it’s a good idea to move your drawings over to a digital format. It looks far neater, and it means that if you need to change something, it’s as simple as deleting or editing a cell or slide rather than you having to start over.
Once you’ve got your rough storyboard more or less ready, it’s time to start building your presentation.
Your presentation outline
Using a presentation template will be a big help here. First, choose your template — then start adding pre-made slides according to your storyboard. For those who didn’t plan, this can be a bit of a nightmare that usually ends up with you shuffling slides around indefinitely. For those who planned, it’s simply a matter of putting all your hard work in place, then spicing it up with pictures, video, and audio.
Top Tip : If your slides are there to support your spoken words, try not to make them too wordy. Talking too much will distract your audience, whose attention will be split between what’s on screen and your voice. Instead, opt for images and video. If you’re sharing your presentation slides without presenting them, keep your communication simple and succinct. A wall of text is never engaging.
Finally, rehearse your presentation. According to experts, 10 is the magic number when it comes to practicing speeches . The more you practice, the better it’ll flow, the easier it’ll be for your listeners to get sucked into your story. And when it comes to persuading, inspiring, informing, or selling — having a captive and engaged audience is half the battle.

5 ways to use diagrams to visualize your ideas

Using a SWOT analysis to develop core business strategies
Subscribe to our newsletter.
Learn with Nulab to bring your best ideas to life
Practical Presentation Outline Examples For Success (+ 8 Must Have Elements)
Jane Ng • 05 April, 2024 • 8 min read
Looking for Presentation Outline Examples ? Do you want to take your presentations from mediocre to magnificent? The secret weapon in achieving that transformation is a well-crafted presentation outline. A clear and organized outline not only guides you through your content but also ensures your audience stays captivated throughout your talk.
In this blog post, we’re going to share practical presentation outline examples and 8 key elements for constructing your own outlines that will leave a lasting impression.
Table Of Contents
What is presentation outline, why is presentation outline important, 8 key elements of presentation outline , presentation outline examples, key takeaways , faqs about presentation outline examples.

Start in seconds.
Get free templates for your next interactive presentation. Sign up for free and take what you want from the template library!

A presentation outline is a plan or structure that helps you organize and deliver a presentation or speech. It’s like a map that guides you through your talk.
- It outlines the main points, ideas, and key elements you intend to cover during your presentation in a logical and organized sequence.
- It ensures that your presentation is clear, logical, and easy for your audience to follow.
In essence, it’s a tool that helps you stay on track and communicate your message effectively.
A presentation outline is a valuable tool that enhances both the organization and delivery of your presentation.
- It benefits you as a presenter by reducing stress and improving focus, while also benefiting your audience by making your message more accessible and engaging.
- If you’re using visual aids like slides, an outline helps you synchronize your content with your visuals, ensuring they support your message effectively.
- If you need to make last-minute changes or adapt your presentation, having an outline makes it easier to identify and adjust specific sections without overhauling the entire presentation.
Whether you’re giving a business presentation, a school lecture, or a public speech, an outline is a key element in ensuring your presentation’s success.

A well-structured presentation outline should include the following key elements:
1/ Title or Topic:
Begin your outline with a clear and concise title or topic that represents the subject of your presentation.
2/ Introduction:
- Hook or Attention-Grabber: Start with a compelling opening statement or question to engage your audience.
- Purpose or Objective: Clearly state the purpose of your presentation and what you aim to achieve.
- Main Points or Sections : Identify the major topics or sections that you will cover in your presentation. These are the core ideas that support your thesis statement.
3/ Subpoints or Supporting Details:
Under each main point, list the specific details, examples, statistics, anecdotes, or evidence that support and elaborate on that main point.
4/ Transition Statements:
Include transition phrases or sentences between each main point and subpoint to guide the flow of your presentation smoothly. Transitions help your audience follow your logic and connect the dots between ideas.
5/ Visual Aids:
If your presentation includes slides or other visual aids, indicate when and where you plan to use them to enhance your points.
6/ Conclusion:
- Summary: Recap the main points you’ve discussed during your presentation.
- Include any final thoughts, a call to action, or a closing statement that leaves a lasting impression.
7/ Q&A or Discussion:
If applicable, mention when you’ll open the floor for questions and discussion. Be sure to allocate time for this if it’s part of your presentation.
8/ References or Sources:
If you’re presenting information that requires citations or sources, include them in your outline. This ensures you give credit where it’s due and can reference them during your presentation if needed.
Here are some additional tips for creating a Presentation Outline
- Time Allocation: Estimate how much time you intend to spend on each section of your presentation. This helps you manage your time effectively during the actual presentation.
- Notes or Reminders: Add any reminders, cues, or notes to yourself that will help you deliver your presentation effectively. These can include tips on delivery, body language, or specific points to emphasize.

Here are a few presentation outline examples for different types of presentations:
Example 1: Sales Pitch Presentation – Presentation Outline Examples
Title: Introducing Our New Product: XYZ Tech Gadgets
Introduction
- Hook: Begin with a relatable customer problem.
- Purpose: Explain the presentation’s goal.
- Thesis: “Today, I’m excited to introduce our innovative XYZ Tech Gadgets designed to simplify your life.”
Main Points
A. Product Features
- Subpoints: Highlight key features and benefits.
B. Target Audience
- Subpoints: Identify potential customers.
C. Pricing and Packages
- Subpoints: Offer options and discounts.
Transition: “I’m glad you’re interested in our product. Let’s talk about the different ways you can purchase it.”
Purchase and Support
- a. Ordering Process
- b. Customer Support
- Recap product highlights and benefits.
- Call to action: “Visit our website or contact our sales team to get your XYZ Tech Gadgets today.”
Q&A Session.

Example 2: The Evolution of Jazz Music – Presentation Outline Examples
Title: The Evolution of Jazz Music
- Hook: Begin with a famous jazz quote or a snippet of iconic jazz music.
- Purpose: Explain the goal of the presentation.
- Thesis: “Today, we’ll take a journey through time to explore the fascinating evolution of jazz music.”
A. Early Origins of Jazz
- Subpoints: African roots, New Orleans as a melting pot.
B. The Jazz Age (1920s)
- Subpoints: Swing music, jazz legends like Louis Armstrong.
C. Bebop and Modern Jazz (1940s-1960s)
- Subpoints: Charlie Parker, Miles Davis, experimental jazz.
Transition : “Let’s now turn our attention to the diversity of jazz styles, which is as vast and complex as the history of the music itself.”
Different Styles of Jazz
- a. Cool Jazz
- b. Fusion Jazz
- c. Latin Jazz
- d. Contemporary Jazz
Influence of Jazz on Popular Music
- Subpoints: Jazz’s impact on rock, hip-hop, and other genres.
- Summary of the evolution of jazz music.
- Call to action: “Explore the world of jazz, attend live performances, or even pick up an instrument to contribute to this ever-evolving art form.”
Presentation outlines are indispensable tools that can elevate your presentations from good to great. They provide structure, organization, and clarity, ensuring that your message reaches your audience effectively. No matter if you’re delivering an educational presentation, a convincing sales pitch, or an interesting speech, these presentation outline examples aim to offer you valuable information.
To take your presentations to the next level, leverage AhaSlides. With AhaSlides , you can seamlessly integrate interactive features into your presentation, such as spinner wheel , live polls , surveys , quizzes , and audience feedback features.
These interactive features not only enhance audience engagement but also provide valuable insights and real-time interaction, making your presentations more dynamic and memorable.
So, let’s explore our template library !
📌 Tips: Asking open-ended questions help you to create an outline for presentation easier!
What should a presentation outline include?
Title, Introduction, Key points, subpoints, transitions, visuals, conclusion, Q&A , and time allocation.
What are the 5 parts of a presentation?
Introduction, main points, visuals, conclusion, and Q&A.
How do you outline a project presentation?
Define objectives, list key topics, organize content logically, and allocate time.
Do you need an outline for a presentation?
Yes, an outline helps structure and guide your presentation effectively.
Ref: Indeed | EdrawMind

A writer who wants to create practical and valuable content for the audience
Tips to Engage with Polls & Trivia
More from AhaSlides

How-To Geek
How to make a powerpoint presentation from an outline.
This is great if you like to start projects with an outline!
Quick Links
Compose your outline, create the powerpoint presentation.
When you plan out your slideshow ahead of time, you might use an outline. This helps determine the content for each slide. In Microsoft PowerPoint, you can pull that outline right into the application and transform it into a presentation.
If you already have an outline, you're one step ahead. If not, you can use an application like Microsoft Word or Notepad for your outline.
Related: How to Create and Work with Multilevel Lists in Microsoft Word
Each line in the outline displays on a separate slide even if you have a multilevel outline .
If you use numbering or bullets in an application like Word , those normally won't carry over to the slides. But with software like Notepad, they may. So, depending on the application you use for the outline, this is something to keep in mind.
You can add the outline to an existing presentation, new blank slideshow, or one with a template . Open PowerPoint and choose the slideshow or make a new one.
Related: How to Create a Custom Template in PowerPoint
On either the Home or Insert tab, select the New Slide drop-down menu. Pick "Slides From Outline."
Browse for the outline file on your computer, select it, and click "Insert."
After a moment, you'll see your outline load into PowerPoint. As mentioned, each line of the outline is its own slide.
From there, you can add text, include images, insert animated charts , and use videos as you normally would.
Creating a PowerPoint slideshow from an outline gives you a good jump-start on your presentation.

How to Outline a Presentation: A Complete Guide From a Pro
- Filed under: Public speaking articles , Speaking tips , Speech preparation
When you’re writing an important speech, you must start with a clear outline. However, I find that many speakers are uncertain of how to write a good outline for their presentation. This is why I decided to write a guide for you, in hopes that learning to perfect your outlines will help you give better presentations in the future.
How do you outline a presentation? Always start with your introduction and end with your powerful closing. Flesh out the body by listing topics in the order that you want to cover them in. Never skimp on the important details of your speech. Remember that an outline is only a draft.
I know at this point that you still have questions, and that you still be confused at how to write the best outline for your speech. But writing a good outline for your presentation does not have to be stressful! This is my complete guide from a pro for you, in hopes that you can take the stress out of this important step.
Table of Contents
How to Outline a Presentation
Outlining a presentation can be done with a regular piece of paper, or on a word processing program on your computer. If you are hosting a PowerPoint presentation, you may prefer to do the entire thing from the comfort of your computer. But if you do decide to write your outline on a piece of paper, make sure you use a pencil and eraser so that you can make changes as you go along.
The very first step in creating an outline is to ask yourself what the purpose of your presentation is.
Write your main message or a one-sentence summary of your thesis at the top of your outline when you get started. This may help you stay on task, and it will keep the purpose of your speech right in your eye’s sight. After all, you don’t want to stray too far off the main topic of your presentation !
Remember, a quality outline is meant to enhance the purpose of your presentation. If you do not write a proper outline, you may risk not properly conveying the right message to your audience.
Or you may even forget to cover essential points that you wanted to talk about. A thorough outline is especially important if you are planning to speak without notes.
You should remember to properly summarize what you want to say with every sentence of your outline. After all, this is not a full script, so a summary is all you really need. Remember to rehearse and practice with your outline, so that you can remember what you have written.
Start With a Strong Beginning
Your introduction is where you start strong by grabbing your audience’s attention from the very beginning. But if that makes you feel stressed out, just remember to stay calm! Creating a great first impression from the beginning of your speech is not as difficult as you might be worrying.
When you create a strong beginning, you should try some of the following:
- Start with an attention-grabbing statement that captures your audience from the start. If you have a few ideas but are not sure what to use, try running your ideas by a trusted friend or mentor.
- Give a strong signal that you are beginning your speech. You don’t want your audience unsure of whether you’ve actually begun or not.
- Give the main thesis statement about the purpose of your presentation.
- You could start by giving a brief preview of all of the things that you are going to talk about in the body of your speech.
- Talk about your credentials at the beginning. However, you should make sure to find a way to do it that is entertaining. You don’t want to risk boring your audience from the very beginning of your speech!
- Thank your audience from the very beginning! This is not only a good way to begin your speech, but a good way to end it, as well.
- If there are any current events or famous historical events that relate to the purpose of your presentation, you can start by talking about these. However, pick only one so that you do not draw your introduction out too long.
- Ask your audience a question at the beginning. You could draw out their interest by answering this question at a later point in your speech.
- Whenever possible, make sure you begin your speech on a positive note . This sets a good tone for the rest of the presentation.
- Start by telling a story that relates to your presentation. A good reason to start with a story is that it helps you form a strong connection with your audience from the beginning. Write some of the main details of your story in your outline so that you remember them.
Be reminded thought, that sometimes it is wise to write your introduction last as only you know what you’ll be introducing. This way, you’ll also avoid including something in your introduction that you won’t be actually talking about.
Once you have written out your introduction, you have completed the first step in creating an excellent outline for your presentation.
Create a Powerful Ending
In my experience, it can be easier to create ending before you flesh out the body of your presentation. However, it is up to you if you prefer to create your outline in a different order.
If you are a regular reader, you might have realized that I already posted an in-depth article here about how to end a presentation in a powerful way . Right now we are going to talk about the same thing in somewhat less detail.
Recommended books
How to Deliver a TED Talk: Secrets of the World's Most Inspiring Presentations
Jeremy Donovan
Resonate: Present Visual Stories that Transform Audiences
Nancy Duarte
Confessions of a Public Speaker
Scott Berkun
Talk Like TED: The 9 Public-Speaking Secrets of the World's Top Minds
Carmine Gallo
The Checklist Manifesto: How to Get Things Right
Atul Gawande
The First 20 Hours: How to Learn Anything... Fast!
Josh Kaufman
Just like with your beginning, make sure that you’ve made it obvious you are ending. After all, few things are more awkward than your audience sitting there long after you’ve finished, feeling confused about whether they should leave or not.
If the point of your speech is to motivate your audience to do something, you might consider ending your speech with a call to action . A call to action is simply an instruction that you give your audience about something you want them to do.
You could also potentially end your presentation with a powerful quote or an entertaining story . And if you have a unique tagline that exists to help promote your personal brand, consider ending with it.
But if you are planning to have a question and answer period at all, make sure you are not directly ending with one. Plan to wrap up your question and answer period before delivering your speech’s closing at the end.
This is because ending with a question and answer period is not only not memorable, but a negative question from an audience member can leave a bad taste in everyone’s mouth . This is not the last thing you want your audience members to remember as they’re leaving!
And as always, you should thank your audience at the end of your speech. This will make them feel valued, and impressed with your gratefulness.
Flesh Out the Body of Your Presentation
So, you’ve got your beginning and ending all figured out, but now what else do you do with your outline? This is the stage where you work on the body of your speech. That is, you will want to think about what you want to say in between your beginning and end. Here are some speech writing tips I have written about previously.
Write the main points of your outline in order
It may be easier for you to write bullet points or even a numbered list. List your main points in order of what you want to talk about. If at first glance the topics don’t seem to flow, it is okay to re-arrange them.
You can also decide at this point if there is anything you want to add or subtract. If you feel like you’ve made a mistake, don’t worry! It is okay to make any changes along the way.
Add sub-points and transitions to your topics
Add sub-points to your main points in order to further flesh out your outline. Even if you want to keep it simple, sub-points may help you to stay on track and remember what you were going to say.
You can also add to the ideas that your main points present. Make sure that the transitions from one point to another flow smoothly from one thing to the next.
Don’t forget the essential details!
Are there any special details that you need to remember for your presentation? Put these in your outline so that you don’t forget them. This can include important names, dates, and locations that you need to remember.
Write down how long will it take
If your speech is supposed to cover a certain amount of time, try listing times for each of your main points. This may help you not go over or under your time.
Also, take a look at these articles:
- 11 Great Tips How to Write a Great Persuasive Speech
- How to Deliver a Perfect Elevator Speech
How to Outline a PowerPoint Presentation?
You may be thinking that you don’t need an outline for your PowerPoint presentation. However, don’t rely on your slides alone ; you need a proper outline, too. An outline for a PowerPoint presentation should also include images that you intend to use for your slides.
Fortunately, the PowerPoint program itself also allows you to view an outline of your slides. This can help give you a visual of your overall presentation.
Remember, This is Only a Draft!
If your outline isn’t the way you want it to be, remember that it is only your very first rough draft. Your outline doesn’t have to be perfect, because it is not your final product. While you should work hard to make your outline as good as possible, you don’t need to stress about it.
And remember that if you finish your outline, and you are not satisfied with how it looks? It is okay for you to scrap it and start all over again. There is no reason that you should stick with an outline that you don’t feel confident about.
An outline is a great place to start whether you intend to read from a full script, read from cue cards, or speak without notes. If you are an avid reader of Speak and Conquer, you’ll remember that I recommend creating an outline in many of my articles.
Get Feedback From Others About Your Outline
There is no reason that you have to go any of this by yourself. If you have a friend or mentor who is experienced with public speaking , why not ask them to take a look at your outline for you? They may see something that needs to be changed that never even occurred to you.
You could also give a practice round of your speech in front of a friend, family member, or mentor. Give them a chance to make suggestions about whether or not there’s anything that you should change. After all, it’s better for you to realize if something needs to be done differently before the actual day of the presentation.
If you don’t have someone who you can rehearse in front of in person, try recording your presentation in front of a video camera . Show it to someone you trust via email or social media. If they have any suggestions for change, you can alter your outline accordingly.
Why is a Presentation Outline so Important, Anyway?
While reading this article, you may be wondering why you even need an outline for your presentation. This may be especially puzzling to you if you are planning to give a speech without notes . But I find that an outline can be incredibly useful no matter what kind of presentation you are planning to give to your audience.
Like I said before, the main point of an outline is to enhance the main purpose of your speech further. But I’m also going to give you a list of some more reasons why I believe an outline is absolutely essential.
Some other good reasons for creating an outline for your presentation are:
- You will have an easy visual to look at the order of the topics you are talking about. This way, you can see if anything looks out of place.
- The proper outline will help to keep your speech organized.
- You will be able to look at the connections between your ideas . This may even help you realize you need to add or subtract certain things from your speech.
- A good outline will help you remember to t ouch on every important point that you need to cover in your presentation.
- Outlining helps you see whether or not your main points and sub-points flow smoothly . If you create your outline and realize that some of your points do not flow, you can easily re-write key parts.
- Using an outline instead of a full script will give you more freedom to improvise during your presentation. This is why creating an outline is a great first strategy if you are speaking without notes, or trying to memorize a speech in a short period of time.
- If you’re not sure where to start preparing for your speech, then writing a loose outline is a good first step to help you out.
- Practicing with an outline will help enhance your memory about the main points and sub-points of your presentation.
No matter what kind of presentation you are planning to give, a solid outline with help you be prepared and ready to go.
Conclusion: How do you make an outline for a talk?
Today, I have compiled a thorough guide about writing a quality outline. We discussed creating a good beginning, ending, and body of your presentation. We have even talked about why a good outline is important, too. If you have any other tips to share about creating an outline for your presentation, make sure to share them in the comments section.
If you are looking to improve your public speaking and presentation skills, check out the rest of my articles on Speak and Conquer. The purpose of my site is to help you succeed in becoming a better public speaker. For example, I have covered popular topics such as how to memorize a speech in less than an hour , and how to use hand gestures effectively during a presentation .
Related Questions
What software should I use to outline my speech? Preferably, you should have a program that allows you to use bullet points or numbered lists. Bullet points and lists are a good place to start when you are outlining. Microsoft Word, Word Processor, or Notepad are acceptable for basic outlines.
How do I decide what the purpose of my speech is? Decide if you are there to inform, educate, motivate, or entertain your audience. When you have narrowed it down to just one of those, you will be able to decide the main idea of your speech. You should preferably speak about a topic that you are well-educated about.
How do I write a speech? Start with a purpose, and then create a detailed outline. Flesh out the points and sub-points from your outline. Decide very early on if you want to give your speech with or without notes. Revise your drafts as much as possible until you have created a full speech. If you are going to speak with notes, write some of the information from your outline onto cue cards.
Useful reading
- 16 secret ways how to speak to a bored audience
- How to Use Your Voice Effectively in a Presentation?
- 13 Effective Ways How to Make Speech Pauses
Posts about public speaking you may also like

How to Give a Eulogy and Deliver It Like A Pro? 8 Great Tips
Someone significant in your life has passed and it is now time to deliver a eulogy. The responsibility is on your shoulders. Of course, it’s

10 Great Tips How to Dress for Public Speaking?
You don’t have to be a fashionista to wonder how to dress for public speaking. This is actually a common concern, and sometimes can cause

How to deliver a ceremonial speech? A Full Guide
There are certain times in your life that are going to involve ceremony, whether it is getting sworn into a local office, as a school
- Tags: Effective speaking , Good speech , Pauses in speech , Speech preparation process , Speech skills , Speech tips , Unprepared speech , Unprepared speech topics
Recommended gear

Best Portable Speakers For The Presentations

Best Video Cameras for Public Speakers

Best rresenter remotes for public speakers

Best Portable Thumb Drives And Hard Drives for the Presentations
Who is janek tuttar.
My name is Janek Tuttar , and I am the founder and author of Speak and Conquer website.
I have been teaching public speaking at Estonian Entrepreneurship University of Applied Sciences
Here, I am sharing the wisdom of how to cope in different public speaking situations.
More information about Janek »

Share this post

Hi! My name is Janek Tuttar, and I am the founder and author of SpeakAndConquer.com.
I have been teaching and blogging about public speaking since spring 2007. Here, I am sharing the wisdom of how to cope in different public speaking situations.
Send me an e-mail: [email protected]
LEGAL INFORMATION
This site is owned and operated by Janek Tuttar. SpeakAndConquer.com is a participant in the Amazon Services LLC Associates Program, an affiliate advertising program designed to provide a means for sites to earn advertising fees by advertising and linking to Amazon.com.
This site also participates in other affiliate programs and is compensated for referring traffic and business to these companies.

Best teleprompters

Best Computer Mice for the Presentations

Best Laptop Backpacks for Public Speakers
Critical PowerPoint Shortcuts – Claim Your FREE Training Module and Get Your Time Back!
The Outline View in PowerPoint (Ultimate Guide)
- PowerPoint Tutorials
- Miscellaneous
- December 5, 2017
This ultimate guide to the Outline View will catch you up to speed on the best ways to use the Outline View in PowerPoint.
There are a variety of different ways you can use the Outline View in PowerPoint to create, review and rearrange your content, all detailed below.
Table of Contents
What is the outline view in powerpoint.
It’s simply a way to view your presentation based solely on the text found within the content placeholders of your slides.
For example, you can see the difference between the views in the SAME deck below – the one on the left is the Normal View (thumbnail view), the one on the right in the Outline View.

And beyond simply showing the outline of your presentation, there are a number of tricks, shortcuts and PowerPoint hacks to BEND the Outline View to do your beck and calling.
You can slowly scroll down the page and soak up all of this PowerPoint goodness, or use the table of contents on the left to jump around to some of the advanced topics.
Switching to the Outline View in PowerPoint
There are three different ways to open (or switch to) the Outline View in PowerPoint, both described below.
Option #1. My favorite way to switch to the Outline View in PowerPoint is the CTRL + SHIFT + TAB keyboard shortcut.
This shortcut opens and/or closes the outline view, displaying either the normal thumbnail view of your slides or the outline view of your content.
Notice how in the outline view (pictured above), instead of seeing the thumbnail preview of the slides (with the respective graphics) you only see the text that is in the content placeholders .
And this makes a BIG difference!
The text you type into normal shapes and text boxes will NEVER show up in the Outline View, only the text that is the content placeholders that are set on the Slide Master.
Open the outline view #2
Another way you can open the outline view is by simply clicking the Normal icon at the bottom of your PowerPoint workspace.
- Clicking the icon once will open the outline view (assuming your notes pane is already open)
- Clicking the icon a second time will close the outline view, returning you to the thumbnail view.
If your notes pane is not open, you will need to click the icon an extra time before moving to the outline or thumbnail view.
Outline View NOT showing text?
Only text that is typed into content placeholders will show up in the outline view.
What’s a content placeholder?
Content placeholders are objects that you (or someone) set on the slide master of your presentation. These are objects like titles, subtitles and any other ‘type to add text here’ type of objects.
These types of placeholders can only be set on the Slide Master, and it’s only the text typed within these placeholders that shows up in the Outline View of your presentation.
So if you move to the Outline View (CTRL + SHIFT + TAB) and don’t see your slide’s text there, it means that your text is not in a content placeholder, it’s likely in a normal shape or text box that has been added to your presentation.
All of the other normal shapes and text boxes that you add to your presentation in the normal view, WILL NOT show up in the outline view of your presentation (no matter what you do).
Drafting an outline in PowerPoint
The MOST IMPORTANT keyboard shortcut to remember when drafting an outline in PowerPoint is:
New Slide Shortcut in PowerPoint, Ctrl plus Enter
Ctrl + Enter
This is your one stop shop for jumping between your content containers (regardless of how many you have) either in the Outline View or the Normal View of your presentation.
In the picture below you can see the different numbers in the Outline View on the left and follow the arrows to the right to see how they line up with the content containers on the right.

CTRL + ENTER allows you to jump between these containers without taking your hands off of the keyboard.
This shortcut works both in the Normal View in PowerPoint – jumping between content containers – and the Outline View in PowerPoint.
Once you run out of content placeholders to type text into, hitting CTRL + ENTER again gives you a new blank slide to work with.
Outline View Keyboard Shortcuts
Besides the CTRL + ENTER keyboard shortcut described above, there are a number of other Outline View shortcuts, most of which involve the ALT + SHIFT keys (making them easier to remember)
When using the Outline View shortcuts, remember that for most of them to work (like collapse groups ALT + SHIFT + 1 and expand groups ALT + SHIFT + 9) you need to rotate to the Outline View to activate it.
To rotate (or activate) the Outline View is to first open the outline view (CTRL + SHIFT + TAB) and then rotate active panes counterclockwise (SHIFT + F6).
If you are brand new to shortcuts, my advice is to just first start with the open/close Outline View shortcut (CTRL + SHIFT + TAB). If you are an intermediate to advanced user and will be frequently using this view, then it’s worthwhile learning how to activate and navigate this view entirely from your keyboard.
Resetting your text formatting
If for whatever reason you forget to paste your content as Text, you can always reset your slide (either in the Normal View or Outline View) to refresh your default formatting.
To do so simply select your text (or slides in the Normal View), navigate to the Home tab, and in the Slide group section select Reset .

Resetting your slides does two things simultaneously:
- It forces all of your content placeholders back into their original position, defined by their position on your Slide Master (this is useful if something accidentally gets moved out of place).
- It forces all of your text back to its original text formatting, as defined by the Slide Master and Theme.
How to print the outline view in PowerPoint
Another overlooked feature of the Outline View is that you can print it.
This is useful when you have a large presentation and you simply want to see what it looks like based on the Titles, sub-titles and other content placeholders….basically your slides minus all of your graphics, pictures, etc.
To print your outline view, simply follow these steps.
1. Navigate to the Print Options
On your keyboard, hit CTRL+P to open up the print options for your presentation.
2. Navigate to the Outline View
Within the print options, select the ‘Full Page Slides’ dropdown (the default setting) and within the menu in the upper right-hand corner, select the Outline View.
Once the outline view is selected, you’ll see a print preview of your slides on the far right.

As shown in the picture above, by default the Outline View is a default blank layout, but you can customize this as I will show you in the next section.
For additional help printing your PowerPoint slides as handouts, check out our guide here .
To learn how to convert your presentation outline into the PDF file format, see our guide here .
Customize the Outline View
If you frequently print the Outline View of your presentation, you can customize it with your own personalized branding (colors, logos, etc.).
This is particularly useful if you plan on sending the print out of the Outline View around. To customize your Outline View, follow these steps.
Step #1. Navigate to the Handout Master
There are two ways to do this:
- From the view tab, select the handout master icon.
- Holding the SHIFT key on your keyboard, click the slide sorter command at the bottom of your screen.

This Shift + Slide Sorter shortcut is a hidden shortcut.
2. Navigate to the Outline View framework
Within the Handout Master view, open up the slides per page drop-down.
So this is where you can select the different formats of your slides when printing them as handouts, depending on how many slides you plan to print per handout.
These options line up directly (plus some like the Notes Page ) with the handout print options available as showing in the picture below.

Within the drop down, simply select the Outline View at the bottom to open up the Outline View format.

3. Customize your Outline View
Just like working with any normal slide, in this Handout Master Outline view, you can add your own personal customizations like your logo, design elements, extra text, etc.
In the example below I’ve added the Nuts & Bolt log in the upper right-hand corner and a simply gradient colored rectangle down the left-side of the page. You don’t have to do anything too fancy…a little effort will go a long way and shock most people.

Using the Outline View in Word and PowerPoint
There are two ways to get an outline from Word into PowerPoint.:
- Import the Outline from PowerPoint which allows you to add the slides to an existing presentation
- Open the Outline directly in PowerPoint creating a brand new presentation
If you are using a Mac, you need to use the Rich Text file Format (.rtf). See instructions for how to do this on Microsoft’s website here .
Import a Word Outline into PowerPOint
Importing your slides like this will add any new slides to the current presentation you are working in. Don’t worry, none of your other slides will be affected.
To learn about the common mistakes that happen when converting Word to PowerPoint, see our post here .
1. Navigate to the ‘Slides from Outline’ command
From within your presentation, navigate to the Home tab, open the New Slide drop down and at the bottom of the dialog select Slides from outline… to open the File Navigation dialog box.

2. Find your Word document
Within the dialog box, find your Word document and select ‘Insert’.

To fix this, you need to use the Title style and Heading 1 styles in Word.

Don’t forget to format your presentation
Importing an outline like this is a great way to jump start your presentation building process, but don’t stop here.
Your outline will always import in the most DEFAULT blank presentation style with only the Title and Content container slide layout.
This default look DOES NOT make for an effective presentation, so you will want to make sure to apply a theme and work on incorporating visuals like charts, tables, pictures, etc. to make your presentation more effective.
Opening an outline in PowerPoint
Instead of importing your outline, you can open your outline directly in PowerPoint to start a brand-new presentation.
To do so, follow these simple steps.
1. Go to the Open File dialog box
Within PowerPoint, either navigate to the File tab, Open and select Computer or on your keyboard simply hit CTRL + F12.

Using either method, the navigation dialog box opens up.
2. Change the file type you are searching for
Within the Open File dialog box, in the lower right-hand corner change the file type you are searching for from PowerPoint files to All Outlines .

3. Find your outline document
Find your outline document (I usually just save mine in Word) and click okay.
Note, if you are using a Mac, you need to save your Word document in the Rich Text File (.rtf) format.
If your outline is formatted correctly, your text will import correctly in the title and content container placeholders. If not formatted correctly, each line of text from your outline will import as its own individual slide.
Final Thoughts
So those are all the different ways you can use the Outline View in PowerPoint to quickly build and edit your PowerPoint presentations.
If you end up using the Outline View a lot, I highly recommend learning the keyboard shortcuts for it. Shortcuts are the fastest way to double your productivity in PowerPoint (no joke). For a full list of our favorite keyboard shortcuts in PowerPoint, read our guide here .
If you enjoyed the depth and detail of this blog post, you can learn more about boosting your PowerPoint skills with us here .
🔒 Unlock the PowerPoint Shortcuts Trusted by Industry Leaders KKR, American Express, HSBC, and More!
Join over 114,880 professionals from diverse fields including consulting, investment banking, advertising, marketing, sales, and business development who have supercharged their PowerPoint game with our proven methods.
✅ Customize compelling presentations effortlessly.
✅ Master time-saving techniques for faster deck creation.
✅ Boost your career prospects with top-notch PowerPoint skills.
Get FREE access to the Critical PowerPoint Shortcuts module of our premium training course by entering your name and email below.
DISCLAIMER: PC Users Only!
We respect your privacy and will keep your info safe and confidential.
Related Articles
About the author.

This Post Has 4 Comments

I apologize if this is obvious and I’m missing it.
But I don’t see anything about the browser-based version of Powerpoint.
Is that because the Outline feature simply does not exist there?

Hi Edward. Yes, unfortunately the Outline View does not exist in the online version of PowerPoint. It’s a very watered down version and I mostly use it to edit existing documents or present, rather that build out a presentation.
Wish I had a better answer for you, but thanks for the question.

I think you meant Ctrl+Shift+Tab rather than Alt+Shift+Tab, in your first mention of that shorcut. Thanks for the helpful article!

Yes, thank you for that (that was a typo on my end)! You are correct, Ctrl+Shift+Tab is the shortcut for the Outline View :). Cheers!
Comments are closed.
Popular Tutorials
- How to Strikethrough Text (l̶i̶k̶e̶ ̶t̶h̶i̶s̶) in Word, Excel & PowerPoint
- How to Make Animated Fireworks in PowerPoint (Step-by-Step)
- Strikethrough Shortcut (l̶i̶k̶e̶ ̶t̶h̶i̶s̶) for Word, Excel & PowerPoint
- How to Create a Flash Card Memory Game in PowerPoint (Like Jeopardy)
- Keyboard Shortcuts Not Working: Solved
PowerPoint Tutorial Categories
- Strategies & Opinions
- Shortcuts & Hacks
- Presentation Design
- Pictures, Icons, Videos, Etc.
- New Features
- Charts & Data Viz
We help busy professionals save hours and gain peace of mind, with corporate workshops, self-paced courses and tutorials for PowerPoint and Word.
Work With Us
- Corporate Training
- Presentation & Template Design
- Courses & Downloads
- PowerPoint Articles
- Word Articles
- Productivity Resources
Find a Tutorial
- Free Training
- For Businesses
We help busy office workers save hours and gain peace of mind, with tips, training and tutorials for Microsoft PowerPoint and Word.
Master Critical PowerPoint Shortcuts – Secure Your FREE Training Module and Save Valuable Time!
⌛ Master time-saving expert techniques.
🔥 Create powerful presentations.
🚀 Propel your career to new heights.
We value your privacy – we keep your info safe.
Discover PowerPoint Hacks Loved by Industry Giants - KKR, AmEx, HSBC!
Over 114,880 professionals in finance, marketing and sales have revolutionized their PPT skills with our proven methods.
Gain FREE access to a full module of our premium PowerPoint training program – Get started today!
We hate spam too and promise to keep your information safe.
You are currently viewing a placeholder content from Facebook . To access the actual content, click the button below. Please note that doing so will share data with third-party providers.
Blog > How to structure a good PowerPoint Presentation
How to structure a good PowerPoint Presentation
08.09.21 • #powerpoint #tips.
When creating presentations, it is particularly important that they are well organized and have a consistent structure.
A logical structure helps the audience to follow you and to remember the core information as best as possible. It is also important for the presenter, as a good presentation structure helps to keep calm, to stay on the topic and to avoid awkward pauses.
But what does such a structure actually look like? Here we show you how to best organize your presentation and what a good structure looks like.
Plan your presentation
Before you start creating your presentation, you should always brainstorm. Think about the topic and write all your ideas down. Then think about the message you want to communicate, what your goal is and what you want your audience to remember at the end.
Think about who your audience is so that you can address them in the best possible way. One possibility is to start your presentation with a few polls to get to know your audience better. Based on the results, you can then adapt your presentation a little. Use the poll function of SlideLizard and have all the answers at a glance. SlideLizard makes it possible to integrate the polls directly into your PowerPoint presentation which helps you to avoid annoying switching between presentation and interaction tool. You can keep an eye on the results while the votes come in and then decide whether you want to share them or not.

- an informative
- an entertaining
- an inspiring
- or a persuasive presentation?
Typical Presentation Structure
The basic structure of a presentation is actually always the same and should consist of:
Introduction

Make sure that the structure of your presentation is not too complicated. The simpler it is, the better the audience can follow.
Personal Introduction
It is best to start your presentation by briefly introducing yourself which helps to build a connection with your audience right away.
Introduce the topic
Then introduce the topic, state the purpose of the presentation and provide a brief outline of the main points you will be addressing.
Mention the length
In the introduction, mention the approximate length of the talk and then also make sure you stick to it.
The introduction should be no longer than two slides and provide a good overview of the topic.
Icebreaker Polls
According to studies, people in the audience only have an average attention span of 10 minutes, which is why it is important to increase their attention right at the beginning and to arouse the audience's interest. You could make a good start with a few icebreaker polls for example. They lighten the mood right at the beginning and you can secure your audience's attention from the start.
For example, you could use SlideLizard to have all the answers at a glance and share them with your audience. In addition, the audience can try out how the polls work and already know how it works if you include more polls in the main part.

Get to know your audience
As mentioned earlier, it is always useful to think about who your audience actually is. Ask them questions at the beginning about how well they already know the topic of your presentation. Use SlideLizard for this so that you have a clear overview about the answers. You can use both single- and multiple-choice questions or also open questions and display their results as a WordCloud in your presentation, for example.
Include a quote
To make the beginning (or the end) of your presentation more exciting, it is always a good idea to include a quote. We have selected some powerful quotes for PowerPoint presentations for you.
Present your topic
The main part of a presentation should explain the topic well, state facts, justify them and give examples. Keep all the promises you made earlier in the introduction.
Length and Structure
The main part should make up about 70% of the presentation and also include a clear structure. Explain your ideas in detail and build them up logically. It should be organized chronologically, by priority or by topic. There should be a smooth transition between the individual issues. However, it is also important to use phrases that make it clear that a new topic is starting. We have listed some useful phrases for presentations here.
Visualize data and statistics and show pictures to underline facts. If you are still looking for good images, we have selected 5 sources of free images for you here.
Focus on the essentials
Focus on what is most important and summarize a bit. You don't have to say everything about a topic because your audience won’t remember everything either. Avoid complicated sentence structure, because if the audience does not understand something, they will not be able to read it again.
Make your presentation interactive
Make your presentation interactive to keep the attention of your audience. Use SlideLizard to include polls in your presentation, where your audience can vote directly from their smartphone and discuss the answers as soon as you received all votes. Here you can also find more tips for increasing audience engagement.

Repeat the main points
The conclusion should contain a summary of the most important key points. Repeat the main points you have made, summarize what the audience should have learned and explain how the new information can help in the future.
Include a Q&A part
Include a Q&A part at the end to make sure you don't leave any questions open. It's a good idea to use tools like SlideLizard for it. Your audience can ask anonymous questions and if there is not enough time, you can give them the answers afterwards. You can read more about the right way to do a question slide in PowerPoint here.
Get Feedback
It is also important to get feedback on your presentation at the end to keep improving. With SlideLizard you can ask your audience for anonymous feedback through star ratings, number ratings or open texts directly after your presentation. You can then export the responses and analyse them later in Excel.

Presentation style
Depending on the type of presentation you give, the structure will always be slightly different. We have selected a few different presentation styles and their structure for you.
Short Presentation

If you are one of many presenters on the day, you will only have a very limited time to present your idea and to convince your audience. It is very important to stand out with your presentation.
So you need to summarize your ideas as briefly as possible and probably should not need more than 3-5 slides.
Problem Solving Presentation

Start your presentation by explaining a problem and giving a short overview of it.
Then go into the problem a little more, providing both intellectual and emotional arguments for the seriousness of the problem. You should spend about the first 25% of your presentation on the problem.
After that, you should spend about 50% of your presentation proposing a solution and explaining it in detail.
In the last 25%, describe what benefits this solution will bring to your audience and ask them to take a simple but relevant action that relates to the problem being discussed.
Tell a Story

A great way to build an emotional connection with the audience is to structure a presentation like a story.
In the introduction, introduce a character who has to deal with a conflict. In the main part, tell how he tries to solve his problem but fails again and again. In the end, he manages to find a solution and wins.
Stories have the power to win customers, align colleagues and motivate employees. They’re the most compelling platform we have for managing imaginations. - Nancy Duarte / HBR Guide to Persuasive Presentations
Make a demonstration

Use the demonstration structure to show how a product works. First talk about a need or a problem that has to be solved.
Then explain how the product will help solve the problem and try to convince your audience of the need for your product.
Spend the end clarifying where and when the product can be purchased.
Chronological structure

When you have something historical to tell, it is always good to use a chronological structure. You always have to ask yourself what happens next.
To make it more interesting and exciting, it is a good idea to start by telling the end of something and after that you explain how you got there. This way you make the audience curious and you can gain their attention faster.
Nancy Duarte TED Talk
Nancy Duarte is a speaker and presentation design expert. She gives speeches all over the world, trying to improve the power of public presentations.
In her famous TED Talk "The Secret Structure of Great Talks" she dissects famous speeches such as Steve Jobs' iPhone launch speech and Martin Luther King's "I have a dream" speech. In doing so, she found out that each presentation is made up of 4 parts:
- What could be
- A moment to remember
- Promise of “New Bliss”
Related articles
About the author.

Helena Reitinger
Helena supports the SlideLizard team in marketing and design. She loves to express her creativity in texts and graphics.

Get 1 Month for free!
Do you want to make your presentations more interactive.
With SlideLizard you can engage your audience with live polls, questions and feedback . Directly within your PowerPoint Presentation. Learn more
Top blog articles More posts

How to find the best font for your PowerPoint presentation

How to create a custom Theme design in PowerPoint

Get started with Live Polls, Q&A and slides
for your PowerPoint Presentations
The big SlideLizard presentation glossary
A podcast is an audio or video contribution that can be listened to or viewed via the Internet. Podcasts can be used for information on specific topics but also for entertainment.
Slide Master
To create your own Template in PowerPoint it is best to use the Slide Master. After updating the Slide Master with your design, all slides (fonts, colours, images, …) adapt to those of the Slide Master.
Slide Layouts
PowerPoint has different types of Slide Layouts. Depending on which type of presentation you make, you will use more or less different slide layouts. Some Slide Types are: title slides, section heading slides, picture with caption slides, blank slides.
Eulogy Speech
A eulogy speech is given at a funeral. It is given by familiy members or friends of the deceased. The aim is to say goodbye and pay tribute to the person who has passed away.
Be the first to know!
The latest SlideLizard news, articles, and resources, sent straight to your inbox.
- or follow us on -
We use cookies to personalize content and analyze traffic to our website. You can choose to accept only cookies that are necessary for the website to function or to also allow tracking cookies. For more information, please see our privacy policy .
Cookie Settings
Necessary cookies are required for the proper functioning of the website. These cookies ensure basic functionalities and security features of the website.
Analytical cookies are used to understand how visitors interact with the website. These cookies help provide information about the number of visitors, etc.
Presentation Outline Example and Template
How to create a presentation Outline
A presentation outline is a roadmap to a more successful business pitch — a general plan that summarizes what you want to say to prospective customers, clients or investors. It lets you organize your thoughts, group ideas into main points and present your material logically. But what should you include in your slides?
We've compiled 11 tips for more effective pitch prep.
If you came here looking for presentation templates , here's an a couople of examples from of our most popular ones. If not, just carry on.

Browse our PRESENTATION TEMPLATES
What is a presentation outline.
An outline for a presentation is a helpful tool that organizes the main points and flow of the presentation. It acts as a guide for the presenter, outlining the order in which information will be presented and the main ideas that will be covered. A good outline should include headings and subheadings that outline the main topics and supporting details, ensuring a clear and logical arrangement of information. Creating a presentation outline helps the presenter stay organized and focused, and makes it easier for the audience to follow the content and understand the main concepts of the presentation.
11 tips to create more effective presentations
1. decide on a goal.

Before you brainstorm, and before you scribble down any notes, come up with a goal for your presentation. What do you want your pitch deck to say to your audience? What message do you want to convey? What do you want it to achieve?
Perhaps you want your pitch to raise seed funds. Maybe you want to introduce a new product or service to customers. Whatever the reason for creating your pitch, decide on a specific, measurable goal. This will guide the rest of your preparation.
2. Create a Structure for Your Presentation
Every good presentation includes an introduction, main body, and conclusion. These three components form the "skeleton" of your presentation — the bare bones of your pitch. You don't need to think about all the small details at this stage — you can flesh out your presentation slides at a later date.
Your introduction is probably the most important part of your pitch. After all, you only have seven seconds to make a good first impression, according to research. Use your intro to introduce your brand, greet your audience and give a taster of what's to come.
The body of your presentation includes your main ideas and any supporting ideas. Use it to feature testimonials, financials and fundraising info, traction and milestones, and, of course, your marketing plan.
Finally, your conclusion summarizes all your points in a few slides. This should leave your audience wanting more.
3. Think About Visual Content

Visual content is an essential ingredient. The human brain processes visuals 60,000 times faster than regular text, so including images in your pitch is a great idea. Don't forget about videos, either. Consumers are 64 percent more likely to purchase a product after watching an online video, making visual content a good choice if you want to generate leads and boost sign-ups.
The most successful pitch decks incorporate striking visuals. Others have fancy fonts and graphics. All of this visual content demands attention from your audience and creates a cool aesthetic that will help you outrank your rivals.
At this early stage of pitch deck preparation, you don't have to finalize the images you are going to include in your pitch. However, we think it's a good idea to point out where you are going to use images in your presentation. This way, you can organize your ideas and make sure everything flows properly.
4. Understand What Makes a Good Presentation — and a Bad One
No two presentations are the same. The most successful pitch decks, however, certainly have a lot in common. When creating your outline, discover what makes a brilliant pitch. The University of Hawaii says great presentations rarely cover more than five points. The University of Cambridge in England says there should be four key points in every 45-minute presentation.
Here at Slidebean, we think one idea per slide, good design, lots of images, and quotes all make presentations so much more interesting. We're not fans of the 'thank you' slide, though — the one that recognizes your audience for sitting through your presentation. It's completely unnecessary.
5. Include a Call-to-Action
A call-to-action is much better than a 'thank you' slide. This encourages your audience to take action after your presentation. When creating your outline, think of a short, snappy call-to-action that prompts a response. A call-to-action is your final chance to engage with your audience during your presentation. You might want to encourage people to sign up to your mailing list, for example. Alternatively, you can include a link to your website so people can download a trial version of your product.
"No matter what form your CTA takes, the most important aspect is the copy," says growth marketing expert Sujan Patel and Voila Norbert co-founder, writing for Forbes magazine . "You’re telling the visitor what you want them to do, so it needs to be persuasive. Remember, your audience is looking for an answer or a solution to a problem. Connect with them by telling them exactly what they’re going to get if they take action."
6. Identify a Solution to a Problem
Every day, more than 30 million presentations are created on PowerPoint alone. Then there are the hundreds of thousands of pitches designed in Keynote, Prezi, and Slidebean. With so many presentations out there, how do you inspire people to invest in your services? One way to create a successful pitch is to identify a solution to a problem that your audience might have.
Slidebean recently reviewed some of the best presentation examples from successful startups. Most of them provide solutions to common problems early on in their respective pitches. Customer messaging platform Intercom, for example, says analytics, customer base browsing, and customer research is the answer for businesses who find it hard to engage with customers. They include these solutions near the beginning of their pitch deck.
If you want to have a more successful presentation, think about solving problems in your niche when creating your outline.
7. Use Quotes, Testimonials and Statistics

Quotes from senior management help you convey abstract ideas and make your presentation more engaging. You should obtain any quotes you want to use in your presentation during the planning stage. Testimonials from customers and clients also prove popular. Research shows that positive reviews influence purchasing decisions and increase trust.
Finally, statistics add some depth to your presentation. Industry facts and figures back up any claims you make and increase engagement. Discover relevant statistics when creating your outline. You don't need to include any actual quotes, testimonials or statistics yet. Just jot down where you want to place them in your presentation.
8. Think About Color and Design
The way you present information in your pitch is just as important as the information itself. Now is the time to start thinking about the font/s you want to use or the color of your slides. Research shows that red conveys passion and excitement and catches the attention of your audience. White, on the other hand, conveys simplicity and purity.
Slidebean has a range of color palettes that transform the look of your slides. You can choose up to three color sets and play around with different text, backgrounds, and highlights.
9. Plan the Order of Your Slides
Think of your presentation outline template as a very rough first draft. Decide on what types of slides you want to use, and decide on a final running order. You might feature quotes early on in your presentation, for example, and leave testimonials until the end. Don't forget to include a slide with your contact details — website, phone number, address, etc. — and your brand values.
Your presentation outline should be a group effort, too. Ask your colleagues for input.
10. Identify Key Takeaways From Your Presentation
Your outline should include enough information so you can visualize what your final presentation will look like. Once you have finished your outline, read it back and identify the key takeaways from the document. Is the structure of your presentation clear, for example? Does it convey your brand message? Will it engage your audience?
Every slide in your presentation should achieve the goal you created at the beginning of your outline. If something isn't working, make changes. You might want to switch slides around or remove unnecessary information, for example.
11. Use a Presentation Template
Once you have completed your outline, it's time to start putting everything together. Yes, you could create a PowerPoint pitch deck from scratch, but this is often time-consuming and complicated. Instead, use a template, which provides you with all the presentation slides you need.
Here at Slidebean, we have presentation templates for business of all sizes, including startups and scaleups. You can create a professional pitch deck in just a few minutes by following the on-screen prompts. Everything's included — bullet points, graphics, headers, footers, and more. Take the time to plan your pitch to produce a powerful sales document that helps you communicate with your audience.
Once you have created your presentation outline template, sign up to Slidebean and design a pitch that provides you with a huge return on your investment.
Try Slidebean Templates
Popular articles.

The Startup Financial Model Template by Slidebean

35+ Best Pitch Deck Examples from Successful Startups (2024 Update with Editable Templates Included)
Upcoming events, financial modeling bootcamp, how to close a funding round.

Pitch Deck Structure: What Investors Want To See

Let’s move your company to the next stage 🚀
Ai pitch deck software, pitch deck services.

Financial Model Consulting for Startups 🚀

Raise money with our pitch deck writing and design service 🚀

The all-in-one pitch deck software 🚀
A pitch deck is the standard document used by startups to present their case to investors; it’s a brief deck of about 10 to 20 slides. See examples here.

Learn how to create a compelling slide deck for your startup. Explore how to use slide decks as aids for your presentation, and the most common uses for them.

This is a functional model you can use to create your own formulas and project your potential business growth. Instructions on how to use it are on the front page.

Book a call with our sales team
In a hurry? Give us a call at
Outline View in PowerPoint – Everything You Need to Know!
By: Author Shrot Katewa

Not a lot of people are aware that you can actually make a presentation by outlining your key points in a simple bulleted list format! This is where the Outline View in PowerPoint comes in handy!
In today’s article, we will take a look at the “Outline View” in PowerPoint, how to access it, and how to work with your presentation in the outline view!
So, let’s get started!
1. What is Outline View and Why is it Used?
The “Outline View” in Microsoft PowerPoint is a way of accessing the slides in a more simplistic manner. It removes the clutter of images and other infographics from your slides and helps you focus specifically on the text present on the slides.
In the outline view, you can see a list of the titles, subtitles as well as text on each slide. Using the outline view you can easily organize key information on your slides. You can also export or import the outline to and from other documents.
Furthermore, the outline view is also editable, which makes it easier to add or remove any text from the PowerPoint presentation.
2. How to Access the Outline View in PowerPoint?
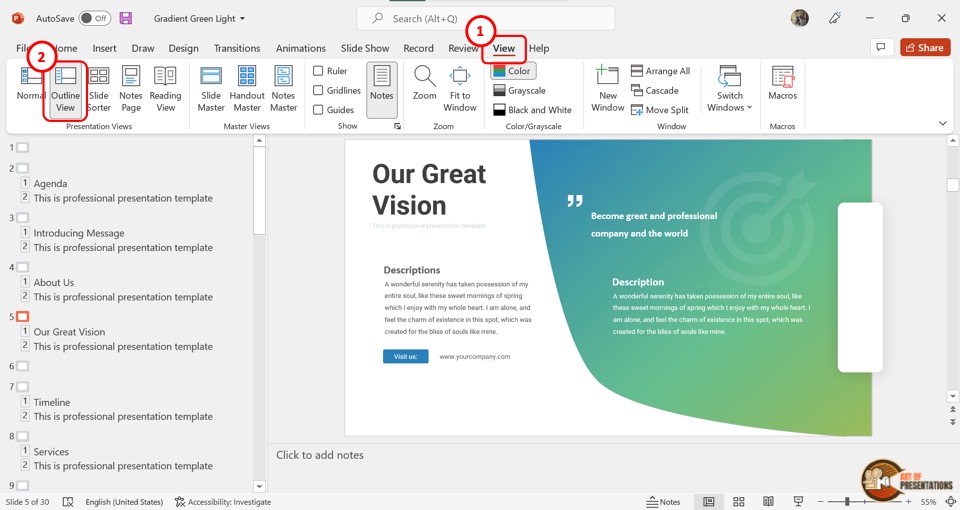
In Microsoft PowerPoint, you can very easily access the outline view and navigate it.
To access the outline view in PowerPoint, first, click on the “View” tab in the menu bar located at the top of the screen. In the “View” menu, click on “Outline View” which is the second option in the “Presentation Views” section.
This will show the presentation outline in a sidebar on the left side of the screen.
3. How to Expand Slides in Outline View?
In the “Outline View” , you can expand any or all slides to view all the content within the slide. There are 3 different methods you can use to expand the slides in the outline view.
3a. Method 1 – Using Right-Click
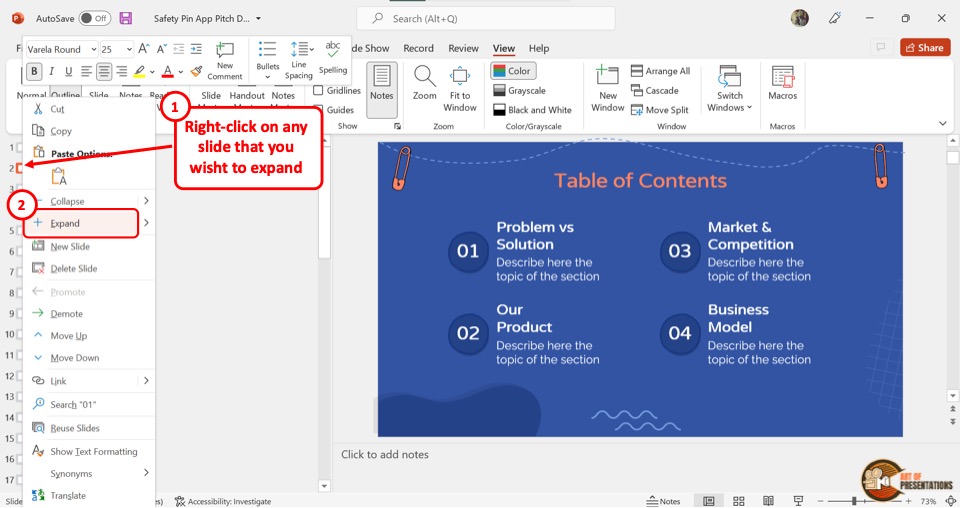
You have to first open the “Outline View” from the “View” menu. In the outline sidebar located at the left side of the screen, “Right Click” on the box beside the slide number which you want to expand.
Then click on the “Expand” option from the right-click menu.
3b. Method 2 – Using Double-Click
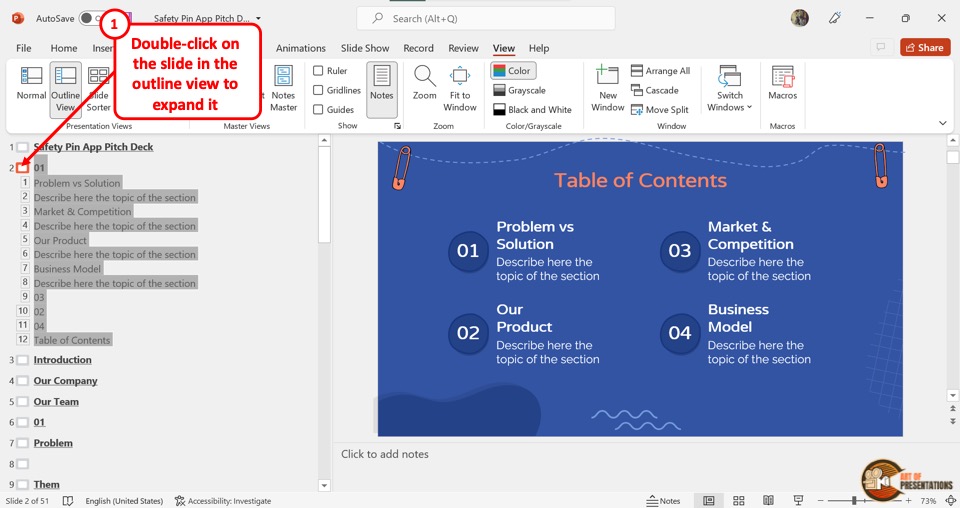
You can use the double-click method to quickly expand the slide outline. All you have to do is “Double Click” on the box located between the slide number and the slide title.
3c. Expand All Slides Using Expand All Feature
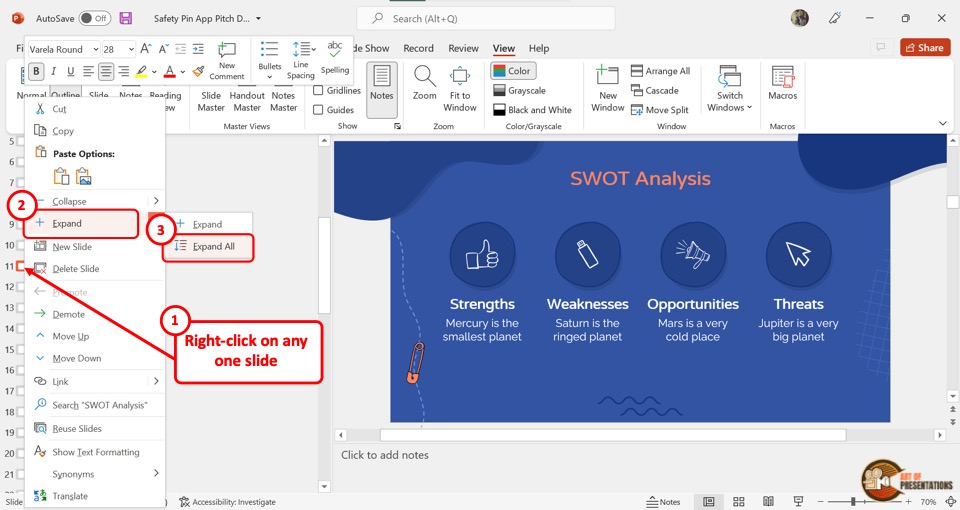
In the “Outline View” , you can also expand all the slides at once. To do so, “Right Click” on the box next to any slide. In the right-click menu, click on the arrow beside the “Expand” option to open another dropdown menu.
Then click on the “Expand All” option to expand all the slides.
4. How to Collapse Slides in Outline View?
Microsoft PowerPoint offers various methods to collapse slides in the “Outline View” . Collapsing the slides can help you see the list of the slides in a presentation easily.
4a. Using Right-Click
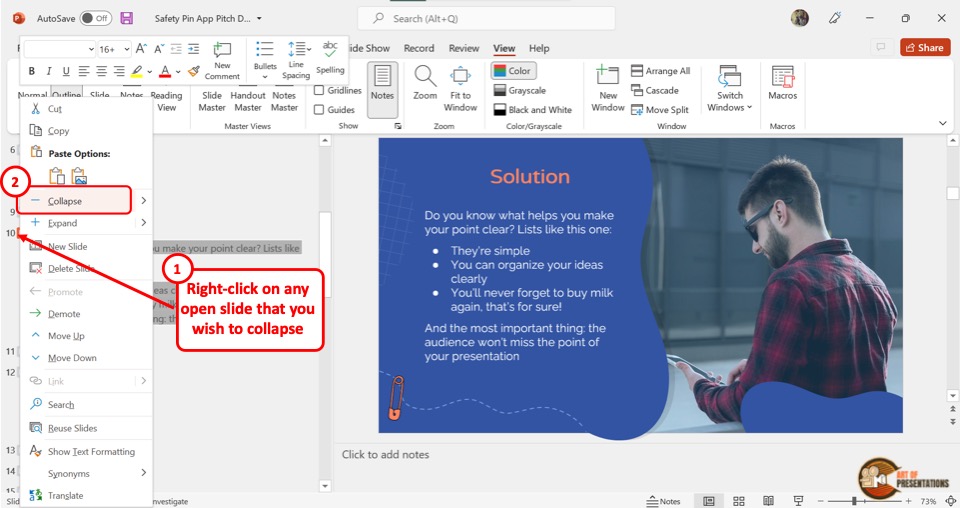
In the “Outline View” , locate the expanded slide from the sidebar on the left side of the screen. Then “Right Click” on the box next to the slide number and click on the “Collapse” option from the pop-up menu.
4b. Using Double-Click
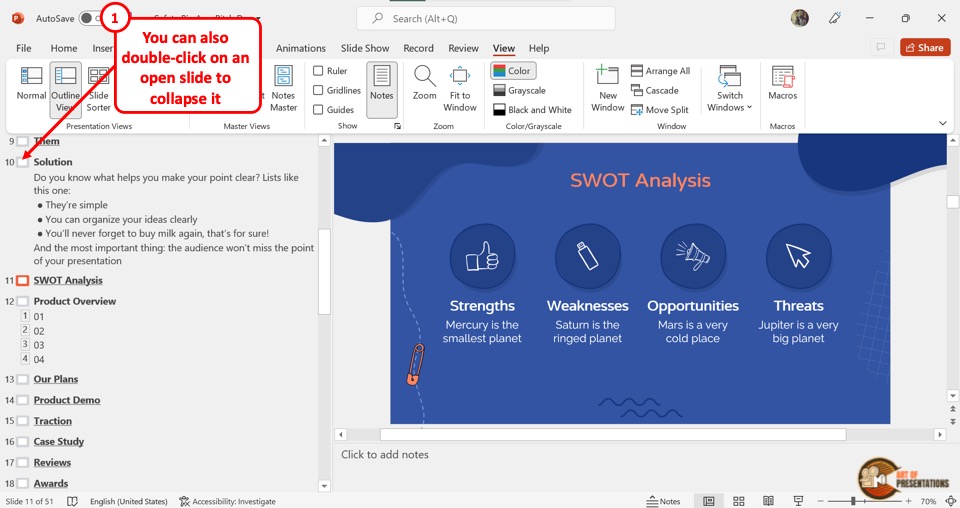
To collapse a slide using the double-click method, all you have to do is “Double Click” on the box at the left side of the expanded slide. The slide will immediately collapse hiding all the text except the heading.
4c. Collapse All Feature
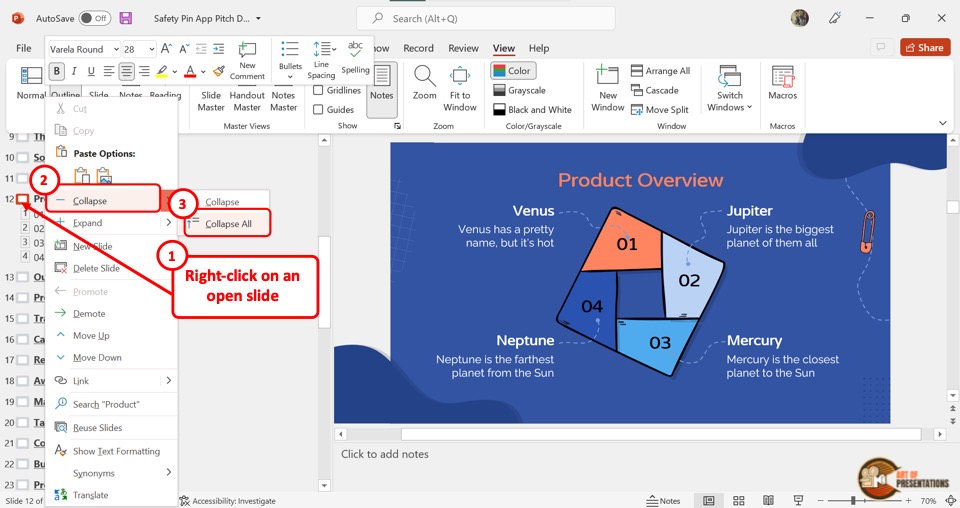
You can also collapse all the slides at once. To do so, “Right Click” on any slide in the outline. Then click on the arrow beside the “Collapse” option.
Finally, you have to click on the “Collapse All” option from the secondary pop-up menu.
5. How to Rearrange Slides in Outline View?
When reviewing the outline of a PowerPoint presentation, you may need to rearrange some slides based on their contents.
In the “Outline View” , you can move a slide in between the contents of another slide. You can also simply move a slide up or down.
5a. How to Move Up Slides in Outline View?
In the “Outline View” , you can move a slide up by one or even more slides. There are different methods to move up slides in PowerPoint. The first step is to click on the “Outline View” option from the “View” menu.
Method 1 – Using Right-Click
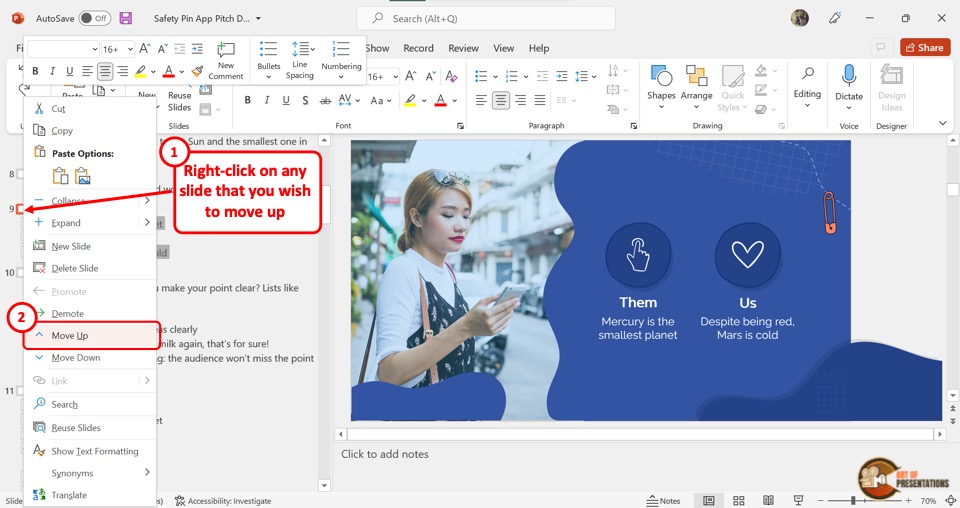
In the “Outline View” sidebar at the left side of the screen, “Right Click” on the slide you want to move up. Then click on the “Move Up” option from the right-click menu.
To move up the slide further, repeat the process until the slide reaches the preferred position in the outline.
Method 2 – Using Drag & Drop
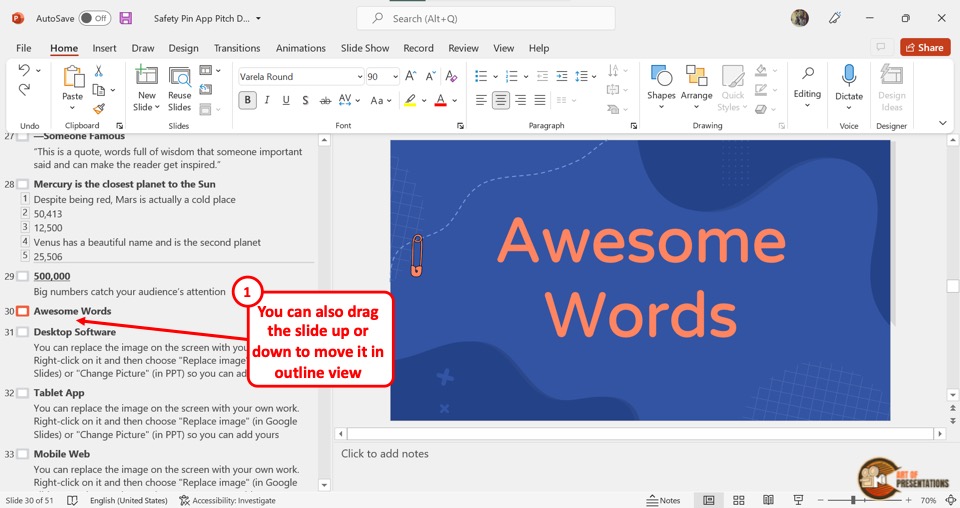
You can also move up a slide quickly by using the drag and drop method. All you have to do is click and hold on to the box next to the slide number and then drag the slide up as much as you need.
5b. How to Move Down Slides in Outline View in PowerPoint?
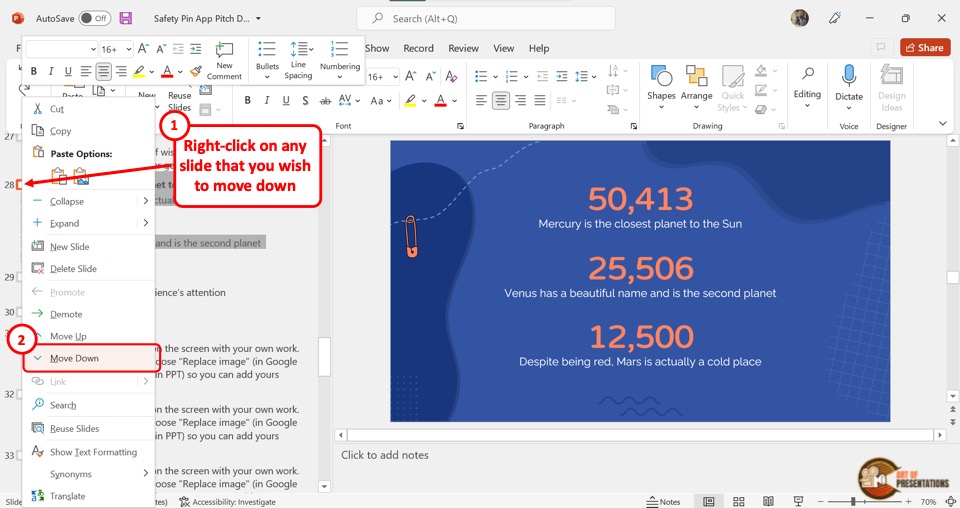
Similar to the process of moving up a slide, you can easily move down a slide. All you have to do is “Right Click” on the slide from the outlines on the left side of the screen.
Then click on the “Move Down” option from the pop-up menu. Alternatively, you can drag and drop the slide to the preferred position.
6. How to Add Content on Slides Using Outline View?
The presentation outline in the “Outline View” is editable. Thus, you can edit the content of a slide by editing the outline. To add content on slides using the “Outline View” , follow the 2 simple steps.
Step-1: Open the Outline View
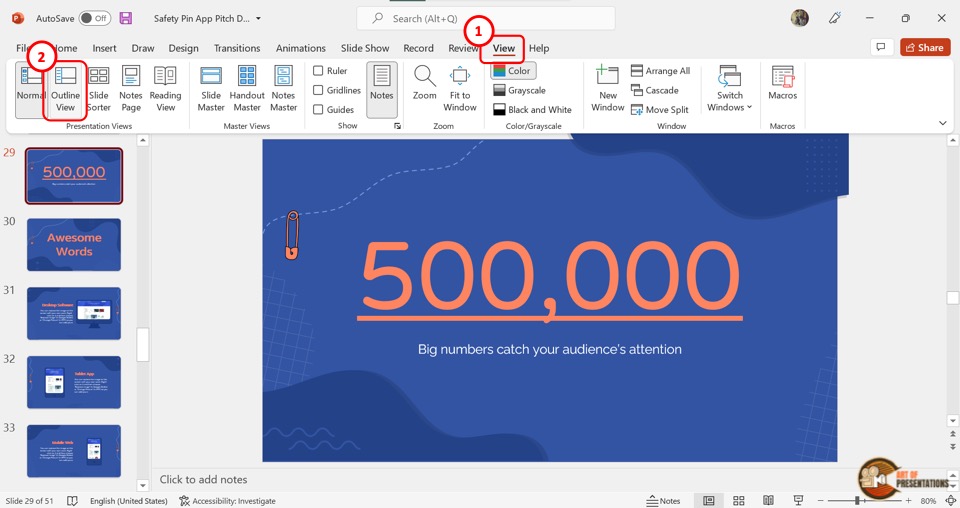
In the menu ribbon located at the top of the screen, click on the “View” tab. You have to then click on the “Outline View” option which is the second option in the “Presentation Views” section of the “View” menu.
Step-2: Click on the slide and add content to the outline
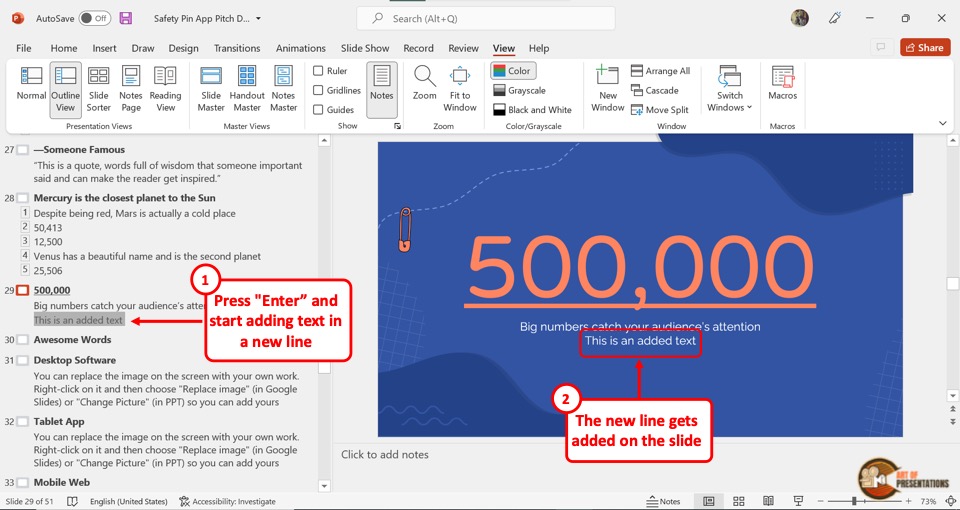
In the outline sidebar at the left side of the screen, click on the slide and heading level where you want to add content. Then type in the content. You will see the text being added to the presentation slide.
If you want to add text in a new line, simply press “Enter” and start adding the content. It will be visible separately on the slide.
6a. How to Increase or Decrease Indent of Content in Outline View?
To increase or decrease the indent of content in the “Outline View” , click on the “Home” tab in PowerPoint . Next, you have to click on the content in the outline sidebar for which you want to change the indentation.
Increase Indentation
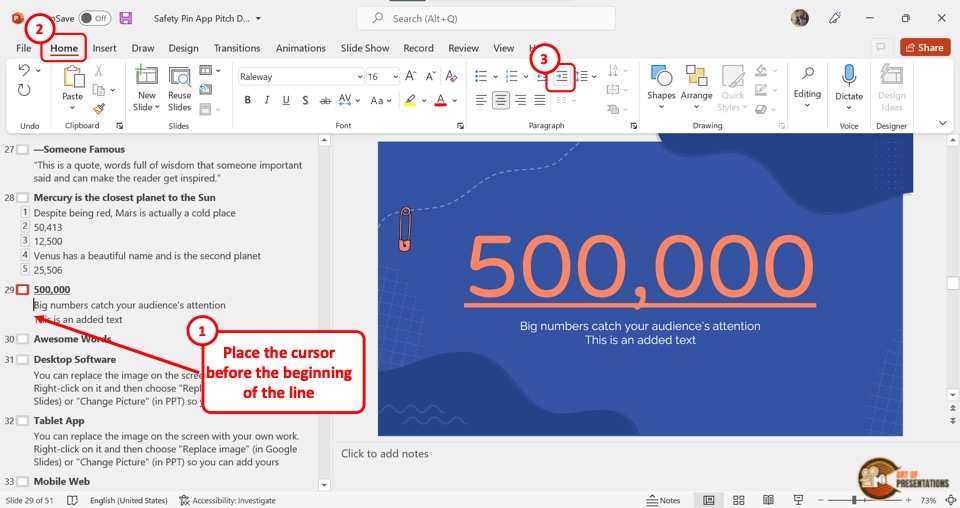
By increasing the indent level, you push the content to the right. The content is thus moved to a higher list level. To increase the indentation, click on the “Increase List Level” option in the “Paragraph” section of the “Home” tab in PowerPoint.
Decrease Indentation
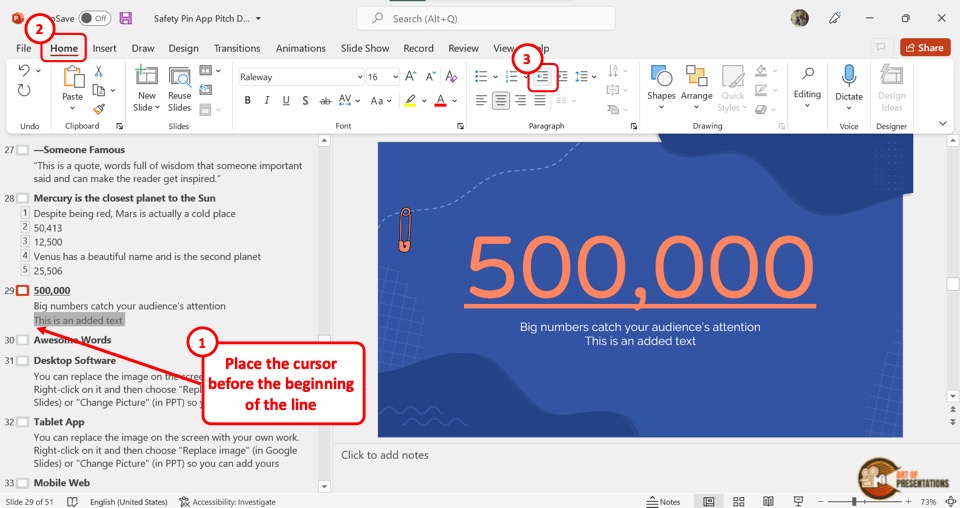
By decreasing the indent level, you can push the content to the left, and decrease the list level. To do so, click on the “Decrease List Level” option in the “Paragraph” section of the “Home” menu.
7. How to Change Content Hierarchy Using Outline View in PowerPoint?
In the “Outline View” , you can change the content hierarchy of the contents within a slide.
Content hierarchy is the order of the content in a slide. The top of the hierarchy is the heading and then the “List level 1” , “List level 2” and so on.
7a. Promote Content in Outline View in PowerPoint
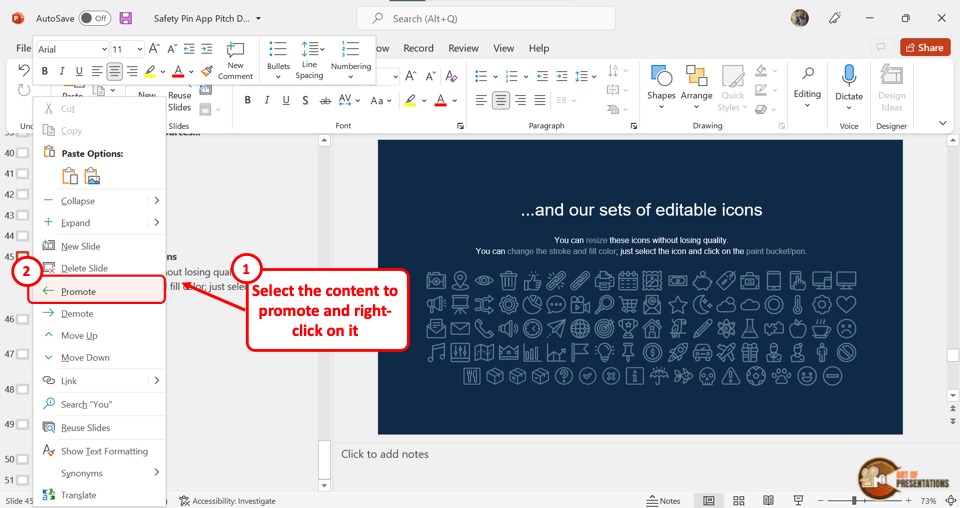
Promoting content pushes the content up the hierarchy.
To promote content in outline view in PowerPoint, you have to first “Right Click” on the content in the outline sidebar. Then click on the “Promote” option from the right-click menu.
You can repeat this process to promote the content up to a few hierarchy levels. However, you cannot promote a “Heading” since it is the highest level in the hierarchy.
7b. Demote Content in Outline View in PowerPoint
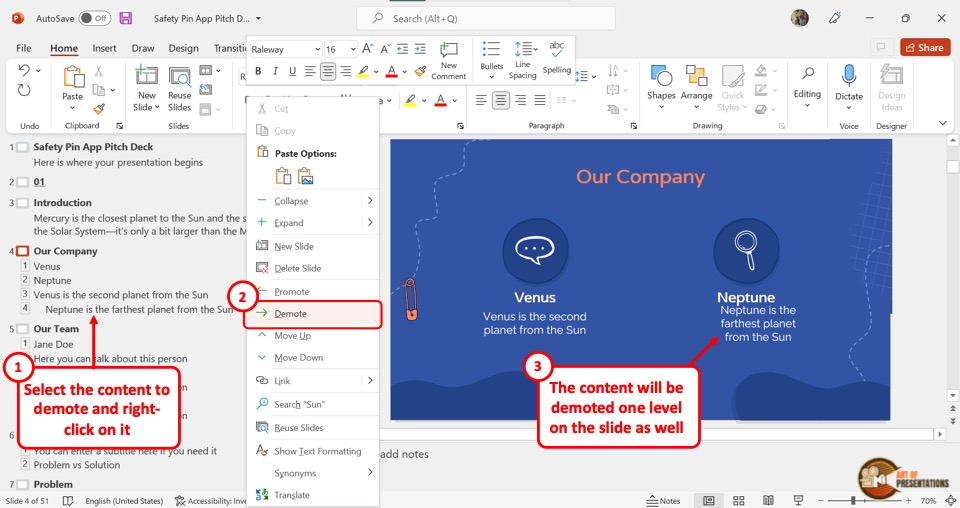
When you demote content, it is pushed down the hierarchy.
To demote content in outline view in PowerPoint, “Right Click” on the content in the outline that you want to demote. Then click on the “Demote” option.
You can repeat the process to move the content further down the hierarchy. For headings, you can only demote the heading of a text-only slide.
8. How to Go Back to Normal View from Outline View in PowerPoint?
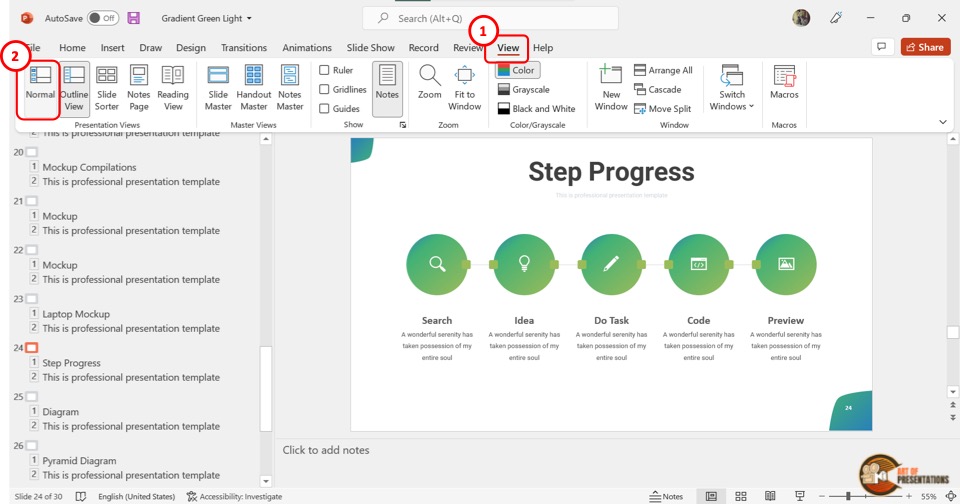
If you want to exit the “Outline View” , you can easily return to the “Normal View” in PowerPoint.
To go back to “Normal View” from “Outline View” , all you have to do is click on the “View” tab in the menu ribbon. Then click on the “Normal” option which is the first option in the “View” menu.
9. How to Save Your PowerPoint Presentation as an Outline?
Besides viewing the presentation outline, you can also save your PowerPoint Presentation as an outline. All you have to do is follow the 4 easy steps.
Step-1: Click on the “Save As” option
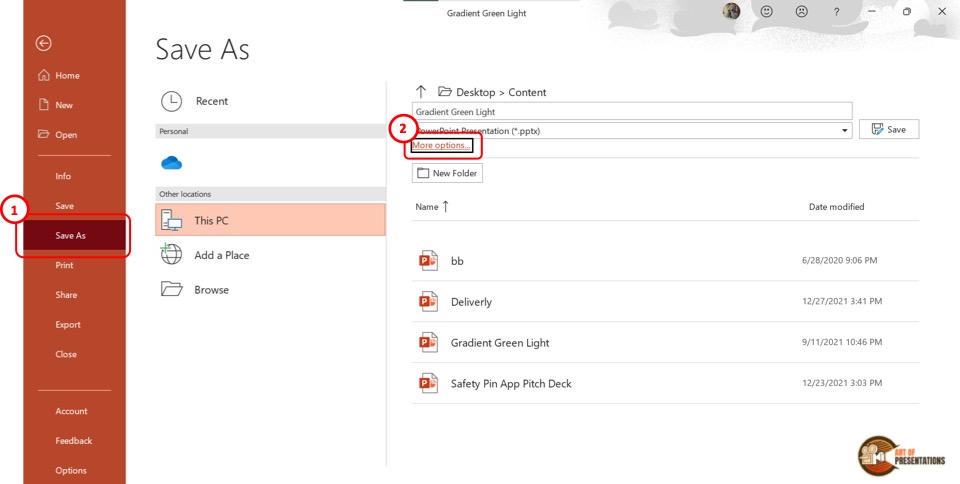
In the menu ribbon at the top of the screen, click on the “File” tab to open the “File” menu. Then click on the “Save As” option in the “File” menu.
Step-2: Click on “More options”
In the “Save As” screen, click on the “More options” option which is above the “New Folder” button (as shown in the image in step 1). This will open a dialog box.
Step-3: Click on “Outline/RTF”
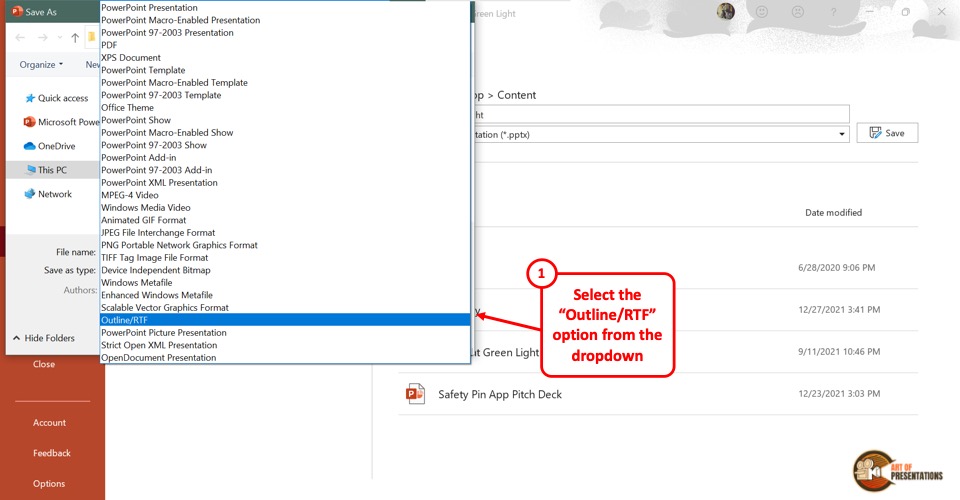
In the “Save As” dialog box, click on the “Save as type” box at the bottom. Then click on the “Outline/RTF” option from the pop-up menu.
Step-4: Click on the “Save” option
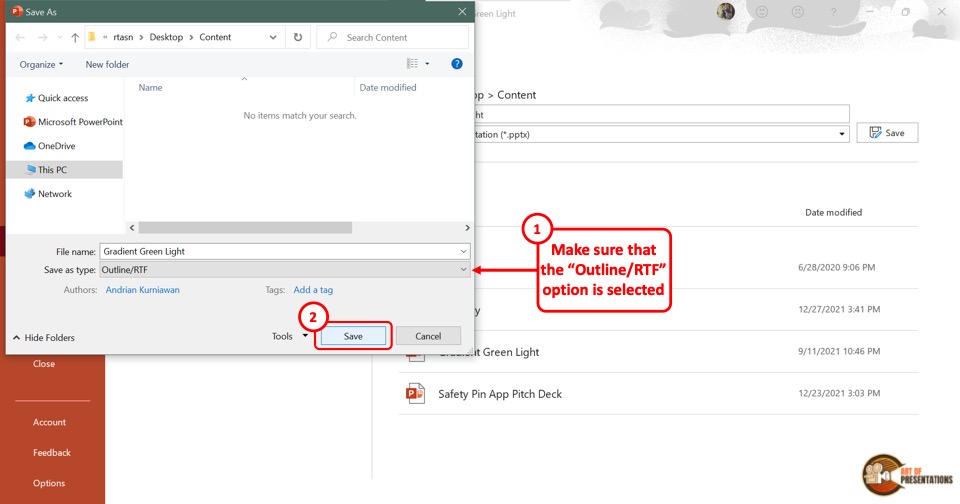
Now all you have to do is click on the “Save” button at the bottom of the “Save As” dialog box. This will save the PowerPoint presentation as an outline.
10. How to Print Outline View in PowerPoint?
Microsoft PowerPoint allows you to print the outline of the presentation only. All you have to do is follow the 3 simple steps.
Step-1: Click on the “File” tab
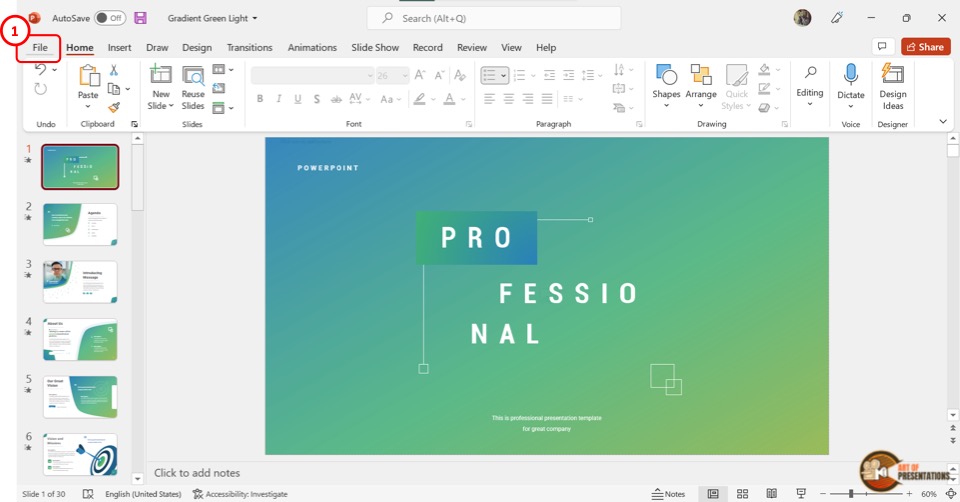
In the open PowerPoint presentation, click on the “File” tab from the menu ribbon located at the top of the screen. In the sidebar of the “File” menu, click on the “Print” option.
Step-2: Click on the “Print Layout” option
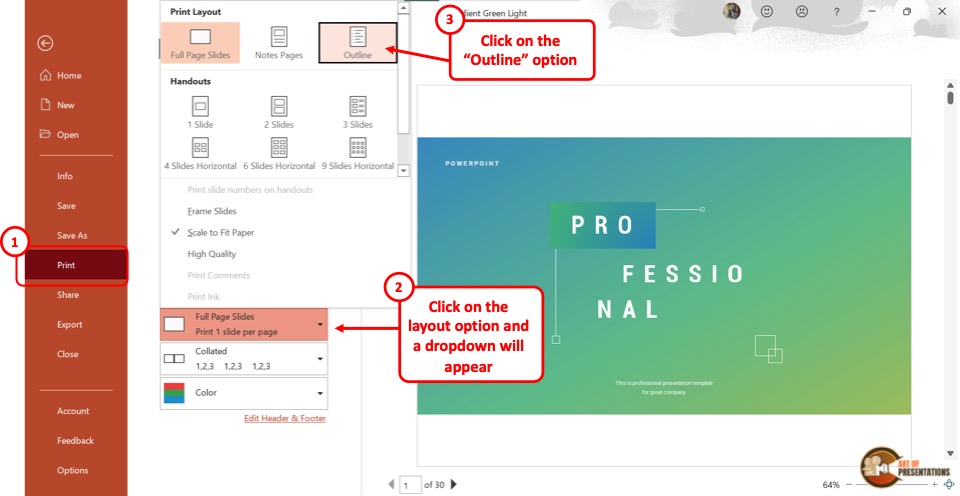
Under the “Settings” section, click on the box that says “Full Page Slides” . It will open a “Print Layout” pop-up menu. In the pop-up menu, click on the “Outline” option.
The presentation outline will appear on the preview screen.
Step-3: Click on the “Print” option
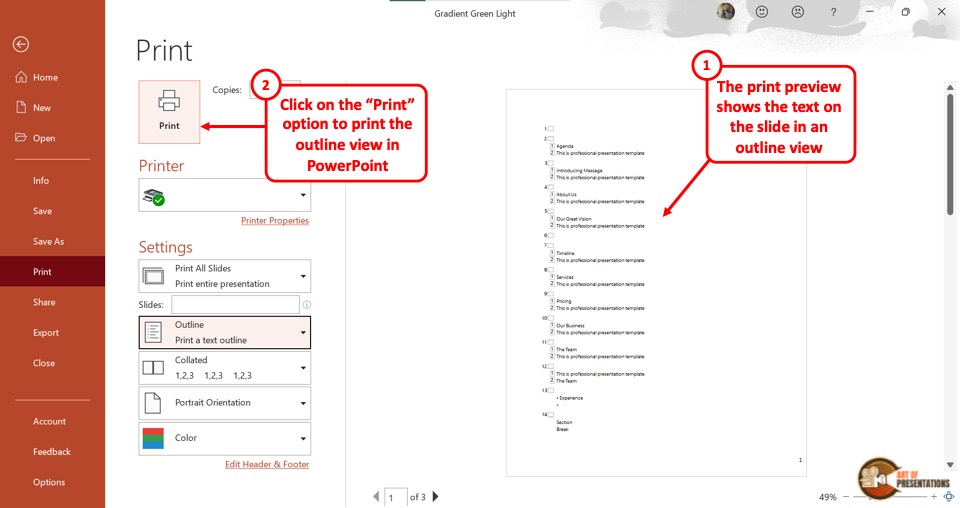
Finally, you have to make sure the device is connected to a printer. Then all you have to do is click on the “Print” button at the top of the screen.
11. How to Convert a Word Outline into a PowerPoint Presentation Using Outline View?
Microsoft PowerPoint allows you to import the outline from a Microsoft Word file. Importing an outline will automatically create slides for you. All you have to do is follow the 3 easy steps.
Step-1: Click on the “Slides from Outline” option
The first step is to click on the “Home” tab in the menu ribbon. In the “Slides” section of the “Home” menu, click on the “New Slide” option to open a dropdown menu.
Click on the “Slides from Outline” option from the bottom of the dropdown menu.
Step-2: Click on the “Insert” button
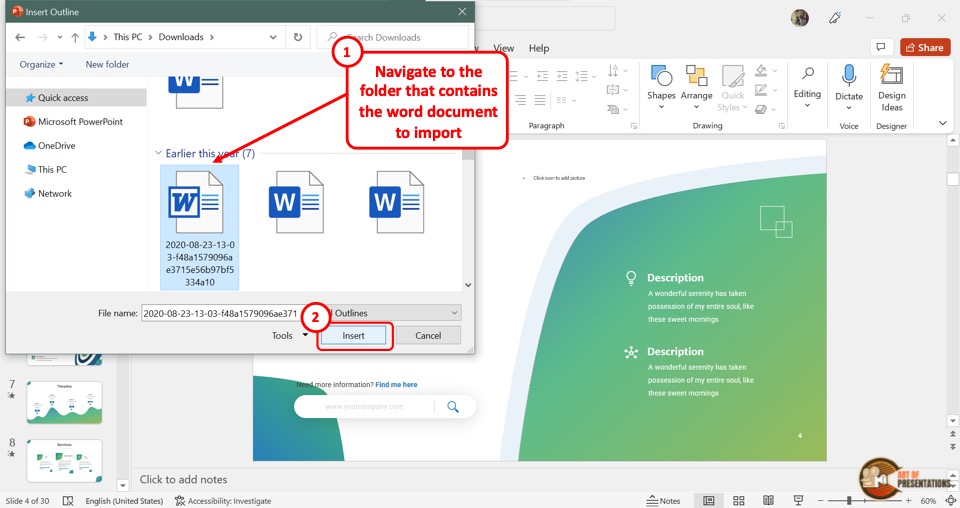
In the “Insert Outline” dialog box, click on the Microsoft Word document which you want to import. Then click on the “Insert” button at the bottom of the dialog box.
Step-3: Arrange the content
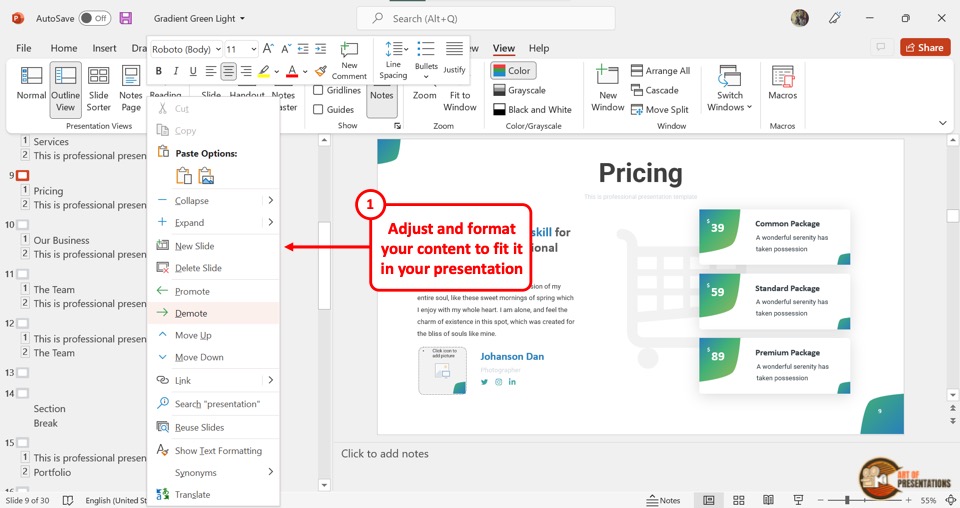
Since the process automatically transforms the Word outline into a PowerPoint outline, the content may need some adjustments. If the Word outline does not have any headings, each paragraph will be converted into a slide.
To arrange them, “Right Click” on the content, and then click on the preferred option from the “Move Up” , “Move Down” , “Promote” and “Demote” options in the right-click menu.
12. Outline View Not Showing Text? Here’s Why!
In Microsoft PowerPoint “Outline View” , the text in the content placeholder is automatically shown in the outline. So when a slide has no content placeholder, the outline will not show any text.
To solve the problem, you will first need to add a placeholder in PowerPoint . Follow the steps mentioned below –
Step-1: Click on the “Slide Master” option
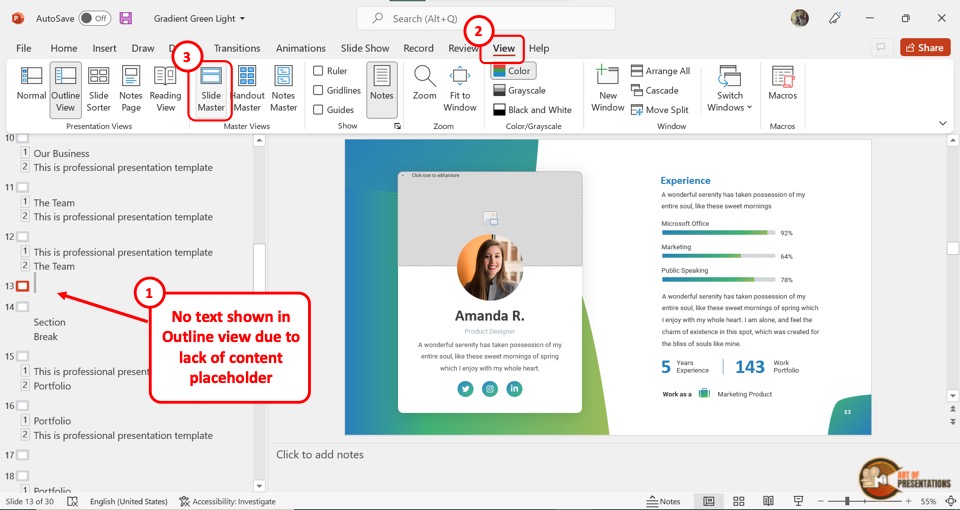
The first step is to open the slide where the “Outline View” is not showing any text. Then click on the “View” tab from the menu ribbon. In the “Master Views” section of the “View” menu, click on the “Slide Master” option.
Step-2: Click on the “Insert Placeholder” button
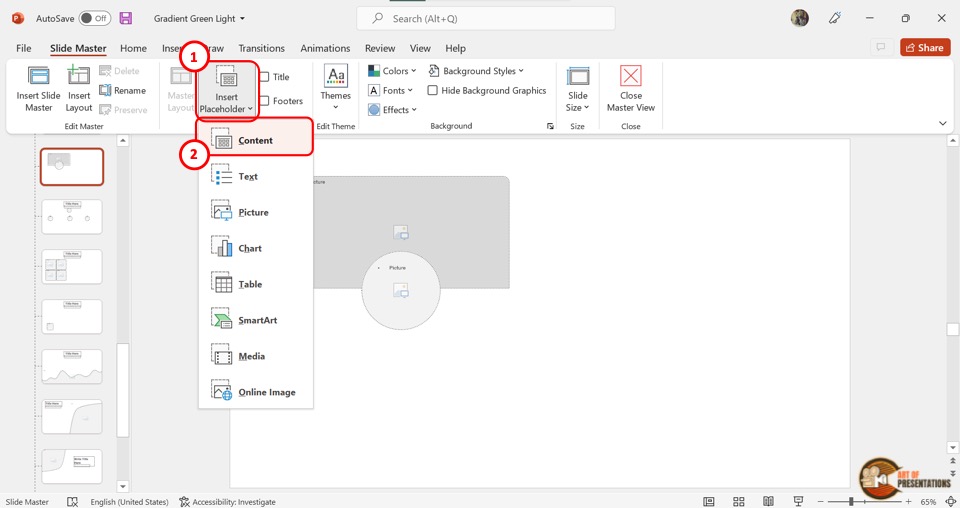
The next step is to click on the “Insert Placeholder” option in the “Master Layout” section of the “Slide Master” view. Then click on the “Content” option from the dropdown menu.
Step-3: Draw the “Content Placeholder”
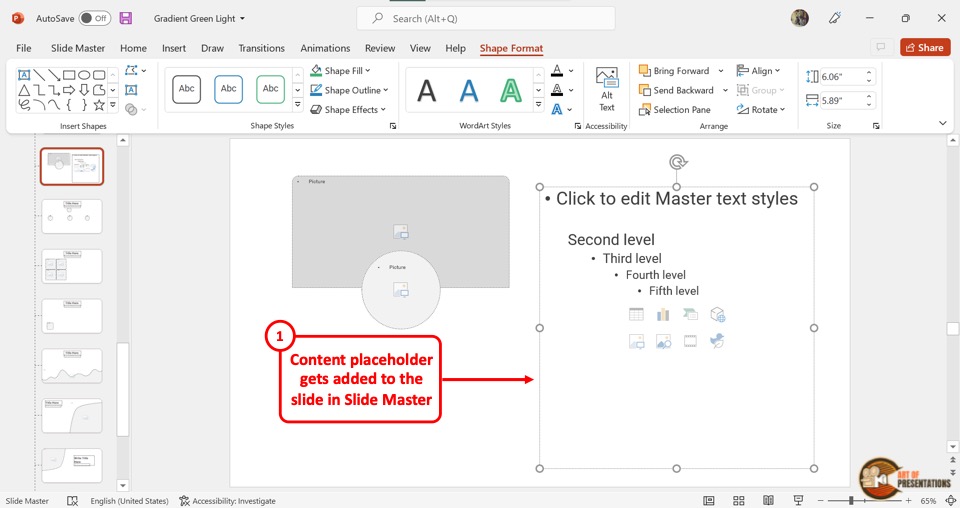
Now all you have to do is draw the “Content Placeholder” into the slide layout. You can also resize and reposition the placeholder.
Click on the “Shape Format” tab in the menu ribbon to access more options to edit the content placeholder.
Step-4: Click on the “Close Master View” option
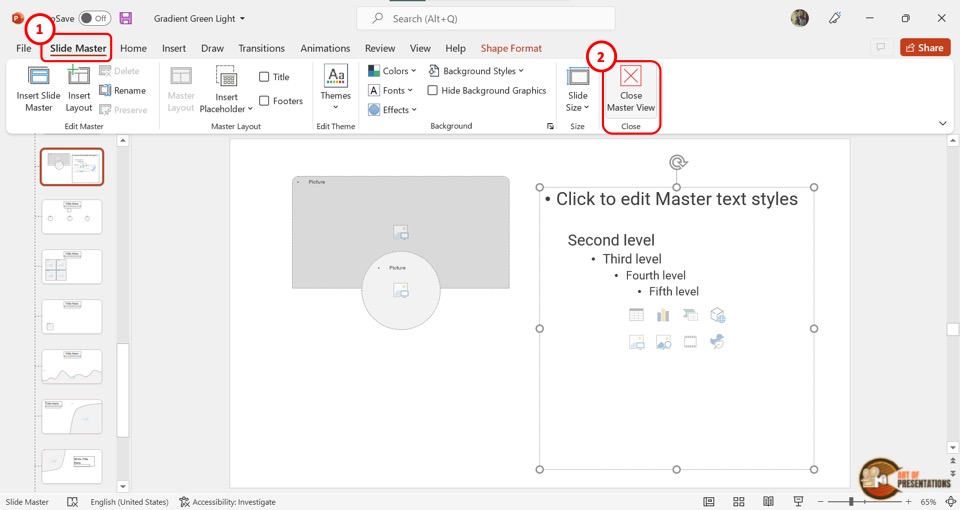
To save the content placeholder, click on the “Close Master View” option under the “Slide Master” tab. The screen will return to “Normal View” .
Step-5: Paste the text to the “Content Placeholder”
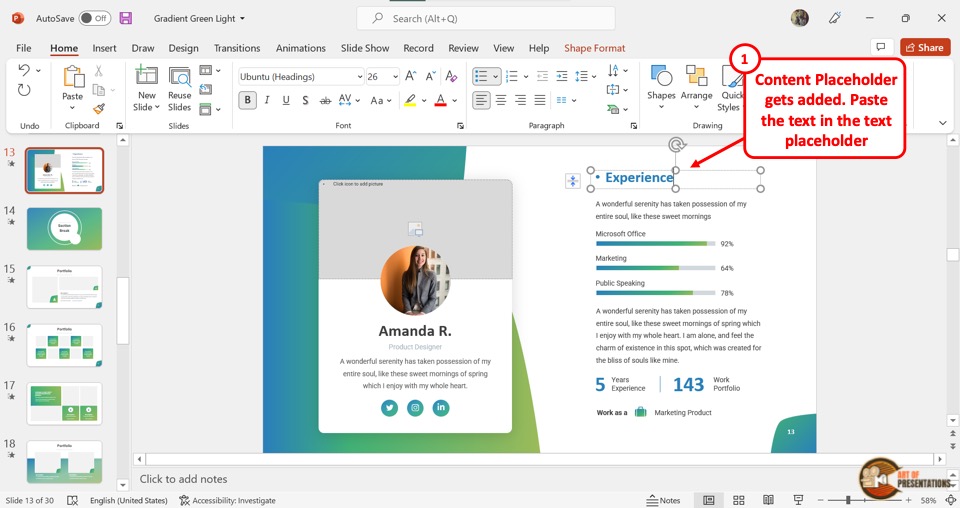
The final step is to cut the text in the slide and paste it into the “Content Placeholder” . To do so, select the text and press the “Ctrl+X” keys on your keyboard. Then click on the “Content Placeholder” and press the “Ctrl+V” keys.
Step-6: Click on the “Outline View” option
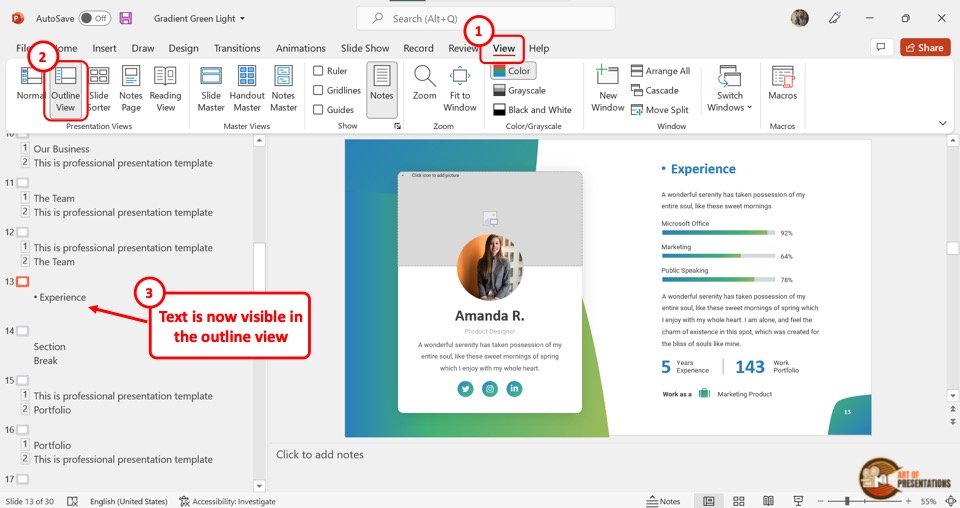
In the menu ribbon, click on the “View” tab and then click on the “Outline View” option. You will see that the text is now showing in the outline view.
Credit to Katemangostar (on Freepik) for the featured image of this article (further edited)

Interlinked Triangle Sequence
Google Slides , PPTX

Nested Alternating Process for PowerPoint and Google Slides

Minimalist Cube for PowerPoint and Google Slides

2-Part Plus Symbol for PowerPoint and Google Slides

Three Arrows Infographics for PowerPoint and Google Slides

Double Opposite Arrows Infographics for PowerPoint and Google Slides

Opposite Arrows Infographics for PowerPoint and Google Slides

Line Design Looping Arrows for PowerPoint and Google Slides

Line Design Alternating Process for PowerPoint and Google Slides

Triangle Lines Process for PowerPoint and Google Slides

Cycle Matrix Lines for PowerPoint and Google Slides

Hexagon Lines Process for PowerPoint and Google Slides
Search templates by categories, search templates by colors.
Love our templates? Show your support with a coffee!
Thank you for fueling our creativity.
Charts & Diagrams
Text & Tables
Graphics & Metaphors
Timelines & Planning
Best-Ofs & Tips
Terms and Conditions
Privacy Statement
Cookie Policy
Digital Millennium Copyright Act (DMCA) Policy
© Copyright 2024 Ofeex | PRESENTATIONGO® is a registered trademark | All rights reserved.

To provide the best experiences, we and our partners use technologies like cookies to store and/or access device information. Consenting to these technologies will allow us and our partners to process personal data such as browsing behavior or unique IDs on this site and show (non-) personalized ads. Not consenting or withdrawing consent, may adversely affect certain features and functions.
Click below to consent to the above or make granular choices. Your choices will be applied to this site only. You can change your settings at any time, including withdrawing your consent, by using the toggles on the Cookie Policy, or by clicking on the manage consent button at the bottom of the screen.
Thank you for downloading this template!
Remember, you can use it for free but you have to attribute PresentationGO . For example, you can use the following text:
If you really like our free templates and want to thank/help us, you can:
Thank you for your support
Powerpoint Templates
Icon Bundle
Kpi Dashboard
Professional
Business Plans
Swot Analysis
Gantt Chart
Business Proposal
Marketing Plan
Project Management
Business Case
Business Model
Cyber Security
Business PPT
Digital Marketing
Digital Transformation
Human Resources
Product Management
Artificial Intelligence
Company Profile
Acknowledgement PPT
PPT Presentation
Reports Brochures
One Page Pitch
Interview PPT
All Categories

Outline powerpoint presentation examples
Employ this Outline PowerPoint Presentation Examples for letting your clients know about your firm. Using this marketing PPT layout, the potential customers and prospective employers can learn about your enterprise and its long term objectives. This sales and advertising PowerPoint template can showcase the entire framework of launching a product in the market. The steps like product idea screening, analysis, and screening of the product, the techniques, and tools required for product lifecycle and market analysis can be highlighted with this business PPT theme. The branding campaigns, development plans, cost analysis, and product feasibility can be showcased with this product lifecycle PowerPoint template. This company introduction PowerPoint layout aids in showcasing the unique features of your company and influence the brand presence in the market. The complete procedure of product development until it is launched in the market can be illustrated. Hence, download this article introduction PowerPoint slide on your website or blog and promote your professional brand.

- Add a user to your subscription for free
You must be logged in to download this presentation.
Do you want to remove this product from your favourites?
PowerPoint presentation slides
Presenting Outline PowerPoint Presentation Examples. This easy to download PPT theme can be easily opened and saved in various formats like JPG, PDF, and PNG. You can alter the font size, font type, font color, and shape used according to your needs as this PPT layout is 100% customizable. This PowerPoint template is Google Slides compatible and is easily accessible.

People who downloaded this PowerPoint presentation also viewed the following :
- Diagrams , Business , Marketing , Strategy , Icons , Management , Business Slides , Flat Designs , Strategic Planning Analysis , Strategic Planning , Market Segmentation
- Product Idea Screening ,
- New Product Analysis ,
- Product Lifecycle ,
- Tools And Techniques ,
- Market analysis ,
- Development Plans
Outline powerpoint presentation examples with all 5 slides:
Establish an atmosphere that fosters camaraderie with our Outline Powerpoint Presentation Examples. Create conditions for effective interaction.

Ratings and Reviews
by Coleman Henderson
July 2, 2021
by O'Sullivan Evans


A simple guide to slideshows
Learn what slideshows are, how they’re used, common features, and how to choose a slideshow maker. Get started creating your own slideshows today with Microsoft PowerPoint.
What is a slideshow?
What are slideshows used for.

Meetings and presentations
Slideshows are most frequently used to create professional presentations for business meetings, conferences, and educational purposes. A slideshow program allows people to organize content, include visuals, and enhance the overall impact of their message.

Visual storytelling
Because slideshows sequentially display engaging visuals, text, and other multimedia, they’re a strong way to tell a cohesive and compelling narrative from start to finish.

Content creation
Slideshows give content creators a versatile and efficient way to organize information, increase visual appeal, and communicate effectively across different contexts.

Photo and video sharing
Slideshow makers are popular for creating photo and video presentations, especially for events like weddings, birthdays, and vacations. People can add transitions, music, and captions to fully bring the photo-sharing experience to life.

Training and tutorials
Slideshows help break down complex information into digestible chunks with the support of visuals and text, making them ideal for instructional materials, tutorials, and training modules.

Collaborative projects
In collaborative settings, teams use slideshow makers to create joint presentations or reports. The best slideshow makers enable multiple contributors to add their content simultaneously, which helps ensure a cohesive and unified presentation.
What are the features of a slideshow creator?
Slideshow creators vary in what they offer but ideally include:
A library of templates, themes, and images.
If you’re not a designer, this feature is huge. Simply browse the options available in your slideshow maker library to create a polished, professionally designed presentation in a flash. Be sure to confirm that access to the library is free and the images are approved for unrestricted usage.
Audio and video compatibility.
Keeping your audience engaged is key to any successful slideshow presentation. To mix things up, being able to add a multimedia element—like a song or a video clip—will help people stay focused and interested.
Presentation tools.
Handy presenter tools go a long way toward making your slideshow experience seamless. For example, straightforward slide navigation, slideshow keyboard shortcuts, pen and highlighter markup, and adjustable resolution settings.
AI assistance.
With AI revolutionizing content creation, using a slideshow maker that has AI capabilities will enhance efficiency and innovation. Depending on the slideshow app you have, creating an entire slideshow could be as easy as a quick prompt, like “Make a presentation about the benefits of sustainable fashion that has 15 slides.”
Animations.
Like audio and video, animations give your audience a bit of sensory surprise that can capture their attention.
Slide transitions.
Add some pizzazz to how you change slides with visual effects like fading, wiping, and zooming.
Screen recording.
Being able to record your screen in a slideshow maker is helpful when giving an instructional talk, software demonstration, and other types of presentations that require visual aids.
A place to put speaker notes.
Having somewhere to jot a few notes down will help remind you of everything you want to cover as you present.
Different viewing options.
Looking at different views—for example, a presenter view, an audience view, and a high-level view of slide order—is useful when organizing your slideshow’s structure and understanding and preparing for what you’ll see versus what your audience will see.
How do I choose the right slideshow maker?
When choosing a slideshow maker, keep the following questions in mind to make sure you get the most for your money:
Is it scalable with your business?
As your organization grows and changes, it’s important to have flexible technology that adapts to new needs. Having certain features—such as cloud-based collaboration, compatibility with other work apps, and a mobile app—will help ensure that no matter how your business changes, the slideshow maker is up to the task. This also applies to pricing plans. Consider choosing a slideshow app that has a subscription plan (so the software is always up to date), volume-based pricing, or enterprise-level pricing.
Does it have a variety of visual elements?
It’s pretty much a given that a slideshow maker will allow you to add images, but think outside the JPEG box—what other visual elements are available to you? Features like preset themes, free templates, SmartArt, a built-in clip art library, shape tools, background styles, 3D models, and charts and graphs provide diverse ways to switch up how a slideshow looks without relying solely on adding your own images.
Is it easy to use?
You could have the most feature-rich slideshow maker on the market, but if it isn’t easy to use, you probably won’t use it. Or you will, but you’ll be frustrated, waste valuable time, and have difficulty convincing people you work with to use it. As you research slideshow makers, look for videos that show the apps’ interfaces in action to help you decide if they’re intuitive and will have a shorter learning curve.
Does it have collaboration and sharing options?
Because making a slideshow is often a collaborative effort, it’s worthwhile to find a slideshow creator that was designed with this in mind. Pick one that offers editing controls and commenting, as well as the ability to work on a slideshow at the same time as someone else. Having a cloud-based slideshow maker will be key here. You’ll not only save yourself time but also keep things simple by not having multiple versions of the same slideshow.
Explore more about slideshows and slideshow makers
Copilot in powerpoint.
Transform how you make slideshows with the versatile AI in Copilot for PowerPoint.
Improve your presenting skills
Practice presenting with an AI speaker coach to get feedback on body language, repetition, and pronunciation.
Six slideshow tips and tricks
Read up on tips about how to finesse your slideshows to give your most confident presentations.
Get free PowerPoint templates
Show your style with PowerPoint templates in more than 40 categories.
How to make a branded slideshow
Create a cohesive visual identity for your brand that goes beyond adding a logo to every slide.
Try a photo album template
Relive your favorite memories with photo album templates designed for all your unforgettable moments.
The benefits of visual aids in slideshows
Discover why using visual aids helps communicate ideas and messaging more effectively.
Slideshows that reach all learners
Explore the different ways that people learn and how to include all learning styles in your presentations.
Frequently asked questions
How do i make a good slideshow.
Making a good slideshow in PowerPoint is easy:
Plan what you’d like to include in your slideshow.
Launch your slideshow creator.
Choose the theme you’d like.
Import media.
Add text, music, and transitions.
Record, save, and share your slideshow.
Learn more about how to make a slideshow .
How do I add music to a slideshow?
To add music to a slideshow, first make sure that you’re using a slideshow maker with music compatibility. In PowerPoint, follow these steps:
Open your PowerPoint presentation and select the slide where you want to add music.
Click on the Insert tab in the ribbon menu.
Click on the Audio button and select Audio on My PC.
Browse to the folder on your computer where the audio file is located and select it.
Click on the Insert button.
How do I record a slideshow?
The steps for recording a slideshow in PowerPoint will vary depending on the version that you own. Get help with slideshow recording based on your version.
What types of files can I add to a slideshow?
File compatibility in PowerPoint includes the use of JPEGs, PNGs, TIFFs, GIFs, PDFs, MP3s, WAVs, MIDIs, MPEG-4 Videos, and Windows Media Videos.
How do I share my slideshow?
To share your PowerPoint slideshow, follow these steps:
Open your presentation and click Share at the top right of your screen.
If your presentation isn't already stored on OneDrive, select where to save your presentation to the cloud.
Choose a permission level, like Anyone with a link , or maybe just people in your company. You can also control if people can edit or just view the doc.
Select Apply.
Enter names and a message.
Select Send.
Follow Microsoft
- Insert WordArt Article
- Add a hyperlink to a slide Article
- Create a PowerPoint presentation from an outline Article
- Check spelling in your presentation Article
- Create and format a table Article
- Insert a linked Excel chart in PowerPoint Article
- Add slide numbers, page numbers, or the date and time Article
- Set text direction and position in a shape or text box Article
Create a PowerPoint presentation from an outline
If you've already jotted down an outline of your presentation in Word and now need a quick way to add it to your slides, you can import a Word outline into PowerPoint.

Create an outline in Word
Select View > Outline . This automatically generates an outline and opens the Outlining tools:
If your document has headings (any heading levels from H1-H9), you’ll see those headings organized by level.
If your document doesn’t have headings and subheadings yet, the outline will appear as a bulleted list with a separate bullet for each paragraph or body text. To assign or edit headings, heading levels, and set up your document structure:
Select a bulleted item. Or press the Ctrl key to select several lines.
In the Outline Level box, select a heading Level 1 for slide titles, Level 2 for bullet points on that slide.
When finished or to edit your document, select Close Outline View .
If you need help creating an outline, see Create an outline in Word .
Save an outline in Word
To save your document, select Save , name your file, and then select Save once more. Select Close to close your document.
Note: Your Word document must be closed to insert it into a PowerPoint presentation.
Import a Word outline into PowerPoint
Open PowerPoint and select New Slide > Slides from Outline .
In the Insert Outline dialog box, find and select your Word outline and select Insert .
Note: If your Word document contains no Heading 1 or Heading 2 styles, PowerPoint will create a slide for each paragraph in your content.
Guidelines for importing an outline
PowerPoint can import an outline in .docx, .rtf, or .txt format.
If your outline is a Word document Apply a heading format to any text you want to include in a slide. For example, if you apply the Normal style to a block of text, Word won't send that text to PowerPoint.
If your outline is a .txt file Use indentation to indicate heading levels. Any unindented lines of text will become titles of new slides.
For PowerPoint to successfully convert your outline to slides, you must follow these guidelines:
If your outline is a Word document:
Apply a heading format to any text you want to include in a slide. For example, if you apply the Normal style to a block of text, Word won't send that text to PowerPoint
Save the Word document as an .rtf file. In PowerPoint for macOS, you can only import Word documents that are saved in Rich Text Format. Click File > Save As , and in the File Format box, select Rich Text Format (.rft) ).
If your outline is a .txt file: Use indents to indicate heading levels. Remember that any un indented lines of text will become titles of new slides.
Insert outline text into a PowerPoint presentation
In a new PowerPoint presentation file, click the first slide. Or, in an existing presentation file, click the slide that you want the outline to appear after.
On the Home tab, click the arrow next to New Slide , and then click Outline .

Locate the outline file (.rtf or .txt) that you want to insert, and then double-click it or click Insert .
New slides are inserted in the presentation based on the text in the outline file you selected. You are now ready to edit the slides and the presentation as you see fit.
Creating a presentation from an outline isn't support in PowerPoint for the web. It requires a desktop version of PowerPoint.

Need more help?
Want more options.
Explore subscription benefits, browse training courses, learn how to secure your device, and more.

Microsoft 365 subscription benefits

Microsoft 365 training

Microsoft security

Accessibility center
Communities help you ask and answer questions, give feedback, and hear from experts with rich knowledge.

Ask the Microsoft Community

Microsoft Tech Community

Windows Insiders
Microsoft 365 Insiders
Was this information helpful?
Thank you for your feedback.
May 10, 2024
How to convert text to PowerPoint
Want to use an existing doc to give you a jumpstart on creating your slideshow? We’ll show you a few ways to convert text to PowerPoint both online and on your desktop.
One of the best ways to get a jumpstart on creating a slideshow is by using existing content. You may have a text, Word, or PDF file that has the text you need for your slides. Using any of the three methods listed here, you can convert text to PowerPoint easily.
Note : If you use Microsoft Word on the web, you may notice an option to export the document to a PowerPoint presentation. However, as of this writing, the feature does not work consistently.
Method 1: Convert text to slides with Plus AI
Using Plus AI for Google Slides and Docs , you can upload a file or paste the text. So, you can use whichever is quickest or easiest at the time. Then, simply download the slideshow and open it in PowerPoint.
- Visit Google Slides , sign in, and create a Blank presentation.
- Open Extensions , select Plus AI , and pick New presentation with Plus AI .

- Select New presentation on the left and optionally, choose a template to get started.

- Pick Upload a file and then Choose file . You can use a Word, PDF, PowerPoint, or text file. Alternatively, click Paste in text if you want to go that route.

- Make any other adjustments you like and click Generate Presentation .

- When your slideshow appears, you can make any changes you like and also use Plus AI to add more slides, rewrite your content, or remix the slide layout.

- To download your presentation as a PowerPoint , go to File > Download and pick Microsoft PowerPoint .

You can then open your downloaded file in PowerPoint.

Tip : You can also enter a prompt or instructions and let the Plus AI create the content for your slideshow!
Method 2: Convert a Word outline to PowerPoint on the desktop
If you use Microsoft Office on your desktop, you can import an outline to PowerPoint using a Word document.
- Start by creating the outline for your presentation using the Outline View in Word. Go to the View tab and pick Outline in the Views section of the ribbon.

- Use Level 1 for each slide title and subsequent levels for the slide content. Using an example shown below, there are three Level 1 statements beginning with “How to” which will produce three sides. Then, each “Steps for” statement is Level 2 for the content on the corresponding Level 1 slide.

- Save and close the Word document; you cannot import it into PowerPoint if the file is open.
- Launch PowerPoint and create a new slideshow or open an existing one.
- Go to either the Home or Insert tab, open the New Slide menu, and pick Slides from Outline .

- Browse for, select the Word outline document, and click Insert .

You’ll then see your outline transformed into a PowerPoint slideshow where you can then spruce it up, add more slides, or make whatever edits you like.

Remember, if you want to intelligently transform text into a presentation, you can use an attractive template with Plus AI and save time from trying to enhance the appearance later.
Method 3: Convert text to PowerPoint with a file converter
One more way to quickly transform text into a PowerPoint slideshow is using an online file converter . By uploading a Word document, text file, or PDF, you can convert the text into a PowerPoint file and download it.
There are several free tools for this task including Convertio and CloudConvert. As an example, we’ll use Convertio.
- Visit Convertio and confirm you’re on the Online Presentation Converter page.
- Use Choose Files to upload the document from your computer, Dropbox, or Google Drive.

- When the file displays, choose PPT or PPTX per your preference in the drop-down menu to the right.
- Select Convert .

- When the conversion completes, click Download to obtain the file.
- Access the Downloads in your web browser or head to your Downloads folder and open the file.
You’ll then have your document converted to a PowerPoint presentation where you can adjust the appearance, change the slide size, and add media.

Depending on the format of your original document, this might not be what you’re looking for. In that case, you might want to use one of Plus AI’s free presentation converter tools that will intelligently use AI to convert your PDF or Word documents into presentations .
Alternatively, you can sign up for the Plus AI add-on and use all of these features directly in Google Slides.
If you want to convert text to PowerPoint for a head start on your presentation, these different methods should have you covered. For flexibility, templates, and editing tools, Plus AI is the perfect option, but you can also import a Word outline or use an online file converter if you prefer.
Can ChatGPT convert text to PPT?
You can use ChatGPT to generate the content for your PowerPoint presentation. Check out our how-to for creating a PowerPoint slideshow with ChatGPT for complete details.
How do I copy text from Word to PowerPoint?
If you only want to add a certain portion of text from a Word document to a PowerPoint slide, you can simply copy and paste it.
Open both documents, select the text in Word, and right-click to pick Copy . Go to the slide in PowerPoint, place your cursor where you want the text, and right-click to pick one of the Paste Special options.
How to convert a PDF to PowerPoint?
You can turn a PDF into a PowerPoint presentation easily using Plus AI in Google Slides. Then, simply download the file and open it in PowerPoint.
In Google Slides, open Extensions > Plus AI > New presentation with Plus AI . Select Upload a file , choose your PDF, and follow the remaining prompts. Then, pick File > Download > Microsoft PowerPoint to obtain your presentation.

Latest posts
Latest post.

How to use ChatGPT to create PowerPoint presentations
Step-by-step guide to using AI tools to create presentations. Looking for ChatGPT for PowerPoint? Here's a guide to using AI in PowerPoint and Google Slides

Five lessons for building AI apps
Five things we've learned the hard way about building AI-powered apps
How many slides do I need for my presentation?
How many slides for a 10 minute presentation and the 3-2-1 rule for presentations
More resources

Best AI Presentation Makers of 2024 (with example outputs)
The best AI presentation software for Google Slides, PowerPoint, and other popular presentation apps. Read our in-depth reviews with real examples and user reviews
In-depth review of Gamma.app and alternative AI presentation tools
An in-depth breakdown of Gamma.app, how it works, pricing, and more. Includes alternative AI slide generators to try.

235+ Ideas for persuasive speech topics
How to choose a great persuasive speech topic, inspiration and ideas, and example presentations for you to get started
Got any suggestions?
We want to hear from you! Send us a message and help improve Slidesgo
Top searches
Trending searches

11 templates

28 templates

holy spirit
36 templates

islamic history

memorial day
12 templates

165 templates
Outline Style Food Icon Resources
Outline style food icon resources presentation, free google slides theme and powerpoint template.
Download the Outline Style Food Icon Resources presentation for PowerPoint or Google Slides and start impressing your audience with a creative and original design. Slidesgo templates like this one here offer the possibility to convey a concept, idea or topic in a clear, concise and visual way, by using different graphic resources. You need to talk about a specific topic, but you don't know how to do it? Try using presentations like this one here, 100% customizable!
Features of this template
- 100% editable and easy to modify
- Different slides to impress your audience
- Contains easy-to-edit graphics such as graphs, maps, tables, timelines and mockups
- Includes 500+ icons and Flaticon’s extension for customizing your slides
- Designed to be used in Google Slides and Microsoft PowerPoint
- Includes information about fonts, colors, and credits of the resources used
How can I use the template?
Am I free to use the templates?
How to attribute?
Attribution required If you are a free user, you must attribute Slidesgo by keeping the slide where the credits appear. How to attribute?
Related posts on our blog.

How to Add, Duplicate, Move, Delete or Hide Slides in Google Slides

How to Change Layouts in PowerPoint

How to Change the Slide Size in Google Slides
Related presentations.
Premium template
Unlock this template and gain unlimited access
Purdue Online Writing Lab Purdue OWL® College of Liberal Arts
Welcome to the Purdue Online Writing Lab

Welcome to the Purdue OWL
This page is brought to you by the OWL at Purdue University. When printing this page, you must include the entire legal notice.
Copyright ©1995-2018 by The Writing Lab & The OWL at Purdue and Purdue University. All rights reserved. This material may not be published, reproduced, broadcast, rewritten, or redistributed without permission. Use of this site constitutes acceptance of our terms and conditions of fair use.
The Online Writing Lab at Purdue University houses writing resources and instructional material, and we provide these as a free service of the Writing Lab at Purdue. Students, members of the community, and users worldwide will find information to assist with many writing projects. Teachers and trainers may use this material for in-class and out-of-class instruction.
The Purdue On-Campus Writing Lab and Purdue Online Writing Lab assist clients in their development as writers—no matter what their skill level—with on-campus consultations, online participation, and community engagement. The Purdue Writing Lab serves the Purdue, West Lafayette, campus and coordinates with local literacy initiatives. The Purdue OWL offers global support through online reference materials and services.
A Message From the Assistant Director of Content Development
The Purdue OWL® is committed to supporting students, instructors, and writers by offering a wide range of resources that are developed and revised with them in mind. To do this, the OWL team is always exploring possibilties for a better design, allowing accessibility and user experience to guide our process. As the OWL undergoes some changes, we welcome your feedback and suggestions by email at any time.
Please don't hesitate to contact us via our contact page if you have any questions or comments.
All the best,
Social Media
Facebook twitter.
IMAGES
VIDEO
COMMENTS
Method 1: Create your outline from scratch. Method 2: Create a presentation outline using an AI presentation maker. Method 3: Create a presentation outline using ChatGPT. Method 4: Create a presentation outline using a template. Presentation outline examples.
Import a Word outline into PowerPoint. Open PowerPoint and select New Slide > Slides from Outline. In the Insert Outline dialog box, find and select your Word outline and select Insert. Note: If your Word document contains no Heading 1 or Heading 2 styles, PowerPoint will create a slide for each paragraph in your content.
Using Outline view in PowerPoint or another tool, gradually pull your outline apart into unique sections. Instead of typing them one-by-one, just paste the sections onto new slides. You don't have to stick with the exact text you wrote. Instead, paste the sections out and use them as the inspiration for content.
Body. Create a skeleton outline of your presentation by breaking down this main message into smaller parts. Use bullet points or headings to organize these bits of information. Think of the main points as the big chapters and the subpoints as the smaller sections within those chapters.
Importance of Presentation Outline. A presentation outline plays a crucial role in ensuring the success of your presentation. Here are some key reasons why having a well-crafted outline is important: Organization: A presentation outline will help you structure your thoughts and ideas in a logical and coherent way. It ensures that your ...
A presentation outline is a bare-bones version of your talk. It should take the general direction of your pitch, plus summaries of your key points. Its purpose is to help you shape your thinking, organize your thoughts, and make sure your material is presented logically. In this article, we're going to take a closer look at what a ...
How to create a presentation outline. Follow these steps when creating an outline for your presentation: 1. Consider the purpose of your presentation. When creating a presentation outline, determine your goal. To find this, think about what you want your audience to obtain or support after your discussion. For example, a nonprofit that builds ...
This helps you manage your time effectively during the actual presentation. Notes or Reminders: Add any reminders, cues, or notes to yourself that will help you deliver your presentation effectively. These can include tips on delivery, body language, or specific points to emphasize. Presentation Outline Examples. Image: freepik.
On either the Home or Insert tab, select the New Slide drop-down menu. Pick "Slides From Outline." Browse for the outline file on your computer, select it, and click "Insert." After a moment, you'll see your outline load into PowerPoint. As mentioned, each line of the outline is its own slide. From there, you can add text, include images ...
Master presentation outlines with our easy, step-by-step guide, complete with practical examples.
However, don't rely on your slides alone; you need a proper outline, too. An outline for a PowerPoint presentation should also include images that you intend to use for your slides. Fortunately, the PowerPoint program itself also allows you to view an outline of your slides. This can help give you a visual of your overall presentation.
Navigate to the Print Options. On your keyboard, hit CTRL+P to open up the print options for your presentation. 2. Navigate to the Outline View. Within the print options, select the 'Full Page Slides' dropdown (the default setting) and within the menu in the upper right-hand corner, select the Outline View.
Open the presentation that you want to print. Click File > Print. In the Print dialog box, under Settings, select the second box (which by default is set to Full Page Slides) to expand the list of options. Then, under Print Layout, select Outline. You can choose a page orientation (Portrait or Landscape) in the Printer Properties dialog box.
Presentation Outline. Introduction. Keep it under 5 minutes. Introduce yourself, your company, and the topic of discussion. Explain the significance and topic relevance. Specify your approach to the topic. Preview the main points or key idea. Make a transition to the main points. Main Body.
Length and Structure. The main part should make up about 70% of the presentation and also include a clear structure. Explain your ideas in detail and build them up logically. It should be organized chronologically, by priority or by topic. There should be a smooth transition between the individual issues.
Free Outline Slide Templates for an Organized Slideshow. Make your presentations organized and visually appealing with an outline PowerPoint template. Whether you're a student, teacher, or business professional, these templates will help you structure your ideas and deliver a clear message. With customizable slides, you can easily manage your ...
It's completely unnecessary. 5. Include a Call-to-Action. A call-to-action is much better than a 'thank you' slide. This encourages your audience to take action after your presentation. When creating your outline, think of a short, snappy call-to-action that prompts a response.
Step-1: Open the Outline View. In the menu ribbon located at the top of the screen, click on the "View" tab. You have to then click on the "Outline View" option which is the second option in the "Presentation Views" section of the "View" menu. Step-2: Click on the slide and add content to the outline.
Sports Presentation. 26,943 templates. Create a blank Presentation. Cream Neutral Minimalist New Business Pitch Deck Presentation. Presentation by Take Care Creative. Brown and Beige Aesthetic Vintage Group Project Presentation. Presentation by hanysa. Beige and Brown Organic Vintage Group Project Presentation. Presentation by Noisy Frame.
Everything will fall into place once you find the tool you need for your presentation. First, we offer you flag slide templates with an elegant abstract wave line pattern. Secondly, our maps will become your maps once you customize them to your needs thanks to text placeholders, map pointers, and icons. You will be able to present historical or ...
Before creating your slide deck, make sure to create an outline with all the major points that you need to include within your presentation. 02. ... You can easily use our free presentation slides and templates to help you create a well-designed and informative presentation. 03. Easily replace any image with millions of free images within our ...
PowerPoint presentation slides: Presenting Outline PowerPoint Presentation Examples. This easy to download PPT theme can be easily opened and saved in various formats like JPG, PDF, and PNG. You can alter the font size, font type, font color, and shape used according to your needs as this PPT layout is 100% customizable.
30 Perfect Presentation Outline Templates (+Examples) February 22, 2021 6 Mins Read. A presentation outline template gives you an overview of what encompasses an entire presentation. Based on the outline, you can start dealing with one slide at a time and then into the nitty-gritty of it. You may consider as a roadmap that leads to a successful ...
We design Outline Panel (Figure 1 (B)) to facilitate users' planning and creating presentation slides using explicit outline (G1). OutlineSpark supports writing a hierarchical outline including topics and sub-topics which are differentiated by font size, indentation, and a vertical gray bar. For example, sub-topic outline items are ...
Slide transitions. Add some pizzazz to how you change slides with visual effects like fading, wiping, and zooming. Screen recording. Being able to record your screen in a slideshow maker is helpful when giving an instructional talk, software demonstration, and other types of presentations that require visual aids. A place to put speaker notes.
Import a Word outline into PowerPoint. Open PowerPoint and select New Slide > Slides from Outline. In the Insert Outline dialog box, find and select your Word outline and select Insert. Note: If your Word document contains no Heading 1 or Heading 2 styles, PowerPoint will create a slide for each paragraph in your content.
Method 2: Convert a Word outline to PowerPoint on the desktop. If you use Microsoft Office on your desktop, you can import an outline to PowerPoint using a Word document. Start by creating the outline for your presentation using the Outline View in Word. Go to the View tab and pick Outline in the Views section of the ribbon.
Download the Outline Style Food Icon Resources presentation for PowerPoint or Google Slides and start impressing your audience with a creative and original design. Slidesgo templates like this one here offer the possibility to convey a concept, idea or topic in a clear, concise and visual way, by using different graphic resources.
The Online Writing Lab at Purdue University houses writing resources and instructional material, and we provide these as a free service of the Writing Lab at Purdue.