
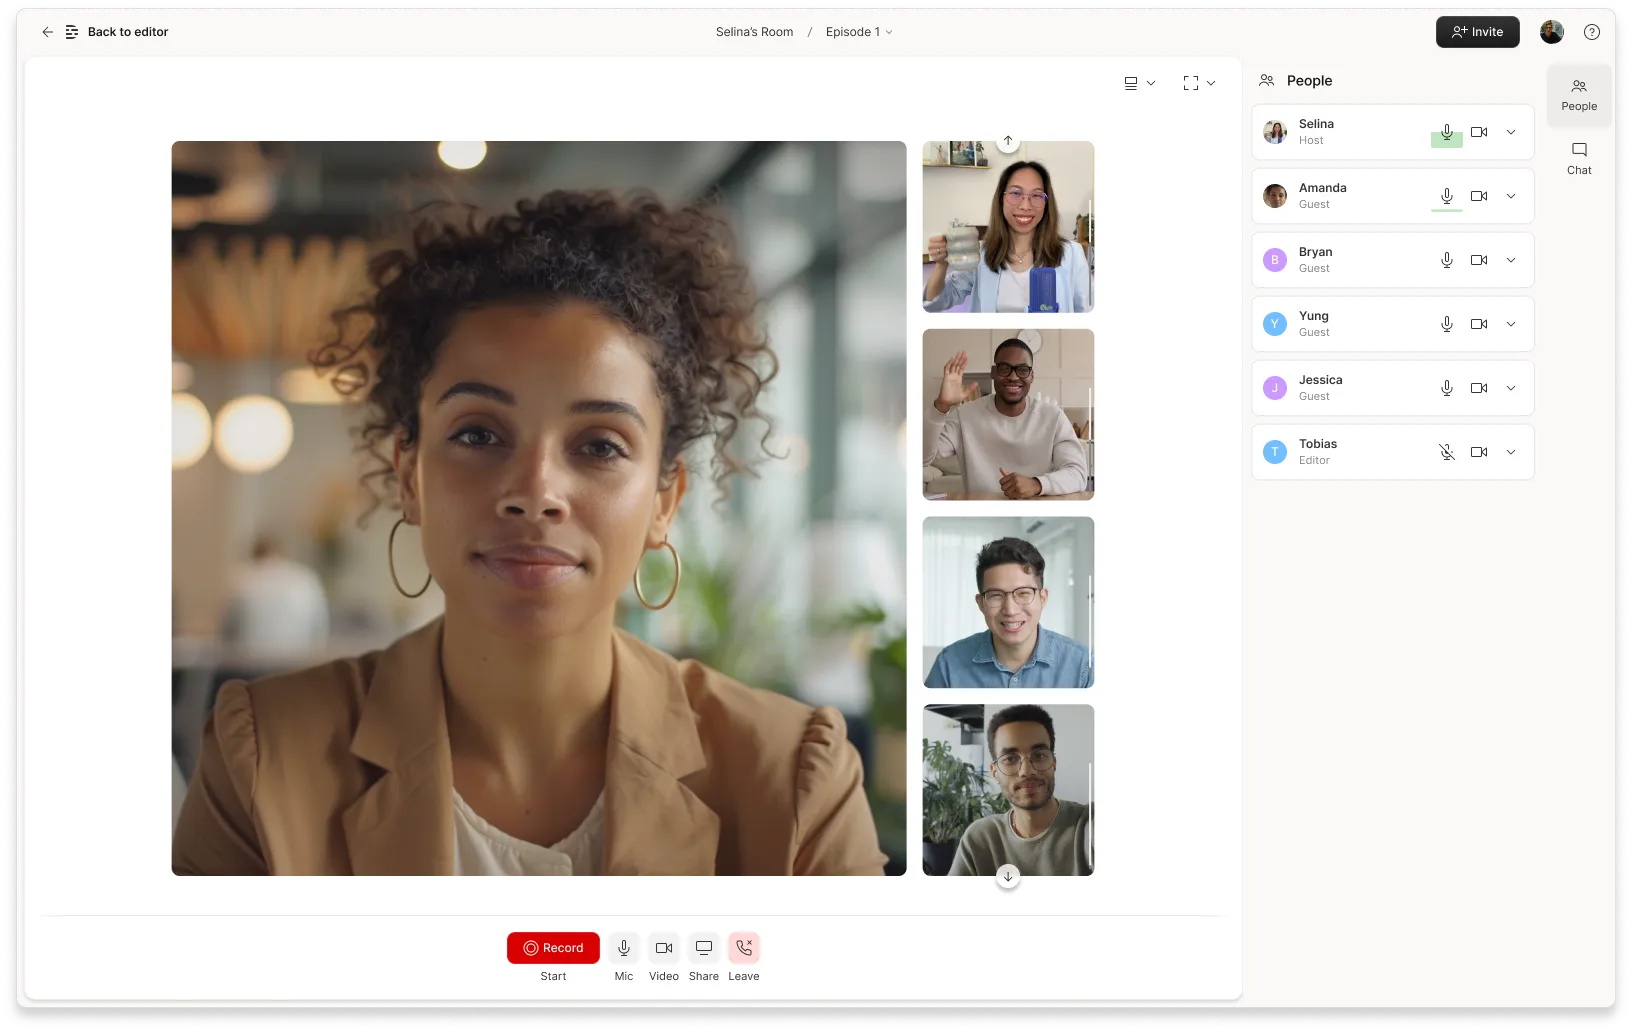
How to video record yourself presenting a PowerPoint

What type of content do you primarily create?

Recording yourself presenting a PowerPoint can be challenging, especially getting the technical aspects right. You need to capture your screen, webcam, and audio seamlessly while delivering your content naturally and avoiding awkward transitions between slides.
Finding a tool that integrates all these components can seem daunting. However, recording yourself presenting a PowerPoint doesn't have to be reserved for the tech-savvy or professional speakers.
Whether you're a teacher creating online lessons, a marketer producing a product demo, or someone looking to improve their presentation skills, this guide will walk you through user-friendly tools and strategies that will teach you how to video record yourself presenting a PowerPoint.
- Recording yourself presenting a PowerPoint can be challenging, but it doesn't have to be reserved for experts.
- Video recording offers unlimited reach, repurposing opportunities, and a more engaging experience.
- Use PowerPoint's built-in recording feature or tools like Descript for a polished presentation.
- Other tools like Zoom, Loom, OBS Studio, Clipchamp, and Quick Time Player can also be used for recording.
- Tips include practicing your script, using slide notes, ensuring high-quality audio and lighting, and incorporating storytelling techniques.
Why video record yourself presenting a PowerPoint?
Video recording your PowerPoint presentations offers several advantages:
- Unlimited reach : Unlike in-person presentations confined to a specific time and location, recorded videos allow your message to reach audiences globally at their convenience.
- Repurposing opportunities: Recorded presentations can be repurposed as evergreen content across multiple platforms, such as social media, online courses, webinars, and internal training materials, maximizing their value.
- Personal and engaging : Recording yourself narrating a presentation adds a personal touch and dynamic element that static slides alone cannot replicate. Your viewers can see and hear you deliver the content, creating a more immersive and engaging experience.
How to record your presentation with the PowerPoint app
Built-in recording feature in powerpoint.
1. Open the PowerPoint slide you want to record.
2. Click on the Record tab of the top toolbar.
3. Click on the Record button and choose from any of the following options:
- From Current Slide
- From Beginning
4. You'll see the PowerPoint screen recording window.
5. Select the microphone and camera from the icon on the top-right.
6. Click the Stop and Replay buttons to end or replay your recording.
7. To export your presentation's recording, click Export to Video within the Recording tab.
Benefits : Easy to use, no external tools needed
Limitations : Limited editing capabilities.
How to make a more polished recording of your presentation with Descript
While PowerPoint's built-in recording features are helpful, they may not produce the refined result you want for your presentation. That's where Descript comes in handy.
It’s a whole production studio at your fingertips, with video recording, transcription, and editing capabilities, ready to transform dull PowerPoint slides into an engaging experience for your audience. Descript also has a built-in screen recorder.
You can use Descript on Windows, Mac, or even straight from your web browser.
Here's step-by-step guide to recording your PowerPoint presentation with Descript.
Set up your screen recording
1. Install and open Descript. At the top of the editor, click and open the Record panel.
2. Select Screen.
3. Set Recorder settings:
Adjust the default recording settings to your liking, including the transcription language, the maximum recording resolution, and more.
4. Set recording options. Choose which audio and video sources to record (e.g., microphone, computer audio, camera). Remember to turn the camera on to capture your talking head video alongside your PowerPoint presentation.
5. Click the Additional Settings icon for
- Studio Sound (Optional): Enhance audio quality with noise reduction and background removal
- Transcription (Optional): Enable automatic transcription for easier editing
- Recording separate audio tracks
6. Add (optional) Speaker labels for each audio track (e.g., "Narrator," "Expert") by typing them in the text box next to your audio inputs.
Capture your screen recording
1. Select the right recording option:
- Recording into script : Choose this if you haven’t recorded anything yet.
- Replace selection : Choose this if you already have a script and want to replace a specific section with a new recording.
- Record new layer : Pick this for recording your video as a new layer on top of an existing recording.
2. Click Record at the bottom of the Record panel.
3. Drag over the area of your screen you wish to record. Click Start Recording. Press Space to start recording the full screen.
4. Click Stop to finish recording
Bonus: Descript creates separate tracks for camera, microphone, and computer audio. You can edit each track individually for more precise control.
- Do a short test recording to ensure everything is set up correctly.
- Set your recording to transibe for easier editing.
Editing and polishing your PowerPoint recording in Descript
Descript's AI video editing tool makes it a breeze to trim, cut, and splice your video footage, ensuring a seamless flow from start to finish. You can add smooth transitions and other visual effects to make your presentation pop.
Here’s a glimpse of how to edit and polish your PowerPoint recording in Descript:
Edit your recording like a doc
Did you make a mistake during a slide transition? No problem. Just delete those sections in the text transcript (created automatically by Descript) and the video will adjust to match.
Remove filler words
Sound smoother and more confident by easily removing filler words like "um" and "uh" from the transcript.
Fix voiceover mistakes by typing
Didn't nail your delivery on a specific slide? No need to start from scratch! Descript's Overdub feature lets you simply type in the correct narration and replace the audio on that slide with AI voice cloning.
Boost video quality and engagement :
- Crisp up audio quality by reducing background noise and room reverb with the AI-powered Studio Sound feature.
- Replace your background completely with the Green Screen Video Editor —look like you're presenting in a sleek studio or broadcasting from a beach.
- Enable Eye Contact simulation with AI, so it appears you're making direct eye contact with viewers, even if you’re looking or reading something off-camera.
Other ways to video record yourself presenting a PowerPoint
Use Zoom’s meeting recording feature to record yourself giving a PowerPoint presentation. Start a Zoom meeting with yourself, share your PowerPoint window, and enable recording
Loom is a handy screen recording tool that also offers a webcam overlay. Launch the Loom app or Chrome extension and set it to record your screen and webcam. Expect high-quality recordings but no advanced editing features. The free plan offers only five minutes of recording at a stretch.
3. OBS Studio
OBS Studio is a free, open-source screen recorder/streaming software with a steeper learning curve. It’s popular among advanced or tech-savvy users who need granular customization and control.
To record your presentation, add a "Screen Capture" source to capture your PowerPoint window and a "Video Capture Device" source for your webcam.
4. Clipchamp: Recording natively in Windows
You can use Microsoft’s Clipchamp , the built-in screen recorder and video editor for Windows, to simultaneously capture your computer screen, webcam, and audio for recording your PowerPoint presentation. It’s also available as a browser-based app. You can record up to 30 minutes on screen and webcam recordings.
Users can also adjust the screen and webcam recordings in the editing timeline separately.
5. Quick Time Player Recording natively in Mac
Use Mac’s Quick Time Player to record your PowerPoint presentation. It’s not as straightforward as the other options on this list, so here’s a quick guide to help you out:
- Launch Quick Time Player.
- Select File and go to New Movie Recording.
- You'll be recording your entire screen in addition to recording your face, so adjust the size and location of the recording window so that it's in a nonintrusive corner of your PowerPoint.
- Go to View and select Float on Top .
- Next, go to File and select New Screen Recording.
- On the menu that appears, select Record Selected Portion and drag a border around your PowerPoint and the webcam recording window.
- Press Record and start presenting.
- You can adjust the video quality and the audio source in the webcam recording window.
How to turn your PowerPoint presentation slides into a video
Did you know PowerPoint lets you save your presentation as a video, too?
Here's a breakdown of the two ways you can do so—keeping all the presentation elements (narration, animation, pointer movements, timings, and so on) intact in the presentation itself.
Save your PowerPoint presentation as a video
This creates a separate video file (MP4 or WMV) that anyone can play, even without PowerPoint.
Follow these steps:
- Save your presentation
- Go to File > Export > Create a Video
- Ultra HD (4K): Best for large screens (if you have Windows 10+)
- Full HD (1080p): Great for computers and TVs
- HD (720p): Good for streaming online or on DVDs
- Standard (480p): Smallest size, good for phones
4. Decide on narration
- If you haven't recorded yourself talking, choose "Don't Use Recorded Timings and Narrations" from the dropdown menu
- If you have a recording, choose "Use Recorded Timings and Narrations." You can also set how long each slide shows for (default is 5 seconds)
5. Click Create Video
6. Name your video, pick a folder to save it in, and choose a file type (MPEG-4 or Windows Media Video)
Creating the video might take a while, especially for longer presentations. You can even leave it running overnight. Once done, find your video in the chosen folder and double-click to play it.
Save your PowerPoint presentation as a slideshow
This saves your presentation as a special file (PPSX) that starts playing automatically on full screen when opened. It only works with PowerPoint.
Here’s how it works:
- Make sure your presentation is saved (regular PowerPoint file)
- Go to File > Save As .
- Pick a folder to save the slideshow in.
- Under Save as type, choose PowerPoint Show (*.ppsx) .
- Click Save .
Now when someone opens the file, it will automatically play the slideshow.
Pro tips for making better video PowerPoint presentations
Practice your script.
Recording a flawless PowerPoint video rarely happens in one take. The key is practice.
Record practice run-throughs and watch them back. Make notes on areas that need improvement or parts lacking clarity. The more you drill your script, the more confident and natural you'll sound in the final recording.
Take advantage of PowerPoint's built-in Speaker Coach . The feature shows you whether your pace is too fast or slow, your use of filler words like "um," and suggestions to improve your voice modulation.
Use slide notes for coherent delivery
Wouldn’t a personal teleprompter make presentations so much easier? That’s what slide notes are for.
Having your thoughts and talking points organized within your PowerPoint file lets you have all crucial information and prompts readily available when recording.
Go ahead and add detailed notes or even a full script for each slide. This will help you stay on track and provide a handy transcript reference if you need to do any editing or voiceover work in post-production.
Use high-quality audio equipment or turn on Studio Sound
Poor audio recording quality is a surefire way to make even the most visually polished video feel amateurish. Do your presentation justice by investing in a decent external or Bluetooth microphone and audio interface to capture clear voiceover audio.
If you must use a built-in mic, record in a quiet environment to minimize background noise pickup. Or better yet, pair up with an AI-powered audio enhancement tool like Descript's Studio Sound , which reduces background noise , reverb, and other artifacts.
Ensure a clean background and even lighting
Ditch cluttered backgrounds. You want people to focus on the content of your PowerPoint and not be distracted by the funny shapes and colors in your video.
Your video lighting and framing matters, too. Position yourself facing a natural light source or bring supplemental video lighting to eliminate weird shadows and squinting-level glare.
Look directly into the camera or turn on Eye Contact
Looking directly into the camera is essential to create a sense of connection with the audience. Position your webcam or camera at eye level and imagine you're talking to a friend. If you're using Descript, enable the Eye Contact feature to auto-adjust your gaze towards the camera.
- Dress professionally and maintain a good posture to project confidence and authority.
- Use visuals, animations, and multimedia elements to enhance your presentation and keep your audience engaged.
- Consider adding closed captions or subtitles to your video for better accessibility and engagement, especially for those watching without sound.
- Speak clearly and at a moderate pace, using vocal variety to emphasize key points and maintain interest.
- Incorporate storytelling techniques, real-life examples, or personal anecdotes to make your video presentation more relatable and memorable .
Take your PowerPoint presentations from amateur to amazing
Recording yourself virtually presenting a PowerPoint allows you to distribute your message using the most engaging type of content: video. And there are many screen recording tools out there that can capture your screen and web camera footage with just a few clicks.
But how do you stand out?
By focusing on the presentation's depth, your delivery, and the video's quality. The first two are the bare minimum to communicate your message effectively.
But the right screen capture software and all-in-one video creation tool like Descript can help you with third. Use the tool to improve the quality of your recorded PPT presentations.
With Descript, it's easier than ever to record your screen, polish up the audio, and create stunning visuals all in one place. So why wait?
Sign up for Descript today and simplify your workflow while creating a PowerPoint presentation video that sticks with your audience in the long term.
How do you make a presentation video with your face?
To create a presentation video with your face, follow these steps:
- Open your presentation in PowerPoint.
- Go to the Slide Show tab.
- Click on Record and choose From Current Slide or From Beginning .
- Choose your microphone and camera by clicking on a sound icon on the top-right.
- Start recording by clicking on the record button.
- Speak into your microphone to narrate the presentation.
- Your webcam will capture your face during the recording.
- Click Stop when you finish recording.
- Export your recorded presentation by clicking on File> Export>Create a video.
How do you present yourself in PowerPoint?
To present yourself effectively in PowerPoint, follow these steps:
- Determine the key information to include in your presentation.
- Design and prepare your PowerPoint slides with a cohesive theme.
- Craft a compelling introduction to engage your audience.
- Tailor your presentation to different time constraints for flexibility.
- Capture the audience's attention before you begin speaking.
Related articles

Featured articles:
Product Updates
Descript Season 7: Rooms, Zoom & Automatic Multicam
Descript's newest release makes recording and editing video with multiple people easier than ever.

How and why to add a game show segment to your podcast
Get ideas and tips for a successful game show segment to freshen up your content and engage your audience.

10 excellent Loom alternatives to record your screen
Looking for the best ways to record your screen without Loom? Find out 10 Loom alternatives, their features, and pricing.

How to record a YouTube video: A guide for all devices
If you want to record a YouTube video for personal use or fair-use repurposing, here are the steps to get started.

For Business
Social media video marketing: Everything you need to know
Learn how to win over potential customers (and the algorithms) with the right social media video marketing tools, strategy, and optimizations.

How to record a podcast on Zoom: A beginner’s guide
Follow this step-by-step guide on how to record a podcast on Zoom, then learn about why it may not be your best recording option.

Articles you might find interesting
Choosing the best fonts for video: The importance of typography
Choosing a font may not be the first thing that comes to mind when you plan a video editing project, but text fonts play an important role in your overall production design.
Forget something? Here's a handy podcast episode posting checklist
Here’s a useful checklist of things you’ll need to take care of before you hit publish on any given episode of your show.
%20(1).JPG)
New in Descript: Multicam support, plus a lot more
Hot on the heels of our video editing and screen recording release, we’re back with more! Nothing huge, but some nice, smaller things.

How to make a YouTube banner that attracts an audience, with examples
Your YouTube channel needs to give visitors a clear, enticing reason to stick around and hit subscribe. Your YouTube banner can do just that — as long as you follow some simple rules.

AI for Creators
How to use ChatGPT to improve your creative process
ChatGPT can improve your creative process by sparking new ideas, saving you time on tedious tasks, and providing valuable revisions to your work — as long as you use it right. Here's how to do that.

Editing For YouTube Videos: Unique Platform, Unique Approach
No matter what kind of video you want to edit, there is a generalizable approach you can use to turn your raw footage into something YouTube-worthy.
Join millions of creators who already have a head start.
Get free recording and editing tips, and resources delivered to your inbox.
Related articles:
Share this article
How to Record a Presentation with Webcam, Narration, and More

Justin Simon

Table of contents
- Benefits of Recording a Presentation
How to record your presentation (with Snagit)
How to record a presentation from powerpoint with audio and webcam, how to turn your powerpoint presentation slides into a video.
- How to edit a presentation video (in Camtasia)
Recording a PowerPoint Presentation, the FAQs
Subscribe to techsmith’s newsletter.
Everyone has, at some point, put a load of time and effort into creating the perfect PowerPoint presentation, only to use it once or twice. But isn’t it a shame for all that hard work to be discarded so quickly? Is every slide deck destined for deletion after just a couple of uses?
Isn’t there a better way to make the most out of your presentations? Well, yes. Yes, there is.
Rather than simply creating and presenting your work once or twice, recording your presentations can give them a new lease of life. Whether it’s a data report or a self-recorded PowerPoint, you can record a presentation in real-time, or in advance to make it available on-demand.
In this guide, we’ll explore two distinct ways of recording your presentation. First, we’ll discuss how to record a presentation from PowerPoint with audio and webcam, and then we’ll look at how to turn your .ppt slides into a video.
Benefits of Recording a Presentation
As well as there being many different ways to record a presentation, there are also many benefits of recording them. So, before we show you the ‘how,’ let’s talk about the ‘why.’
- Encouraging asynchronous communication : One key benefit is fostering asynchronous communication . By recording presentations, you’re letting your audience engage with the content in their own time, breaking the constraints of time zones and scheduling conflicts. This also ensures your viewers can absorb information at their own pace, and revisit it as needed.
- Boosting SEO : You can use your presentation to create a YouTube video and share it on your website to increase your online visibility and attract prospective customers. This can be a great way to expand your audience, increase web traffic, and establish yourself as an expert in your field.
- Perfecting your presentation : Whether it’s in-person or over Zoom, you don’t get second chances with live presentations. However, a pre-recorded keynote lets you perfect the content and the narration before anyone sees it. This is a great way to combat stage fright while honing your presentation skills and building confidence.
With this in mind, turning your slides into a video is a no-brainer. It’s an easy way to grow your audience and make the information you’re sharing more accessible and easier to digest.
Video messages > meetings
Record your screen and camera with Snagit for quick updates and feedback.

Depending on your audience and the type of presentation you need to deliver, TechSmith’s Snagit could just be the perfect tool for recording your PowerPoint. With its user-friendly interface and advanced features, Snagit is ideal for capturing top-notch presentation videos, in just a few clicks.
Now, there’s no denying that presentations are better when you can see the presenter… Fortunately, Snagit lets you capture your screen and webcam at the same time to create a Picture-in-Picture video.
In this section, we’ll guide you through the steps to record your presentation and webcam with Snagit.
Step 1: Open video capture
First, open Snagit and navigate to the Capture window. Select the Video tab, and start by clicking the big red Capture button.
Step 2: Select a recording area
Next, you’ll be prompted to choose which parts of your screen you want to record. Use Snagit’s orange crosshairs to select a specific region, window, or your entire screen.
Step 3: Configure recording settings
With the Video Recording toolbar, you can set options like Cursor Capture and Effects, System Audio, and Webcam.
If your webcam isn’t showing, click on the webcam icon. If you have an external webcam, select the one you want to use by clicking the dropdown arrow next to the webcam icon.
Step 4: Adjust your webcam
Next, adjust your webcam options to ensure your Picture-in-Picture recording looks how you want it. Here you can change the Picture-in-Picture placement as well as the shape and size of your webcam recording. You can even toggle between Picture-in-Picture and fullscreen webcam modes as you like.
The best part? You can make these adjustments even while recording.
Step 5: Manage recording
When you’re ready to roll, hit the Record button and click the Stop button when you’re finished. It’s that simple!
And remember, if there’s an interruption (like an unexpected visit from the mailman), just hit Pause. It’s okay to take a break — your video won’t be ruined by a little interruption.
Step 6: Edit your video
Once you’ve finished recording, Snagit will automatically open your video in the Snagit Editor, which is super easy to use. From here, you can make light edits to the footage as needed.
For example, if you need to cut or trim your footage , you can! Here’s how:
- Set Start Point : Drag the Start handle (green) on the timeline to your desired starting point.
- Set End Point : Similarly, drag the End handle (red) to where you want to end the cut.
- Review the Segment : Before making any cuts, you can review the segment by dragging the Playhead (white) left and right across the timeline. This ensures you’re only cutting the footage you intend to.
- Make the Cut : Once you’re satisfied with the selection, click the Cut button, which will pop up once you’ve made a selection.
And that’s all there is to it! If you want to go the extra mile, you can also use Snagit to save individual frames of your video as images , which can be used to create a thumbnail for your video .
Record your screen with Snagit
Snagit makes it easy to share quick updates and how-to’s by capturing exactly what’s happening on your screen.

Now, Snagit is great for recording less formal videos in a flash, but if your presentation is intended for a particularly large or important audience, you might be looking to create something more polished. This is where TechSmith’s Camtasia comes in.
Camtasia is one of the smartest and most intuitive pieces of editing software out there, but it also makes for a pretty nifty screen recorder too. Camtasia is great for recording presentations when you need more control and editing powers over the final product.
But best of all, Camtasia streamlines the process by letting you record your presentation and voice over directly within PowerPoint.
Step 1: Set up your presentation video recording
If you’re a Windows user, you’ll have the option to include a PowerPoint Add-in Toolbar when you install Camtasia. While this feature isn’t currently available on MacOS, the Camtasia Add-in Toolbar allows you to start, stop, and control your recordings from within PowerPoint — so you don’t need to switch between applications.

Just open the presentation you want to record and locate the Add-in toolbar under the Add-ins tab.
Don’t see the add-in toolbar? Go to File > Options > Add-ins, to enable it. Click on the Manage drop-down, select Disabled Items, then click Go. If the Camtasia Add-in is listed, select it, and click Enable.
If you’re an Apple user, don’t panic! You can still record your screen (with audio) on a Mac using Camtasia, and it’s just as easy. Alternatively, you can skip ahead to the next section and import your slides directly into Camtasia.
Step 2: Customize your recording options
Now let’s walk through each of the options on the toolbar before we begin recording.

Record audio
The microphone button controls whether or not audio is recorded as part of your presentation. When you enable it, you’ll be able to record your narration using a microphone.
If you are planning to record audio, this is where you’ll select your microphone. If you want to record great audio , we suggest using an external microphone, rather than the one that’s built into your laptop.
Some of the best microphones for recording video are likely to be less expensive than you think. But, if you’re on a shoestring budget, even the mic that’s built into your headphones could produce better audio than your laptop.
Once you’re set up, be sure to test the mic and adjust the volume slider as needed. You’ll also need to decide whether or not to record your system audio, which is any sound that comes out of your speakers, such as email notifications.
Record webcam
If you have a webcam, you can also record your camera during the presentation to create a Picture-in-Picture clip — just as you can with Snagit!

To customize even more of the recording settings, click the Recording Options button. Here you’ll find settings that let you record with a watermark and adjust your video frame rate . There are a few more options too, but the default settings should work just fine.
When you’re ready, click OK to close this window and save any changes made.
Step 3: Record your presentation
The final step is as simple as clicking the Record button in the toolbar. This will launch your slides into the Presentation Mode and start recording.
When you exit Presentation Mode or reach the end of your slideshow, you can either continue recording your screen, or stop recording and save your file. Pretty easy right?
Before you get started, let us show you another way to turn your presentation into a video, without recording your desktop .
Another way to create a video from your presentation is to import your PowerPoint slides into Camtasia. This way you can adjust how long each slide appears on screen, as well as add Behaviors and Annotations to personalize your presentation and highlight important information.
By importing your slides into Camtasia, and recording your voice over separately, you get a lot more flexibility with the editing process, which means you have more control over the finished article.
If you do decide to record your audio separately, you might want to take a look at TechSmith’s Audiate . This advanced audio recorder will transcribe your voice over in real-time and let you edit the audio file as if it were a text-based document. We don’t want to brag, but it’s probably the best way to add a voice over to a PowerPoint .
Regardless of how you decide to narrate your PowerPoint, here’s how to turn your presentation into a video:
1. Import your PowerPoint slides
First, start by importing your PowerPoint slides directly into Camtasia. Once your media is imported, you can edit it by dragging your slides into the Editing Toolbar.

You can now add the images to the Timeline, and edit them like any other media in a Project.

If you drag your slides to the Timeline, the slides will be placed in the order of the presentation, each with a default 5-second duration.

With your presentation on the timeline, use Ripple Move to create space in between slides to adjust the timing of each one. To do this, hold shift, then click and drag.

Once you’ve imported your slides and adjusted the duration of each one to correlate with your voice over, it’s time to start editing.
How to edit a presentation video (in Camtasia)
Add behaviors.
Firstly, add some visual interest with Camtasia Behaviors . A Behavior is an animation that brings movement to your slides, making them stand out on screen. This is a great way to bring parts of your presentation to life and take it from ordinary to extraordinary — because nobody likes a boring presentation .
To add a Behavior, click and drag the Behavior you wish to use onto the slide you want to animate. Once added, you can adjust the Behavior using the Properties tab.
Add annotations
Another good way to grab and direct your audience’s attention is to add some Annotations, which are great for highlighting important information.
To insert an Annotation, click the Annotation tab on the left side of the screen and drag it into the designated slide. You can then re-position and edit the Annotation in the Properties tab as needed.
Absolutely! Both Snagit and Camtasia are excellent choices for recording a professional and polished presentation. Snagit is perfect for no-fuss recording and editing. If you require more sophisticated editing capabilities, Camtasia is the ideal choice, offering the added convenience of recording your slideshow and voice over directly within PowerPoint.
Click the Record button in the toolbar to launch your slides into the Presentation Mode and start recording. When you exit Presentation Mode or reach the end of your slideshow, you can either continue recording your screen or stop and save your file.
If you’re planning to record audio, select your microphone in the recording options. The microphone button controls whether or not audio is recorded as part of your presentation. If you have a webcam attached to your computer, you can also record your camera to create a Picture-in-Picture clip, perfect for showing the presenter during the presentation.
With Snagit, you can conveniently record your voice over as you go through your presentation, capturing both the audio and visuals in one go. If you’re looking for more advanced recording and editing options, you might also consider using Camtasia, which allows you to record your voice over while presenting. For even more control, use Audiate to record your audio separately and then import it into Camtasia for fine-tuning.
Additional Resources
Camtasia vs. clipchamp: which screen recorder is best, how to screen record on iphone: the ultimate guide, how to make money on youtube: 7 effective strategies.
How to video record yourself presenting a PowerPoint
Heads up! This content is relevant for Clipchamp for personal accounts. Try this link If you're looking for information about Clipchamp for work accounts.
On this page
Method 1: How to record your webcam in PowerPoint
Method 2: how to record your webcam and powerpoint in clipchamp, resize your video presentation for any platform, tips to setup your video presentation recordings, editing tips to make your video presentations better.

Creating an engaging and professional video presentation requires more than just delivering information—it's about connecting with your audience. Whether you're crafting a presentation for a business, sales, school, or onboarding , adding a video of yourself can transform your PowerPoint slides into a dynamic (and personal!) storytelling tool.
This guide covers two ways to video record yourself into a PowerPoint: recording your presentation directly in PowerPoint and using the free online video editor, Clipchamp , to elevate your videos. Learn how to elevate your video presentations in this step-by-step guide.
Step 1. Open Microsoft PowerPoint and navigate to the record tab
Head over to the PowerPoint application to start your webcam recording in PowerPoint. Next, click on the record tab to launch recording options.

Step 2. Select the cameo option to enable your webcam
Click the cameo button on the record toolbar.

A blue placeholder circle will appear to preview the placement of your webcam recording overlay. If desired, you can customize the shape and add a border to your webcam recording. If you haven’t used the cameo feature before, make sure to enable the webcam and microphone permissions and select your mic and camera source.

Step 3. Record your presentation video
Click on the record button in the top right corner to start recording. Here, you will record your PowerPoint presentation slides, teleprompter, and webcam. A three-second countdown will appear. To stop recording, click on the stop recording button. You can preview your video before saving it.

Step 4. Save and share your presentation video
Preview your PowerPoint video before saving. When you’re done recording, click on the export button then click on export video.

For more help, take a look at the record a presentation help article .
Now that you've mastered the basics, so let's move on to another workflow that will make your PowerPoint presentations even more compelling.
To level up your presentation, we'll explore how to video record yourself presenting a PowerPoint with Microsoft Clipchamp and edit your video with beginner-friendly features. Using the screen and camera recorder, you can record your webcam and PowerPoint presentation without leaving your browser. Your webcam recording automatically saves as a picture-in-picture overlay , making your video easy to edit and customize to your liking.
Follow the steps below to learn how to record your webcam and video presentation in Clipchamp .
Click on the record & create tab on the toolbar.
Click on the screen and camera option .
Select a camera and mic to use.
Click on the record button to select a tab, window, or entire screen with your PowerPoint presentation shown.
Save your recording when you’re finished presenting.
Trim away mistakes or excess footage on the timeline with the trim tool .
Save your video presentation in 1080p video resolution.

For more help, check out the screen and camera tutorial . You can also save your PowerPoint presentation as an MP4 or MOV file , then import your video onto the timeline to start editing.
If you’re sharing your video presentation to multiple different platforms, such as YouTube or Stream , it might require different aspect ratios for video posts. Instead of creating a new video for each platform, just resize your PowerPoint video using the aspect ratio presets .
Follow the steps below to resize your presentation video using the presets quickly.
Import and add your video to the timeline.
Click on the 16:9 aspect ratio button .
Hover over each preset to preview the aspect ratio.
Click on a new aspect ratio that suits your platform to resize your video.
Use the fit or fill buttons in the floating toolbar to remove black borders or bars .
Save your video by clicking on the export button and selecting 1080p video resolution.

In order to produce high-quality recordings, it's important to pay attention to a few key factors: a stable internet connection, a quiet recording environment, and good lighting. Once these are sorted, consider setting up your technical tools correctly.
Here's how to configure your recording setup when using PowerPoint or Clipchamp.
How to setup PowerPoint’s recording features
As mentioned above, PowerPoint allows you to record your slides as well as your camera. Take a look at some considerations to record without errors.
Video source setup : Navigate to the recording tab in PowerPoint. Here, you can select your video source—usually your computer’s built-in webcam or an external camera connected to your computer. Ensure the camera is correctly selected and positioned.
Audio source setup : Select your audio input source in the same recording tab. This could be your laptop’s internal microphone, an external microphone, or another connected audio device. Choose the best-quality microphone available and record audio to check for clarity and volume. Adjust the microphone settings to reduce background noise and ensure your voice is clear and audible.
Preview and testing : Before starting the actual recording, do a test run to see and hear how you appear and sound in the recording. This test will help you adjust the camera position, audio settings, and move to another location if the lighting or background noise are distracting.
How to setup screen and webcam recording in Clipchamp
Configure your recording settings in Clipchamp to optimize video and audio quality.
Choose a presentation size: A standard 16:9 aspect ratio is suitable for most presentations.
Set up your screen and camera recording permissions : Go to the record & create tab on the toolbar. Next, click on the screen tool or screen and camera tool. A popup window will appear requesting permissions. Allow Clipchamp access to your camera and microphone if you haven't used our webcam recorder before. Click allow when ready to proceed.
Choose screen source : Either record your browser tab, window, or entire screen through the popup window.
Choose webcam and audio source: Select your microphone source, camera source and select speaker coach if desired through the popup window.
Trim away mistakes
Use the intuitive trimming tool in Clipchamp to remove unnecessary segments of your screen recording, webcam video or audio voiceover in a few clicks. This helps maintain the engagement in your presentation. Learn how in this tutorial video .
Use captions to create accessible videos
Generate real-time captions for your video presentation to make it easier to understand on mute with the autocaptions feature . Just turn on autocaptions to automatically create a video transcript which consists of an index of timestamps to help you navigate your video better.
Add annotation stickers to enhance messages
Draw attention to specific elements within your PowerPoint presentation by overlaying sticker annotations. In the content library tab on the toolbar, search through an endless range of shapes and annotations like arrows, squares, circles, stars, graphics, and more.
Speed up and slow down videos
If your presentation is too slow or too fast, easily edit your video’s speed with the beginner friendly speed selector . Just remember to make your presentation speed easy to understand and not too fast.
Add text animations for clarity
This can help reinforce your messages and ensure they resonate with your audience. Provide more context for viewers with text animations . Choose from a wide range of professional titles like multiline, lower third, bouncing, mirror and more. Customize titles to suit your presentation theme with different fonts, colors, sizes, and positions .
Use ASL stickers to enhance videos
Make your PowerPoint videos more accessible for work, school, or social media with the help of popular American Sign Language video stickers . Just place an ASL sticker side by side with your video content or as a standalone clip to convey meaning to the deaf and hard of hearing community.
Adjust your webcam footage
Make your webcam videos appear more vibrant and professional-looking with the color correction tools . These tools allow you to adjust brightness, contrast, and saturation simply.
Learn more about recording a presentation video using Windows 10 and explore how to create engaging video presentations .
Edit videos today with Clipchamp for free or download the Clipchamp Windows app .
More from the Clipchamp blog

Inside the major update for Clipchamp on iOS

How to convert video from MOV to MP4

How to make an image transparent
Start creating free videos with clipchamp.
How to Create Pro-level PowerPoint Videos with Audio
Senior Marketing Manager at Loom

The power of a presentation lies in its ability to educate and inspire.
But why limit access to inspiring ideas because of the time slot in which they were presented? Microsoft PowerPoint, Google Slides, and Keynote slides have become the go-to formats for delivering supporting content to help audiences from classrooms to boardrooms engage with ideas. But once the content is complete, what happens to it?
Getting used to the sound of your own voice can take some time, but the benefits of using Loom to record PowerPoint presentations are worth it.
Depending on the content and intended audience, a few will be published, stored, or made available on a marketplace. However, many will be lost, all your hard work never to be seen again. PowerPoint slides that aren't accompanied by a presentation are incomplete and don't do a sufficient job of expressing the author's ideas.
If you want to get ahead of the curve and preserve the integrity of your hard work, learn how to record a presentation by recording your screen .
Loom is one of the most popular choices for recording a video presentation—and for a good reason. The user interface is straightforward and easy to use. Mastering it requires little effort.
The benefits of presenting a PowerPoint in video
There are several reasons someone would want to learn how to record a PowerPoint presentation. Whether they’re explaining the quarterly statistics in a sales meeting , creating a webinar as a marketing tool , or recording training sessions for onboarding new hires, communicating ideas clearly and succinctly via video becomes more crucial every day.
With Loom, you can engage directly with your audience, allowing you to interact with a large group of people in a small, intimate environment. Let's look at some advantages of knowing how to record slide show presentations and the procedure for doing so.
Scheduled attendance is not guaranteed
Unless your presentation is a mandatory work meeting or you're teaching a paid course, many individuals will drop out before or during the presentation. However, by providing a presentation recording for them, you can still interact with those people, and they’ll feel supported by your accessibility.
Provides on-demand access to your presentation
Using Loom's video recording capabilities, you provide access to your material long after you've presented it. Giving your audience access to resources is one of the best ways to build trust and support.
Enhances your search engine optimization (SEO)
If you don't want to make your recorded presentations available on-demand but want to reap the benefits of SEO-driven traffic, you may post all or part of it on YouTube as a free resource in the future to attract new prospects.
Practice makes perfect
Another reason to learn how to record a presentation is that you can review your work before showing it to a live audience. By recording yourself before a meeting or lecture, you can review the footage to ensure you cover every aspect of the topic, make improvements, and eliminate those pre-performance jitters.
Tips for video recording yourself presenting a PowerPoint
While technology and practice are your two best allies in confidently presenting PowerPoint video presentations, a few extra tips can make yours even more effective and professional. Consider following these best practices:
Choose the right equipment
Video communications technology has flourished in the last few years. There are more options than ever to record presentations and deliver them digitally to a worldwide audience. A tool like Loom makes it easy to record webcam videos, screen captures, and recorded narration quickly and easily. This lets you present your PowerPoint or any other content to a digital audience without extensive and time-consuming video editing.
Include direct-to-camera (DTC) content
Personalization is the heart of every good video—nothing builds a personalized experience like a friendly face. Use a simultaneous webcam and screen capture to record yourself explaining the slides and information on the screen. Adding picture-in-picture DTC elements creates rapport and trust with your audience and ensures they stay engaged with your presentation.
Slide text: Less is more
Text is great for outlining the major themes of a presentation and adding context to discussions, but with a PowerPoint presentation, treat text as the seasoning in a recipe. Use what you need to enhance the experience, but don’t overwhelm.
Build your slides as an outline for each discussion topic and a home for visual elements like charts, infographics, and embedded video clips. But you, as the presenter, should do most of the talking. Building your presentation this way keeps viewers focused and engaged instead of hurrying to keep up with the reading.
Structure your presentation
Well-structured content is vital to the flow and digestibility of your presentation. When building your slides and video script, organize your information similarly to a blog post or an ebook. Start with an introduction to share your personal info and a general topical overview. Create segments that logically lay out each point or step in the process. Wrap things up with a conclusion and (if needed) a call to action that invites the viewer to take the next step—booking a call, downloading a resource, or signing up for a service.
Keep videos concise and skimmable
Digital fatigue is real. With so many videos and messages competing for our attention, creating a streamlined presentation results in longer view duration . The average view duration of a YouTube video may be as short as 40 seconds, with the median watch time averaging just over a minute and a half .
Another trick to increase viewability is to make it easy for viewers to skim. A well-structured presentation offers natural segments to help viewers zero in on the information they need. YouTube offers a Chapters feature that lets you insert a linkable outline so viewers can easily skip to specific timestamps.
Basic recording in PowerPoint
Microsoft offers basic tools to start recording your PowerPoint presentation. Here’s a quick step-by-step guide to recording a simple presentation:
Step 1: From PowerPoint, open the slide with which you want to start your presentation.
Step 2: Select Record from the upper right hand corner of the PowerPoint window.
Step 3: Make sure your recording and voice settings are set properly, then click the round Record button. Begin your presentation.
Step 4: Click through your slide presentation and record your audio. Be sure to pause during slide transitions, as PowerPoint will not record audio during slide changes.
Step 5: Save your finished PowerPoint video to your local device and share it through email or upload it to sharing platforms like Vimeo, YouTube, etc.
An important note: PowerPoint’s native recording features offer some editing and highlight features. You’ll need a screen recorder app like Loom to film direct-to-camera or make substantial edits.
How to use Loom’s presentation recording software
It's simple to record yourself and your screen presentation side-by-side using only your laptop, a built-in camera, a mic, and Loom. Using Loom to record presentations on a computer is a fantastic way to save time and guarantee that your presentation goes precisely as planned. Loom's basic version is free to use and provides users with different options to meet their unique needs best. You may record the material on your screen and even take a video of yourself presenting alongside your screen capture.
Loom is available as a PC screen recorder , Mac screen recorder , iOS screen recorder , and Android screen recorder . The two primary methods are through the Desktop Client or the Chrome Screen Recorder . The desktop versions offer a higher recording resolution (4k compared to 1080p in the Chrome extension) and additional features like camera frames and backgrounds.
In either case, learning to record a presentation is simple with Loom’s easy-to-use presentation recorder. Here’s some information to help you get started.
You can create a Loom account using a variety of methods. Users may log in with their Google account information, or connect their Slack account information, email address, password, and name. You must first complete the registration process to have access to the program.
What is the Loom desktop client, and how can I use it?
Search for Loom in the Windows search box or click the red pinwheel Loom logo to launch the Loom Desktop Client. After you've opened it, choose the type of video recording you wish to make. Cam Only, Screen Only, and Screen + Cam are the three possibilities for the basic Loom version. As their names suggest, Cam Only and Screen Only allow you to record the material on your screen or yourself through a camera. Screen + Cam will enable you to make a presentation recording with both yourself and the information in real time, allowing others to watch your reactions to the material and connect with you as the presenter.
If you wish to record your screen, the presentation recorder has three options for defining the parameters of your video: Full Screen, Window, and Custom Size.
Full Screen captures everything on your monitor or display, allowing others to watch and follow along.
You may use the Window option to record a single computer application if you want to construct a more restricted lesson without interruptions.
Custom Size is exclusively available to Pro account holders, allowing users to build custom windows to capture particular areas of their screen.
To record your Loom videos, use the built-in webcam and microphone on your smartphone or computer or additional devices as needed. Loom recommends using high-quality microphones for better audio.
Using the Loom Google Chrome Extension to capture videos
First, download and install the Loom Google Chrome Extension from the Chrome Web Store. Then launch the extension's user interface by clicking on the red pinwheel Loom logo in the browser's top right corner. You can choose Cam Only, Screen Only, and Screen + Cam, the same as the desktop client. Unfortunately, users of the Google Chrome Extension can only record their entire screen or the contents of a single tab.
The Video Control menu differs from the desktop extension, appearing in the bottom left corner of the browser window. Users may only utilize three buttons: Start/End Recording, Pause Recording, and Delete Recording.
Using the Loom desktop client to record videos
Each option lets you use Loom's camera bubble , which allows you to see and record yourself as well as a video. There is no set limit on the duration of the video, but Loom will provide you alerts to ensure you don't keep recording by accident. Once you've decided on your selections, go to the four-button Video Control menu on the left side of your screen. To start your video, press the Recording button at the top of the menu. This button has two purposes: When the button is red, it indicates that you’re currently recording, and it stops the recording when clicked a second time.
The Pause button is located beneath the Recording button and is used to pause your video. However, depending on your computer, you may alternatively use Alt + Shift + P or Option + Shift + P . The Delete option is represented by a garbage can icon, which pauses the recording and completely deletes the video once you confirm your decision via a dialog box.
How to use the speaker notes feature
Loom makes presentations easier with speaker notes , an on-screen cue card feature visible only to you. Speaker notes are bullet points or full scripts written by you and activated during recording. These prompts allow you to deliver your message with confidence, without the need to remember your whole script or utilize physical note cards.
From the desktop app, open Loom and click Speaker Notes. Use the pop-up window to type in your notes, then resize the notes window to suit your needs before recording. Speaker notes are always presented on top, so there’s no need to switch windows during your presentation.
How AI-generated chapters work
Want your viewers to be able to skip to the most useful portion of a presentation? The AI-generated chapter feature allows viewers to select important topics within your presentation and navigate to them easily. These time-stamped chapters also allow users to link and respond to content.
How to use the drawing tool
Finally, the drawing tool , symbolized by a pen icon and available with the Pro subscription, can assist you in focusing on certain facts and numbers. Using this button, which includes picking a preset color, lets you make graphics that will draw your viewer's attention to key information.
Preserve your ideas with Loom’s Presentation Recorder
If you’re just starting out, learning to record a presentation with Loom is an excellent tool for creating quality content. As the world continues to move towards remote work environments, the ability to give an online presentation (and record it for posterity) becomes more essential every day.
Loom is free, so don’t wait to see how you can enhance your video presentation with video capture software.
Jan 8, 2024
Featured In:
Share this article:.
Jeong Lee works in Marketing at Loom.
- English Español Deutsch Português Italiano Français 日本語 한국어 繁體中文 Türkçe Dutch Polish Thai Indonesian Malay
- Free Download For Windows For macOS
- Screen Recording RecExperts For Windows Screen recorder for PC RecExperts For Mac Screen recorder for macOS Online Screen Recorder Record screen online free ScreenShot Take Screenshot on PC
- Buy Now Buy Now
- Student Discount
- Resources Screen Recorder Windows 10 Record Zoom Meeting Record Internal Audio Mac Record Gameplay on PC Video Recording Software
- Support Support Center Guides, License, Contact Chat Support Chat with a Technician Pre-Sales Inquiry Chat with a Sales Rep
How to Record a Presentation with Your Face (Audio and Video)
How to record a presentation with your face? This article offers three ways: video record all presentations without limits by using EaseUS RecExperts, record a PowerPoint presentation with its default recording function, and record Google slideshows via its built-in recorder.
Trustpilot Rating 4.7
Don’t forget to share this post!
Page Table of Contents
Updated on Jun 19, 2024
The development of technology enriches communication forms. From professors to business consultants, college to company, and school assignments to work reports, self-presenting has become indispensable in our study and work.
Adding narration in Google Slides, meetings, and other scenarios not only enhances audience engagement but also conveys ideas efficiently. So, users are more inclined to record presentations with their faces and audio.
This guide will teach you how to record a presentation with your face in PowerPoint, Google Slides, and other video narration forms. Read this article and get free video recording software to record slide about yourself easily and effectively.
|
|
|
|
| 🔥 | - No time limit; no license or signup; no lag or watermark |
|
| ⭐ | - Need a Microsoft Office license; recordings saved on each slide separately; record the PPT area only; saved video file size super large |
|
| 👍 | - Need a Google account; recording length up to 30 minutes; affected by the Google Drive storage |
|
How to Record Presentation with Face Using EaseUS RecExperts
A professional screen recorder like EaseUS RecExperts would be the best way to record PPT with video. It helps you record yourself presenting a PowerPoint , including your face and audio.
Narrators can record PowerPoint with webcam and audio, easily record presentations on Google Slides, and effectively record a presentation on Zoom with face. This easy-to-use presentation recorder can simplify the experience of recording presentations with faces.
EaseUS RecExperts
- Record Google Slides , MS PowerPoint, Zoom meetings, and other presentations with face, audio, and video using a webcam and microphone.
- Record about me presentation, self-presenting videos, and slide about yourself without time limit, lag, or watermark.
- Record full screen , part of screen, and any region of screen on computer.
- Save a PowerPoint as a video in high-quality. The AI-empowered function can reduce noise naturally.
Now, let's see how to record a presentation with your face.
Step 1. Launch EaseUS RecExperts on your computer. Choose a recording mode from "Full Screen" or "Region" . To record a part of the screen, select the recording area manually.

Step 2. After selecting the recording mode, click on the camera sign on the interface. This will let the tool record your screen and the webcam at the same time.

Step 3. You can also change the background with the AI Recognition ot green screen feature. Classroom, blur, studio, or your local images are supported. Just click "Webcam" > "Settings" > "Remove Background" to download and use these modules. Then, click the "REC" button to start recording.

Step 4. After recording, the recording list window will open. Here you can view, split, delete, manage your recordings easily.

How to Record a PowerPoint Presentation with Your Face via the Internal Recorder
If you want to record yourself talking in Microsoft PowerPoint, an inbuilt screen recorder is provided. You can record PowerPoint presentations with audio and video through its Record Slide Show or Screen Recording feature.
Before learning how to record on PowerPoint, pay attention to the following tips:
➤ You need to have a license for Microsoft Office to use PowerPoint.
➤ Check if the webcam and microphone are pre-placed well before recording.
➤ A new recording is saved on each slide separately. So, you should cover everything on one slide and not go back, otherwise the new recording will replace the previous one.
➤ Microsoft PowerPoint only records the PPT area, not supporting full-screen recording.
➤ The saved videos are very large. Make sure your computer has enough space.
After reading the perquisites, let's see how to record a PowerPoint presentation with your face.
Step 1. On the toolbar, tap Record Slide Show or Screen Recording .

Step 2. Click Record . Then, you can select Record from Current Slide… or Record from Beginning… .

Step 3. You have entered the recording screen. In the bottom right corner, turn on the microphone and webcam.
Step 4. Click Record in the upper left corner. It starts recording the PPT on yourself with audio. Click the arrow to move to the next slide, and use the pen to write notes on the slide if needed.

Step 5. To stop recording in PPT, click Stop .
Step 6. To save a PowerPoint as a video, go to Files > Export > Create a Video in the upper left corner. The recording file will be saved in MP4 format.

Share this post on your social platform to help more people!
How to Record a Presentation with Your Face Google Slides via the Default Recorder
Google Slides is another popular presentation tool that allows users to record video with face. Unlike MS, Google Slides is a cloud-based software that requires no installation or license. But there are some limitations you need to pay attention to:
➤ Each presentation can be recorded for up to 30 minutes.
➤ You need a Google account to use this function.
➤ There is a storage limit. You cannot record new videos if the Google Cloud has insufficient space.
After reading the perquisites, let's see how to record a presentation with your face Google Slides:
Step 1. Open a browser, sign into your Google account, and visit Google Slides .
Step 2. Create or open a PPT, click the Rec button in the upper right corner, and tap Record new video .
Step 3. You will enter the screen recording interface. Press the red button to start recording.
Step 4. In the coming prompt, click Allow and toggle on Also allow tab audio to enable the camera and microphone. Now, you can record your face and voice.
Step 5. To end the recording, press the red button again. Here, you can click Re-record to start over or click Save to Drive to save the presentation as a video.
Extra Tip: How to Record a PowerPoint Presentation with Your Face on Mac
Since there is not a Mac version of MS PowerPoint, users may ask what is the best way to record a presentation for Mac ?
For how to record a PowerPoint presentation with your face Mac, you have two options:
Way 1. Use the Mac built-in recorder - QuickTime Player
Although Mac has a default presentation recorder, it cannot capture internal sound. If you want to record screen on Mac with audio , you need to download and install an extra add-on extension: Soundflower.
Step 1. Open the Soundflower download page . Then, download and install Soundflower on your Mac.
Step 2. Launch Soundflower and go to System Preferences > Volume . Click the Gear icon at the bottom-left panel. Tap Create a Mult-Output Device > Built-in Output > Soundflower (2ch) .

Step 3. Click the Gear button again and click Use This Device for Sound Output .
Step 4. Open QuickTime Player, navigate to File > New Screen Recording , tap the down-arrow icon next to the record button, and choose Soundflower (2ch) as the microphone device.

Step 5. Now, open the presentation PPT and locate the slide you want to record.
Step 6. Click Record to start recording slide about yourself.
Step 7. To stop recording in PPT, the Stop button.
Way 2. Try another presentation recorder - EaseUS RecExperts for Mac
To record presentation with face and audio directly, you can use a Mac screen recorder . Compared with QuickTime Player, it offers an easier and more straightforward solution.

Step 1. Firstly, launch EaseUS RecExperts on your Mac. There are two options, "Full Screen" and "Region," for you to select the recording area.

Step 2. Then, click on the "Webcam" button at the bottom. When a "Record webcam" window pops up, click the button to activate the webcam, and you can select the device you want to use from the dropdown menu.

Step 3. If you want to capture the screen with audio, the "Sound" button beside "Webcam" can help. You can click on the two buttons on the "Select recording sound" window to choose the audio source, such as the system sound, the microphone audio, or two of them.

After adjusting the settings appropriately, click on the "REC" button to start recording.
Step 4. Now, you can record the Mac screen and your webcam at the same time. After capturing all the content you need, hit the "Stop" button to end it, and this software will offer you a built-in video player to view the video you captured.

Guess now you have known how to record a presentation with your face . To summarize, both the internal recording functions in PowerPoint and Google Slides are limited. If you want to record PowerPoint, Google Slides, Zoom, or other presentations without any limits, use EaseUS RecExperts.
It allows narrators to record their PPT with face easily. No time limit, no screen size limit, and no sophisticated steps. Download this free presentation recorder to your computer and give it a shot.
FAQs on How to Record a Presentation with Your Face
Learn more frequently asked questions on how to record presentation with face.
1. Is there a free recording app?
Yes, there is a free recording app called EaseUS RecExperts. This versatile screen recorder lets you record everything you want, including presentation, video conference, streaming video, gameplay, YouTube, and more. You can record full screen or part of screen to your liking.
2. Why can't I record my face on PowerPoint?
Recording face on PowerPoint not working can be caused by:
- The microphone not enabled. Go to Settings on PowerPoint to check if you give access to your microphone.
- Insufficient disk space. You need to free up your drive and leave more storage space.
3. How do you present yourself in PowerPoint?
To present yourself in PowerPoint, you can use the built-in recorder in MS PowerPoint. Here are the steps:
Step 1. Go to Record Slide Show or Screen Recording .
Step 2. Click Record > Record from Current Slide… or Record from Beginning… .
Step 3. Click Record on the upper left corner to video record yourself presenting a PowerPoint.
Step 4. Click Stop to end recording the introduction slide about yourself.

One-click to capture anything on screen!
No Time Limit, No watermark
Melissa Lee
Related Posts

YouTube TV Recording Limit and Alternative

How to Use Asana to Record Videos Efficiently

How to Record on Firestick Free in 2024 (4K UHD)

How to Screen Record on Alienware in 2024 [Easy!]
Success, thanks for submitting!
- Refund Policy
- Terms & Conditions
- Do Not Sell
Copyright © 2004 - 2023 EaseUS. ALL RIGHTS RESERVED.
- Use Presenter View Video
- Add speaker notes Video
- Practice and time your presentation Video
- Record a presentation Video
- Print a presentation Video

Record a presentation

Record narration and timings for your presentation to give it a professional and polished feel.
Record narration and timings
Open the slide you want to start recording from.
Near the upper right corner of the PowerPoint window, select Record .
Choose from two options
When you're ready, select the round, red Record button, wait for the countdown, then start speaking. To record from a specific slide, go to it, and then select Record .
Note: Narration isn't recorded while the transition between slides happens, so pause during a transition, then resume speaking.
Manage narration and timings
There are different ways to manage recordings in your presentation:
Pause - to pause a recording
Stop - to end a recording
Replay - to replay a recording
Pen , Highlighter , or Eraser - use the pen, highlighter, or eraser tools to mark up your recording
Remove narration or timings
An audio icon appears on a slide when narration is available.
You can also remove narration or timings from your slide.
If you're in record mode, select Clear .
Choose from two options:
Clear Recording on Current Slide - to delete narration and timings on the current slide
Clear Recording on All Slides - to delete narration and timings from all slides at once
Save a recording
When you're done recording, save and share your presentation as a PowerPoint file or video.
Select File .
Choose an option like Save or Export . Your recording will automatically play when someone opens the presentation.
Record a slide show with narration and slide timings
PowerPoint training

Need more help?
Want more options.
Explore subscription benefits, browse training courses, learn how to secure your device, and more.

Microsoft 365 subscription benefits

Microsoft 365 training

Microsoft security

Accessibility center
Communities help you ask and answer questions, give feedback, and hear from experts with rich knowledge.

Ask the Microsoft Community

Microsoft Tech Community

Windows Insiders
Microsoft 365 Insiders
Was this information helpful?
Thank you for your feedback.
How to record your face when presenting a PowerPoint
Do you want to make a video recording of yourself while presenting a PowerPoint to check your performance? This article will guide you step-by-step in specific.

- Microsoft PowerPoint offers built-in slide recording to capture the webcam when presenting, but it will cut the recording into pieces and input them into each slide.
- Users can also record the screen by another inbuilt feature in PowerPoint which allows you to capture all activities performed on the screen, but you can't open the ppt in full-screen.
- QuickTime Player is a dependable recorder for Mac users to capture the ppt with your face, but similar to the screen recorder of PowerPoint, you have to build a space for the webcam.
- AppGeeker Screen Recorder offers a simple and pleasant user experience to record the whole ppt presentation with a webcam.

Recording the ppt presentation with a webcam is hard since the webcam window will be hidden.
The next time you present a PowerPoint and are fearful that you will forget key information, don't worry. You can quickly record yourself to ensure that you do not forget any important points or facts. The trouble is how to record yourself when presenting a PowerPoint.
There are many ways to record themselves to ensure one doesn't forget their presentation content. This short and simple manual will show you how to accomplish exactly that. Now, let's delve into this article and find a perfect method to record yourself when presenting a PowerPoint.
Table of Contents
Can I Video Record Myself When Presenting PowerPoint?
Record yourself when presenting a powerpoint within the software, how to record the powerpoint presentation process with webcam, can i record the presentation process with my face using xbox game bar on windows pc.
Yes, you can. What we call a "PowerPoint presentation" is a sequence of slides you can use to present and discuss various topics. When using a Windows computer, PowerPoint from Microsoft offers a wide range of choices for personalizing presentations. PowerPoint allows you to add visual elements such as pictures, tables, charts, movies, and links to your presentation to make it stand out from the crowd.
Even if you're not the most tech-savvy person, you'll be able to make a polished presentation with the help of the program's user-friendly features and pre-made templates. To give your audience the best possible experience watching your presentation, use PowerPoint to display all relevant visuals in full view (instead of behind slides). You'll need to know how to record your presentation with your face once you've mastered PowerPoint's fundamentals and made your slides.
The purpose of a PowerPoint presentation is to supplement your spoken presentation, not replace it entirely. You can record a PPT on Windows and Mac both. Within the confines of the Microsoft PowerPoint software, you can record video, audio, or simply your slide presentation.
Let's start with the Windows version of it:
Step 1: Once PowerPoint is open, go to Recording in the menu bar at the very top. A drop-down menu including Record Slide Show and Screen Recording will appear.

Step 2: Click Record Slide Show to capture your slideshow with music or moving pictures. During the recording process, you can adjust the microphone and webcam in the top-right corner.
Step 3: Once you finish the recording and exit the slide show, the recording process of your face will be cut into pieces and automatically input in the bottom-right corner of your screen.
Step 4: If you choose Screen Recording , not only will your slideshow be recorded, but so will your face and other activities on the screen with the sound from the microphone. The downside is that if you maximize the windows of the PPT, the webcam window will be hidden behind the PPT. To record the presentation and your face at the same time, you have to build the space for the webcam window in the recording area.

Step 5: After you hit the Screen Recording button, you'll be able to set the precise region of your display that you want to record.

Step 6: In the recording toolbar, the Audio button should be grayed out before you start recording. Enable it to record your sound when recording.
Step 7: Press the record button, and your computer's mic and surroundings will start collecting the presentation with your face.
The two PowerPoint-inbuilt recording features have their pros and cons. You can choose the feature that fits your situation more.
Record the PPT presentation with a face on Mac
On a Mac, you also can record yourself when presenting a PowerPoint. This section will teach you how to use a webcam when recording PowerPoint presentations on Mac computers without the necessity to download or install any additional software on your Mac. The built-in program QuickTime Player allows you to record your presentation as well as your face.
The steps that need to be taken to record your presentation using a Mac are as follows:
Step 1: Launch the QuickTime program by navigating to the Launchpad .
Step 2: Open the webcam app you like to use and set it Float on Top from the menu at the very top so that your camera application is shown on top of all the other apps. Then adjust the size of the camera window. You can move the camera to whatever position you choose on the screen.
Step 3: Open the PowerPoint presentation.
Step 4: Open the File menu on the top-left screen and go to the New Movie Recording option to open the screenshot toolbar. If you use the Mojave and later macOS versions, you can open the screenshot toolbar by using the combination Command + Shift + 5 .

Step 5: Click the Option to choose the audio source as the microphone.

Step 6: Then hit the Record button. Right now, both the screen and the presentation from your camera are being recorded.
Step 7: When you are ready to stop recording, simultaneously hit the Command + Control + Esc buttons on your keyboard.
QuickTime Player can only record the audio from the microphone. It is convenient for a PPT presenter to capture his voice, while if there's a video or a piece of audio needs to play during the presentation, the internal sound from the computer can't be captured. If you want to record the internal audio simultaneously, you need to resort to a reliable third-party tool.
On both Windows and Mac, AppGeeker Screen Recorder is one of the most dependable applications that you can use to record your face with presentations on your computer. It is one of a kind since it was developed to function with various recording formats, including the capability to record 4K video and high-quality audio.
It includes both the sound from the outside and the sound from the device. Using AppGeeker Screen Recorder, you are available to record your face at the same time without the necessity to pin the webcam window or build the space for the window. This all-in-one program will astound you with its plethora of functions, which can take the place of all other screen recording applications that you can have used in the past. To record the PowerPoint presentation process with your face, download AppGeeker Screen Recorder first, then launch the Screen Recorder application located on your computer.
for Windows | for macOS
Step 1: Choose the Video Reorder option to record your PPTs screen.

Step 2: You can record your full desktop or screen by selecting the Full option or clicking on the Custom option and dragging to pick a specific screen section to record.
Toggle on the button of the webcam to ensure that you can record yourself when presenting a PowerPoint.
Record sounds from your computer and microphone by turning on System Sound and activating the Microphone .

Step 3: To begin recording, you can press the REC button once ready.
Step 4: Once you have finished recording all the activity on the screen, click the button labeled Stop Recording located on the toolbar's left, then preview the recording and check your performance.
Step 5: Hit the Done button to export the screen recording on your computer.

The Xbox Game Bar's primary purpose is to capture gameplay footage; however, it can be used for any video recording. However, switching to recording another window after Game Bar has begun recording is impossible. This is because Game Bar can only capture one program screen at a time, often the last session you clicked into.

How to Record PowerPoint with a Webcam

How to screen record on Windows 8 computer

How to record audio from browser

How to Record with Webcam on Windows 10?

Presentation Recorder
Record and share your presentations online; free

319 reviews

Free online presentation recorder
A powerful online screen, webcam, and audio recorder for creating professional video presentations. It’s an incredibly better tool than Google Slides! VEED lets you easily capture your screen. Customize your layout, background, and camera feed in a few clicks. Our free presentation recorder works on Windows and Mac; no software to download or plugin to install. Upload your PowerPoint slides, add annotations, scenes, and even soundwaves for audio recordings. You can also record business meetings, messages to colleagues, explainer videos, gaming videos, and more!
How to Record Your Presentations:

Select layout
Select from our list of layouts (you may need to click to ‘Allow’ permission to access your screen, camera, or microphone). You can record just your screen, your webcam, or both at the same time!

Start recording
Click the red button to start recording! You'll see a countdown before the recording starts. Don't worry if you mess up. You have unlimited time and unlimited retakes. You can navigate to other pages, and don't worry, you are still recording.

Review, edit, and export
You can playback your recording to review it, click ‘Share’ to share with friends and colleagues, or ‘Edit’ to edit your video (perfect for adding text, subtitles, and professional touches to your screen recording)
‘Presentation Recording’ Tutorial

Presentation recording with multiple layouts
Select a layout that best suits your presentation. Record your screen and audio at the same time. It’s also a powerful video capture software. Add yourself to the scene with your webcam; you can choose the size and layout of your camera feed as well. Give your PowerPoint presentations a new look! Add annotations, images, text, and subtitles.

Edit your recordings with our powerful online video editor
Once your presentation recording is finished, edit your videos online with our powerful video editing software. Create overlays, cut between scenes, and more. If you’re recording with noise in the background, you can use our one-click Clean Audio feature—available to premium subscribers. Perfect for product demos, walk-through videos, and annotated videos.

Screen and webcam recording for business presentations
With more and more businesses operating remotely, there has never been a more important time for video presentation software in all industries. Our presentation recorder allows your team to record important business messages, explainers, presentations, and more. Share, comment, review, and collaborate with videos online.

How can I record my presentation?
It’s incredibly straightforward! Choose your layout (screen only, webcam only, or both) and hit the red button. You can choose to record JUST your screen or have your webcam record a video of you in the top right corner, for example, at the same time. You will see a countdown timer then the screen capture will start. To stop, just hit the red button again. Simple!
How do I share the video?
To share the video, all you have to do is click ‘Copy Link’ and leave the Public Video toggle on. Then anyone with the link will be able to watch and comment on your video, like on google drive. (Note - they will NOT be able to edit the video. Only you will be able to edit)
How do I edit the video?
Just click ‘Edit’ when the recording is finished, and you will be taken into VEED’s video editor. Here you will be able to add subtitles, text, annotations, music, sound effects, and much more. Just hit the ‘Export’ button when you’re finished, to save your new edited recording.
How do I record audio?
It happens automatically! When you start using the screen recorder, you will need to click ‘Allow’ to give the recorder access to your microphone. That’s it. As soon as you start to record the video (of your screen, webcam, or both), the audio will also be recorded, so you can make awesome video presentations, explainer videos, team comms videos, and more!
How do I screen record myself for a presentation?
VEED allows you to record your webcam along with your screen and audio. Just select “Screen & Webcam” when choosing a layout for your presentation recording.
How do you record your screen on Windows?
VEED works with Windows and Mac. You can access our screen and presentation recorder straight from your browser. No software or plugins to install!
Discover more
- PowerPoint Recorder
Loved by creators.
Loved by the Fortune 500
VEED has been game-changing. It's allowed us to create gorgeous content for social promotion and ad units with ease.

Max Alter Director of Audience Development, NBCUniversal

I love using VEED. The subtitles are the most accurate I've seen on the market. It's helped take my content to the next level.

Laura Haleydt Brand Marketing Manager, Carlsberg Importers

I used Loom to record, Rev for captions, Google for storing and Youtube to get a share link. I can now do this all in one spot with VEED.

Cedric Gustavo Ravache Enterprise Account Executive, Cloud Software Group

VEED is my one-stop video editing shop! It's cut my editing time by around 60% , freeing me to focus on my online career coaching business.

Nadeem L Entrepreneur and Owner, TheCareerCEO.com

When it comes to amazing videos, all you need is VEED
Launch FREE Recorder
No credit card required
More than a presentation recorder
Our powerful video editor lets you do so much more than just record your screen and presentation slides. You can resize your screen recordings to fit any video-sharing and social media platform. You can also edit your videos (whether screen recordings or from your camera or phone) - add text and captions automatically, add music, sound effects, draw on your videos, and more! Try VEED for your presentation recordings today!

- Help Center
- Google Docs Editors
- Privacy Policy
- Terms of Service
- Submit feedback
- Google Slides
Use slides recording in Google Slides
You can only record your presentations in Google Chrome and Edge Browsers. However, you can view, share, and delete recordings from any browser.
Important: This feature may only be available on certain work or school accounts
Record a slideshow
- There's a 30-minute limit to every recording.
- Information about Slides recordings isn't available in Revision History.
- If you exceed your Drive Storage quota, you can’t create more recordings.
- You must have edit access to the slides in order to create a new recording.
- To open your presentation, go to Google Slides .
- To start over, pause and click Re-record .
- To save your recording, pause and click Save to Drive .
- To blur your background, click Turn on camera blur .
Find your recording
- On your computer, go to Google Slides .
- Open the presentation where you created the recording.
- Select your recording from the list that appears.
Tip: Recordings are saved into a My Drive folder called Slides recordings.
Share your recording
Recordings can be shared to collaborators on the document immediately after creation.
- To share your recording, click the title of the recording from the list.
- The video in the full-screen player layout appears.
- Select the user, audience, or URL visibility rules.
Tip : Alternatively, you can share a recording like you would share any file in Drive. Learn how to share files from Google Drive .
Remove a recording
- If you created the recording, you also have the option to move the recording file in Drive to Trash. If the recording in Drive isn't moved to Trash, the recording stays visible in Drive to anyone with access.
- If you didn't create the recording, it's still visible in the creator's Drive and anyone to with access.
Use external device
You can use a microphone or camera that isn't built into your computer, such as a USB-based external camera or wireless earbuds.
To get started, set up your camera or microphone device like you would normally use it with your computer.
- Open your presentation.
- When the recording studio opens, at the bottom toolbar, click Settings .
- If your external microphone or camera is available, it's listed in the dropdown of devices available to use while recording.
Troubleshoot camera & microphone
When you create a Slides recording for the first time, it asks for a series of permissions to use the camera and microphone of your computer.
Tip: Camera and microphone access isn't required to start recording.
If you decide not to grant access to your camera or microphone, you can change it later.
- On your computer, open Chrome.
- chrome://settings/content/microphone
- chrome://settings/content/camera
- Adjust the settings to grant access.
Need more help?
Try these next steps:.
Using Google products, like Google Docs, at work or school? Try powerful tips, tutorials, and templates. Learn to work on Office files without installing Office, create dynamic project plans and team calendars, auto-organize your inbox, and more.
How to Video Record Yourself Presenting a PowerPoint

Table of contents:
What is a PowerPoint Presentation?
How are powerpoint presentations used , how to get microsoft powerpoint for free, how to record a powerpoint presentation, how to record a powerpoint presentation with audio and video, how do i video myself and use a powerpoint at the same time, how to video record your screen in hd, other options to record yourself presenting a powerpoint, how to turn your powerpoint presentation slides into a video, pro tips for making better video powerpoint presentations, how to broadcast your presentation to remote audiences, get started creating and recording high-quality powerpoint presentations .
How to Video Record Yourself Presenting a PowerPoint Presentation FAQ
Are you trying to figure out how to record a video of your PowerPoint presentation?
Though it might seem complicated to figure out, it’s not so difficult to record the audio and video of your presentations. All you need is the right tools, and to follow a few simple steps which we’ll outline for you in this guide.
We'll explain how to craft a memorable PowerPoint presentation, how to turn your PowerPoint slides into a video, and how to record a PowerPoint presentation in HD.
A PowerPoint presentation is a series of slides used to organize and share information . Microsoft’s PowerPoint program for Windows comes with a variety of customization options for creating a presentation. In addition to text, you can place images, tables, charts, videos, links, and other types of content in your PowerPoint presentation to really make it pop. The program has easy-to-use features and provides templates so you can create a professional-looking presentation even if you aren’t the most tech-savvy person.
If you have to present a business proposal, report on your business budget, or complete a book report, create a Powerpoint presentation. Some of the most common uses for PowerPoint presentation include:
- Creating a digital portfolio
- Constructing guides and tutorials
- Organizing a visual lecture
- Sharing vacation photos
- Sales presentations
- Creating videos
You’ll have to purchase Microsoft’s suite of products or subscribe to Microsoft 365 if you want access to the full version of PowerPoint. But if you only need to create a basic presentation, there’s a free web version available.
Follow these steps to get Microsoft PowerPoint for free:
Step 1: Go to office.com and sign up for an account or log in to your Microsoft account if you already have one.
Step 2: At the top of the screen, select the Excel program
Step 3: Create a PowerPoint and save your work on OneDrive
After you’ve gotten the basics of PowerPoint figured out and you’ve created your slides, you’ll need to learn how to record your presentation. We’ll teach you how to record a presentation on PowerPoint and how to use video recording software to capture both you and your presentation at the same time.
Learning how to record a PowerPoint presentation with video and audio will set you apart from your coworkers and classmates and add a level of professionalism to your work. Use our step-by-step guide to record a presentation with the PowerPoint program.
Step 1: Prepare Your PowerPoint Slides and Talking Points
Before you record your presentation, make sure your slides are organized correctly and are error-free. The function of your PowerPoint presentation is to act as a visual aid for the information you’re presenting, not to present all your information for you. Don’t put too much info on your slides so you won’t be tempted to read directly from them.
Step 2: Select Your Audio and Video Sources
You can record video, audio, or just your slide show directly within the Microsoft PowerPoint program. After you’ve opened PowerPoint, select “Recording” from the top navigation bar. This will open a new navigation bar with the options of “Record Slide Show” and “Screen Recording”.
If you just want to record your slideshow without added audio or video, you would select “Record Slide Show”. Choosing “Screen Recording” will let you capture your slideshow while at the same time recording audio from your computer and any video on your computer screen.
Step 3: Open Your PowerPoint Slides and Capture the Screen
Choose “Screen Recording” and you’ll be given the opportunity to select the area on your screen you want to capture. Adjust the red box to fit your Powerpoint presentation. Once you have the box where you want it, you’re ready to record!
Step 4: Press Record And Start Presenting
Make sure the “Audio” button appears gray before you hit the record button. Once you hit record, you’ll begin capturing everything in the area you’ve selected and any audio picked up by your computer’s mic.
If you prefer, you can skip recording audio during this step and add it later. Use the “Audio” option from the PowerPoint navigation if you’re trying to find out how to record PowerPoint presentations with audio you’ve already recorded.
The best way to record yourself and a PowerPoint at the same time is with video recording software. You can do this with PowerPoint’s screen recording feature, however, recording software will provide much better quality and professional polish. Keep reading to learn how to video record yourself presenting a PowerPoint presentation using video recording software.
Use Riverside to Record Your PowerPoint Presentation
Riverside is our top choice for video recording software. It’s easy to use, and it’ll take you no time at all to figure out how to record a PowerPoint presentation. What sets this platform apart from others is the wide range of features available and the quality of the audio and video you can record.
These Riverside features are a huge help when you’re learning how to record a PowerPoint presentation with video and audio that’s high quality:
Local Recording
Riverside records locally and simultaneously uploads your audio and video. This produces better quality files and allows you to record comfortably without having to rely on the strength of your internet connection. You also won’t have to worry about losing any part of your recording if you get disconnected or experience technical difficulties.
Quality Recording and Affordability
Quality and affordability go hand-in-hand when you choose Riverside for your recording needs. You don’t have to pay a lot to get HD video recording capabilities. You can record 4k studio-quality video using Riverside with just a few clicks.
Text-Based Editor Tool
Riverside's Editor tool has automated editing features to improve the quality of your recording. You can edit your recordings, by simply editing an Ai transcription. It's as easy as deleting text to remove unwanted parts in your actual recording. You can also use our automated tools to edit out distracting background noises and adjust volume levels with a couple of clicks - no technical knowledge or experience required.
Separate Tracks
With Riverside you can download separate audio and video tracks, but also a separate track of your screenshare recording. This means that you recieve a track just for your presentation, and you'll have more control to edit and repurpose your recordings as you want.
For all these benefits and more, start recording with Riverside .
Do you want your presentation to look really professional and stand out from the crowd? You can vastly improve the quality of your recording when you know how to video record yourself presenting a PowerPoint presentation in HD. You can’t achieve this high-quality recording through PowerPoint, so you’ll have to use video recording software.
Riverside HD Screen Sharing and Recording
Use Riverside’s HD screen sharing and recording features to capture your PowerPoint presentation in high definition. Host your presentation and invite guests to watch and interact with you live all directly in your browser. Viewers will see you and anything displayed on your computer screen, all in HD.
Though Riverside is a clear standout for recording PowerPoint presentations, you can find other video recording alternatives. We’ve outlined how to use some other video recording programs to record yourself presenting a PowerPoint.
OBS Studio to Video Record PowerPoint Presentation
Record a PowerPoint presentation in OBS Studio by taking the following steps:
Step 1: Open your presentation in PowerPoint.
Step 2: Open OBS Studio and click the + icon to add a source.
Step 3: Select Display capture to record your desktop
Step 4: Click the Controls Box and then select Settings.
Step 5: Under Output, select your recording path and recording format.
Step 6: Under Audio, choose the audio device you’re using to record.
Step 7: Start Recording!
Bandicam to Video Record PowerPoint Slides Presentation
You can record a PowerPoint in Bandicam in Screen Recording mode following these instructions:
Step 1: Open Bandicam and select Fullscreen mode.
Step 2: Open PowerPoint and start your presentation.
Step 3: Click the REC button to start and stop your recording.
Step 4: Choose Home from the left navigation bar to play, edit, and upload your captured videos.
After you’ve created a PowerPoint presentation, you can save it as a video that can be shared with others. Here’s how to record a PowerPoint presentation and then turn it into a video:
Step 1: Choose File from the PowerPoint navigation, then Export , and then Create a video .
Step 2: Pick the quality of the video you’re going to export.
Step 3: Select whether or not you want to use recording timings and narrations in your video.
Step 4: Choose the amount of time you want each slide in your video to display in the “Seconds spent on each slide” box.
Step 5: Click Create Video and then enter a name for your video and choose where you want to save it.
Step 6: Click Save.
It will take PowerPoint a little time to create your video. The progress of your video creation will be displayed at the bottom of the screen.
Knowing how to record a PowerPoint presentation with audio and video won’t get you far if your content isn’t put together well. These five tips will help you create a PowerPoint presentation that is informative and impactful.
1. Make it Short, Sweet, and Concise
Keep your audience interested and your presentation focused by making your content brief but at the same time comprehensive. It’s okay to have a lot of ideas and many slides when creating your presentation but edit it down to focus on your narrative or key points. If you’re unorganized or present too much information, your audience will become disengaged.
2. Don't Add Too Much Text to the Slides
It’s up to you to deliver the information to your audience and keep them interested. Avoid reading directly from your slides when presenting. Instead, use text to enhance your presentation. Your slides can have some information in bullet point or list format but avoid large blocks of text.
3. Get to the Point Upfront
You want your audience to listen to what you’re saying. Format your presentation so you get to the point as quickly as possible. Once your audience understands where you’re going, they’ll join you for the journey. All of the information in your presentation will be easier to digest and understand for a listener who understands why it’s being presented.
4. Make It Engaging (And Humorous if Possible)
Don’t forget to have a little fun with your presentation, your audience will appreciate it! PowerPoint is full of features you can use to make your slides humorous and engaging. Add photos, gifs, videos, charts, graphs, and more to present your information in an engaging way. Since you can embed videos from online sources, why not add a funny (and relevant!) clip from YouTube to make an impression on your listeners?
5. Have a Memorable Ending
The best way to leave a lasting impression is to end your PowerPoint presentation in a memorable way. This can be achieved in a variety of ways that include: adding a famous quote that relates to your content, telling a joke, or sharing a video or image that encompasses the main points of your presentation. Whatever you choose to do, make sure your presentation stands out in a good way.
You can also broadcast your presentation live to remote audiences with the right video recording software. Popular with content creators who regularly use live streaming, this feature of some video recording platforms is also useful for sharing presentations with remote audiences.
Riverside Remote Broadcasting Features
Riverside’s remote recording platform is full of features that make it simple for you to present a PowerPoint presentation remotely. You can be online and present in just a couple of minutes. These are just a few of the reasons we love Riverside for broadcasting to remote audiences:
A) Stream Across Multiple Platforms
While you’re recording your presentation, you can Livestream to Facebook, YouTube, Twitch, and LinkedIn simultaneously! Reach your audience no matter where they’re watching from.
B) Easily Connect With Your Audience
You can easily invite guests to view your broadcast using Riverside. You can invite up to eight guests to view your presentation from their browser with just one click! Your guests don’t need any technical knowledge to access your broadcast.
C) Engage Directly With Your Audience
The Audience Link feature lets you share your recording live with anyone and provides them with the ability to call in and interact with you during your presentation. This feature works great if your broadcast relies on audience participation.
Composing engaging and informative PowerPoint presentations takes time, practice, and some finesse. However, learning how to video record yourself presenting a PowerPoint presentation is simple. All you need is the right video recording software. Riverside offers a great option for recording PowerPoint presentations. It comes with many recording and editing features not available in the Microsoft PowerPoint program. Choose the right video recording software to enhance your presentations and add another level of professionalism.
Start recording presentations professionally. Sign up to Riverside !
How to Video Record Yourself Presenting a PowerPoint Presentation FAQ:
Still unclear on how to record a powerpoint presentation with audio and video? Our FAQ section will provide some clarity!
Can You Add a Video of Yourself to PowerPoint?
Yes, you can add a video that’s already recorded and saved on your computer or a video that you’ve uploaded online.
To add a video from your computer, select “Insert”, then “Video”, and finally “This Device”. Locate your saved video and then select it.
To add a video that’s online, select Insert , then “Video”, choose “Online Video”, and then enter the embed code from YouTube, Vimeo, SlideShare, Stream, or Flipgrid. Embed codes from other platforms are not supported at this time.
How do you record a video of yourself while presenting a PowerPoint?
If you want to record yourself while recording your PowerPoint presentation at the same time, it might be best to use dedicated software to do this. For example, with Riverside, you can record yourself presenting your PowerPoint live with the following steps:
- Open PowerPoint and set up your presentation.
- Open a Riverside studio.
- Start a screen share and choose to capture the PowerPoint window tab.
- Start Recording your face and your Powerpoint presentation simultaneously.
- Stop recording and wait for your files to upload.
- Download separate tracks of yourself and your PowerPoint presentation or merge them into one seamless video.
How Do You Record Audio on PowerPoint?
You can record audio on PowerPoint by first selecting “Recording” from the navigation bar. From here, select “Audio” and then choose “Record Sound”. You can also record audio and your screen at the same time by choosing “Screen Recording” instead of “Audio”. If you choose to record audio this way, just be sure the “Audio” button at the top of the screen is grayed out before you hit “Record”.
What Are Alternatives to PowerPoint?
PowerPoint has been around for decades and though it may be the program most people are familiar with, it has spawned many alternatives you can use to create a presentation in slideshow format. Some of the top free PowerPoint alternatives include Google Slides, Canva, Prezi, Visme, and WPS Office.
Kendall Breitman
leads Riverside's community. She has over ten years of experience in television and video production for places like NBC and Bloomberg News. You’ll find Kendall on our webinar, where she shares her expert insights on content production, branding, and more.
Record in studio quality without the studio. Transcribe, clip, and edit within seconds.

Keep reading

Riverside resources
Video recording software.
Capture video and screen-sharing online with up to 4k resolution, and get ISO tracks for all participants.
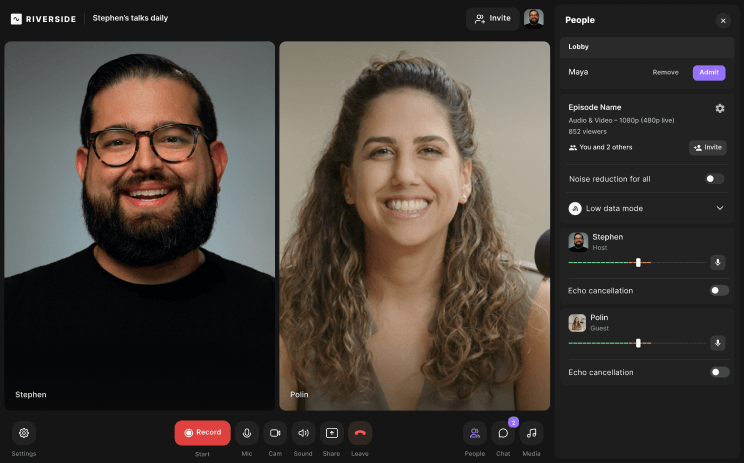
Video Capture Software
HD video capture software with powerful editing tools and automatic constant frame rate recordings.
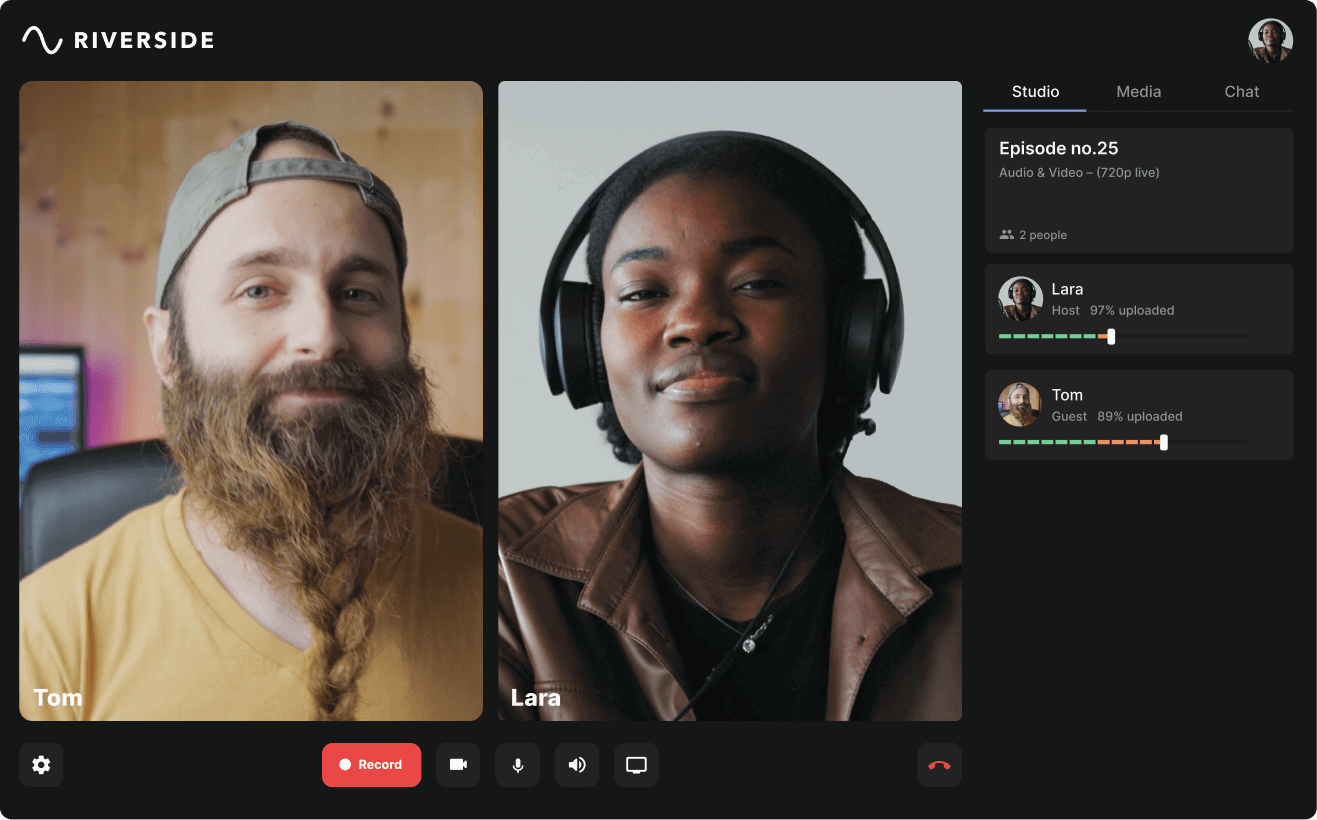
Start creating with Riverside

Podcast guides
© 2023 RiversideFM, Inc.

Create & Share Inspiring Videos
Join thousands of educators, students and business professionals on slideator to record, manage, and share your videos from the comfort of your own browser, without any downloads, and for free.

Latest Videos

Slideator: More Than Screen Recording
Slideator is a YouTube API-based platform for creating, managing, hosting, and sharing video presentations, online tutorials, digital stories, pre-recorded interviews, and recorded responses. It helps you to import your presentation content in all popular formats, narrate and annotate your slides, and synchronize a variety of visual media, including live camera feed, whiteboard, drawing board, and computer screen, in a few clicks.
Key Features
Slideator combines cutting-edge cloud technology with seamless media integration to simplify the process of creating and sharing interactive video presentations. With easy slide imports, support for various media formats, and cross-platform accessibility, Slideator empowers users to record, manage, and share content effortlessly. Plus, its seamless integration with popular LMS and CMS platforms makes it the ideal tool for educators, businesses, and content creators alike.
Cloud Technology
Slideator is developed using Google Cloud and YouTube API technology to automate the process of video recording, and ensure that you need minimal technical knowledge recording your videos.
Easy Slide Import
Slideator allows you to effortlessly import your presentation file from your local drive, your Google Slides account, or a web link, in all popular formats, including PPTX, PPT, PDF, KEY for Mac, ODP, and WPS formats.
Variety of Media
Slideator assists you in narrating and annotating your video presentations, allowing you to synchronize a variety of visual media, including slide content, live camera feed, whiteboard, and desktop screen seamlessly.
Interactive Videos
Slideator video recorder and platform combine video with scrollable slide thumbnails, allowing the audience to navigate to the respective video content and control both the progress and length of the video.
Cross-Platform
Slideator is compatible with desktop and mobile devices using any operating system, and can be accessed from the comfort of your own browser, without the need to download and install any apps, extensions, or add-ins.
Seamless Integration
We designed Slideator for integration with any LMS (Google Classroom, Moodle, or Blackboard), MOOC, and CMS to help users record, host, manage, and share their videos without leaving their own environments.

Why Slideator?
Slideator offers a seamless video recording experience by allowing users to import, narrate, and annotate slides directly from any browser without downloading additional software. It supports various slide formats, provides unlimited cloud storage, and enables high-quality video recording and sharing across platforms with no time limits or watermarks.

Effortless Video Recording
Effortless video recording refers to the ability to create video recordings with ease and minimal effort. It implies that the process of recording videos is streamlined, simple, and user-friendly, allowing users to focus on their content rather than worrying about complicated technical details or cumbersome procedures.
In the context of Slideator, it highlights how users can easily import, narrate, and annotate slides to create videos directly from their browser without the need for additional software or complex setups. The goal is to make video recording as smooth and straightforward as possible.
Import, narrate, and annotate your slides, and synchronize a variety of visual media. You spend no additional time recording and sharing inspiring online videos from the comfort of your own browser, on any desktop or mobile device.
- Developed using web standards and technologies for consistent video recording experience.
- Accessible from any browser, regardless of your device.
- No need to download and install any apps, extensions, or add-ons.

Instant Recording & Sharing
Instant recording and sharing refers to the capability to quickly record and immediately share videos without any delays or complicated steps. This means that after recording a video, users can instantly make it available to others, whether by sharing a link, embedding it on a website, or posting it on social media.
In the context of your Slideator project, it emphasizes how users can record their presentations and share them across platforms almost instantly, making it easy to distribute content without waiting for long processing times or dealing with multiple steps in between.
Get Started
Slideator leverages Google Cloud and YouTube API to enable one-click recording, saving, and publishing of video presentations. Users can select their audio and camera devices, toggle camera layouts, and control recording with ease. Once recorded, videos can be saved to the Slideator cloud, published, and shared via various platforms.

Record and Save to the Cloud
Slideator Recorder is designed to help you record and share your video presentations and tutorials from the comfort of your own browser.
The Recorder is cross-platform and supported on desktop and mobile devices by modern browsers. The Recorder is designed to run completely internally by your browser.
Slideator uses the latest Google Cloud and YouTube Data API technology to record, process and share your online video presentations. Just one click to start recording, saving, and publishing your video presentation to bring it to life.
- Select your audio device and turn on your camera before recording if you need to show your face or overlay your live camera feed.
- Click Start button when ready to start recording, and click Pause/Resume button while recording to pause and resume recording.
- Open Cam menu to toggle between different cam layouts while recording.
- Click Stop button to finish recording, then review your video before saving and publishing.
- Click Save button to save the video to your Slideator cloud account.
Sign up for your free account now to start recording and sharing your video presentations, e-lectures, pre-recorded presentations, and digital stories.

Publish and Share
Slideator use the latest YouTube Data API technology to upload, combine, process and save your slides with video. Just one click to save, publish and bring your video presentation to life.
- Record and publish your video directly to Slideator platform.
- Combine video with scrollable slide thumbnails, allowing the audience to move to the respective video content and control both the progress and length of video tutorials.
- Upload and save videos with unlimited video storage space and video delivery bandwidth.
- Share your online video presentation link with your audience. Your audience can watch vidoes with slides on their desktop and mobile devices, using any OS (Windows, MacOS, iOS, Android, Linux, Chrome, etc.).
Video sharing and embedding is available in any LMS (like Google Classroom, Moodle, and Blackboard), MOOC (like edX, Coursera, and Udacity), CMS (like WordPress, Joomla, and Drupal), or social networks.
Saving videos to the cloud is crucial for sharing because it ensures easy accessibility from any location or device, simplifies the sharing process through links, and supports scalability for large audiences. It enhances collaboration by allowing multiple users to access and watch the video.
Testimonials
Discover what our users are saying about Slideator! Whether you're working with PowerPoint, Keynote, or PDF slides, Slideator makes it easy to record and host your presentations all in one place. Hear from our satisfied users about their experiences with our seamless and efficient platform.

Richard Byrne
Ceo & edtech blogger.
Slideator works with just about any type of slides that you own. You can even use it with a set of slides that you have in PDF. The nice thing about Slideator is that it provides the recording and hosting tools in one place so that you don't have to record and then upload the video to another site.

Tracy Backstrom
Online instructor.
Slideator has revolutionized the way I deliver lectures and engage with my students. The seamless integration with our LMS allows me to effortlessly record and share video presentations directly within our course modules. This has saved me valuable time in creating and distributing video.

Joanne Anderson
University professor.
The platform's versatility is impressive, whether I'm annotating slides, sharing my web camera, or demonstrating concepts on the whiteboard. Slideator has empowered my colleagues, regardless of their technical expertise, and enhanced the educational experience for our students.

Ashna Singh
Sales & marketing specialist.
Slideator has truly become an essential part of our training toolkit, making the process of creating video presentations not only efficient but also enjoyable. I highly recommend Slideator to professionals seeking a reliable and user-friendly platform for their training needs.

Lavinia Iancu
University student.
What's amazing is that it works on all my devices, regardless of the operating system, and I can access it from any browser without the hassle of downloading additional apps or extensions. It ensures a smooth experience for recording and sharing videos right from within our systems.

Nicolae Oancea
Slideator has truly simplified the video presentation process for me. As a student, its user-friendly design makes recording and sharing videos a breeze. Slideator platform has made my academic life simpler, and I'm grateful for its straightforward and intuitive approach.

Joann Keirstead
As a presenter who's always on the go, finding a simple and efficient way to turn my PowerPoint slides into polished video presentations was a constant struggle. With its intuitive recording interface, I can now record professional-looking video presentations in minutes, thank you for your work.

Jennifer Wifholm
School teacher.
The ability to annotate, add webcam footage, and even whiteboard explanations takes my presentations to the next level. My students love the interactive thumbnails – they can easily navigate through the video and focus on the information that matters most to them.

Vartika Yadav
Instructional designer.
If you're looking for a hassle-free, time-saving solution to turn your presentations into engaging video content, and transform static slides into dynamic videos that captivate your audience, Slideator is the answer. Trust me, it's the missing piece you've been looking for.

Narendra Singh
Online school co-founder.
It is more than just a platform; it is a community of educators, entrepreneurs, and thought leaders connecting with their audiences in a deeper, more impactful way. If you're looking to elevate your learning and communication, embrace the power of Slideator.
Frequently Asked Questions
Whether you are curious about supported slide formats, recording features, privacy, or pricing, we've got you covered. Find answers to help you get the most out of Slideator and create seamless, professional video presentations.
Slideator is a non-profit and free platform with the mission to help educators, students, and business professionals record, host, manage, and share their online video presentations easily, and establish a global library of quality video recordings, providing these services at no cost to our users.
Slideator offers a cloud-based video recorder and platform. There is no need to download or install any apps, extensions, or add-ins. Everything you need is available directly through your web browser.
Slideator supports a variety of slide and presentation formats, including PPTX, KEY for Mac, ODP, WPS, and PDF formats. You can easily upload and work with these file types directly on our platform.
Slideator stands out with its unique combination of media and tools designed to enhance the quality and engagement of your presentations. The platform supports voice-over, allowing you to add personality, emotion, and emphasis, creating a personal connection with your audience. The camera feed feature boosts engagement, enhances clarity, and creates a sense of presence, making it feel like you are in the same room. Slide content is elevated from merely informative to engaging, clear, and memorable experiences. Annotations improve engagement by clarifying complex information, guiding attention, bridging language barriers, and adding interactivity. The whiteboard tool allows you to demonstrate the evolution of ideas, build a connection with the audience, and keep viewers captivated. Lastly, screen sharing enables you to showcase your computer screen, provide visual walkthroughs, offer unique perspectives, and enhance overall engagement.
To publish and share your video presentation, start by opening your presentation slides or document from your local drive in PPTX, KEY, ODP, WPS, or PDF format. Select your audio device and turn on your camera if you need to show your face or overlay your live camera feed. Click the Start button when you're ready to begin recording, and use the Pause/Resume button to pause and resume the recording as needed. You can toggle between different cam layouts by opening the Cam menu while recording. Once you finish recording, click the Stop button, then review your video before saving and publishing. Click the Save button to save the video to your Slideator cloud account. Share your online video presentation link with your audience, who can watch the videos with slides on their desktop and mobile devices using any OS (Windows, MacOS, iOS, Android, Linux, Chrome, etc.). Video sharing and embedding is available in any LMS (Google Classroom, Moodle, Blackboard, etc.), MOOC (edX, Coursera, Udacity, etc.), CMS (WordPress, Joomla, Drupal, etc.), or social network. Share and embed your online video presentations in your own LMS, MOOC, or CMS environment.
Slideator Project 83511, Qena, Egypt
+20 100 435 3882 Phone & WhatsApp
[email protected] [email protected]
Working Hours
We are available 24 hours a day, 7 days a week
IMAGES
VIDEO
COMMENTS
VEED is a complete browser-based tool that lets you do so much more than just record and share your Microsoft PowerPoint presentations. You can annotate your videos to make your presentation more informative. Edit your recording to add images, subtitles, and more. It is a professional all-in-one video-creation and editing software that's ...
Record new layer: Pick this for recording your video as a new layer on top of an existing recording. 2. Click Record at the bottom of the Record panel. 3. Drag over the area of your screen you wish to record. Click Start Recording. Press Space to start recording the full screen. 4. Click Stop to finish recording.
In the Options dialog box, click the Customize Ribbon tab on the left. Then, in the right-hand box that lists the available ribbon tabs, select the Recording check box. Click OK. To get ready to record, select Record on either the Recording tab or the Slide Show tab of the ribbon.
Step 3: Configure recording settings. With the Video Recording toolbar, you can set options like Cursor Capture and Effects, System Audio, and Webcam. If your webcam isn't showing, click on the webcam icon. If you have an external webcam, select the one you want to use by clicking the dropdown arrow next to the webcam icon.
Step 3. Record your presentation video . Click on the record button in the top right corner to start recording. Here, you will record your PowerPoint presentation slides, teleprompter, and webcam. A three-second countdown will appear. To stop recording, click on the stop recording button. You can preview your video before saving it.
Step 2: Select Record from the upper right hand corner of the PowerPoint window. Step 3: Make sure your recording and voice settings are set properly, then click the round Record button. Begin your presentation. Step 4: Click through your slide presentation and record your audio.
After reading the perquisites, let's see how to record a presentation with your face Google Slides: Step 1. Open a browser, sign into your Google account, and visit Google Slides. Step 2. Create or open a PPT, click the Rec button in the upper right corner, and tap Record new video. Step 3.
PowerPoint for Microsoft 365 PowerPoint 2021 PowerPoint 2019 More... You can record your PowerPoint presentation—or just a single slide—and capture voice, ink gestures, and your video presence. The completed recording is like any other presentation. You can play it for your audience in Slide Show or you can export it as a video file.
Step 3: Open Your PowerPoint Slides and Capture the Screen. Open your PowerPoint presentation and put it in "Slide Show" mode. With Panopto Express, you'll have two options for recording your slides: You can either record your slides by recording your screen or by recording the slides within the PowerPoint application.
Open the slide you want to start recording from. Near the upper right corner of the PowerPoint window, select Record. When you're ready, select the round, red Record button, wait for the countdown, then start speaking. To record from a specific slide, go to it, and then select Record. Note: Narration isn't recorded while the transition between ...
This tutorial will show you how to record videos, specifically your webcam video, on top of PowerPoint slide lecturess. I will 1) demonstrate how to record v...
Learn how to record a PowerPoint Presentation with audio and video simply by using the build-in PowerPoint functionalities and tools. You will learn how to...
Step 7: Press the record button, and your computer's mic and surroundings will start collecting the presentation with your face. The two PowerPoint-inbuilt recording features have their pros and cons. You can choose the feature that fits your situation more. Record the PPT presentation with a face on Mac
Free online presentation recorder. A powerful online screen, webcam, and audio recorder for creating professional video presentations. It's an incredibly better tool than Google Slides! VEED lets you easily capture your screen. Customize your layout, background, and camera feed in a few clicks. Our free presentation recorder works on Windows ...
To open your presentation, go to Google Slides. To record your slideshow, in the top right, click Rec Record new video. To start recording, in the middle, click the red record button. To start over, pause and click Re-record. To save your recording, pause and click Save to Drive. To blur your background, click Turn on camera blur.
Step 1: Get started on Riverside. Create a free account on Riverside.fm or choose from a paid plan with more features. Click Get Started and create an account instantly by signing into a Google or Apple ID account, or just enter in your name, email, and preferred password. No need to install anything.
Step 1: Open your presentation in PowerPoint. Step 2: Open OBS Studio and click the + icon to add a source. Step 3: Select Display capture to record your desktop. Step 4: Click the Controls Box and then select Settings. Step 5: Under Output, select your recording path and recording format.
Slideator Recorder is designed to help you record and share your video presentations and tutorials from the comfort of your own browser. The Recorder is cross-platform and supported on desktop and mobile devices by modern browsers. The Recorder is designed to run completely internally by your browser. Slideator uses the latest Google Cloud and ...