Home Blog Education How to Present a Lesson Plan

How to Present a Lesson Plan

First days are always exciting, and expectation builds up about the contents of the task ahead, especially if you’re starting a class as a student or professor. This interaction will be significant because it will establish and define the subjects to be covered and the set of expectations flowing from the instructor towards the audience.
Perhaps you are ready to begin your career as a teacher and need some guidance; otherwise, you are a seasoned instructor searching for a refresher in your program. No matter which of the above you represent, the truth of the matter is that you are probably seeking a better way to introduce the subjects you’ll be teaching to your students.
What is a lesson plan?
A lesson plan will be the set of subject matter materials you will be teaching during a specific timeframe. The lesson plan should be an index that students can constantly consult to understand better the parts of the learning journey they will go through during each session.
Teachers and professors should have a lesson plan template that happens in every session. This is different from a syllabus because, in the latter case, the whole curriculum of the program will be laid out; however, for each lesson, there should be one individual lesson plan example to guide the instructor in the set timeframe.
When building the materials for the class or lesson’s attention, it’s always essential to share elements like the purpose or rules that guide the learning process . This article will explore the best way to present a lesson plan and drive a learning session successfully from the instructor or professor’s view.
How to write a lesson plan
Education nowadays guides different sorts of students and target specific learning needs. Therefore, it’s important and relevant to understand how lesson plans can change and be varied to truly implement the best learning path for your students. Once you have this part figured out, the next step is to understand how you will transmit the information and use a PowerPoint Presentation to simplify creating and presenting a lesson plan to your students.
Lesson plans will comprise several different sections that will clarify the first questions students can have: How long will the course be? Will it be an online course ? What will be the main objectives? Which subjects will be discussed along with the class?
1. Introduction
As the lesson begins, it’s essential to place a brief yet descriptive introduction about what the session will cover. A good practice is to create a catchy title for each lesson to have an overall understanding of the information they will be receiving.
Example: Digital Marketing Basics: Industry background, historical review years 1980-2010. In this session, we will cover the birth of digital marketing, including all the touchpoints that shaped today’s industry.
2. Audience
If your class is a one-time-only or recurring session, or even a blended learning journey, it’s essential to explain to your students who this class is for; this will allow them to calibrate their expectations about the matter to be taught ahead.
Example: This lesson is directed to professionals who work in traditional marketing, business owners, or communication specialists seeking to have a profound understanding of how digital marketing came to be.
3. Lesson Objectives
This piece is critical because it will allow the students to assess the intention of each lesson. When thinking about the objectives, it’s vital to consider the acquired skills we expect our students to have at the end of the class. Like any other goals in life or business, each one should be actionable and measurable, meaning after each class, students should be able to use what they have learned and put into action the concepts.
Example : Understand and be able to create a timeline framework of reference to explain the story of the Internet.
4. Materials
Suppose the lesson requires using any specific materials, physical or not, including any software or hardware necessary. In that case, it´s important to list or include within the lesson plan so students can set clear expectations on what they might require. This is particularly important if the session you will be delivering requires them beforehand to bring anything.
Example :
- Computer
- Scratch paper
5. Learning Activities
We´ve covered all the logistics by this point; however, now we need to start sharing the actual activities during the lesson. Ideally, this is a play-by-play of how each activity will guide the lesson towards the already established objectives. To add the list of learning activities that will be helpful for your students, take into account how all of them align with each goal and the requirements students need.
Make sure that you add variety to the activities that you are proposing, go ahead and research trends of how many other teachers or professors, students will appreciate your search to engage them in learning.
Also, consider how much time they will take so that you can note it in the next section.
- Create a timeline on the wall with the most important moments of digital marketing history, including creation of social media, mainstream of email, etc.
Time periods
Pairing each learning activity with a specific timeframe will be useful both for instructors and students. Make sure you calculate a reasonable amount of time for each activity and list it within the lesson plan so everyone can set correct expectations. Assigning time slots for each exercise will also help students and teachers stay on track with the lesson and not waste valuable time invested in learning.
Example : Creation of a timeline – 45 min

How to present a lesson plan
We have now listed the components of the lesson plan structure, everything looks beautiful in the draft, but now we need to start planning how we will present the program to the students. This part is challenging because you have to choose a template that makes sense for you and will be helpful for your students to understand.
A PowerPoint presentation is a great way to showcase all the contents of the lesson plan, however, the trick is to decide how you want to structure it.
Lesson Plan Design
By this point, you’ve structured a lesson plan template that can go through any test. Nevertheless, creating the materials to accompany it can be a key in the commitment generates between the students and the professor.
Design and Style
Before adding any text to your presentation template , think about the requirements you have: Does the academic institution where you work require the use of logos? Do you have to follow any visual guidelines? This might be important for the cohesiveness of your presentation.
It’s essential to think about how you would like to present the lesson plan. You may want to keep it simple and have a 1 pager and talk through it to understand your students fully, or perhaps you need to create one full presentation where every slide will be a relevant piece of information. Let’s explore this a bit further.
One Pager Lesson Plan
If your style is more towards simplicity, this is a great solution: succinct, minimalistic, and straight to the point. You can complete a one-page lesson plan with bullets of the relevant data and send it out to students. A great advantage of this format is that you can either send it as a PDF or even as a single image (JPG or PNG), exporting it directly from PowerPoint.
One significant advantage is that your students will only have to check for one source by choosing this simple format when revising the lesson during the class or afterward.
Several pages lesson plan
Almost like a syllabus, a more extended presentation will include several slides so you can include the information in different formats.
For example, you can use the first slide to include the lesson title; afterward, a new slide can define the purpose or introduction of the lesson. In the upcoming slides, you can include materials, contents, and even ad charts or similar to explain how grades will be affected by each lesson’s assignments on the upcoming slides.
Text in the presentation
It’s always good to follow the reliable practices of presentations and include the necessary information without overwhelming students. Don’t add an excessive amount of text to one slide; actually, make sure that every piece of data is helpful for students to plan their time both during and after class.
However, if you will be sending out the presentation to your students before reviewing it, consider that they will be using it for their reference to follow through with your lesson. So make sure all the information is easy to read and accessible.
Additional elements
Learners of all sorts have become increasingly visual, so don’t be afraid to add infographics, images, photographs, icons or any other elements to make your lesson plan presentation more appealing visually.

Final Words
Remember the lesson plan presentation will be the first approach your students will have with the subject matter. Take your time, enjoy the process, and create comprehensive and attractive lesson plan slides that will inspire your students to have thoughtful and deep learning.
1. 1-Slide Lesson Plan PowerPoint Template
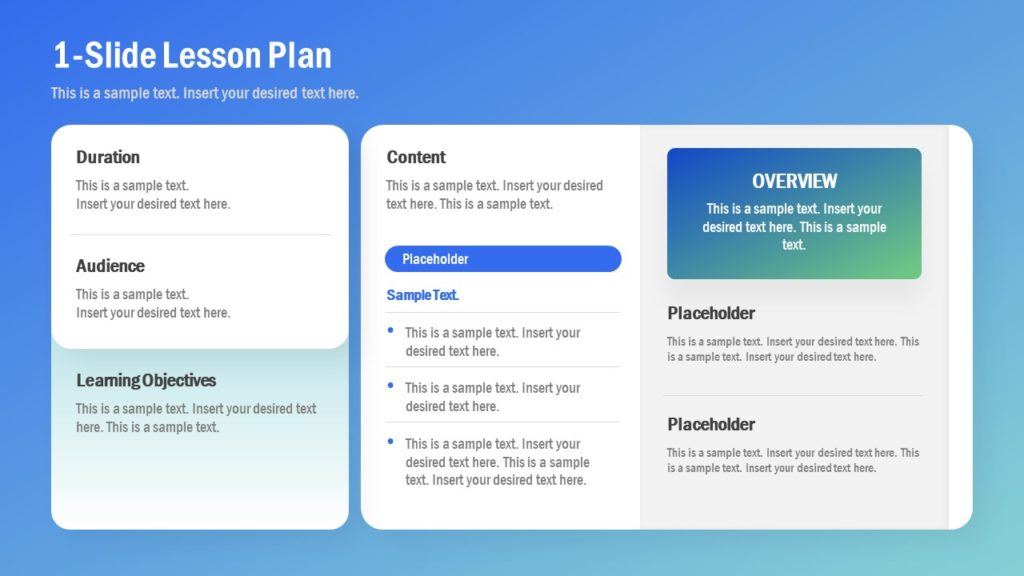
Create a simple and minimalist one-pager lesson plan for your academic uses, course planning, and even as student handouts, with this eye-catching PowerPoint template.
Use This Template

Like this article? Please share
Learning Experience, Learning Styles, Presentation Approaches, Presentation Tips, Presentations Filed under Education
Related Articles

Filed under Design • July 3rd, 2024
ChatGPT Prompts for Presentations
Make ChatGPT your best ally for presentation design. Learn how to create effective ChatGPT prompts for presentations here.

Filed under Design • July 1st, 2024
Calculating the Slide Count: How Many Slides Do I Need for a Presentation?
There’s no magical formula for estimating presentation slides, but this guide can help us approximate the number of slides we need for a presentation.

Filed under PowerPoint Tutorials • June 28th, 2024
How to Represent Branching Scenarios in PowerPoint
Do you have a situation to expose with multiple possible outcomes? If so, check our guide on branching scenarios in PowerPoint.
Leave a Reply
How to Create an Effective Lesson Plan Presentation
Regardless of the subject or content you’re teaching, having a lesson plan in place prepares you for class by offering detailed guidelines for the session. The lesson plan doesn’t have to be lengthy or complex—it just needs to include elements about what you’re teaching, the method of presenting this material, and what objective and goals you wish your students to achieve as part of the curriculum.
Why Lesson Plans Are Important
It’s crucial for teachers to prepare their lessons in advance and implement the best teaching approaches. Attending a session without a lesson plan can be counterproductive for both students and teachers. Without the right preparation beforehand, classes can end up being unproductive or confusing.
Below are a few reasons why you should consider lesson planning:
Lesson Planning is Handy for Classroom Management
Developing the lesson plan from the learning objectives provides flexibility in adapting to different teaching methods and classroom management techniques. For instance, hybrid or online classes require a different delivery approach from the traditional classes, which means making modifications to any existing plans. With the right foresight and plan in place, classes can stay on topic and effective. Such circumstances underscore how crucial lesson plans are in ensuring that the class runs smoothly, regardless of the learning environment.
Lesson Planning Creates Student Success
Various studies have shown that students benefit immensely from and appreciate well-structured lessons. Thus, success is more likely when students engage and show interest in the material being taught. Using a curriculum guide, teachers can develop valuable lesson plans based on specific objectives and goals (what’s intended for students to learn).
Lesson Planning Is Central to Teacher Success
Teachers’ success is, to some extent, pegged on students’ success. Besides that, the documents you develop as part of the lesson planning process are often part of your assessment by school administrators. What’s more, as you advance your teaching career, your lesson plans serve as a repository for your expanding body of knowledge. Thus, the significance of lesson planning cannot be overlooked when it comes to advancing your career as an educator.
Lesson Planning is Vital in Student Assessment
Lastly, lesson plans turn the learning sessions into clear objectives for students and a way to gauge their understanding of the subject matter. One notable benefit of the lesson plan is tailoring the assessment to a particular objective while considering students’ specific needs. You can use common assessment methods such as quizzes, tests, and homework assignments.
How to Write a Lesson Plan
Lesson plans include different sections that clarify questions students might have about the subject on hand. What are the lesson objectives? What subjects will be covered during the session? How long will the course take?
- Introduction – As the lesson commences, it’s good to have a concise yet vivid introduction about what the lesson will cover. The ideal practice is to create a memorable title for every lesson to create a general understanding of the learning material students will be interacting with.
- **Lesson Objectives –**This section is critical as it allows the students to ascertain each lesson. When it comes to objectives, it is crucial to consider the acquired skills you expect the students to gain by the end of the session. Each objective should be measurable and actionable; meaning after every session, students should be able to apply what they’ve learned.
- Learning Activities – This should be a detailed account of how each activity will lead the class to achieve its predetermined goals. To create valuable activities, consider how each learning activity fits each objective, and the requirements students need.
- Practice – Practices are primarily intended to assess students’ comprehension of the material and aid in memorizing what they have learned in class. Therefore, it is crucial to include this in the lesson plan so that assessments can always be done at the appropriate time.
Today, lesson planning has been made less time-consuming and easier, thanks to smart whiteboards for the classroom . A digital whiteboard like the Vibe Board Pro provides unmatched performance that shows you know your craft and are way ahead of the pack.
Download Our New E-book
The Future of Learning
Download Our New E-book The Future of Learning
Read our privacy policy .
We’ve sent you an email with the PDF download link. Enjoy!
Can't wait? Read now
How Smart Whiteboards Simplify Lesson Plan Creation and Presentation
Not only does using a smart whiteboard make learning accessible , it’s also a great way of enhancing and enriching your lesson plans with interactive activities for the class. Smart whiteboards function as a touch screen for all; during class sessions, you and your students can use it as a digital whiteboard to create a space where students’ engagement, knowledge, and teamwork are appreciated.
While the smart whiteboard aids in making your lesson more engaging, interactive, and educational, you as the teacher can still customize your teachings to what you want them to be. This helps in foiling any hitches in your lesson presentation and makes switching from one topic to another seamless.
Below are more specific ways how smart whiteboards make your lesson plan presentation better:
Take Advantage of Built-in Templates
Once you invest in a smart whiteboard, make sure to take advantage of the wide variety of built-in lesson planning templates. You can use these templates to improve lesson plans while leveraging the technology associated with smart whiteboards. Even better, these templates can be easily customized for every lesson plan and cover different subject matters, allowing you to create new lesson plans without always starting from scratch quickly. How cool is that?
Organize and Present Lesson Plans Better
Smart whiteboards combine the power of the traditional whiteboard and a TV/projector into one hub, allowing you to write on the board while concurrently projecting it to the classroom. This allows you to conduct lesson plan presentations on a larger scale while also letting students see what’s going on.
For instance, if you’re presenting on an extensive topic involving multiple subtopics, a smart whiteboard will help you walk students through each subtopic with ease. Begin with the presentation divided into primary or main sections, highlight key definitions, and add infographics and videos to ensure that every student understands the tiniest detail.
Additionally, you can get students involved in the lesson plan presentation by asking questions, polling them on key points, or allowing them to follow along on their tablets or laptops.
Record Lesson Plan Presentations
Another benefit of using smart whiteboards in the classroom is that a lesson plan presentation can be recorded and accessed long after the session is over. This allows your students to access the material on their own time.
Final Words: Creating a Lesson Plan Presentation
Lesson plan presentation offers students the first interaction with the material they will learn. Take your time, appreciate the process, and create an attractive and comprehensive lesson plan that will encourage your students to have deep and thoughtful learning experiences. Even better, all of this can be made easier with smart whiteboard technology. Leave the spiral notebooks and sticky notes at home. A smart whiteboard is all you need.
What is the presentation stage in lesson planning?
Presentation is usually the core of the lesson plan. During this stage, theteacher introduces the topic and the key subject matter the students need to master. Presenting with smart whiteboards is exceedingly easy and less time-consuming.
What are the 5 steps in lesson planning?
The five steps are:
- Objective: A learning concept or objective is introduced.
- Warm-up: Revise the previous lesson
- Presentation: Present the material using suitable tools and techniques.
- Practice: Students try to apply what they have learned.
- Assessment: Evaluate whether the objectives were achieved
How does lesson planning help teachers?
Planning lessons in advance allows teachers to arrive at class each day prepared to introduce new concepts and facilitate engaging discussions rather than improvising as they go. In other words, without a lesson plan, teachers may be left scrambling, making students lose interest in the material to be learned.
Subscribe to get updates on all things at Vibe
- Our Mission
8 Tips to Power-Up Your Classroom Presentations
Last month, I attended a Back to School Night for parents, sitting through presentation after presentation by teachers, some with slides that helped make their presentation a delight to listen to, and others . . . well, that's why I'm writing this blog post.
The goal of a classroom presentation is to aid you in effectively conveying information in a way that allows students (or their parents) to remember what you said. Unfortunately, for some, the presentation becomes a crutch, and they begin to rely on the slides to tell their story, rather than to help them tell the story.
I've been creating presentations using software like PowerPoint and KeyNote for 20 years, and I've learned a lot about how to most effectively communicate. Here's what I've found.
1. Use as Many Slides as You Need
It's a common myth that better presentations use fewer slides. This is simply not the case. I once sent an education conference presentation to the organizers so they could preview it in advance of my speaking. They wrote back, concerned that my 45-minute presentation had 116 slides. I looked it over and realized they were right! I revised it and sent a presentation with 135 slides back to them. I finished my talk with 5 minutes to spare -- just enough time to take questions -- and the presentation was a huge success.
The number of slides in your presentation is irrelevant. What matters is how well your slides communicate and how much time you spend talking about each slide. Spending five minutes on five slides will almost always be more engaging to your students than spending five minutes on a single slide, even when the information is exactly the same.
In the movie Amadeus , the Emperor of Austria complains to Mozart that his music has "too many notes." Mozart responds, "There are just as many notes as are required. Neither more nor less." Use as many slides as you need to make your point. No more. No less.
2. Minimize Verbosity
Your slides are there to support what you are saying, not to say it for you. Keep your word count low, and only place one main point on a slide, plus three to five sub-points if absolutely needed. Remember tip #1 above -- don't be afraid to use more slides. They're free! Also, the language in your slides doesn't need to be in complete sentences. Pare the text to as few words as possible, using what's there only to emphasize and reinforce -- not replace -- the words coming out of your mouth.

3. Maximize Visuals
Photos, figures and icons work as visual memory triggers. They help your students remember what it is you're saying. Any time you can add a visual that helps illustrate or reinforce the points you're making in your slides, you should use it. One great way to do this on the cheap is to use public domain or creative commons photos you can find on Flickr or Google .
4. Reduce Noise
Many teachers like to add banners, headers, footers, page numbers and more noise to their slides. Unless the information needs to be on every slide for a vital reason (which is rare), you should remove it. All these redundant elements do is create distractions from the content of your slides. I find this to be especially true of page numbers. Imagine if a movie included a time code at the bottom, constantly reminding you how long you had been watching. All this does is serve to take the viewer out of the moment. Page numbers in slides really don't provide any useful information -- they just remind your students how long they've been watching.
Pursuant to tips #1 and #2, you're not going to win awards by cramming the most content on the fewest slides. Make text and visuals as large as you can. Not only does this make them easier to see and read, but larger images and text make a greater impact to aid memory. There's nothing wrong with filling an entire slide with a photo, and then placing text right on top. You may have to use a transparent background immediately behind the text so that it's clearly readable, but the overall effect is almost always more memorable than just some text beside an image.
6. Highlight What You Are Talking About
While you are presenting, your students may be momentarily distracted taking notes, thinking about what you are saying, glancing out the window, possibly even daydreaming. When they refocus on your slides, though, they need to quickly pick back up where you are, or you risk losing them again.
- Use contrast or call-outs to clearly show the area of the slide you are talking about.
- Reveal bullet points or table rows one at a time so that the last one visible is the one you are talking about.
- Use arrows, circles or other pointers to show what you are referencing in specific parts of an illustration, photo or graph.
- Animate and reveal parts of illustrations and graphs (where possible) to build your story rather than showing everything at once.
- Use bold type or different colors to highlight the keywords in any lengthy text.
7. Transition Changes
Humans suffer from an affliction called change blindness -- we have a hard time seeing changes unless there is a clear transition between the states. This is especially a problem in presentations where slides may look very much alike. Most programs include transitions that can be used between slides or on elements in the slides themselves.
My favorite transition is the cross-dissolve -- where the first slide fades down while the next slide fades up -- but different transitions can help illustrate points in your presentation. Are you talking about combustion or the fire of London? Use a flame transition. Talking about photography or Hollywood movies? Use the flashbulb transition. Even "cheesy" transitions help overcome change blindness and aid student memory at the same time.
8. Repeat Yourself Redundantly
It’s OK to repeat the same slide more than once -- especially when using images -- if you are reminding students of an earlier point. Obviously, this is not a license to be monotonous. However, if you want to tie separate ideas together, emphasize a point or splash in a little comic relief, it's perfectly fine to repeat a slide.
Bonus Tip: Make it Funny!
There's little doubt that emotional responses can aid memory. While it can be difficult to apply this power in a classroom slide presentation, humor is easy enough, and adding a bit of levity to your presentations at the right points can work to give students vital memory hooks.
Remember, the point of presentation slides is not to replace you as the teacher, but to help your students understand and remember what you are teaching. Overwhelming them with too much information can be just as harmful as underwhelming them with too little.
The Ultimate Guide to Effective Teacher Presentations: Strategies & Tips

Dianne Adlawan

Teachers, by nature, are considered professional presenters. Their main responsibility is to talk in front of their students to relay educational knowledge, sharpen their minds and skills, and even serve as a second guide alongside their parents. They also speak in front of parents, co-teachers, and school administrators. This just means that preparing for a presentation is already not new to them.
Still, teachers can become so comfortable with their presentation routine that their techniques turn into autopilot. The result of a repetitive task can become tiring and not challenging anymore which may result in students losing interest or attention span in the process.
The tips featured in this article are dedicated to these hard-working professionals. This will help them prepare and perform a better presentation in front of any type of audience.

Why You Should Prepare for a Presentation
- Preparation helps you build to structure your thoughts to create a well-organized presentation. By taking the time to prepare, you can decide what information is most important, plan the flow of the presentation, and make sure that everything is connected and easy to follow.
- Second, it allows you to think ahead of the questions that your audience might ask. Especially if you’re giving a presentation to a group of various audiences, who are curious about the topic at hand. By preparing in advance, you’ll be able to answer any questions they may have, which will not only increase their understanding but also boost your credibility as a teacher.
- Lastly, preparation helps you make the most of your time. Advanced preparation ahead of the presentation can ensure that you’re not wasting time trying to organize your thoughts at the last minute.
Effects of an Organized and Well-Planned Presentation
An audience engages with a speaker who knows their words and poses a confident attitude. While the projector may display clear and concise slides, the presenter is the main ingredient to every presentation.
For teachers, a well-planned lesson presentation helps the teacher maintain the attention and interest of their students, which is crucial for effective learning. Additionally, being organized and prepared will help teachers convey their ideas more effectively and it will help the teacher to feel more confident, which also impacts their teaching and in turn can help to build trust and rapport with their students.
Possible Outcomes of An Unprepared Presentation
Let’s suppose you haven’t allocated enough time to plan and prepare for an important presentation. What could be the potential outcomes?
- Increased Stress and Anxiety: Lack of preparation can lead to increased anxiety and stress, which can not only hinder your ability to deliver a convincing presentation but also hurt your mental health and work balance. It can cause a “mental block,” causing you to lose focus and concentration during your delivery.
- Poor Presentation Delivery: Without proper preparation, your presentation can appear scattered and disjointed. This can lead to an incoherent message that fails to convince your audience.
- Diminished credibility: Delivering an unprepared presentation can harm your reputation as a professional. It can portray you as disorganized and unreliable which could lead your colleagues or students to question your competence and reliability.
Effective Visual and Content Organization Tips
Consider this as the first stage towards an effective teacher presentation. Before moving on to improving your verbal communication cues, let’s enhance first your presentation visuals and content.
Visual Tips
1. add powerpoint animations and different media.
Establishing an attractive slideshow is one of the keys to a successful presentation. This will put a good impression on your audience that you’re prepared just by seeing how well-designed your presentation is. Of course, images add to slideshow attraction, but consider adding another forms of media such as GIFs and videos, as well as animations! Microsoft PowerPoint has a lot of fun & captivating features that you may not be aware of. Check out this example of an easy yet appealing Slide Zoom trick in PowerPoint that you can add to your presentation to wow your audience.
@classpoint.io Did someone say FREE??? Yes, we did. Here are free websites to help you upgrade your next PowerPoint presentation! 😎 #powerpoint #presentation #design #studytok #edutok #tutorial #tipsandtricks #ai ♬ original sound – r & m <33
Read Next: Make Your Presentations POP With This PowerPoint Animation Template
2. Use Readable Font Styles
Make sure to use the best font style that makes your presentation look sleek, readable, and won’t strain your audience’s eyes while reading. We all want to use a fancy font, trust me, I get it. But most of the time, simplicity is beauty, especially if you’re presenting a professional-looking slideshow. Font styles such as Poppins, Tahoma, Verdana, Montserrat, and Helvetica are great examples of font styles that screams simple yet professional to look at.
On the other hand, font styles such as Bradley Hand, Comic Sans, and Chiller are not ideal choices as they are not meant to captivate your audience’s eyes. And another tip is to stick to two or three fonts only!

3. Use Relevant Graphics
Selecting graphics for designing your presentation depends on your audience and the goals you aim to achieve with the presentation. For example, if you are presenting in front of students and your goal is to keep them engaged, motivated, and actively participating, then you might consider incorporating charts, tables, and relevant shapes into your design.
It’s important to remember that your presentation design should align with the theme of your topic.
Free Websites to Upgrade your Presentation Graphics:
- Craiyon. com
- The Noun Project
4. Use Audience Engagement tools to Activate Learning
Want the quickest solution to an engaged audience? Well, it’s audience interactive activities! Adding interactive activities to your presentation can help keep your audience engaged and interested. One of the easiest ways to do this is to use ClassPoint, an audience engagement tool added right into PowerPoint presentations.
With ClassPoint, you no longer need to worry about strategies to keep your students engaged, as this tool transforms PowerPoint into a teacher presentation tool with a teacher toolbelt and student quizzes , polls, and games that make presentations more fun & engaging.
By combining ClassPoint with your presentation techniques, you can focus solely on setting up your lesson content in PowerPoint and allow ClassPoint to handle the rest for achieving a learning-activated presentation lesson .
🔍 Learn more about ClassPoint, the teacher add-in for better lessons & student engagement 👍
5. Use a Laser Pointer
Help focus your audience attention by using a laser pointer!
With the help of a laser pointer device, teachers are able to attract the attention of their audiences and concentrate on essential points in their presentations. Highlighting these main ideas and terms assists the speaker in organizing their speech, preventing distraction, and increasing retention of the information presented.
You can use a physical laser pointer & clicker, or with the addition of ClassPoint into PowerPoint, presenters can easily turn their cursor into a laser or a spotlight . This can make it even easier for students to follow along and is a convenient tool for creating a more captivating teacher presentation.
Secret tip: if you write on your slide with the laser, it will leave disappearing ink! 🪄
Content Tips
1. research and fact-check your presentation.
As educators, it is crucial to equip ourselves with reliable and accurate information before presenting to our students. We have a responsibility to not only educate them but to also mold them into critical thinkers who are equipped with factual knowledge. Without thorough fact-checking, we risk disseminating misinformation and hindering their intellectual growth.
To avoid such situations, we must prioritize research and fact-checking before presenting any information. Conducting research helps us not only in finding accurate information but also in ensuring that the sources we use are reliable and credible. Moreover, taking the time to fact-check demonstrates our commitment to providing students with high-quality education and the desire to create a safe and accurate learning environment.
2. Be Prepared to Anticipate Questions during the Presentation
It is important to be well-prepared for a presentation especially anticipating and addressing questions. This applies particularly to a teacher presentation, as educators face varied expectations and questions. Adequate preparation allows you to organize ideas and justifications, and it can deepen understanding, boost confidence, and improve adaptability. Addressing questions, makes your audiences feel heard and appreciated. This will result in comprehensive presentations, enhanced confidence, improved information flow, and an atmosphere of respect and understanding.
A great & visual way you can elaborate, or explain your material in new ways, is by using ClassPoint’s whiteboard tools added to PowerPoint. ClassPoint’s added toolbar presents teachers with unlimited whiteboard slides they can open whenever they need, and user-friendly yet comprehensive pen tools with available shapes, and text boxes. Plus you can also use ClassPoint’s quick poll or other question types to assess students’ understanding with hard data & insights.
Addressing questions well makes your audience or students feel heard & appreciated leading to improved learning, enhanced confidence, and a respectful, safe learning environment.
3. Provide an Outline Structure of your Content
When you are preparing your presentation, it is best to first create an effective outline structure that will guide your presentation flow and help you focus on the main learning objective. But what you may not be doing, is offering that outline structure to your students, but you should!
Providing students with a clear understanding of what this lesson is about, the structure of the lesson, and what they will be able to take away from it is important. By doing so, you can help students stay focused and follow along with the material. Additionally, you are setting expectations and ensuring that everyone is on the same page, which can help promote student autonomy. So, include an outline at the start of your presentation lesson.
Step-by-Step Strategies for a Successful Presentation
Before presentation, know your audience, your students, or observers.
Once you have completed your deck, you may want to add a guide script and any additional notes with important points you don’t want to forget or you want to highlight in your presentation to impress your students .
Practice your presentation delivery/lesson
Practice delivering your presentation give you a chance to fine-tune your content and get your facts down. This will help you become more comfortable with the material and identify areas that need improvement. You can practice in front of a mirror, record yourself and watch it back, or even rehearse with a colleague or friend. When practicing, pay attention to your posture, tone of voice, and pacing. By doing so, you’ll be able to deliver a confident and engaging presentation that will captivate your audience.
Use a friendly tone of voice and pace
Adjust your tone to match your message, and avoid speaking too quickly so that your audience will get the chance to absorb the information you’re sharing. By being mindful of these aspects, you will capture your audience’s attention and leave them feeling informed and inspired.
Use engaging body language
Body language is essential for engaging your audience during a presentation. Stand up straight, make eye contact, and use hand gestures to emphasize important points. You can also move around the classroom to keep your students’ attention. By using engaging body language, you’ll be able to convey your message more effectively and keep your students interested throughout the presentation. You’ve got this!
During Presentation
Create an icebreaker.
Having an icebreaker is a warm-up for your students’ brains, allowing you to focus and engage with the material being presented. It also helps break down any barriers or tension between the presenter and the audience, making for a more relaxed and welcoming atmosphere. Additionally, an icebreaker provides an opportunity for the presenter to showcase their creativity and personality, adding an extra level of excitement and engagement to the presentation.
Good thing that ClassPoint has numerous features to help you perform an entertaining and unforgettable icebreaker. Here are some examples that you can use during an icebreaker.
- Quick Poll : Quick Poll allows you to create interactive polls right inside your presentation. When used as an icebreaker, it can engage the audience, initiate discussions, and provide valuable insights that help tailor the content to participants’ preferences.
- Word Cloud: Presenters can ask thought-provoking questions related to the topic or general interest. Using Word Cloud, the audiences can answer through their mobile which can be instantly seen as collective responses, with the most frequently mentioned words appearing larger.
- Short Answer : In short answer, you can challenge your audiences’ thought process in a short-form writing activity with no options to get from to test their ability to understand.
- Image Upload : Using single image, audiences can interpret what they feel like, or their mood using only the photos in their gallery or surroundings. A creative yet fun way for an icebreaker!
Speak clearly
Effective communication is crucial when presenting important information to students. Speaking clearly helps ensure that students understand the concepts being taught and follow instructions effectively. As a teacher, it’s important to focus on clear speech to promote effective communication and help your students comprehend the material being presented.
Pay attention to your audience’s attention
Since distractions are aplenty, attention spans are dwindling, it’s important for presenters to captivate their audience’s attention right from the beginning. For teachers, when speaking in front of your class, you should not only focus on the content of your presentation but also on your students’ attention.
To ensure that your students won’t start drifting away or zoning out, start with a compelling opening that immediately grabs their attention. Use vivid storytelling, examples, or demonstrations to engage your students and drive home your message. Don’t forget the power of humor, and never be afraid to be yourself – authentic, passionate, and confident.
Add Personality: share short relatable stories
“A great personality makes everyone feel energized; just like a flower’s fragrance that freshens ups the complete surrounding.” 29 Personality Quotes to Achieve Greatness
As to what is stated in the quote, having a positive and vibrant personality affects the overall mood of your surrounding, it can capture the audience’s attention and maintain their interest throughout the presentation. While the ultimate goal is to deliver a presentation rich with new learnings and knowledge, adding humor can do no harm to lift up the mood in the room. You might want to start by segueing a short story that your students can relate to and make interactions by encouraging them to share a story too or ask questions.
Post-Presentation Reflection
Take the comments by heart.
Receiving feedback from your students is a great way for evaluating the efficacy of a teacher presentation. This can help you identify areas where you can improve and tailor your teaching tactics to better suit the needs of your students. Listening to your students’ feedback can also promote a feeling of cooperation and enable them to become more actively involved in the learning experience. So, don’t be afraid to ask for feedback and take it to heart in order to continually improve your presentations.
Experienced educators understand that they are perpetually crafting their skills, and feedback from their audience brings an opportunity for professional advancement. In addition, accepting audience feedback illustrates esteem and worth for the students’ views. It promotes a feeling of cooperation and enables students to become more actively involved in the learning experience.
Preparing for a presentation is essential for teachers to deliver engaging and impactful content to their students. By structuring thoughts, anticipating questions, and preparing ahead, teachers can achieve a well-organized presentation that will enhance the students’ understanding and leave them feeling confident.
By following our strategies and tips teachers can achieve successful lessons using PowerPoint presentations. And, with the help of an advanced educational technology tool like ClassPoint, teachers can create dynamic and memorable presentations that their students will enjoy and actively participate in.
Try out ClassPoint today and experience a whole teacher presentation in PowerPoint! ✨
About Dianne Adlawan
Try classpoint for free.
All-in-one teaching and student engagement in PowerPoint.
Supercharge your PowerPoint. Start today.
500,000+ people like you use ClassPoint to boost student engagement in PowerPoint presentations.
- CRLT Consultation Services
- Consultation
- Midterm Student Feedback
- Classroom Observation
- Teaching Philosophy
- Upcoming Events and Seminars
- CRLT Calendar
- Orientations
- Teaching Academies
- Provost's Seminars
- Past Events
- For Faculty
- For Grad Students & Postdocs
- For Chairs, Deans & Directors
- Customized Workshops & Retreats
- Assessment, Curriculum, & Learning Analytics Services
- CRLT in Engineering
- CRLT Players
- Foundational Course Initiative
- CRLT Grants
- Other U-M Grants
- Provost's Teaching Innovation Prize
- U-M Teaching Awards
- Retired Grants
- Staff Directory
- Faculty Advisory Board
- Annual Report
- Equity-Focused Teaching
- Preparing to Teach
- Teaching Strategies
- Testing and Grading
- Teaching with Technology
- Teaching Philosophy & Statements
- Training GSIs
- Evaluation of Teaching
- Occasional Papers
Strategies for Effective Lesson Planning
Stiliana milkova center for research on learning and teaching.
A lesson plan is the instructor’s road map of what students need to learn and how it will be done effectively during the class time. Before you plan your lesson, you will first need to identify the learning objectives for the class meeting. Then, you can design appropriate learning activities and develop strategies to obtain feedback on student learning. A successful lesson plan addresses and integrates these three key components:
- Objectives for student learning
- Teaching/learning activities
- Strategies to check student understanding
Specifying concrete objectives for student learning will help you determine the kinds of teaching and learning activities you will use in class, while those activities will define how you will check whether the learning objectives have been accomplished (see Fig. 1).

Steps for Preparing a Lesson Plan
Below are six steps to guide you when you create your first lesson plans. Each step is accompanied by a set of questions meant to prompt reflection and aid you in designing your teaching and learning activities.
(1) Outline learning objectives
The first step is to determine what you want students to learn and be able to do at the end of class. To help you specify your objectives for student learning, answer the following questions:
- What is the topic of the lesson?
- What do I want students to learn?
- What do I want them to understand and be able to do at the end of class?
- What do I want them to take away from this particular lesson?
Once you outline the learning objectives for the class meeting, rank them in terms of their importance. This step will prepare you for managing class time and accomplishing the more important learning objectives in case you are pressed for time. Consider the following questions:
- What are the most important concepts, ideas, or skills I want students to be able to grasp and apply?
- Why are they important?
- If I ran out of time, which ones could not be omitted?
- And conversely, which ones could I skip if pressed for time?
(2) Develop the introduction
Now that you have your learning objectives in order of their importance, design the specific activities you will use to get students to understand and apply what they have learned. Because you will have a diverse body of students with different academic and personal experiences, they may already be familiar with the topic. That is why you might start with a question or activity to gauge students’ knowledge of the subject or possibly, their preconceived notions about it. For example, you can take a simple poll: “How many of you have heard of X? Raise your hand if you have.” You can also gather background information from your students prior to class by sending students an electronic survey or asking them to write comments on index cards. This additional information can help shape your introduction, learning activities, etc. When you have an idea of the students’ familiarity with the topic, you will also have a sense of what to focus on.
Develop a creative introduction to the topic to stimulate interest and encourage thinking. You can use a variety of approaches to engage students (e.g., personal anecdote, historical event, thought-provoking dilemma, real-world example, short video clip, practical application, probing question, etc.). Consider the following questions when planning your introduction:
- How will I check whether students know anything about the topic or have any preconceived notions about it?
- What are some commonly held ideas (or possibly misconceptions) about this topic that students might be familiar with or might espouse?
- What will I do to introduce the topic?
(3) Plan the specific learning activities (the main body of the lesson)
Prepare several different ways of explaining the material (real-life examples, analogies, visuals, etc.) to catch the attention of more students and appeal to different learning styles. As you plan your examples and activities, estimate how much time you will spend on each. Build in time for extended explanation or discussion, but also be prepared to move on quickly to different applications or problems, and to identify strategies that check for understanding. These questions would help you design the learning activities you will use:
- What will I do to explain the topic?
- What will I do to illustrate the topic in a different way?
- How can I engage students in the topic?
- What are some relevant real-life examples, analogies, or situations that can help students understand the topic?
- What will students need to do to help them understand the topic better?
(4) Plan to check for understanding
Now that you have explained the topic and illustrated it with different examples, you need to check for student understanding – how will you know that students are learning? Think about specific questions you can ask students in order to check for understanding, write them down, and then paraphrase them so that you are prepared to ask the questions in different ways. Try to predict the answers your questions will generate. Decide on whether you want students to respond orally or in writing. You can look at Strategies to Extend Student Thinking , http://www.crlt.umich.edu/gsis/P4_4.php to help you generate some ideas and you can also ask yourself these questions:
- What questions will I ask students to check for understanding?
- What will I have students do to demonstrate that they are following?
- Going back to my list of learning objectives, what activity can I have students do to check whether each of those has been accomplished?
An important strategy that will also help you with time management is to anticipate students’ questions. When planning your lesson, decide what kinds of questions will be productive for discussion and what questions might sidetrack the class. Think about and decide on the balance between covering content (accomplishing your learning objectives) and ensuring that students understand.
(5) Develop a conclusion and a preview
Go over the material covered in class by summarizing the main points of the lesson. You can do this in a number of ways: you can state the main points yourself (“Today we talked about…”), you can ask a student to help you summarize them, or you can even ask all students to write down on a piece of paper what they think were the main points of the lesson. You can review the students’ answers to gauge their understanding of the topic and then explain anything unclear the following class. Conclude the lesson not only by summarizing the main points, but also by previewing the next lesson. How does the topic relate to the one that’s coming? This preview will spur students’ interest and help them connect the different ideas within a larger context.
(6) Create a realistic timeline
GSIs know how easy it is to run out of time and not cover all of the many points they had planned to cover. A list of ten learning objectives is not realistic, so narrow down your list to the two or three key concepts, ideas, or skills you want students to learn. Instructors also agree that they often need to adjust their lesson plan during class depending on what the students need. Your list of prioritized learning objectives will help you make decisions on the spot and adjust your lesson plan as needed. Having additional examples or alternative activities will also allow you to be flexible. A realistic timeline will reflect your flexibility and readiness to adapt to the specific classroom environment. Here are some strategies for creating a realistic timeline:
- Estimate how much time each of the activities will take, then plan some extra time for each
- When you prepare your lesson plan, next to each activity indicate how much time you expect it will take
- Plan a few minutes at the end of class to answer any remaining questions and to sum up key points
- Plan an extra activity or discussion question in case you have time left
- Be flexible – be ready to adjust your lesson plan to students’ needs and focus on what seems to be more productive rather than sticking to your original plan
Presenting the Lesson Plan
Letting your students know what they will be learning and doing in class will help keep them more engaged and on track. You can share your lesson plan by writing a brief agenda on the board or telling students explicitly what they will be learning and doing in class. You can outline on the board or on a handout the learning objectives for the class. Providing a meaningful organization of the class time can help students not only remember better, but also follow your presentation and understand the rationale behind in-class activities. Having a clearly visible agenda (e.g., on the board) will also help you and students stay on track.
Reflecting on Your Lesson Plan
A lesson plan may not work as well as you had expected due to a number of extraneous circumstances. You should not get discouraged – it happens to even the most experienced teachers! Take a few minutes after each class to reflect on what worked well and why, and what you could have done differently. Identifying successful and less successful organization of class time and activities would make it easier to adjust to the contingencies of the classroom. For additional feedback on planning and managing class time, you can use the following resources: student feedback, peer observation, viewing a videotape of your teaching, and consultation with a staff member at CRLT (see also, Improving Your Teaching: Obtaining Feedback , http://www.crlt.umich.edu/gsis/P9_1.php and Early Feedback Form , http://www.crlt.umich.edu/gsis/earlyfeedback.pdf).
To be effective, the lesson plan does not have to be an exhaustive document that describes each and every possible classroom scenario. Nor does it have to anticipate each and every student’s response or question. Instead, it should provide you with a general outline of your teaching goals, learning objectives, and means to accomplish them. It is a reminder of what you want to do and how you want to do it. A productive lesson is not one in which everything goes exactly as planned, but one in which both students and instructors learn from each other.
Additional Resources
Video clips of GSIs at the University of Michigan actively engaging students in a practice teaching session: https://crlte.engin.umich.edu/engineering-gsi-videos/
Plan the First Day's Session: How to create to a lesson plan for the first day of class: http://gsi.berkeley.edu/gsi-guide-contents/pre-semester-intro/first-day-plan/
Fink, D. L. (2005). Integrated course design. Manhattan, KS: The IDEA Center. Retrieved from https://www.ideaedu.org/idea_papers/integrated-course-design/
back to top

Contact CRLT
location_on University of Michigan 1071 Palmer Commons 100 Washtenaw Ave. Ann Arbor, MI 48109-2218
phone Phone: (734) 764-0505
description Fax: (734) 647-3600
email Email: [email protected]
Connect with CRLT

directions Directions to CRLT
group Staff Directory
markunread_mailbox Subscribe to our Blog
Lesson Plan - Definition, Examples & How To
Do you want to create your lesson plan.
EdrawMax specializes in diagramming and visualizing. Learn from this article to know everything about lesson plan and create your own with ease. Just try it free now!

1. What is a Lesson Plan?
A lesson plan is a teacher's detailed guide that outlines what students need to learn, how the subject would be delivered, and the achievement of class goals measured. No matter what subject is being taught, having a lesson plan guides the learning process by providing a clear outline to follow while teaching. Having the lessons planned ensures every bit of time spent in class turns out meaningful. The teacher and students would definitely know what to do in the classroom.
Details of a lesson plan may vary slightly depending on the subject being taught, the teacher's preference, and the needs of the students. Not every bit of the details has to be in a lesson plan. It should be a fine-tuned outline that builds on each period and provides a seamless transition from one lesson to the next.
2. What is Included in a Lesson Plan?
While lesson plans may vary slightly from one another, there are common components that build each one. The components work together to bring out the overall quality of a lesson plan. This will, in turn, determine how efficiently class time is utilized and the learning objectives achieved.
A good lesson plan that would work well for both teachers and students has to include the following.
1. Details of the lesson
Indicate what the lesson is about and the class you're going to teach. The details should include the unit, lesson number, class period, and the topic to be handled during the lesson.
2. Lesson objectives
The objectives of the lesson act like the mainframe of the whole plan. Setting out objectives targeted by the lesson is the most important part that will guide you to achieve what is expected from the class. Carefully write down three or four most relevant objectives students are expected to attain by the end of the lesson. The objectives should be SMART (Specific, Measurable, Achievable, Realistic, and Time-bound) and written from the learner's perspective.
3. Teaching aids
List the tools you'll use to facilitate learning by attracting your students' attention. The teaching materials should be adapted to the learning environment as well as students' learning levels. From pictures, flashcards, drawings, wall sheets, charts, and diagrams to real objects, the teacher should only write down what the lesson will use.
4. Lesson Procedure
Stages of the class session are like the framework of the lesson. Lesson procedure should work out to harmonize the following main stages of a lesson:
Warm-up stage – In which you should share, in a single sentence, how to prepare the students for the new lesson.
Presentation – Have at least three focused steps to introduce the lesson's content highlighted in the framework. The presentation should work out to capture the students' attention as you hammer in your lesson objectives.
Practice – You could divide this stage into controlled, guided, and free methods. Write one sentence indicating how to cover each type.
5. Evaluation
The evaluation stage has two categories:
Assessment – Write how to ascertain the students achieved the objectives set at the beginning of the lesson. You might have questions for students to answer in writing, or orally, give home assignments or anything suitably bringing out to what extent students have attained the lesson goals.
Self-evaluation – You, as a teacher, should take time to reflect on your lesson after ending it. Write out how things went on during class. Were the lesson objectives well achieved? Otherwise, what more needs to be done to achieve lesson goals?
During your lesson, for efficient time management, specify what time each stage will take and commit to the timeframe. If possible, have a specific time beside each stage, task, or activity.
3. Lesson Plan Examples for Teachers
1. lesson plan strategy.

2. Lesson Plan Template

3. Simple teacher lesson plan template

Image source: pinterest
4. Daily lesson plan template

Image source: teachervision.com
5. Simple science lesson plan sample

Image source: venngage.com
6. Student, teacher guide lesson plan template

Image source: pinterest.com
7. Blank lesson plan template

Image source: teachwire.net
8. Word lesson plan template

All-in-One Diagram Software
- Superior file compatibility: Import and export drawings to various file formats, such as Visio
- Cross-platform supported (Windows, Mac, Linux, Web)
3. How to Make a Great Lesson Plan
Making an effective lesson plan requires you to identify suitable components that need to teach your class. It weighs into understanding the goals of the lesson and your students' abilities. While making a lesson plan, the overall objective should be to motivate the students to learn and retain what is taught.
Rely on the following steps to come out with a great lesson plan .
1. Know your students’ needs
Whether you’re introducing new topic or reviewing what you’ve already done before, you need to understand the students and let them know what to expect from the lesson. This will help them stay focused while meeting the class objectives.
When you engage your students in the whole process, it makes them more interested in what you’re to teach. Share with them what the lesson is all about and give out the outline you’ll be presenting. You could even introduce the topic informally by discussing certain relevant historical events, deriving a formula from scratch, etc.
2. Identify the objectives of the lesson
As a teacher, what do you want to accomplish by the end of class time? List the specific things that your students should know by the end of the lesson. The period objectives should be simple and SMART (Specific, Measurable, Achievable, Realistic, and Time-bound) as possible. Outline what you wish to achieve by providing an overview of the main topics or ideas by the end of the lesson.
3. List resources and materials that you’ll need for the lesson
Think and list what would be used during the period to attain the set objectives. These might include materials like paper, pens and rulers. Other technological resources like computers and gamified learning tools may be part of the lesson plan.
4. Plan your timeline
Break your lesson plan into sections if the topic to cover may not be concludable within the allotted time. This allows you to engage the students well and share the main ideas or points during the class. Planning your timeline ensures that the lesson objectives are met within the set period.
Try EdrawMax and make an excellent lesson plan to outlines the content of your lesson step-by-step.


5 Teacher Tips For Better Presentations In The Classroom
With slides, less is more. Here are some tips for teachers to make better presentations for engaging learning in the classroom.

What Are The Best Tips For Giving Great Presentations In The Classroom?
contributed by Catherine Willson
When you need to put together information for a presentation for students or other teachers, you can be surprisingly effective without having to do too much at all. Here are some tips for teachers making presentations for in the classroom.
See also 15 Presentation Tools for Teachers
1. Establish one clear idea.
Conventional wisdom of the past used to be about putting as much information and content into a presentation as possible. It was all about trying as hard as you could to come across as an authoritative figure who truly was a master of the subject. That barely works in higher ed, and certainly is pliable in K-12. Consider that you aren’t trying to teach someone everything you know in a short window, but rather making an impression for long-term retention. Focus on one idea with supporting information in a quick period of time.
2. Start with a compelling hook.
When you consider the average suggested presentation length is only around ten minutes, you don’t have any time to waste. Obviously the specifics of the presentation will vary depending upon the grade level, time of day, content being presented and so on. One thing that won’t vary is the need to grab students right off of the bat and have them paying attention from the first few seconds.
As Cision recommends , when the average attention spans have shrunk down to around eight seconds, you know that you need to jump right in with something captivating. Obviously your presentation needs to have a point and needs to be worthwhile as well, but if you can simply give them something that they actually want to see in the first place, you stand a much better shot of being successful in your presentation. It might not seem like a powerful point but it is true in any context.
You might even do it without noticing, but you still do it constantly. Do your ears ever perk up when someone talks about a certain subject? Or, do you hear someone start a conversation with words that bore you and immediately look for a way out? It’s the same thing when it comes to presenting. You only have a few seconds to get it right and hook your class.
3. Prioritize–only put in what’s important.
Another major item to remember is what you are putting into your presentation as far as content is concerned. If you already understand how important it is to captivate your classroom and capitalize on the short attention spans, it’s not a wise strategy to grind the presentation to a screeching halt just so that you can read boring statistics and bland figures. There does need to be some information, but you could read and reference figures without using presentation software in the first place.
By having presentation slides with tons of words, you are just wasting time and filling space that will turn off your viewers. As Mr. Media Training suggests , if you have too many words then you either don’t know your presentation well enough, or your presentation isn’t supported by any additional evidence. The good news is that the technology of companies such as LiveSlides allows you to insert video into PowerPoint so that you can truly bring any sort of evidence you want. Those sorts of slides make perfect sense because you can’t put video on a notecard. Plus, by stimulating your classr with an additional surprise and viewpoint, you aren’t risking students falling asleep because of a long, monotonous message.
4. Consider schema and background knowledge.
Familiar images, references, sounds, music, and other bits of information can act as anchors to ground student understanding, as well as disarming some of the intimidation or anxiety new content can represent for some students. Along with focusing on a single idea per presentation, this can go a long way towards making better presentations for students.
5. With slides, less is more.
Believe it or not, the most acceptable answer from professionals is that you don’t need a lot of slides in a presentation. As Six Minutes Speaking and Presentation Skills suggests , sometimes you don’t need any slides. However, if you are going to give a presentation to your class and you need to have supporting information then you can easily do that with a few slides. The short answer is you probably need fewer slides than you think.
If there’s too much information, students are instantly going to go from trying to listen to you into a mode where they simply skim the PowerPoint slide. Once they realize it is the same message, the PowerPoint slide is basically worthless. You obviously can put summarizing points, facts, and figures into your presentation. But with that being said, PowerPoint was created as a tool and you need to be comfortable with using it. By having the right type of information in it you can actually enhance the presentation and student retention.
A presentation itself isn’t that difficult of a thing to master. So many people are caught up with using PowerPoint that they forget what it is actually for. When you are going to give your next presentation to your class, you need to know your subject matter first and the essentials of PowerPoint and presentation design second. Once you’ve narrowed your content and honed your message, you can capitalize on it by adding in all of the bells, whistles, and other enhancements that will help students retain what they’ve learned.
TeachThought is an organization dedicated to innovation in education through the growth of outstanding teachers.
In order to continue enjoying our site, we ask that you confirm your identity as a human. Thank you very much for your cooperation.
Lesson Plan Procedures: A Guide for Teachers

| Add to Folder | |
|---|---|
| creative writing | |
| children's book | |
| activities | |
| classroom tools | |
| language arts and writing | |
| vocabulary |
Lesson Plan Procedures
In this article, we will explain how to properly perform a lesson plan in school by diving deeper into lesson plan procedures. We will discuss the three major steps involved in lesson plan procedures and share how teachers can self-evaluate their lesson plan success.
What is a Lesson Plan Procedure?
Lesson plan procedures are the sequence or step-by-step guidelines detailing how a teacher plans to deliver a lesson to students. This includes the activities, methods, materials, and timing necessary to effectively facilitate learning.
Typically, there are three stages of a lesson plan that make up the lesson plan procedure. These stages are the motivational opening, the development of the lesson, and the closing of the lesson. However, there may also be some form of formal or informal periodic assessment. Periodic assessment throughout a lesson will alert you to any misconceptions or misunderstandings students may have long before they conclude the lesson.
Let’s take a closer look at the three major stages of effective lesson planning.

The Three Stages of Lesson Plan Procedures
Step 1: the motivational opening.
The first stage of a lesson plan is critical! It’s how you’ll stimulate students’ interest in the topic.
Start by asking students a thought-provoking question, such as, “How would you like to sleep for four months every year?” or “Did you know we can measure any tree on the playground without climbing it?”Other attention-grabbing openers can include the use of models, maps, apparatus, or a demonstration.
When starting a lesson, don’t make the mistake of assuming what students know. For example, just because students studied American history in elementary school, had a basic history course in middle school, and are now in your high school history class, don't assume they know all there is to know about American history. Take the time to find out. Bottom line: Always know what your students know!
Step 2: The Development of the Lesson
The development of a lesson plan is the heart of any lesson. It’s the portion where you teach and students learn.
This vital stage is when students will obtain valuable information, manipulate data, and engage in active discovery through total involvement. Include some of the following elements in this stage:
- Lesson methodologies. Not only is it important to give some thought as to what you're going to teach, it is equally significant that you consider the methods of presentation as well. I'm sure you've been in a class where the only method of instruction was dry, stale lectures. You undoubtedly found the class boring and wearying. The same fate awaits your students if you provide them with an overabundance of one type of teaching methodology to the exclusion of others. (These are addressed in Lesson Methodologies )
- Problem-solving. As I discuss in another article , problem-solving is an inherent part of any lesson. Providing students with the opportunities to solve their own problems in their own way is a valuable motivational technique.
- Creative thinking. Learning is much more than the memorization of facts. Any lesson must allow students opportunities to manipulate data in new and unusual ways.
- Hands-on activities. It's critical that students have sufficient opportunities to create products based on what they learn. These might include but are not limited to posters, dioramas, charts, graphs , mobiles, notebooks, portfolios , and models.
- Students critique the directions or set up for a presentation or demonstration.
- Students verbalize the steps they're taking during the completion of an activity.
- Students manipulate objects or devices and verbalize their feelings about their actions.
- Students work in small groups to share information learned and how it relates to prior knowledge.
- Students graph or illustrate significant points on the chalkboard for class critique.
Teaching Tip! When creating lesson plans, consider both short-term and long-term projects for students. This will keep the learning experience interesting as you switch up styles.

Step 3: The Closing of the Lesson
The closing of the lesson is a vital stage where you recap key points and help students consolidate their learning. It’s an opportunity to review the lesson's objectives and assess whether they have been met. This can be done through summary discussions, quizzes, or reflective activities.
It's also important to provide an outlook for the next lesson, thus creating a seamless transition and maintaining students' interest.
Teaching Tip! To keep your students engaged, try ending the lesson on a cliffhanger. This can be by proposing a question or telling them an enticing bit of information (e.g.“, Tomorrow I'll bring in a creature with eight eyes. You won't want to miss it!”).
Lastly, it’s good practice to end the lesson on a positive note to boost students' confidence and encourage them to look forward to the next session.
Self-Evaluation in Creating Lesson Plan Procedures
As you write lessons, include a brief section at the end that allows you to self-evaluate. This will be important when and if you decide to teach the lesson again. It will also provide you with some important insights relative to your perceived level of success.
You might consider some of these self-evaluative questions:
- “How was my pacing?”
- “Did students understand the content?”
- “Did students understand the important concepts?”
- “Did I use my time appropriately?”
- “What changes should I make the next time I teach this lesson?”
- “Were students engaged and involved?”
- “What new activities or procedures could I include?”
- “Did I present the lesson well?”
Featured High School Resources

Related Resources

About the author

Digital Content Manager & Editor
About haley.
- The Open University
- Explore OpenLearn
- Get started
- Create a course
- Free courses
- Collections
My OpenLearn Create Profile
- Personalise your OpenLearn profile
- Save Your favourite content
- Get recognition for your learning
Already Registered?
- Welcome to this free course on 'General Teaching M...
- Information that is not to miss Mark as done
- Alternative format Mark as done
- Tell us what you think of this course Mark as done
- Acknowledgements & references Mark as done
- Course guide Mark as done
- TOPIC 1 - QUIZ View Receive a grade Receive a passing grade
- TOPIC 2 - QUIZ Receive a grade Receive a passing grade
- TOPIC 3 - QUIZ Receive a grade Receive a passing grade
- TOPIC 4 - QUIZ View Receive a grade Receive a passing grade
- TOPIC 5 - QUIZ View Receive a grade Receive a passing grade
- Introduction Mark as done
- 1.1 DEFINITIONS, TYPES & PROCESSES OF LEARNING Mark as done
- What is learning Mark as done
- Behaviourism Mark as done
- Constructivism Mark as done
- Social-constructivism Mark as done
- Cognitivism Mark as done
- Conclusion on learning theories Mark as done
- 1.2 LEARNING STYLES Mark as done
- Introduction to learning styles Mark as done
- Overview of learning styles Mark as done
- Interpersonal learners Mark as done
- Intrapersonal learners Mark as done
- Kinesthetic learners Mark as done
- Verbal learners Mark as done
- Visual learners Mark as done
- Logical learners Mark as done
- Auditory learners Mark as done
- Identifying learning styles Mark as done
- 1.3 LEVELS OF COGNITION Mark as done
- Introduction to Bloom's taxonomy Mark as done
- How Bloom’s Taxonomy is useful for teachers Mark as done
- 2.1 FOUNDATION AND RATIONALE Mark as done
- Introduction to Active Teaching and Learning Mark as done
- Defining Active Teaching and Learning Mark as done
- Rationale for Active Teaching and Learning Mark as done
- 2.2 METHODS, TECHNIQUES & TOOLS Mark as done
- METHODS FOR ACTIVE TEACHING AND LEARNING Mark as done
- Problem-based learning Mark as done
- Project-based learning Mark as done
- Learning stations Mark as done
- Learning contracts Mark as done
- TECHNIQUES FOR ACTIVE TEACHING AND LEARNING Mark as done
- Groupwork Mark as done
- Demonstration Mark as done
- Presentation Mark as done
- Brainstorming Mark as done
- Simulation Mark as done
- Storytelling Mark as done
- Drill Mark as done
- TOOLS FOR ACTIVE TEACHING AND LEARNING Mark as done
- Quiz Mark as done
- Roleplay Mark as done
- Low cost experiments Mark as done
- Flashcards Mark as done
- Videos Mark as done
- Images Mark as done
- Charts and maps Mark as done
- Diagrams Mark as done
- Student portfolio Mark as done
- 2.3 BARRIES IN INTEGRATING ACTIVE TEACHING Mark as done
- Identifying Barriers Mark as done
- 3.1 INTRODUCTION TO CLASSROOM MANAGEMENT & ORGANIZATION Mark as done
- Defining classroom management Mark as done
- The role of the teacher Mark as done
- Defining classroom organization Mark as done
- Classroom seating arrangement Mark as done
- Overview of classroom seating arrangement styles Mark as done
- Benefits of effective classroom management and organization Mark as done
- 3.2 STRATEGIES FOR EFFECTIVE CLASSROOM MANAGEMENT Mark as done
- The teacher as a model Mark as done
- Desired learner behaviour Mark as done
- Rewarding learners Mark as done
- Types of rewards Mark as done
- Reinforcing learners Mark as done
- Delivering a reinforcement Mark as done
- 3.3 LESSON PLANNING Mark as done
- Definition of a lesson plan Mark as done
- Components of a lesson plan Mark as done
- 4.1 INTRODUCTION TO ASSESSMENT AND EVALUATION Mark as done
- Definition of assessment Mark as done
- Formative vs. summative assessment Mark as done
- Assessment for learning Mark as done
- Assessment vs. evaluation Mark as done
- 4.2 CLASS ASSESSMENT TOOLS Mark as done
- Assessment rubrics Mark as done
- Self-assessment Mark as done
- Peer-assessment Mark as done
- 4.3 REFLECTIVE PRACTICE Mark as done
- Definition of reflective practice Mark as done
- The reflective cycle Mark as done
- 5.1 CONCEPT OF INSTRUCTIONAL MATERIALS Mark as done
- Introduction to teaching and learning materials Mark as done
- Purpose of teaching and learning materials Mark as done
- 5.2 TYPES OF INSTRUCTIONAL MATERIALS Mark as done
- Traditional and innovative resources Mark as done
- Podcasts Mark as done
- Screencasts Mark as done
- Educational videos Mark as done
- Educational posters Mark as done
- Open Educational Resources (OERs) Mark as done
- 5.3 CHOOSING INSTRUCTIONAL MATERIALS Mark as done
- Integrating instructional materials Mark as done
- Factors to consider when selecting instructional materials Mark as done
About this course
- 11 hours study
- 1 Level 1: Introductory
- Course description
Course rewards
Free Statement of Participation on completion of these courses.
Earn a free digital badge if you complete this course, to display and share your achievement.

General Teaching Methods
If you create an account, you can set up a personal learning profile on the site.
Presentation
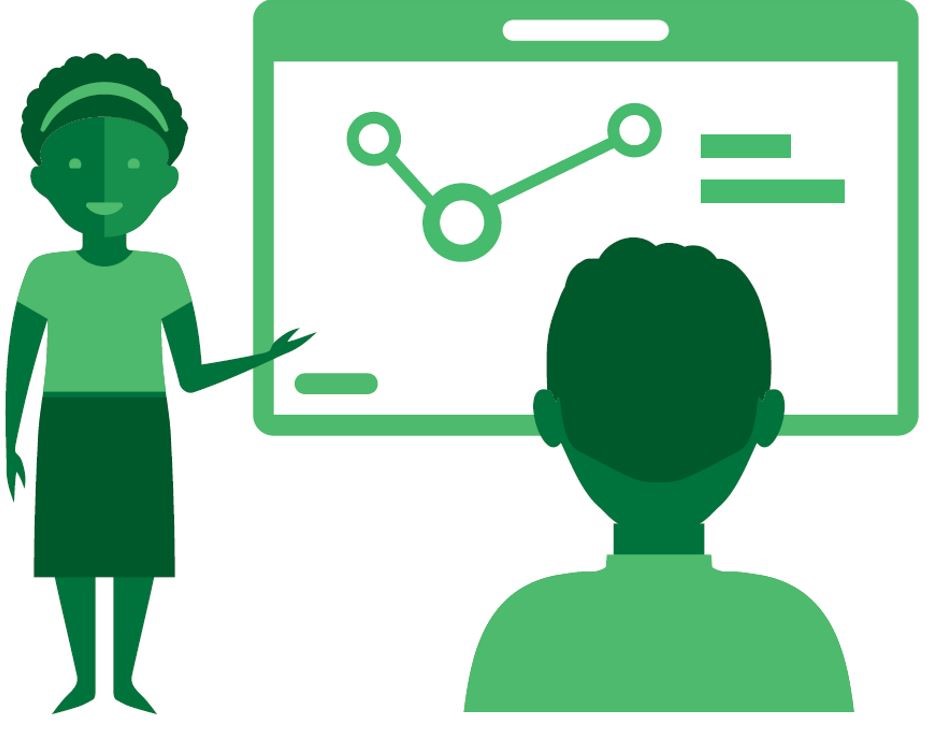
A presentation delivers content through oral, audio and visual channels allowing teacher-learner interaction and making the learning process more attractive. Through presentations, teachers can clearly introduce difficult concepts by illustrating the key principles and by engaging the audience in active discussions. When presentations are designed by learners, their knowledge sharing competences, their communication skills and their confidence are developed.
- Define the objectives of the presentation in accordance to the lesson plan (lesson planning)
- Prepare the structure of the presentation, including text, illustrations and other content (lesson planning)
- Set up and test the presentation equipment and provide a conducive seating arrangement and environment for the audience (lesson planning)
- Invite the audience to reflect on the presentation and give feedback (lesson delivery)
- After the presentation, propose activities or tasks to check the learners’ understanding
- Use Mentimeter for interactive presentations and to get instant feedback from your audience (consult this written tutorial on how to use Mentimeter).
- An infographic; graphic visual representations of information, data, or knowledge, is an innovative way to present. Use the digital tool Canva to create your own infographics (consult this written tutorial on how to use Canva).
- Use Google Slides or the Microsoft software PowerPoint , to easily create digital presentations.
- The purpose of a presentation is to visually reinforce what you are saying. Therefore the text should contain few words and concise ideas organised in bullet-point.
- Support your text using images .
- Provide time for reflection and interaction between the presenter and the audience, for example by using Mentimeter .
Techniques/ Demonstration Techniques/ Brainstorming
For further information, take a look at our frequently asked questions which may give you the support you need.
Have a question?
If you have any concerns about anything on this site please get in contact with us here.
Report a concern
Lesson Presentation: Rediscover a Lost Art in The Digital World

Presenting before a class is a rite of passage all students must go through. For some students, however, this can be a great challenge. Many students are losing the art of verbal communication in today’s digital world. This can have negative consequences later on. However, lesson presentation is an equally important skill for teachers too. Knowing how to create and present a lesson is the key to successful teaching.
Lesson Presentation Basics
Lesson preparation and presentation are two different but equally important skills. Lesson preparation is the process of creating the materials and organizing the content that will be used during a lesson. This includes creating handouts, PowerPoint slides (an outdated approach replaced by more advanced methods like online collaborative whiteboards ), and lesson plans.
Lesson presentation is the process of delivering content to students engagingly and effectively. Lesson presentation skills are essential for all teachers, especially those who teach large classrooms. Teachers with creativity and charisma can make any topic interesting, while those lacking these qualities often struggle to engage their students.

While preparing a lesson plan, it is essential to keep the following in mind:
- Lesson objective: What do you want your students to learn from this lesson?
- Lesson content: What information or skills will your students need to achieve the lesson objective?
- Lesson structure: How will you present the content so your students can learn it effectively?
The answers to these three questions will determine the success of your lesson presentation approach.
Lesson Plan Presentation Tips & Tricks
Teachers sometimes need to present their lesson plans to their colleagues, at education forums, or to administrators. While this can be a simple task, there may be teachers struggling with it. Lesson plan presentations are usually 15-20 minutes long and should be clear, concise, and well-organized. The following tips will help you deliver an effective lesson plan presentation:
1. Define your audience: Who will be listening to your presentation? What are their needs and interests?
2. Use modern technology solutions: Lesson plan presentations can be boring. Use technology to make them more interesting and engaging. For instance, prepare a visual aid with a well-designed lesson outline. Include charts, graphs, images and other supportive material to make your presentation visually appealing. Many teachers prefer using interactive whiteboards to collaborate with their students and audience in real time while presenting the topic.
3. Prepare a clear and concise introduction: Introduce yourself and your topic. Get your audience’s attention by highlighting what they will learn from your presentation.
4. Start with the objective: Begin the presentation by stating the lesson objective, helping your audience understand the lesson’s purpose.
5. Be clear and concise: Use simple language and avoid professional jargon. Get to the point quickly and use transitions to move from one idea to the next.
6. Engage your audience: Use questions, stories, and examples to keep listeners active. Make sure your presentation is interactive by involving your audience in polls, interactive quizzes, and AMA sessions.

7. End with a conclusion: Summarize the key points of your presentation and thank your audience for their time.
Teachers following these tips can deliver an effective lesson plan presentation that will position them as leaders in their field.
Help Students Develop Lesson Presentation Skills
In today’s digital world, it is more important than ever to help students develop strong lesson presentation skills. By providing the new generation with the opportunity to practice their public speaking skills, we can help them build self-confidence and communication skills that will last a lifetime.
In fact, one study found that students often fear being judged while presenting a topic in front of their peers. Teachers need to create a positive learning environment to address this problem and help students succeed academically and in their future careers.
The good news is there are simple things teachers can do to help students develop strong lesson presentation skills. Let’s look at a few examples below.
Ask Them to Prepare for an Online Presentation

Digitalization is the present and the future of modern society. Students are constantly exposed to online platforms to connect with their friends, share funny memes or stories, and consume content. It’s not surprising that they may be more comfortable presenting online rather than in front of a live audience.
Ask your students to present online in front of their peers.
Use Lesson Presentation Assessments
Lesson presentation assessments are a great way to help students understand what is expected of them in a presentation. Using a scoring system, you can provide clear feedback to help students improve their performance. There are many lesson presentation scoring approaches available online. You can also create your own based on the specific needs of your students.
Encourage Students to Practice in Front of a Mirror
Many students fear making mistakes while presenting. As a result, they may be unable to deliver their presentation confidently.
Encouraging your students to practice in front of a mirror will help them be aware of their posture and body language. It will also help them identify and correct errors in their delivery. As a result, mirror practices are great for building confidence and becoming more comfortable with the material.
These are just a few of the many ways teachers can support their students and guide them toward success. Helping students develop strong lesson presentation skills can set them up for a bright future.
Although technology has changed the way we learn, verbal communication is still an important skill. To be successful in life, students need to be able to communicate effectively both verbally and in writing. Teachers must also be skilled presenters to effectively engage their students and motivate them to learn and grow as future professionals. We hope these tips have given you some ideas on how you can improve your lesson presentation skills.

Join over 1.5 million users worldwide
Related articles.

6 September 2022
5 Ways to Use Digital LiveBoard for Improved Learning

2 September 2022
How Much To Charge For Group Tutoring? The Optimal Rate

1 September 2022
Teacher’s Cheat Sheet of Interactive Classroom Activities With LiveBoard
- Product Features Integrations Solutions Pricing
- Resources Blog FAQ
- How to Present a Lesson
Teacher Presentation Instructions (TP)
The Write Foundation provides teaching tools which easily accommodate different teaching situations and make teaching writing straightforward and painless as possible.
All of the Teacher Presentation information is included in the instruction manuals (spirals) along with instructions, answers and examples. While the instruction manuals with a white board and student worksheets are sufficient for teaching, the teacher presentation also comes in easy to use pdfs . The Teacher Presentation pdfs in the Additional Resource folder contain the teaching forms for presenting a lesson, but do not contain the teaching instructions and all of the suggested answers and examples.
| writing sentences, poetry, brainstorm and other open-ended answers using as much of your students’ creative input as possible. Simply put, you are to fill in the blanks with student input while guiding your students through the writing process. Some examples and sample answers are already on the Teacher Presentations. You can always fall back on the instruction manual suggested answers and examples when those are not already on the pdfs. |
| As the teacher presents the lesson information using the with the , overhead projector and or or projector, students are to copy the information on their coordinating paper to use for reference as they complete their independent work. As their skills develop, students are required to produce more of their independent work on the computer using a word processor. The end result is your students learn how to write papers quickly and skillfully. |
The Teacher Presentation pdfs , which come in the Additional Resources, make it easy to present and view the lesson whether at home with 1 student or in a co-op or class setting.
- Computer monitor – use directly from files
- Overhead Projector – print on transparencies with or without highlighting
- Paper Copies – print on paper with or without highlighting
| : You will need to use a cover sheet on the teacher presentation information to keep student attention focused on what you are teaching at that moment, rather than working ahead of you. To create a digital cover sheet for your computer screen, which you can adjust by grabbing the side or top. |
1. Interactive Digital Teacher Presentation TP: Computer Monitor / Screen friendly
The computer friendly digital Teacher Presentation pages (pdfs) were created so a teacher could easily type information directly onto the digital Teacher Presentation pages while students are viewing the information on a screen, monitor or wall and writing on their worksheets.
- The digital pages can be typed on by the teacher in the colored boxes and spaces.
- As you type, the fonts are mostly Arial to make the typed words stand apart from the Times New Roman text already on the pages.
- It is easiest to click your mouse onto the next space where you want to type information. The tab works also, but not as easily.
|
You will need a reader to open and use the digital Teacher Presentation pages (pdfs). Adobe and Foxit are 2 possible readers that are free. such as highlighting more and writing in other places besides the PDFill colored spaces, but you will need to play with the reader you choose to discover what else can be done. |
Longer examples?: Blank boxes and blank pages are provided in the Teacher Presentation pdfs for you to type examples, but I recommend you switch to a blank page on your computer for longer examples. It helps students to see how to type using a word processor.
Word Processor: Microsoft Word, Microsoft Works, Pages, Open Office and others
- Have a document already open in your word processor before you begin teaching, where you can hit Alt/Tab to easily switch back and forth between the TP and your word processor as needed.
- When you use a document in your word processor for typing poetry examples or other examples with students, you have more options available for arrangement, font and other structure.
- When working directly in a word processor it is easy to show students how to use toolbar options to set up their independent work in a proper format.
Have access to an overhead projector instead of a computer?
2. Teacher Presentation TP: Overhead Projector
Copy the digital teacher presentation pages (pdfs) to transparencies and present the lesson using an overhead projector. This can work with 1 student or with multiple students.
- Print the Teacher Presentation pdfs on transparencies with or without highlighting. The highlighting on the Teacher Presentation pdfs and the PDFill colored boxes does not print if you click for your computer to print only black and white.
- Transparencies can be reused multiple times, since the information written using overhead pens can be erased.
Do you prefer to use other teaching surfaces with or without a computer screen or overhead projector ?
3. White Board, Blank Paper, Chart Tablet, Paper Copies of the pdfs, and or the Instruction Manuals:
If a computer monitor or overhead projector is not available, or you want to use other teaching surfaces alongside, use a white board, blank paper, a chart tablet and or view some things directly from the instruction manual or paper copies of the pdfs.
| a) When making word lists with student input, and then using the words in sentences, it can be easier to write the new sentences on a white board rather than switching back and forth between the digital word list and the digital page provided for writing sentences. b) Poetry examples for concrete poetry and word pictures can be challenging to make on the computer. A real white board or paper works much better for those. |
When teaching a fill in the blank chart using other surfaces, just write the words that go in the blanks being clear about which words go in which blanks.
- A white board works great.
- Blank paper
- Chart tablet: This works well with multiple students and for information that the teacher will want to save to teach another time.
For an already printed format use the instruction manuals or paper copies of the pdfs that you print for student viewing.
- For some information, when teaching 1 or 2 students, allow the students to copy directly from the instruction manuals . This works fine for fill in the blank answers where only one answer is possible.
- Paper Copies : You may copy the pdfs on paper and use the paper copies to present the lesson to your students. This works well with 1 or 2 students. This is not the easiest method because of all the printing, but you have my permission to copy the pdfs to use in this manner if it is easier for you to do so.
H e is like a man building a house, who dug deep and laid the foundation on the rock. Luke 6:48

- Complete Lesson Plans
- Free Assessment Tests
- Free Reading Lists
- Organization for Writing
- Checklists & Guidelines
- Brainstorm & Outline Forms
Open doors to writing success!
Contact Rebecca . Rebecca Celsor will answer your questions regarding how to easily teach your child to write.
" Thank you for such prompt service and a great product. My 12 and 14 y/o girls enjoyed writing with your level 1 curriculum! I didn't know it was possible! Thanks again! "

- Course Selection Assistance
- Suggested Age Levels for Homeschool Writing
- Entry Level I - Prepare to Write
- Entry Level II - Creating Sentences
- Level 1 - Sentence to Paragraph
- Level 2 - Paragraph
- Level 3 - Essay
- Free Curriculum Writing Samples
- Example Teaching Videos
- Online Grading Service
- Writing Skills Reference Folder
- Grading Writing
- Key Points for Grading Writing
- MindBenders®
- Order Curriculum Packages
- Order Worksheets Only
- Refund/Return Policy
- Selecting Home School Curriculum
- Writing Preparation
- Writing Development
- High School and Beyond
- Homeschool Co-ops
- Homeschool How To
- The Story Behind TWF
- Why Another Writing Curriculum?
- Copyright Information
He is like a man building a house, who dug deep and laid the foundation on the rock . Luke 6:48
Dedicated to equipping God's children with the ability to communicate His Truth to the world.
- Teaching Tools
- Curriculum Ordering
- homeschool writing curriculum
- home school writing samples
- Mind Benders®
- Online Grading
Copyright © 2021 TheWriteFoundation.org
web site design - evolvethebrand.com

Tips for Teachers on Effective Presentation Skills
- Pamela Rice-Linn
- Categories : Teaching methods, tips & strategies
- Tags : Teaching methods, tools & strategies

Use these presentation skills for teachers to plan and practice your next presentation in class, whether that is an introduction to a unit, or an everyday assignment. Or, if you’re considering a career in education, imagine yourself before a classroom or before a gathering of your peers—how might you create an effective presentation? These suggestions will set you on the right track.
Preparation Before You Begin
Before you conduct a presentation, consider all learners and adapt your lesson presentation to their needs. While an auditory learner is okay with just listening to a lecture, a visual learner needs pictures, graphs, or a video clip. Kinesthetic learners, however, require movement in the form of responses to questions or hands-on activities. If you keep all of your audience learning styles in mind, you’ll be sure to maintain their attention throughout your lesson.
Next, be organized about your lesson or presentation. Lesson plans are essential to everyday teaching, especially for new teachers. Keep your lesson plan available as a guide. Also, have your necessary materials readily available, such as handouts or any other materials your lesson requires. If textbooks or a novel set are required for the lesson, have those items passed out before so you don’t lose the momentum of your presentation.
It’s also a good idea to be tech savvy about your equipment. It’s great to venture into using a new software program or new technology equipment for the sake of a lesson, but make sure you practice using the technology before class begins so you can work out the bugs.
With a little practice, preparation for an effective presentation will become like second nature.
During Your Presentation
Move around the room while you teach. Modern students have a shorter attention span than their parents or grandparents possessed. Don’t make your students dizzy, don’t pace, but shift your location in the classroom. Take a chance and be histrionic once in a while. From a pause to a demonstration to a wave of the arms, keep students riveted. Enthusiasm is part of the power of presentation. When your face lights up from the information you share, you might be surprised to see your students listening with eyes and ears wide open.
Similarly, keep a sense of humor. It’s not about being a clown, but it is about coming across as having a good attitude when it comes to teaching and enjoying your job.
As you’re presenting, pause after key points to check for student understanding and involvement. It’s not enough to ask a question
and have a student answer. Ask them to explain what you’ve taught in their own words. Question if the lesson reminds them of anything in the real world or within their personal lives, or perhaps even something else they might have learned in another class. By doing so, you’re helping students establish a connection between themselves and what you’re teaching.
Speak up! You want to be loud enough to be heard, but you also need to vary your pitch to avoid the monotone lecture voice. Students can hear authority in your voice. Confidence means you won’t falter when the slide doesn’t automatically pop up on the screen, the class drama queen has a break down or you accidentally bump into your desk and drop all the handouts onto the floor. Confidence means you’re a professional and every moment is a teaching experience. Feel good about your teaching voice. It’s a whole new facet to your personality now.
Final Advice for an Effective Presentation
Know how to improvise and be spontaneous with your presentation. On your computer screen, your presentation might look like a work of art, a feat of greatness that will inspire all students to become teachers and follow your lead. However, presentations don’t always come across that way once they’re up on screen in the classroom. If you notice students are drifting off, be quick on your feet and get students involved in moving around the room, whether that’s by helping to pass out worksheets or manipulatives, asking students for their personal experiences with the topic at hand, or play a speed round of Simon Says to get students laughing and noticing what’s happening at the front of the room. Lesson plans don’t always go according to plan. You’ll have interruptions at the door, fire drills that send you marching outside, and the usual and unusual round of announcements. That’s school. It happens.
Author’s personal experience
Image credit: https://commons.wikimedia.org/wiki/File:Manual _communication.jpg
- MyExperience
- Teaching Centre
- Teaching Essentials
- Active Learning
Creating a Lesson, Lecture or Presentation
Creating a lecture or presentation.
When creating a lecture or presentation, there are a few rules to keep in mind. These rules are suggestions that can help you as a presenter, and also help your audience follow along better.
The 10-20-30 rule.
Guy Kawasaki created this rule when he worked at Apple. 10 refers to the number of slides you have in your presentation. Obviously this only applies if you are using slides to enhance your presentation or lecture. 20 refers to the time limit of the presentation. This means you should spend about 2 minutes per slide. A change every 2 minutes is great because it helps the audience refocus. It keeps the lecture from getting boring and repetitive because the change comes with a visual cue. 30 refers to the font size on the slides. A 30 point font is great for visibility. It also limits you from putting too much text on your slides.
The Chunking Rule
Students will have an easier time remembering something if you split it into 3, 5, or 7 chunks. Seven chunks of information are the highest you should go. How did this rule come about? Think about things we have to remember. Street numbers, postal codes, zip codes, phone numbers, and email addresses. They all contain small chunks. Phone numbers are 7 chunks. 332 3333. If we start by giving the area code, we more than likely will forget the last three numbers and remember the area code. Chunks of limited information are easy to remember. They can compile into short lists, and can recall in the same way. Although this does not help with deep learning, it will help with recall and hopefully get the student pointed in the right direction.
Don’t read off of your PowerPoint or cue cards. Having some notes as prompts is great. Your PowerPoint can work as a prompt as well, but you need to be familiar with the subject matter and the material, so the prompts make sense. No one wants to sit through a lecture in which you read off of the projection screen or off of the sheets of paper piled in front of you.
Eye Contact
Make sure you look at your students. If you follow the rule of not reading, then this should provide you with ample opportunity to make eye contact. It will help you connect with your students, and allow you to see if they are getting that “lost” look or the “intrigued” look.
Be Engaging
Incorporate some short, funny stories or anecdotes into your lecture or presentation. These stories help get your point across and keep your students from losing interest. Don’t plan any gestures to help your story along, but feel free to use gestures if the mood and the story allow for it. You don’t have to be a comedian, but provide the students with something of interest that helps them create connections.
Put yourself in the audience
If you were a student in your class, and you had to attend your lecture, would you want to stay? Was it entertaining? If not, think of some things that would enhance the message you need to convey. Would a visual help? How about a story? Be creative and have fun with your presentation. If you enjoy giving the presentation, your students will notice. If you just read in front of them, your students will notice. Although sometimes it seems as though you have lost their attention, they are still cognizant of instructors that want to be lecturing even less than they want to be listening to the lecture. So have fun and let your students enjoy and have fun with you.
Let your stories be told, and let the ideas flow. Don’t rush through the presentation. Consciously slow yourself down. Take pauses for emphasis. Pauses and eye contact can become a useful part of your lecture.
Now that we have covered the rules of presenting think about the content of the presentation.
What ideas do you want to convey to your students during that lecture? Write these ideas down. Ask yourself if it is feasible to express all of these ideas in a single lecture.
The best way to decide which ideas need to be lectured on is to look at your course design. Look at your student learning objectives and course objectives. Does your lecture provide information that will help students meet their learning objectives? If not, why are you covering it in a lecture. Stories, photos and graphs that help reinforce main ideas fit in. They may not be the main idea you want to convey, but can work as aids to help you convey those ideas in an entertaining way.
Once you have prepared your lecture or presentation, give it a try. Try presenting in your office, or run your presentation past some peers. See what they think. Do they have any feedback for you? How can you incorporate their suggestions? If you need a place to practice your presentations, you can use one of the meeting rooms in the Teaching Centre. Just call ahead to make sure it’s available. We even have staff that could act as your test audience if that would help.
The following link recaps the information above and provides you with a few more tips. http://www.lifehack.org/articles/communication/18-tips-for-killer-presentations.html
Top 10 Teacher Lesson Plan presentation templates

Having a Teacher Lesson Plan template is crucial for educators as it provides a structured and organized approach to delivering lessons. Teachers, tutors, and instructors across various educational levels and subjects benefit from using these templates. Utilizing a presentation template, like the examples below, streamlines the process of creating visually appealing and engaging content, allowing educators to focus on the quality of their instruction and save valuable time.
What makes a good Teacher Lesson Plan?
- Clear objectives: Clearly outline the goals and learning outcomes for the lesson, ensuring that students understand what they are expected to achieve by the end of the session.
- Engaging visuals: Incorporate relevant images, graphics, and multimedia elements to capture students' attention and enhance their understanding of the subject matter.
- Logical structure: Organize the content in a coherent and easy-to-follow manner, breaking down complex topics into smaller, manageable sections for better comprehension.
- Interactive activities: Include opportunities for students to actively participate in the learning process through group discussions, hands-on exercises, or problem-solving tasks.
- Assessment methods: Provide a variety of assessment tools, such as quizzes, assignments, or projects, to evaluate students' progress and understanding of the lesson content.
1. Tome's Teacher Lesson Plan Template

Easily organize and execute educational lessons with the Tome's Teacher Lesson Plan Template , perfect for educators aiming to structure their sessions effectively. This template is ideal when preparing detailed lesson plans that align with course objectives, facilitating student engagement and learning.
- Slides: Guides for lesson structuring, engaging questions, and student involvement.
- Format: Available online via Tome app, exportable in PDF or PowerPoint format.
- Pricing: Free to use on the Tome.app.
2. Space Illustrative Lesson Plan for High School PowerPoint and Google Slides Template

The Space Illustrative Lesson Plan for High School Template captures the vastness of space in an educational format, perfect for high school and college astronomy units. Use it when the lesson's aim is to explore celestial phenomena and foster scientific curiosity.
- Slides: Engaging and themed visuals to complement space-related lessons.
- Format: Available in PowerPoint and Google Slides formats.
- Pricing: Free to download.
3. STEM Elective Subject for Middle School - 7th Grade: Principles of IT, Cybersecurity and Engineering Template

STEM Elective Subject for Middle School Template is ideal for introducing students to the basics of IT, cybersecurity, and engineering, best used in middle school STEM curricula.
- Slides: Includes 3D illustrations and various educational resources.
- Format: Available in Google Slides format.
4. Global Education PowerPoint Template Template

Global Education PowerPoint Template is suited for presenting global educational concepts and multicultural learning experiences, great for broadening students' worldviews.
- Slides: Features vibrant colors and interactive design elements.
- Format: Compatible with PowerPoint.
- Pricing: Specific pricing information is not publicly available. Users may buy the template through a subscription at SlideModel.
5. Kimok Science Doodles Style Lesson Template - Daily Learning: STEM Infographics

Kimok Science Doodles Style Lesson Template makes science subjects approachable and fun, ideal for daily STEM lessons that encourage interactive learning and creativity.
- Slides: Doodle-style graphics and STEM-focused infographics.
6. 1-Slide Lesson Plan PowerPoint Template

The 1-Slide Lesson Plan PowerPoint Template simplifies the educational planning process, ideal for teachers needing a quick overview of daily or weekly educational objectives.
- Slides: A single slide for a concise lesson summary.
- Format: Available in PowerPoint format.
7. Math lesson PowerPoint and Google Slides Template

Math Lesson PowerPoint and Google Slides Template offers a vibrant and engaging approach to math lessons, perfect for educators looking to make math fun and accessible for students.
- Slides: Colorful and math-themed design to enhance learning.
- Format: Available in both PowerPoint and Google Slides formats.
8. Lesson Roadmap Presentation Template

Lesson Roadmap Presentation Template is great for outlining the journey of a lesson or unit, helping educators plan and communicate the path of learning effectively.
- Slides: Customizable for different educational needs.
- Format: Available for Google Slides, PowerPoint, and Canva.
9. Biology Subject for High School: Stem Cells Presentation Template

Biology Subject for High School: Stem Cells Presentation Template is designed for high school biology lessons, especially effective for topics on stem cells and advanced biological concepts.
- Slides: Rich in scientific illustrations and content.
10. Simple 5-Step Timeline Concept for PowerPoint Template

The Simple 5-Step Timeline Concept for PowerPoint Template is perfect for educators and professionals needing to outline processes or timelines clearly and concisely.
- Slides: Features a straightforward 5-step timeline design.
Create the best presentations with Tome!
As an educator, you're always looking for ways to create engaging and interactive lesson plans that capture your students' attention. With Tome , you can effortlessly craft polished presentations that not only look great on any screen but also incorporate AI tools to help you express your ideas quickly and effectively. Our platform is designed to assist you in developing structured starting points for compelling presentations, integrating web references, and ensuring your finished output is both captivating and clear.
Whether you're teaching a science class or a history lesson, Tome's versatility allows you to create immersive and interactive experiences for your students. By transforming your existing documents into polished presentations, you can elevate your lesson plans and make learning more enjoyable for your students.
Ready to see how Tome can enhance your lesson plans? Sign up for free and start shaping your ideas with Tome today.

In this article, we will share the main uses of DALL·E 2, its pricing, reviews, and some alternatives to it.

In this article, we will share the main uses of ElevenLabs.io, its pricing, reviews, and some alternatives to it.

In this article, we will share the main uses of Namelix, its pricing, reviews, and some alternatives to it.

In this article, we will share the main uses of Jenni.Ai, its pricing, reviews, and some alternatives to it.

In this article, we will share the main uses of Grammarly, its pricing, reviews, and some alternatives to it.
In this article, we will share the main uses of DALL·E 3: Features, Pricing, and Alternatives, its pricing, reviews, and some alternatives to it.
Google Slides Lesson Plan
A Google Slides lesson plan designed to help educators implement the digital tool into their instruction

Google Slides is a robust, interactive, and flexible presentation and learning resource tool that can be used to bring content to life in all academic subject areas. While Google Slides is known primarily for being an alternative to PowerPoint, the comprehensiveness of features and tools within Google Slides allows for active learning and consumption of content.
For an overview of Google Slides, check out “ What is Google Slides and How Can It Be Used By Teachers?”
Below is a sample lesson plan that can be used for all grade levels to not only teach students vocabulary, but to have students demonstrate their learning.
Subject: English Language Arts
Topic: Vocabulary
Grade Band: Elementary, Middle, and High School
Learning Objectives:
Tech & Learning Newsletter
Tools and ideas to transform education. Sign up below.
At the end of the lesson, students will be able to:
- Define grade-level vocabulary words
- Appropriately use vocabulary words in a sentence
- Locate an image that illustrates the meaning of a vocabulary word
Start the lesson by using a shared Google Slides presentation to introduce the set of vocabulary words to students. Explain how to pronounce each word, what part of speech it is, and use it in a sentence for students. For younger students, it may be helpful to have more than one visual aid on the screen to help students understand the content more easily.
If you are using video to teach students about vocabulary words, you can quickly embed a YouTube video into a Google Slides presentation. You can either search for videos or, if you already have a video, use that URL to locate the YouTube video. If the video is saved within Google Drive you can easily upload it through that process.
Google Slides Creation
After you have reviewed the vocabulary words with students, provide time for them to create their own vocabulary Google Slides. This serves as an opportunity to spend time with the content, and as Google Slides are housed online in the cloud, students can use their finished product as a study guide.
For each Google Slide, students will have the vocabulary word at the top of the slide. In the body of the slide, they will need to use the following features within the “Insert” function:
Text box : Students can insert a text box to type out the definition of the vocabulary word in their own words. For older students, you can also have students use the text box to write a sentence using the vocabulary word.
Image: Students can insert an image that represents the vocabulary word. Google Slides provides several options for inserting an image, including uploading from a computer, conducting a web search, taking a picture, and using a photo already on Google Drive, which is helpful for younger users who may need to have a preset collection of images to choose from.
Table: For older students, a table can be inserted and they can break down the vocabulary word based on the part of speech, prefix, suffix, root, synonyms and antonyms.
If students finish early, allow them to use some of the formatting tools to decorate their Slides by adding different colors, fonts, and borders. Students can present their Vocabulary Google Slides to both their in-person and virtual classmates using the Google Meet option.
Providing Real-time Support
What makes Google Slides an excellent interactive learning edtech tool is the ability to work in real-time and see students’ progress as they work. While each student is working on their vocabulary slides, you can pop in and offer support by either going to the student in person or virtually conferencing with one who is working remotely.
You may want to upload an audio file to Google Slides so students can be reminded of the assignment expectations. This would be helpful if you are teaching in a dual audience environment and some students are working on the lesson at home. Or, if students in class need more time to complete the assignment at home and need a reminder of the directions. There are also accessibility features within Google Slides that allow for screen reader, braille, and magnifier support.
Extended Learning with Add-Ons
One of the unique features that differentiates Google Slides from other interactive presentation edtech tools is a host of Add-Ons that elevates the learning experience. Even other platforms such as Slido, Nearpod , and Pear Deck have add-on features which allow Google Slides content to work seamlessly within those platforms.
The learning engagement options are truly endless with Google Slides. Whether Google Slides are being used to present or engage with content, it is an exciting and interactive tool that can be used in a variety of learning settings to teach all subjects.
- Top Edtech Lesson Plans
- 4 Best Free and Easy Audio Recording Tools for Google Slides
Dr. Stephanie Smith Budhai is an associate clinical professor in the department of Teaching, Learning, and Curriculum at Drexel University, in Pennsylvania. She holds a Ph.D. in Learning Technologies and K-12 teaching certifications in Technology Education, Instructional Technology and Business, Computers, Information Technology, Special Education and Elementary Education. She is also the 2021 Emerging Leader for the Society for Information Technology and Teacher Education (SITE) and the 2017 ISTE Awardee for Excellence in Teacher Education. Dr. Smith Budhai is a Nearpod, and VoiceThread Certified Educator. Dr. Smith Budhai has more than a decade of online teaching experience, and has published myriad books, articles, and invited editorials surrounding the use of technology and online learning in education. Her publications include:
- Leveraging Digital Tools to Assess Student Learning
- Increasing Engagement in Online Learning: Quick Reference Guide
- Culturally Responsive Teaching Online and In-Person: An Action Planner for Dynamic Equitable Learning Environments
- Teaching the 4Cs with Technology
- Best Practices in Engaging Online Learners through Active and Experiential Learning Strategies
- Nurturing Young Innovators: Cultivating Creativity in the Classroom, Home and Community
Scientists Compared ChatGPT Writing Assessments to Human Assessments. Here’s What They Found
Edtech Show & Tell: July 2024
Slidesgo: How to Use It to Teach
Most Popular
Here's What You Need to Know About Lesson Plans
The best teachers use a simple, seven-step format.
Janelle Cox
- Assessments & Tests
- Becoming A Teacher
- Elementary Education
- Secondary Education
- Special Education
- Homeschooling
- M.S., Education, Buffalo State College
- B.S., Education, Buffalo State College
A lesson plan is a detailed step-by-step guide that outlines the teacher's objectives for what the students will accomplish during the course of the lesson and how they will learn it. Creating a lesson plan involves setting goals , developing activities, and determining the materials that you will use.
All good lesson plans contain specific components or steps, and all essentially derive from the seven-step method developed by Madeline Hunter , a UCLA professor and education author. The Hunter Method , as it came to be called, includes these elements: objective/purpose, anticipatory set, input modeling/modeled practice, check for understanding, guided practice, independent practice, and closure.
Regardless of the grade level you teach, Hunter's model has been adopted and used in various forms for decades by teachers across the nation and at every grade level. Follow the steps in this method, and you'll have a classic lesson plan that will be effective at any grade level. It doesn't have to be a rigid formula; consider it a general guideline that will help any teacher cover the necessary parts of a successful lesson.
Objective/Purpose
Students learn best when they know what they are expected learn and why, says the U.S. Department of Education . The agency uses an eight-step version of Hunter's lesson plan, and its detailed explanations are well worth reading. The agency notes:
"The purpose or objective of the lesson includes why students need to learn the objective, what they will be able to do once they have met the criterion, (and) how they will demonstrate learning....The formula for the behavioral objective is: The learner will do what + with what + how well."
For example, a high school history lesson might focus on first-century Rome , so the teacher would explain to students that they are expected to learn the salient facts about the empire's government, its population, daily life, and culture.
Anticipatory Set
The anticipatory set involves the teacher working to get students excited about the upcoming lesson. For that reason, some lesson plan formats actually put this step first. Creating an anticipatory set "means doing something that creates a sense of anticipation and expectancy in the students," says Leslie Owen Wilson, Ed.D. in " The Second Principle ." This can include an activity, a game, a focused discussion, viewing a film or video clip, a field trip, or reflective exercise.
For example, for a second-grade lesson on animals, the class might take a field trip to a local zoo or watch a nature video. By contrast, in a high school class getting ready to study William Shakespeare 's play, " Romeo and Juliet ," students might write a short, reflective essay on a love they lost, such as a former boyfriend or girlfriend.
Input Modeling/Modeled Practice
This step—sometimes called direct instruction — takes place when the educator actually teaches the lesson. In a high school algebra class, for example, you might write an appropriate math problem on the board, and then show how to solve the problem in a relaxed, leisurely pace. If it's a first-grade lesson on important sight words to know, you might write the words on the board and explain what each word means. This step should be very visual, as the DOE explains:
"It is important for the students to 'see' what they are learning. It helps them when the teacher demonstrates what is to be learned."
Modeled practice, which some lesson plan templates list as a separate step, involves walking the students through a math problem or two as a class. You might write a problem on the board and then call on students to help you solve it, as they also write the problem, the steps to solve it, and then the answer. Similarly, you might have first-grade students copy the sight words as you spell each out verbally as a class.
Check for Understanding
You need to make sure students understand what you have taught. One easy way to do this is to ask questions. If you're teaching a lesson on simple geometry to seventh-graders, have students practice with the information you just taught, says the ASCD (formerly the Association for Supervision and Curriculum Development) . And, be sure to guide the learning. If students don't seem to grasp the concepts you've just taught, stop and review. For the seventh-graders learning geometry, you may need to repeat the previous step by showing more geometry problems—and how to solve them—on the board.
Guided and Independent Practice
If you're feeling like the lesson plan involves a lot of guidance, you're right. At the heart, that's what teachers do. Guided practice provides each student a chance to demonstrate her grasp of new learning by working through an activity or exercise under the teacher’s direct supervision. During this step, you might move around the room to determine your students' level of mastery and provide individual help as needed. You may need to pause to show students how to successfully work through problems if they are still struggling.
Independent practice , by contrast, can include homework or seatwork assignments, which you give to the students to complete successfully without the need for supervision or intervention.
In this important step, the teacher wraps things up. Think of this phase as a concluding section in an essay. Just as a writer wouldn't leave her readers dangling without a conclusion, so too, the teacher should review all key points of the lesson. Go over any areas where students might still be struggling. And, always, asked focused questions: If students can answer specific questions about the lesson, they likely have learned the material. If not, you may need to revisit the lesson tomorrow.
Tips and Hints
Always gather all needed supplies ahead of time, and have them ready and available at the front of the room. If you'll be conducting a high school math lesson and all students will need are their textbooks, lined paper, and calculators, that makes your job easier. Do have extra pencils, textbooks, calculators, and paper available, though, in case any students have forgotten these items.
If you're conducting a science experiment lesson, make sure you have all of the ingredients needed so that all students can complete the experiment. You don't want to give a science lesson on creating a volcano and find out once students are gathered and ready that you've forgotten a key ingredient like baking soda.
To ease your job in creating a lesson plan, use a template . The basic lesson plan format has been around for decades, so there's no need to start from scratch. Once you figure out what kind of lesson plan you will be writing, then you can determine the best way to use the format to fit your needs.
- 10 Ways to Keep Your Class Interesting
- Questions for Each Level of Bloom's Taxonomy
- Writing a Lesson Plan: Independent Practice
- How to Write a Lesson Plan
- Components of a Well-Written Lesson Plan
- Writing a Lesson Plan: Closure and Context
- Writing a Lesson Plan: Direct Instruction
- Writing a Lesson Plan: Guided Practice
- Lesson Plan Step #8 - Assessment and Follow-Up
- Writing a Lesson Plan: Anticipatory Sets
- Easter Acrostic Poem Lesson Plan
- Write Lesson Plans
- Preparing a Dynamic Lesson Plan
- Writing a Lesson Plan: Objectives and Goals
- Mini-Lesson Plans: Template for Writers Workshop
- Fantasy Christmas Shopping Lesson Plan

What is ‘Presentation, Practice, Production’ (PPP)?
And how can i best use it in my classroom.

Presentation, practice, production (PPP) is a lesson structure, a way to order activities in your lessons.
Although quite old and heavily criticised over the years, PPP is probably the most commonly used lesson structure in teaching English to foreign learners today. It’s also still widely taught to new teachers and seen on initial teacher training courses like the CELTA and CertTESOL.
Most course books that you’re likely to use will structure their chapters in ways similar or the same as PPP, meaning that you’ll get a lot of exposure to this method.
As the name suggests, there are three stages to this lesson structure, which we’ll look at now.
Thanks for reading Barefoot TEFL Teacher! Subscribe for free to receive new posts.
The ‘presentation’ stage
This is where the language is introduced, or ‘presented’ to the learners, usually by introducing a context or situation. For example, you could:
Tell or act out a short story or anecdote ( “I woke up this morning with a nasty cold… AHHH-CHOOO! I went to the doctor and…”)
Play a short audio clip
Show a clip from a movie or TV show.
Show objects you’ve brought in (e.g. newspaper cuttings, plane tickets, hobby materials)
The aim is to ensure students understand the context and get them thinking about it. You could elicit ideas or suggestions from students, get them to talk to each other about what they know or think about the situation, etc. This also helps them start to remember the language and vocabulary they already know about the topic (or ‘activate the schemata’, if you want the fancy term for it).
The ‘practice’ stage
The ‘practice’ stage is when students use the language in a controlled way. This stage is sometimes divided into two — a controlled practice and a freer practice. Again, among many things, you could get students to:
Drill sentences or sounds, chorally or individually.
Substitution drill in pairs
Sentence matching activities
Gap-fill exercises
Pair work asking and answering questions
The aim of this stage is accuracy . Error correction is important in this stage, so monitor the students closely and take time to correct errors immediately. A delayed error correction section after the activity would be useful for target language errors that seem to be common.
The ‘production’ stage
The ‘production’ stage is where the language is used more openly. Things like:
Communication tasks
Collaborative tasks
Discussion activities
The focus of this stage is using the language as fluently and naturally as possible , as students would do outside of the classroom.
Theory behind Presentation, Practice, Production
This is where PPP gets criticised. It started in the 1960s, and language learning theory has developed considerably since then. Academics who study second language acquisition get annoyed at how PPP doesn’t tick any of the boxes for how we’re supposed to learn a language and yet is still so widespread.
Some learning assumptions behind presentation, practice, production are:
Students should be told the grammar rules and then practice them (a deductive approach).
Language learning is a skill like any other and should be practised as such.
There should be a high level of teacher control, slowly handed over to learners as the lesson progresses.
Language is a series of items that can be learned in sequence.
The target language should be practised by removing unnecessary language to help focus.
All of these have been shown that this isn’t how we best learn languages (in fact, the opposite is largely true!).
However, it isn’t all bad. Here’s my opinion on the advantages and disadvantages of PPP:
It’s easy to learn for new teachers.
It’s very flexible.
It’s easy to plan for and has a logical progression.
It works for most types of classes, including larger classes.
Most course books use this or a similar method to structure their lessons and chapters.
Disadvantages
Research shows that it may not be the best way to teach/learn a language.
Weaker learners may overuse the target language from the practice session, so it sounds unnatural.
Learners may not know how to use the target language in different contexts.
It can be boring if used repeatedly for higher-level students.
Thoughts on Presentation, Practice, Production
Academics are often far removed from the classroom and the real world, studying the individual phenomenon in isolation.
I’ve often seen a light bulb moment for students whilst teaching PPP (although one could argue that it’s not strict PPP, and it’d be hard to isolate the teaching method from other variables). Teaching over a period of time with this method, you do see students improve. Consider also that it’s not done in isolation — you should be getting your learners to interact in English naturally and read extensively outside of class, for starters.
Presentation, practice, production works. Maybe not as well as something like task-based learning (TBL), but TBL takes longer to plan and implement, which becomes very difficult when your teaching hours are high.
Sure, so it might not be theoretically perfect, but it does work.
How to adapt the PPP method
Also, I believe it has evolved from the ‘traditional’ PPP approach described above. Here are some ways you can adapt the classic PPP structure:
Spend more time in the presentation stage eliciting.
Turn the deductive aspect of explicit grammar instruction into an inductive aspect (so learners have to figure out the patterns themselves).
Add collaborative tasks during the practice stage, which learners must use the target language to complete successfully.
Include meta-learning strategies so students can learn how to learn.
Include more incidental language throughout the class so learners hear language in a more natural context.
Change the final stage into a task, such as you’d find in task-based learning .
These changes turn PPP into something else, a blended approach that addresses many of the criticisms of PPP.
Other structures have sought to improve upon the model of PPP. Variants include ESA (engage, study, activate) and CAP (context, analysis, practice)
However, the simplicity of PPP and its notoriety have kept it the most widely used model. I doubt it’s going away any time soon.
If you liked this article, you’ll love my books:

📝 Lesson Planning for Language Teachers - Plan better, faster, and stress-free (4.5 ⭐ , 175 ratings).
👩🎓 Essential Classroom Management - Develop calm students and a classroom full of learning (4.5 ⭐, 33 ratings).
🏰 Storytelling for Language Teachers - Use the power of storytelling to transform your lessons (4.5 ⭐, 11 ratings).
🤖 ChatGPT for Language Teachers - A collection of AI prompts and techniques to work better, faster (4.5 ⭐, 10 ratings).
💭 Reflective Teaching Practice Journal - Improve your teaching in five minutes daily (4.5 ⭐, 16 ratings).
📄 PDF versions available here.
| Liked by David Weller
|
Ready for more?

- Search Close search
- Toggle menu Close menu
- Capital Funding
- Crisis and Issues Management
- Policy and Compliance
- Strategic Services
- Technology Services
- Workplace Management
The Association of Independent Schools of NSW Ltd
Level 12 / 99 York Street, Sydney, NSW 2000
T: (02) 9299 2845
F: (02) 9290 2274
- Curriculum Reform
- Development and Accreditation
- Funded Programs and Projects
- Research and Data in Schools
- Supporting Students and Staff
- Teaching and Learning
- Courses & Events
- Resource Centre
- Login / Sign-up
- Search Close search bar
What are you looking for?

- Teachers and Staff
- Literacy and Numeracy
- Foundations of Effective Instruction
- Principles of Instruction
Teacher Presentation
principles of instruction - teacher presentation.
Overview
The Teacher Presentation, or ‘ I do’ , component of the lesson is when the concept or skill that is being taught is explained , modelled and demonstrated using concise language. The new material is presented in small steps to reduce the cognitive load for students. It begins with a clear statement of the learning intention and success criteria for the lesson. Incorporating a carefully selected range of examples and non-examples in the presentation also helps to avoid possible misconceptions of when and when not to apply the skill, strategy, concept, or rule. To develop students’ understanding of the content, clear definitions are provided.
Classroom Illustration
A learning intention outlines what students should know, understand or be able to do by the end of the lesson. It is included at the beginning of the presentation and referred to in the closing of the lesson. Stating a success criterion assists both the teacher and student to know what is required to achieve the learning intention.
The students are engaged through the effective use of strategies such as repeat and read with me. A think-aloud strategy is also an effective way to model the new skills. The teacher explains the steps by saying and making obvious the thinking required to complete the task. Demonstrations of new content are also evident. The teacher uses prompts such as visual diagrams, objects or gestures to make the new concept clear for the students.
Illustration:
Literacy Teacher Presentation
Numeracy Teacher Presentation
Learning intention: We are learning to spell the /e/ sound with the digraph ‘ea’.
Presentation
- Write these words on the board: head, bread, breath, ready, weather. Read the words.
- Then have students read the words with you.
- Identify the vowel sound in these words /e/.
- How is this sound spelled in these words? ‘ea’.
- Underline the ‘ea’ and point out it is always in the middle of the word.
- Group words with similar patterns after the ‘ea’ (e.g. ‘ea’ followed by ‘d’, ‘ea’ followed by ‘th’).
- Select words appropriate to students’ abilities.
Personalised Learning
A barrier can be an obstacle or issue that may prevent students from successfully accessing and participating in the instructional practice. When students with additional needs are engaging with the presentation of the lesson, there may be some potential barriers that need to be considered. These may include the mode of presenting new vocabulary, information and concepts, including verbal explanations and the frequency and repetition of the presentation.
Some potential adjustments may include:
- Providing visual supports and scaffolds to demonstrate the lesson intention and success criteria (may include display of a completed work sample).
- Providing additional steps (verbally or visually) using task analysis and present to the student to assist with managing the lesson content.
- Providing additional modelling and feedback to assist with processing and comprehension. This could be facilitated by an additional support person in the classroom.
- Providing options for alternate modes of responding when using the strategies of repeat with me and/or read with me for example, the student responds using a communication device such as a voice output or a communication aid.
- Adjusting the complexity of the concept or skill being taught to appropriately address identified learning needs.
- Increasing wait time to allow processing of explanations and definitions of new concepts.
- Providing written and visual explanations for concepts that the student previews in advance and/or can refer to during the lesson presentation.
- Using non-verbal communication to enhance comprehension (gestures, natural signs, key word signing) of key concepts.
Resources

PDF poster explaining what learning intentions and success criteria are and how to construct them.
Access resource

Blog post describing how to teach new information, including the use of examples and non-examples.

This clip demonstrates a teacher using a range of strategies to teach the new content in the presentation component of an explicitly taught lesson.

Explore All Principles of Instruction
Daily Review
Guided Practice
Independent Practice

Checking for Understanding

Lesson Closure
Topic: Presentation Skills

As you can see in the slide (giving presentations)
Step into the world of presentations with this handy lesson! Students explore vocabulary for structuring presentations, read the text of a presentation and watch a video on how to communicate ideas clearly.

Presentation: putting skills into action
With this lesson plan, students practise giving a presentation in English by doing a lot of different speaking activities. The lesson is the third of the three-part series of lessons about delivering presentations.

Moving through your presentation
With this lesson plan, students learn plenty of useful phrases for presentations in English. They also prepare presentation excerpts, and learn how to start a presentation. The lesson is the second of the three-part series of lessons about delivering presentations.

How to nail that presentation
In this lesson about business presentations in English, students discuss presentation structures in depth, watch a video with tips on giving presentations, and learn useful words and phrases related to the topic. The lesson is the first of the three-part series of lessons about delivering presentations.

The city of the future is here
With this lesson plan based on a video about Toyota’s city of the future students learn some useful language for presentations and then practise their presentation skills.

The chair that conquered the world
This lesson plan about the chair that conquered the world includes a variety of tasks for students to learn new vocabulary related to describing furniture design and practise their presentation skills.

How do you like your milk?
In this lesson, students will learn advanced cooking verbs, discuss different types of milk and do an English class project.

Apple’s legendary keynotes
The objective of this lesson plan is to teach students some adjectives for describing products and show them a video analysing Apple’s legendary keynotes.
Subscribe to get premium content
Subscribe to get access to professional, ready-to-use lesson plans in both digital and printable formats . Discover a variety of lesson types: Standard Lessons, Speaking Classes, Critical Reading Club worksheets and Flipped Classroom lesson plans.
Username or Email Address
Remember Me
- International
- Education Jobs
- Schools directory
- Resources Education Jobs Schools directory News Search

Introduction to Python: Lesson 3 Key Stage 4/5
Subject: Computing
Age range: 14-16
Resource type: Lesson (complete)
Last updated
5 July 2024
- Share through email
- Share through twitter
- Share through linkedin
- Share through facebook
- Share through pinterest
An Introduction to Python Lesson Three. This is the 3rd lesson in a series of 6 one-hour lessons, with full class presentation, lesson plan, and with fully tested codes for any teacher who has little experience of coding. Easy to follow programming, with all codes and tailor-made videos, to make teaching effortless.
This lesson covers:
- Using strings and loops
- Using slicing techniques
- Working with arrays
- Working with Boolean values
This Introduction to Python lesson is created to enable you to jump straight in with absolutely no specialist background whatsoever.
This lesson has been created to be 1 hour in length. However, this can be broken down due to the nature of the presentation and is fully editable for teacher use.
This is suitable for age ranges between Year 9 to 12 and for home schooling, but can be used for younger children, where applicable.
This package includes:
- Extensive presentation
- Full lesson plan
- Full and extensive codes (no need to code yourself)
- Practice session at the end of the lesson, this can be used for homework
Tes paid licence How can I reuse this?
Your rating is required to reflect your happiness.
It's good to leave some feedback.
Something went wrong, please try again later.
This resource hasn't been reviewed yet
To ensure quality for our reviews, only customers who have purchased this resource can review it
Report this resource to let us know if it violates our terms and conditions. Our customer service team will review your report and will be in touch.
Not quite what you were looking for? Search by keyword to find the right resource:
COMMENTS
A PowerPoint presentation is a great way to showcase all the contents of the lesson plan, however, the trick is to decide how you want to structure it. Lesson Plan Design. By this point, you've structured a lesson plan template that can go through any test.
Lesson plan presentation offers students the first interaction with the material they will learn. Take your time, appreciate the process, and create an attractive and comprehensive lesson plan that will encourage your students to have deep and thoughtful learning experiences. Even better, all of this can be made easier with smart whiteboard ...
The competencies are as follows: 1. Content knowledge. The presenter must display a deep understanding of what they are delivering in order to share the "what, why, how, and how-to" of the topic. 2. Clarity. The presenter must be clear with precise, academic language.
4. Reduce Noise. Many teachers like to add banners, headers, footers, page numbers and more noise to their slides. Unless the information needs to be on every slide for a vital reason (which is rare), you should remove it. All these redundant elements do is create distractions from the content of your slides.
For teachers, a well-planned lesson presentation helps the teacher maintain the attention and interest of their students, which is crucial for effective learning. Additionally, being organized and prepared will help teachers convey their ideas more effectively and it will help the teacher to feel more confident, which also impacts their ...
Presentation skills are the abilities and qualities necessary for creating and delivering a compelling presentation that effectively communicates information and ideas. They encompass what you say, how you structure it, and the materials you include to support what you say, such as slides, videos, or images. You'll make presentations at various ...
A lesson plan is the instructor's road map of what students need to learn and how it will be done effectively during the class time. Before you plan your lesson, you will first need to identify the learning objectives for the class meeting. ... but also follow your presentation and understand the rationale behind in-class activities. Having a ...
A good lesson plan that would work well for both teachers and students has to include the following. 1. Details of the lesson. Indicate what the lesson is about and the class you're going to teach. The details should include the unit, lesson number, class period, and the topic to be handled during the lesson. 2.
See also 15 Presentation Tools for Teachers. 5 Teacher Tips For Better Presentations In The Classroom. 1. Establish one clear idea. Conventional wisdom of the past used to be about putting as much information and content into a presentation as possible.
The definition or meaning of a formal presentation is a presentation that one has had time to prepare for. One has generally been asked in advance to give the presentation, and one has practiced ...
Lesson plan procedures are the sequence or step-by-step guidelines detailing how a teacher plans to deliver a lesson to students. This includes the activities, methods, materials, and timing necessary to effectively facilitate learning. Typically, there are three stages of a lesson plan that make up the lesson plan procedure.
Presentation. A presentation delivers content through oral, audio and visual channels allowing teacher-learner interaction and making the learning process more attractive. Through presentations, teachers can clearly introduce difficult concepts by illustrating the key principles and by engaging the audience in active discussions.
However, lesson presentation is an equally important skill for teachers too. Knowing how to create and present a lesson is the key to successful teaching. Lesson Presentation Basics. Lesson preparation and presentation are two different but equally important skills. Lesson preparation is the process of creating the materials and organizing the ...
Teacher Presentation TP: Overhead Projector. Copy the digital teacher presentation pages (pdfs) to transparencies and present the lesson using an overhead projector. This can work with 1 student or with multiple students. Print the Teacher Presentation pdfs on transparencies with or without highlighting.
Before you conduct a presentation, consider all learners and adapt your lesson presentation to their needs. While an auditory learner is okay with just listening to a lecture, a visual learner needs pictures, graphs, or a video clip. Kinesthetic learners, however, require movement in the form of responses to questions or hands-on activities. ...
Slow down. Let your stories be told, and let the ideas flow. Don't rush through the presentation. Consciously slow yourself down. Take pauses for emphasis. Pauses and eye contact can become a useful part of your lecture. Now that we have covered the rules of presenting think about the content of the presentation.
Format: Available in both PowerPoint and Google Slides formats. Pricing: Free to download. . 8. Lesson Roadmap Presentation Template. Lesson Roadmap Presentation Template is great for outlining the journey of a lesson or unit, helping educators plan and communicate the path of learning effectively.
A Google Slides lesson plan designed to help educators implement the digital tool into their instruction. (Image credit: Google) Google Slides is a robust, interactive, and flexible presentation and learning resource tool that can be used to bring content to life in all academic subject areas. While Google Slides is known primarily for being an ...
A lesson plan is a detailed step-by-step guide that outlines the teacher's objectives for what the students will accomplish during the course of the lesson and how they will learn it. Creating a lesson plan involves setting goals, developing activities, and determining the materials that you will use. All good lesson plans contain specific ...
Presentation, practice, production (PPP) is a lesson structure, a way to order activities in your lessons. Although quite old and heavily criticised over the years, PPP is probably the most commonly used lesson structure in teaching English to foreign learners today.
To present a lesson or demonstrate a skill. Clearly describes the content or how to perform or execute the skill. 3: Narrative. To entertain, inform, or share thoughts and reflections. Describes information in an entertaining way. 4: Information Report. To describe what is known about a certain topic.
The Teacher Presentation, or 'I do', component of the lesson is when the concept or skill that is being taught is explained, modelled and demonstrated using concise language. The new material is presented in small steps to reduce the cognitive load for students. It begins with a clear statement of the learning intention and success criteria for the lesson.
1. Know your objective. At the beginning of every lesson, write your lesson aim at the top. Something like, "Students will be able to improve reading or writing skills. 2. Write your overview. Use ...
In this lesson about business presentations in English, students discuss presentation structures in depth, watch a video with tips on giving presentations, and learn useful words and phrases related to the topic. The lesson is the first of the three-part series of lessons about delivering presentations.
An Introduction to Python Lesson Three. This is the 3rd lesson in a series of 6 one-hour lessons, with full class presentation, lesson plan, and with fully tested codes for any teacher who has little experience of coding. Easy to follow programming, with all codes and tailor-made videos, to make teaching effortless. This lesson covers: