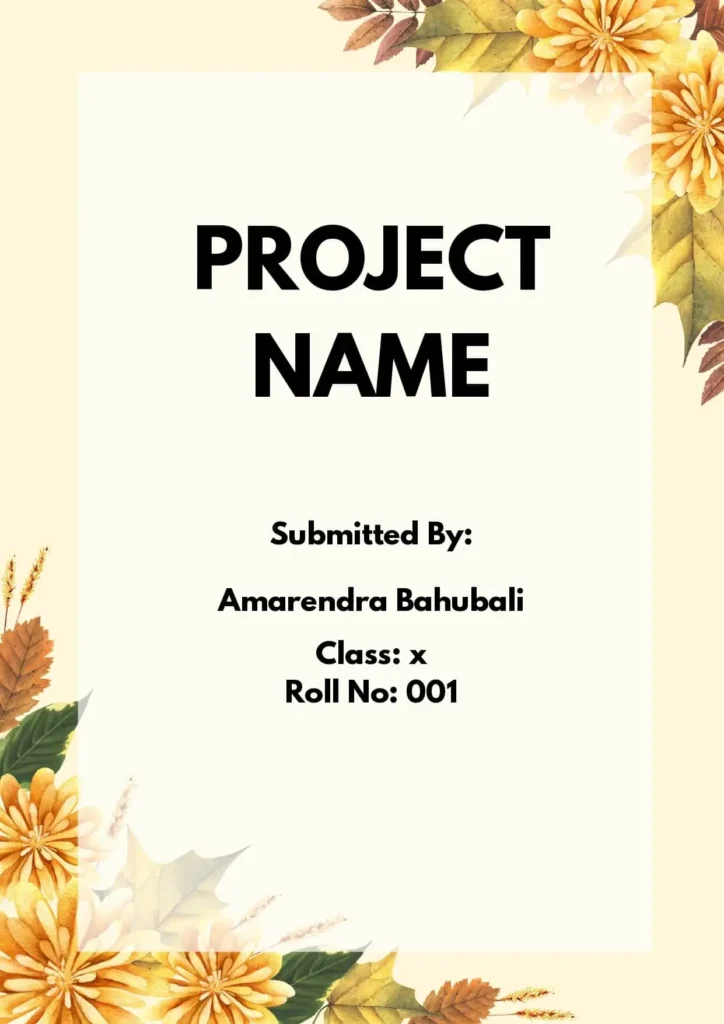
Free Front Page Design

Free Front Page Designs For Assignments And Projects [Download MS Word Templates]
A good front page design is important in a project because it makes a strong first impression. A well-designed cover page or front page can create a positive initial impression on the reader and set the tone for the rest of the project. It Conveys professionalism. A professional looking cover page demonstrates to the reader that the project has been completed with care and attention to detail.
The cover page should clearly communicate the title, author(s), and date of the project, as well as any other important information that the reader needs to know.
A well-designed cover page should reflect the content and tone of the project, helping to build a connection between the reader and the project’s contents.
In short, the cover page is a crucial component of a project and can have a significant impact on how the project is perceived and received by the reader.
Front Page Design Template Samples
Benefits of using a good front page design on your project
- Establish a visual identity: A consistent and recognizable design on the cover page can help to establish a visual identity for the project and make it easier for the reader to identify it in the future.
- Differentiate the project: A unique and eye-catching cover page design can help to distinguish the project from others and make it stand out.
- Create a sense of unity: A well-designed cover page can provide a sense of unity to the entire project and reinforce the idea that all of the elements of the project are part of a cohesive whole.
- Provide context: The cover page design can provide context and information about the purpose, audience, and goals of the project, helping the reader to better understand and engage with the content.
- Improving organization: A well-designed cover page can help to organize the contents of the project and make it easier for the reader to navigate.
- Facilitating access: A clear and well-designed cover page can make it easier for the reader to access the contents of the project, and quickly find the information they are looking for.
- Enhancing accessibility: For projects that are shared electronically, a well-designed cover page can enhance accessibility for users with disabilities, such as those using screen readers.
Overall, a good cover page design is not just a cosmetic detail, but an important aspect of the project that can influence the reader’s perception and understanding of the content.
A well-designed front page can set the tone for the entire project and make it stand out from the rest. In this blog, we’ll take a look at some sample front page designs, best practices and tips to help you create a stunning front page design for your next project.
Front Page Designs Of Assignment
Front page designs for assignments [free ms word template download].

Creative Front Page Design For Assignment [Free MS Word Template Download]

MORE ASSIGNMENT TEMPLATES
Tips for Stunning Front Page Design Of Assignment
While it’s important to keep the front page design simple, that doesn’t mean it can’t be creative. You can still add a touch of personality to your design while making sure it’s organized and professional.
Here are a few ideas to get you started:
- Use a unique font or color scheme
- Incorporate illustrations or graphics related to your project topic
- Experiment with different layout options
Science Project Front Page Design [Free MS Word Template Download]
When it comes to designing the front page for a science project, the design should reflect the topic and make the project stand out. You can include images or graphics related to the topic, and use a font that is easy to read.
Front Page Design For Physics Project

Front Page Design For Chemistry Project

Front Page Design Tips For Chemistry Project
To design a cover page for a Chemistry project, you could try the following design concept:
- Use a light blue or green gradient to represent the chemical elements in a test tube.
- Use a bold sans-serif font, such as Arial or Verdana, to write the title of the project in white or yellow. Make the title the focal point of the page.
- Use a smaller sans-serif font, also in white or yellow, to write a brief description of the project, such as “An investigation into the properties of chemical reactions.”
- Use a smaller sans-serif font in black to write your name, class, and date of submission, positioned in the bottom right or left corner of the page.
- Add the logo of your school or university in the top right or left corner of the page.
- Include a relevant image or illustration of a chemical reaction, periodic table, or other scientific concept to reinforce the subject of Chemistry.
- Consider adding a simple white border around the entire page to give it structure and definition.
- This design concept incorporates elements of the subject of Chemistry, while also keeping it simple, clean, and professional.
Front Page Design For Biology Project

Front Page Design Tips For Biology Project
For a biology project cover page, you can consider incorporating the following elements:
- Title: A descriptive and concise title that accurately reflects the content of the project.
- Author(s): The name(s) of the person(s) who completed the project, usually in a prominent position on the page.
- Date: The date the project was completed, which is typically included in the header or footer of the page.
- School or organization: The name of the school, institution, or organization that the project was completed for, if applicable.
- Relevant images or graphics: Images or graphics related to the biology topic being studied, such as diagrams, charts, or photos of specimens.
- Project description: A brief summary or description of the project, including the purpose, methodology, and key findings.
- Aesthetics: A clean and professional design with a color palette that reflects the biology topic being studied. For example, green and blue might be appropriate for an aquatic biology project, while warm oranges and yellows might be appropriate for a botany project.
It’s important to note that the specific requirements for a biology project cover page can vary based on the guidelines provided by the teacher or institution. However, these elements can serve as a starting point for creating a visually appealing and effective design for a biology project cover page.
Border Front Page Design For Project [Free MS Word Template Download]
Adding a border to your front page design can help make it look more polished and professional. You can choose a border that reflects the topic of your project, or use a simple border in a neutral color.

Front Page Design For English Project [Free MS Word Template Download]

Front Page Design Tips For English Project
To design a cover page for an English project, you can consider the following steps:
- Choose a theme that aligns with the project topic and make it visually appealing.
- Add a title that clearly represents the project, it should be big and legible.
- Add your name, class, and date in a clear and concise manner.
- If required, include the name of your instructor and school/university.
- Add any relevant graphics, images, or logos that reinforce the theme of your project.
- Make sure to use a font that is easy to read and aesthetically pleasing.
- Consider adding a border or design element that ties everything together.
Note: The design should be professional and align with any guidelines provided by the instructor.
School Project Front Page Design

Floral Front Page Design For School Project

Whether or not it’s a good idea to use a floral front page design for a school project depends on the context of the project and the guidelines provided by the teacher or instructor. If the project is related to a subject such as art, design, or gardening, then a floral design may be appropriate. However, if the project is focused on a more technical or scientific subject, a more straightforward design may be more suitable. It’s important to consider the purpose and audience of the project and to ensure that the design effectively communicates the information you want to convey.
Cute Front Page Design For Project

Simple Front Page Designs For Project

Front Page Designs For Math Project

Front Page Designs For Music Project

Handmade Front Page Design For Project
Tips to make your handmade front page designs more appealing .
A handmade cover page design can add a personal touch to your assignment and make it stand out. Here are some elements you could consider incorporating into your design:
- Hand-drawn illustrations or graphics: Use hand-drawn illustrations or graphics that are relevant to the subject matter of the assignment.
- Handwritten typography: Incorporate hand-written typography into your design to add a personal touch. Consider using a calligraphy pen or brush to create unique, hand-lettered text.
- Collage: Create a collage using different materials, such as paper, fabric, or photographs, to create a unique and visually interesting cover page design.
- Watercolor: Use watercolor to create a painted cover page design. Consider using colors that are consistent with the subject matter of the assignment.
By incorporating these elements, you can create a handmade cover page design that is both personal and professional. Keep in mind that a handmade design may take longer to create than a digital design, so be sure to allow enough time to complete it.
What are the best tools to create a beautiful Front Page Design for a project ?
There are many tools you can use to create a beautiful front page design for a project, including:
| It is a widely used word processing software developed by Microsoft. It provides users with tools to create and edit documents, including text, images, tables, and more. | |
| A professional-level desktop publishing software that is perfect for creating complex designs with multiple pages. | |
| : | An easy-to-use graphic design tool with a variety of templates and design elements for creating a front page design. |
| A desktop publishing software that comes as part of the Microsoft Office suite and is suitable for creating basic designs. | |
| : | A free and open-source image editing software that can be used for creating and editing graphics and images. |
| : | A cloud-based interface design tool that is suitable for creating front page designs and offers collaboration features for teams. |
| A vector graphics editor that is commonly used for designing user interfaces and user experiences. | |
| A vector graphics editor that is similar to Adobe Illustrator and provides a wide range of tools for creating graphics and designs. |
Here’s How You Can Create a Beautiful Front Page Design in MS Word:
- Choose a page size and orientation that suits your design. Go to Page Layout > Page Setup.
- Select a theme or color scheme. Go to Design > Colors.
- Add a header or footer for branding. Go to Insert > Header & Footer.
- Insert a title text box and customize its font, size, and color. Go to Insert > Text Box.
- Add an image to the background. Go to Insert > Picture.
- Add other design elements such as shapes, lines, or text boxes to create visual interest. Go to Insert > Shapes.
- Align and arrange elements as desired. Go to Home > Align.
- Apply styles to text, such as bold or italic, to make the page look more polished. Go to Home > Styles.
- Preview the page to check its appearance. Go to View > Print Layout.
- Save the document as a template to use as a starting point for future projects. Go to File > Save As > Word Template.
A good looking front page design for a school or assignment project or a science project is important because it reflects the attention and effort put into the project, and can impact the grade or evaluation received. A well-designed front page can also effectively convey the topic and purpose of the project, making it easier for the teacher or evaluator to understand and appreciate the content. A visually appealing and organized design can also make the project stand out, showing initiative and creativity, and can help the student effectively communicate their ideas and findings. In science projects, a clear and effective front page design can also help emphasize the significance and potential impact of the research. Ultimately, a good looking front page design can enhance the overall presentation and impact of the project.
What is the downloaded file format?
.doc (MS Word file extension)
How to edit the downloaded template?
Open it in MS Word and make changes according to your need.
What is the size of the template?
It is A4 size template.
Leave a Comment Cancel reply
Save my name, email, and website in this browser for the next time I comment.
- Columbia University in the City of New York
- Office of Teaching, Learning, and Innovation
- University Policies
- Columbia Online
- Academic Calendar
- Resources and Technology
- Instructional Technologies
- Teaching in All Modalities
Designing Assignments for Learning
The rapid shift to remote teaching and learning meant that many instructors reimagined their assessment practices. Whether adapting existing assignments or creatively designing new opportunities for their students to learn, instructors focused on helping students make meaning and demonstrate their learning outside of the traditional, face-to-face classroom setting. This resource distills the elements of assignment design that are important to carry forward as we continue to seek better ways of assessing learning and build on our innovative assignment designs.
On this page:
Rethinking traditional tests, quizzes, and exams.
- Examples from the Columbia University Classroom
- Tips for Designing Assignments for Learning
Reflect On Your Assignment Design
Connect with the ctl.
- Resources and References

Cite this resource: Columbia Center for Teaching and Learning (2021). Designing Assignments for Learning. Columbia University. Retrieved [today’s date] from https://ctl.columbia.edu/resources-and-technology/teaching-with-technology/teaching-online/designing-assignments/
Traditional assessments tend to reveal whether students can recognize, recall, or replicate what was learned out of context, and tend to focus on students providing correct responses (Wiggins, 1990). In contrast, authentic assignments, which are course assessments, engage students in higher order thinking, as they grapple with real or simulated challenges that help them prepare for their professional lives, and draw on the course knowledge learned and the skills acquired to create justifiable answers, performances or products (Wiggins, 1990). An authentic assessment provides opportunities for students to practice, consult resources, learn from feedback, and refine their performances and products accordingly (Wiggins 1990, 1998, 2014).
Authentic assignments ask students to “do” the subject with an audience in mind and apply their learning in a new situation. Examples of authentic assignments include asking students to:
- Write for a real audience (e.g., a memo, a policy brief, letter to the editor, a grant proposal, reports, building a website) and/or publication;
- Solve problem sets that have real world application;
- Design projects that address a real world problem;
- Engage in a community-partnered research project;
- Create an exhibit, performance, or conference presentation ;
- Compile and reflect on their work through a portfolio/e-portfolio.
Noteworthy elements of authentic designs are that instructors scaffold the assignment, and play an active role in preparing students for the tasks assigned, while students are intentionally asked to reflect on the process and product of their work thus building their metacognitive skills (Herrington and Oliver, 2000; Ashford-Rowe, Herrington and Brown, 2013; Frey, Schmitt, and Allen, 2012).
It’s worth noting here that authentic assessments can initially be time consuming to design, implement, and grade. They are critiqued for being challenging to use across course contexts and for grading reliability issues (Maclellan, 2004). Despite these challenges, authentic assessments are recognized as beneficial to student learning (Svinicki, 2004) as they are learner-centered (Weimer, 2013), promote academic integrity (McLaughlin, L. and Ricevuto, 2021; Sotiriadou et al., 2019; Schroeder, 2021) and motivate students to learn (Ambrose et al., 2010). The Columbia Center for Teaching and Learning is always available to consult with faculty who are considering authentic assessment designs and to discuss challenges and affordances.
Examples from the Columbia University Classroom
Columbia instructors have experimented with alternative ways of assessing student learning from oral exams to technology-enhanced assignments. Below are a few examples of authentic assignments in various teaching contexts across Columbia University.
- E-portfolios: Statia Cook shares her experiences with an ePorfolio assignment in her co-taught Frontiers of Science course (a submission to the Voices of Hybrid and Online Teaching and Learning initiative); CUIMC use of ePortfolios ;
- Case studies: Columbia instructors have engaged their students in authentic ways through case studies drawing on the Case Consortium at Columbia University. Read and watch a faculty spotlight to learn how Professor Mary Ann Price uses the case method to place pre-med students in real-life scenarios;
- Simulations: students at CUIMC engage in simulations to develop their professional skills in The Mary & Michael Jaharis Simulation Center in the Vagelos College of Physicians and Surgeons and the Helene Fuld Health Trust Simulation Center in the Columbia School of Nursing;
- Experiential learning: instructors have drawn on New York City as a learning laboratory such as Barnard’s NYC as Lab webpage which highlights courses that engage students in NYC;
- Design projects that address real world problems: Yevgeniy Yesilevskiy on the Engineering design projects completed using lab kits during remote learning. Watch Dr. Yesilevskiy talk about his teaching and read the Columbia News article .
- Writing assignments: Lia Marshall and her teaching associate Aparna Balasundaram reflect on their “non-disposable or renewable assignments” to prepare social work students for their professional lives as they write for a real audience; and Hannah Weaver spoke about a sandbox assignment used in her Core Literature Humanities course at the 2021 Celebration of Teaching and Learning Symposium . Watch Dr. Weaver share her experiences.
Tips for Designing Assignments for Learning
While designing an effective authentic assignment may seem like a daunting task, the following tips can be used as a starting point. See the Resources section for frameworks and tools that may be useful in this effort.
Align the assignment with your course learning objectives
Identify the kind of thinking that is important in your course, the knowledge students will apply, and the skills they will practice using through the assignment. What kind of thinking will students be asked to do for the assignment? What will students learn by completing this assignment? How will the assignment help students achieve the desired course learning outcomes? For more information on course learning objectives, see the CTL’s Course Design Essentials self-paced course and watch the video on Articulating Learning Objectives .
Identify an authentic meaning-making task
For meaning-making to occur, students need to understand the relevance of the assignment to the course and beyond (Ambrose et al., 2010). To Bean (2011) a “meaning-making” or “meaning-constructing” task has two dimensions: 1) it presents students with an authentic disciplinary problem or asks students to formulate their own problems, both of which engage them in active critical thinking, and 2) the problem is placed in “a context that gives students a role or purpose, a targeted audience, and a genre.” (Bean, 2011: 97-98).
An authentic task gives students a realistic challenge to grapple with, a role to take on that allows them to “rehearse for the complex ambiguities” of life, provides resources and supports to draw on, and requires students to justify their work and the process they used to inform their solution (Wiggins, 1990). Note that if students find an assignment interesting or relevant, they will see value in completing it.
Consider the kind of activities in the real world that use the knowledge and skills that are the focus of your course. How is this knowledge and these skills applied to answer real-world questions to solve real-world problems? (Herrington et al., 2010: 22). What do professionals or academics in your discipline do on a regular basis? What does it mean to think like a biologist, statistician, historian, social scientist? How might your assignment ask students to draw on current events, issues, or problems that relate to the course and are of interest to them? How might your assignment tap into student motivation and engage them in the kinds of thinking they can apply to better understand the world around them? (Ambrose et al., 2010).
Determine the evaluation criteria and create a rubric
To ensure equitable and consistent grading of assignments across students, make transparent the criteria you will use to evaluate student work. The criteria should focus on the knowledge and skills that are central to the assignment. Build on the criteria identified, create a rubric that makes explicit the expectations of deliverables and share this rubric with your students so they can use it as they work on the assignment. For more information on rubrics, see the CTL’s resource Incorporating Rubrics into Your Grading and Feedback Practices , and explore the Association of American Colleges & Universities VALUE Rubrics (Valid Assessment of Learning in Undergraduate Education).
Build in metacognition
Ask students to reflect on what and how they learned from the assignment. Help students uncover personal relevance of the assignment, find intrinsic value in their work, and deepen their motivation by asking them to reflect on their process and their assignment deliverable. Sample prompts might include: what did you learn from this assignment? How might you draw on the knowledge and skills you used on this assignment in the future? See Ambrose et al., 2010 for more strategies that support motivation and the CTL’s resource on Metacognition ).
Provide students with opportunities to practice
Design your assignment to be a learning experience and prepare students for success on the assignment. If students can reasonably expect to be successful on an assignment when they put in the required effort ,with the support and guidance of the instructor, they are more likely to engage in the behaviors necessary for learning (Ambrose et al., 2010). Ensure student success by actively teaching the knowledge and skills of the course (e.g., how to problem solve, how to write for a particular audience), modeling the desired thinking, and creating learning activities that build up to a graded assignment. Provide opportunities for students to practice using the knowledge and skills they will need for the assignment, whether through low-stakes in-class activities or homework activities that include opportunities to receive and incorporate formative feedback. For more information on providing feedback, see the CTL resource Feedback for Learning .
Communicate about the assignment
Share the purpose, task, audience, expectations, and criteria for the assignment. Students may have expectations about assessments and how they will be graded that is informed by their prior experiences completing high-stakes assessments, so be transparent. Tell your students why you are asking them to do this assignment, what skills they will be using, how it aligns with the course learning outcomes, and why it is relevant to their learning and their professional lives (i.e., how practitioners / professionals use the knowledge and skills in your course in real world contexts and for what purposes). Finally, verify that students understand what they need to do to complete the assignment. This can be done by asking students to respond to poll questions about different parts of the assignment, a “scavenger hunt” of the assignment instructions–giving students questions to answer about the assignment and having them work in small groups to answer the questions, or by having students share back what they think is expected of them.
Plan to iterate and to keep the focus on learning
Draw on multiple sources of data to help make decisions about what changes are needed to the assignment, the assignment instructions, and/or rubric to ensure that it contributes to student learning. Explore assignment performance data. As Deandra Little reminds us: “a really good assignment, which is a really good assessment, also teaches you something or tells the instructor something. As much as it tells you what students are learning, it’s also telling you what they aren’t learning.” ( Teaching in Higher Ed podcast episode 337 ). Assignment bottlenecks–where students get stuck or struggle–can be good indicators that students need further support or opportunities to practice prior to completing an assignment. This awareness can inform teaching decisions.
Triangulate the performance data by collecting student feedback, and noting your own reflections about what worked well and what did not. Revise the assignment instructions, rubric, and teaching practices accordingly. Consider how you might better align your assignment with your course objectives and/or provide more opportunities for students to practice using the knowledge and skills that they will rely on for the assignment. Additionally, keep in mind societal, disciplinary, and technological changes as you tweak your assignments for future use.
Now is a great time to reflect on your practices and experiences with assignment design and think critically about your approach. Take a closer look at an existing assignment. Questions to consider include: What is this assignment meant to do? What purpose does it serve? Why do you ask students to do this assignment? How are they prepared to complete the assignment? Does the assignment assess the kind of learning that you really want? What would help students learn from this assignment?
Using the tips in the previous section: How can the assignment be tweaked to be more authentic and meaningful to students?
As you plan forward for post-pandemic teaching and reflect on your practices and reimagine your course design, you may find the following CTL resources helpful: Reflecting On Your Experiences with Remote Teaching , Transition to In-Person Teaching , and Course Design Support .
The Columbia Center for Teaching and Learning (CTL) is here to help!
For assistance with assignment design, rubric design, or any other teaching and learning need, please request a consultation by emailing [email protected] .
Transparency in Learning and Teaching (TILT) framework for assignments. The TILT Examples and Resources page ( https://tilthighered.com/tiltexamplesandresources ) includes example assignments from across disciplines, as well as a transparent assignment template and a checklist for designing transparent assignments . Each emphasizes the importance of articulating to students the purpose of the assignment or activity, the what and how of the task, and specifying the criteria that will be used to assess students.
Association of American Colleges & Universities (AAC&U) offers VALUE ADD (Assignment Design and Diagnostic) tools ( https://www.aacu.org/value-add-tools ) to help with the creation of clear and effective assignments that align with the desired learning outcomes and associated VALUE rubrics (Valid Assessment of Learning in Undergraduate Education). VALUE ADD encourages instructors to explicitly state assignment information such as the purpose of the assignment, what skills students will be using, how it aligns with course learning outcomes, the assignment type, the audience and context for the assignment, clear evaluation criteria, desired formatting, and expectations for completion whether individual or in a group.
Villarroel et al. (2017) propose a blueprint for building authentic assessments which includes four steps: 1) consider the workplace context, 2) design the authentic assessment; 3) learn and apply standards for judgement; and 4) give feedback.
References
Ambrose, S. A., Bridges, M. W., & DiPietro, M. (2010). Chapter 3: What Factors Motivate Students to Learn? In How Learning Works: Seven Research-Based Principles for Smart Teaching . Jossey-Bass.
Ashford-Rowe, K., Herrington, J., and Brown, C. (2013). Establishing the critical elements that determine authentic assessment. Assessment & Evaluation in Higher Education. 39(2), 205-222, http://dx.doi.org/10.1080/02602938.2013.819566 .
Bean, J.C. (2011). Engaging Ideas: The Professor’s Guide to Integrating Writing, Critical Thinking, and Active Learning in the Classroom . Second Edition. Jossey-Bass.
Frey, B. B, Schmitt, V. L., and Allen, J. P. (2012). Defining Authentic Classroom Assessment. Practical Assessment, Research, and Evaluation. 17(2). DOI: https://doi.org/10.7275/sxbs-0829
Herrington, J., Reeves, T. C., and Oliver, R. (2010). A Guide to Authentic e-Learning . Routledge.
Herrington, J. and Oliver, R. (2000). An instructional design framework for authentic learning environments. Educational Technology Research and Development, 48(3), 23-48.
Litchfield, B. C. and Dempsey, J. V. (2015). Authentic Assessment of Knowledge, Skills, and Attitudes. New Directions for Teaching and Learning. 142 (Summer 2015), 65-80.
Maclellan, E. (2004). How convincing is alternative assessment for use in higher education. Assessment & Evaluation in Higher Education. 29(3), June 2004. DOI: 10.1080/0260293042000188267
McLaughlin, L. and Ricevuto, J. (2021). Assessments in a Virtual Environment: You Won’t Need that Lockdown Browser! Faculty Focus. June 2, 2021.
Mueller, J. (2005). The Authentic Assessment Toolbox: Enhancing Student Learning through Online Faculty Development . MERLOT Journal of Online Learning and Teaching. 1(1). July 2005. Mueller’s Authentic Assessment Toolbox is available online.
Schroeder, R. (2021). Vaccinate Against Cheating With Authentic Assessment . Inside Higher Ed. (February 26, 2021).
Sotiriadou, P., Logan, D., Daly, A., and Guest, R. (2019). The role of authentic assessment to preserve academic integrity and promote skills development and employability. Studies in Higher Education. 45(111), 2132-2148. https://doi.org/10.1080/03075079.2019.1582015
Stachowiak, B. (Host). (November 25, 2020). Authentic Assignments with Deandra Little. (Episode 337). In Teaching in Higher Ed . https://teachinginhighered.com/podcast/authentic-assignments/
Svinicki, M. D. (2004). Authentic Assessment: Testing in Reality. New Directions for Teaching and Learning. 100 (Winter 2004): 23-29.
Villarroel, V., Bloxham, S, Bruna, D., Bruna, C., and Herrera-Seda, C. (2017). Authentic assessment: creating a blueprint for course design. Assessment & Evaluation in Higher Education. 43(5), 840-854. https://doi.org/10.1080/02602938.2017.1412396
Weimer, M. (2013). Learner-Centered Teaching: Five Key Changes to Practice . Second Edition. San Francisco: Jossey-Bass.
Wiggins, G. (2014). Authenticity in assessment, (re-)defined and explained. Retrieved from https://grantwiggins.wordpress.com/2014/01/26/authenticity-in-assessment-re-defined-and-explained/
Wiggins, G. (1998). Teaching to the (Authentic) Test. Educational Leadership . April 1989. 41-47.
Wiggins, Grant (1990). The Case for Authentic Assessment . Practical Assessment, Research & Evaluation , 2(2).
Wondering how AI tools might play a role in your course assignments?
See the CTL’s resource “Considerations for AI Tools in the Classroom.”
This website uses cookies to identify users, improve the user experience and requires cookies to work. By continuing to use this website, you consent to Columbia University's use of cookies and similar technologies, in accordance with the Columbia University Website Cookie Notice .
Academic Resources
- Academic Calendar
- Academic Catalog
- Academic Success
- BlueM@il (Email)
- Campus Connect
- DePaul Central
- Desire2Learn (D2L)
Campus Resources
- Campus Security
- Campus Maps
University Resources
- Technology Help Desk
Information For
- Alumni & Friends
- Current Students
- Faculty & Staff
- Teaching Guides
- How Students Learn
- Course Design
- Instructional Methods
- Aligning with Learning Goals
- Critical Thinking
- Deterring Plagiarism
- Integrative Learning
- Feedback & Grading
- Learning Activities
- Flex Teaching
- Online Teaching
- Scholarship of Teaching and Learning
- Reflective Practice
- Inclusive Teaching
- Teaching at DePaul
- Support Services
- Technology Tools
Teaching Commons > Teaching Guides > Assignment Design > Writing
Designing Writing Assignments

Well-designed writing assignments, in short, lead directly to student learning. In doing so, well–designed writing assignments help you achieve your most central student-learning goals.
What's on This Page?
You’ll find a list of general assignment design principles directly below and then a design template that can help you apply best practices and create an effective and clear/easy-to-understand writing assignment.
Some General Principles
- Clearly link each assignment to the course goals and learning outcomes.
- Break large, high-stakes assignments into multiple, low-stakes assignments .
- Identify the purpose, audience, and genre (e.g. book review, reflection letter) for the assignment.
- Design assignments around real-world issues and events to engage and motivate students.
- Link directly to assignment readings (in your course reserves , for example)
- Provide model responses to the assignment from previous students whose permission you've received to anonymously share their work. Make sure to take time to discuss these models with your students in class. Be explicit about what makes them successful.
- Provide supporting structures such as templates, peer review, multiple drafts, and guidelines for library research.
- Provide grading guidelines for the assignment in the form of rubrics and examples of acceptable and unacceptable work.
- Revise assignments for next term based on student performance and feedback . Does each assignment develop student expertise in line with course learning goals?
- Consider how you can create assignments that deter plagiarism . Remember to include plagiarism, re-write, and late work policies in your syllabus.
Writing Assignment Template
Use this one-page writing assignment template to help you prepare for your class's next writing assignment.
Faculty Development
Matthew Pearson, Director of the Center for Writing-based Learning, is available to meet with individual faculty members to revamp existing course assignments or design new writing assignments.
Email Matthew for an appointment.
Further Resources
- Designing Writing Assignments by Traci Gardner. This free open text is all about designing writing assignments. Jump to chapter 3 to learn what Gardner argues the "three goals of a writing assignment" are.
- Writing Commons . This site bills itself as a "free, comprehensive, peer-reviewed, award-winning Open Text for students and faculty in college-level courses that require writing and research."
- Solutions expand_more
- > How to Make your Assignment Design Look More Professional
How to Make your Assignment Design Look More Professional

Introduction
One of the most important aspects of an assignment, apart from the content of the assignment, is the aspect of assignment design. Assignment design is becoming more and more important as online school is becoming more dominant and the need for visually appealing digital assignments is increasing. Well-designed assignments can make sure that your work will leave a very good impression on your teachers, stands out from the rest of the class, and reflects how much work you and/or the group have invested in this project.
Good assignment design comes with a lot of benefits. It helps you display a clear-cut message in an interesting way, grab and retain the attention of the people who see that piece of work, and add a layer of detail and professionalism to the work.
Learning such design skills while still in school can be beneficial later on in life as well. In the working world, knowing how to identify professional designs that can have a deep impact on your audience and get a point across clearly can give a real advantage, especially when creating presentations and reports, and working with customers.
Tips to Make Your Designs Professional
Here are some ideas to help make your assignment design ideas pop and give them a professional look.
Make Use of Design Elements
Design elements are shapes, lines, or any other pieces that help make something look appealing. These shapes can help accentuate certain elements of your design that can make them stand out. Design elements can also have a more profound function - guide the eyes of the viewer. Putting design elements in the right place can make the viewer look at what you are trying to show them. For example, it is psychological fact that the first place a person will look when looking at a design will be the top left portion because that is generally where people look automatically when reading. So, if you put some information there or if you add a design element like an arrow there towards something that you feel requires attention, like an important statistic, graph or image, you can effectively drive the attention of the viewer.
Use Elegant Fonts
Fonts are an integral part of assignment design when it is an online assignment. Using the right kind of font can leave the teacher with a good impression because not only will it make it look professional, it will also make it eligible and readable to the viewer, making it more attractive to the teacher evaluating it. The best fonts for this would be Times New Roman and Arial.
Do Not Overdecorate
A lot of students get into the habit of overdecorating their designs with too many design elements. Too much of anything is bad, and the last thing you want is for your assignment to look crowded. Crowded designs are not attractive at all, especially when it comes to a professional setting like an assignment. Make the design as minimalistic as possible so that the teacher can focus on the content and not on the loud design.
Use Bullet Points Wherever Possible
This is one of the most essential points to keep in mind in assignment design - use bullet points whenever you are trying to make a point. Bullet points are especially important in assignment design because it makes reading and interpreting the core content of the assignment that much easier. Bullet points also make the assignment look neater and more systematic because everything is so organized.
Font Colour and Size
This is something that is so overlooked and yet has such a deep impact on the viewer. Always use black text on an assignment. In fact, try to use as little colour as you possibly can because, in a professional setting, less is more. Use colour only when emphasizing something that is so important that you cannot help but point it out.
Another aspect of it is size. Size does matter in fonts and in design, especially in assignments. Preferably keep the headings H1 size, subheadings H2, and further subheadings under them at H3, H4, etc. This creates a visual hierarchy that makes it easier for the teacher to follow the assignment and grade it accordingly.
Pay Attention to Punctuation
Punctuation marks are typographical conventions that can greatly affect your assignment’s effectiveness. Make sure that the punctuations are right at all places and make sure to review once you are done because the proper use of punctuation marks can help the teacher understand the content better and make it easier for the teacher. The basic idea behind it is simple - if you make it easier for the teacher, it will reflect better on you.
These are simple yet effective ways to make your assignment look as professional as possible. The idea behind this is to make the design language simple and minimalistic while at the same time, aesthetically pleasing.
The online scenario is, however, changing rapidly. Creating and submitting assignments has never been easier. Teachmint makes creating homework and assignments easier with the Homework feature. It reduces a lot of stress on the part of the teacher and sets a proper deadline that the students can follow to complete it. The students also will be able to submit the assignment with the aesthetics and perfection they want. They also do not have to physically be present there to submit the assignment, they can simply submit it online.
Suggested Read - Importance of Project Work in School
Teachmint provides ed-infra to educational institutions. With our state-of-the-art lms portal , teachers can improve the teaching-learning experience. Our tools like institute erp help schools manage their everyday activities hassle-free.

Eberly Center
Teaching excellence & educational innovation, how do i design effective writing assignments.
A key challenge in helping students learn basic writing skills is doing so without overwhelming the students or overburdening yourself. Thus you must prioritize which skills you value and design assignments accordingly,
- prioritize which skills you value and design assignments accordingly,
- communicate those priorities (and your specific expectations) to students, and
- give them appropriate opportunities to practice and receive feedback .
Design assignments that isolate specific skills.
Many people find it helpful to “scaffold” writing assignments; that is, sequence assignments that break reading, analysis, and writing into component parts and give students practice developing mastery in each area, building gradually towards more complex, comprehensive writing tasks. For example, you might first ask students to summarize, in writing, the central argument of a reading and three pieces of evidence the author used to support it. At a second stage, you might ask students to write a critique of the argument in light of that evidence and alternative evidence. At a third stage, you might ask students to write an essay comparing two readings in terms of how compellingly the authors made their cases.
Use frequent, short assignments.
It is also helpful to assign more writing tasks of shorter length or smaller scope rather than fewer tasks of great length or large scope. This way, students get more opportunity to practice basic skills and can refine their approach from assignment to assignment based on feedback they receive. This strategy frees you to think beyond the term paper and be more creative in the type of writing you assign, e.g., a letter, program notes, or policy memo. For more information on designing effective assignments, see the following materials from MIT and the University of Wisconsin:
- http://web.mit.edu/writing/Resources/Teachers/creating.html
- http://mendota.english.wisc.edu/~WAC/category.jsp?id=12
28+ Best Free Assignment Cover Page Formats for MS Word
What is an assignment cover page, key elements for a comprehensive front page.
- Institution Details: Begin by prominently featuring the name of your school, college, or institute. This establishes credibility and provides context for your assignment.
- Personal Information: Include your own name to indicate authorship and ownership of the assignment. This adds a personal touch and facilitates easy identification.
- Assignment Title: Clearly state the title of your assignment, conveying its purpose and focus. A concise and informative title sets the tone for your work.
- Course Information: Specify the relevant course title or code to indicate the academic context in which your assignment was completed. This assists in proper categorization and organization.
- Instructor’s Name: Acknowledge the teacher or professor who will be evaluating your assignment by including their name. This demonstrates respect and professionalism.
- Due Date: Clearly indicate the deadline or due date for the assignment submission. This ensures timely assessment and helps you stay organized.
What are the basic tips?
- Font style : It is always in the best interest to use bold, simple, and clear text instead of using fancy text fonts and styles. This helps the reader understand things in a better way. Moreover, the usage of pictures behind texts must be avoided as it creates poor visibility for the reader when reading the text printed on it.
- Presentation: Presentation plays an important role in expressing what you need to convey to someone and how you need to communicate it. Presenting the title page in the most effective manner is essential as this leaves an impression on the teacher reading the assignment. It also acts as a decisive tool for the teacher whether or not he/ she interestingly goes through the whole document.
- Spell Check: Before handing over the assignment, one should take a brief review of all the spelling and also look for any grammatical errors.
- Avoid plagiarism: A student must always be honest in what he writes. He should avoid copying material or texts from anywhere.
- Personal detail: One should never forget to mention his/her name. The font size used for writing the name must be bigger so that it makes the name visible to the teacher.
Advantages of an Impressive Assignment Cover Page
- Showcasing Professionalism: By meticulously designing your cover page, you demonstrate a strong commitment to professionalism. This attention to detail reflects positively on your work ethic and sets you apart as a dedicated student.
- Creating a Positive Impression: A well-crafted front page sets the tone for your assignment, capturing the attention of your teacher or professor. It establishes a positive first impression, arousing their interest and encouraging them to delve further into your work.
- Enhancing Visual Appeal: A visually appealing cover page enhances the overall presentation of your assignment. With carefully chosen fonts, colors, and layouts, you create an engaging and aesthetically pleasing introduction that captivates the reader’s attention.
- Communicating Pertinent Information: It provides a concise summary of essential details, such as the assignment title, your name, and the due date. This ensures clarity and facilitates seamless identification and organization of your work.
- Reflecting a Professional Attitude: By dedicating time and effort to creating an impressive cover page, you exemplify a professional attitude towards your academic pursuits. This level of dedication and care leaves a lasting impression on your teacher or professor.
Download Free Cover Page Templates
#1 – best format.

#2 – Assignment Cover Page for Case Study

#3 – Best Design for Critical Review

#4 – For Any Kind of Educational Assignment

Video Tutorial
#5 – essay assignment.

#6 – Syllabus Assignment

#7 – Cover Page For University Assignments

#14 – Cover Page for Business Assignment

#16 – Academic

#17 – Generic Cover Page for any Assignment

#18 – Biology Assignment

#19 – For Chemistry Projects

#20 – Cover Page for Computer Projects

#21 – For Engineering-Related Assignments

#22 – For English Assignment

#23 – For Geography Projects

#24 – Mathematics

#25 – Physics

#26 – Cover Page for School Assignments

#27 – Best for Science Projects

#28 – For Social Study Assignment

Versatile Designs and Layouts for Every Purpose
- Assignment Types: Our templates are designed specifically for different types of assignments, such as case studies, critical reviews, essays, syllabi, and business projects. Each template is tailored to suit the requirements and objectives of its respective assignment type.
- Academic Disciplines: Our collection includes templates suitable for various academic disciplines like biology, chemistry, computer science, engineering, English, geography, mathematics, physics, and social studies. Each template aligns with the themes and aesthetics of its corresponding discipline.
- Purposes: Whether you are a student, educator, or professional, our templates serve multiple purposes. They can be used for university assignments, school projects, research papers, or any academic or professional endeavor that requires a polished cover page.
- Designs, Layouts, and Styles: Our templates offer a diverse range of designs, from minimalistic and clean to visually captivating and sophisticated. You can choose from different layouts that creatively arrange text, images, and graphics. Our templates cater to a variety of styles, ensuring there is something for everyone’s preferences.
User-Friendly Customization: Make It Your Own
- Easy Modifications: We believe in keeping things simple. With just a few clicks, you can effortlessly modify our templates to suit your specific requirements. Change colors, fonts, and layouts with ease, and watch your cover page transform before your eyes.
- Colors and Themes: Infuse it with the perfect color scheme and themes that truly represent your assignment. Our templates offer a wide range of options, so you can find the ideal palette and theme that resonate with your content.
- Font Selection: The right font can make all the difference. Choose from our diverse selection of fonts to enhance the visual appeal and readability. From elegant and professional to modern and bold, we have fonts to suit every style.
- Layout Flexibility: It should reflect your unique presentation style. With our templates, you have the freedom to experiment with different layouts, arranging titles, subtitles, images, and text blocks in a way that best suits your assignment.
Benefits of Using Professionally Designed Templates: Make an Impact with Ease
- Time and Effort Saving: Our professionally designed templates eliminate the need to start from scratch. With pre-designed layouts, styles, and graphics, you can save valuable time and effort in creating visually appealing front pages. Simply customize the template to suit your assignment’s requirements, and you’re ready to impress.
- Consistency and Professionalism: Using our templates ensures consistency in your assignment submissions. The standardized design elements and formatting guidelines help maintain a professional appearance throughout your work. Presenting your assignments with a polished title page enhances the overall quality and credibility of your content.
- Visual Appeal: A visually appealing title page grabs attention and sets the tone for your assignment. Our templates are thoughtfully crafted by design professionals, incorporating aesthetically pleasing elements, color schemes, and typography. By leveraging these designs, you can effortlessly create eye-catching cover pages that captivate your professors or readers.
- Positive Impression: First impressions matter, and a well-designed cover page leaves a positive impact on professors and readers alike. Showcasing your assignment in a professional and visually appealing manner demonstrates your dedication and attention to detail. It sets the stage for an engaging reading experience, encouraging your audience to delve deeper into your work.
- User-Friendly Customization: Our templates are designed to be easily customizable, allowing you to add your personal touch without technical expertise. You can modify text, colors, images, and other elements to align with your assignment’s theme and requirements. This flexibility ensures that your cover page reflects your unique style while maintaining a professional look.
Tips for Maximizing the Impact: Make Your Cover Page Stand Out
- Choose Colors Wisely: Select colors that complement your assignment’s theme and evoke the desired emotions. Vibrant colors can grab attention, while muted tones create a sense of elegance. Maintain consistency with your assignment’s overall design and avoid using too many colors that may distract from the main message.
- Opt for Legible Fonts: Use clear and readable fonts to enhance the accessibility and professionalism of your cover page. Avoid overly decorative or complex fonts that may hinder readability. Opt for fonts that align with your assignment’s tone and maintain consistency throughout the document.
- Incorporate Relevant Graphics: Graphics can enhance the visual appeal of your cover page and reinforce the assignment’s subject matter. Choose images or icons that are directly related to the topic or convey the assignment’s main concept. Ensure that the graphics are high-quality and appropriately sized to maintain clarity.
- Organize Information Effectively: Arrange the information in a logical and visually appealing manner. Use headings, subheadings, and bullet points to break down content and make it easier to read. Highlight key details such as the assignment title, your name, course information, and submission date.
- Maintain Simplicity: While it’s important to make it visually appealing, avoid cluttering it with excessive elements. Keep the design clean and uncluttered, allowing the key information to stand out. Remember, simplicity often has a greater impact than complexity.
- Preview and Proofread: Before finalizing, preview it to ensure that all elements are properly aligned and visually balanced. Proofread the content to eliminate any spelling or grammatical errors. A polished and error-free cover demonstrates your attention to detail and professionalism.
← Previous Article
Next Article →
You may also like

- 4th July Flyers
- Invitation Templates for 4th July
- Doctor Prescription Pad Formats
- Printable ID Cards
- Creative Resume Formats for Freshers
- Modern Resume Templates
- Best Cover Page Formats
- Printable Report Cards
- Business Proposal Templates
- 22 Raffle Ticket Templates
- Free Certificate Templates
Search the database of 10,000+ templates, designs & formats for Microsoft Office.
- Make it Memorable: Free 4th of July Flyer Templates
- Say Goodbye with Style: Free Impactful Resignation Letter Templates
- Share Your Appreciation: Free Memorial Day Card Templates
- Crafted with Love: Free Mother’s Day Cards to Warm Mom’s Heart
- Stand Out from the Crowd: 6+ Free Fact Sheet Templates
- Make Your Mark: Free Printable Dog Name Tags for Every Tail-Wagger!
- 7+ Free Stunning Easter Templates for Joyful Celebrations
- 9+ Free Admit-One Ticket Templates: Flexible and Easy to Edit
- Get Cooking with Style: 8+ Free Customizable Recipe Card Templates
- 11+ Free Mortgage Flyer Templates to Elevate Your Marketing
- Enhance Your Events with 20+ Unique and Free Ticket Voucher Templates
- Relaxation Redefined: Explore Free 8+ Spa Voucher Templates
- Certificates
- Cover Pages
- Educational
- Event Templates
- Invoices & Receipts
- Letterheads
- Office Related
- Personal Use
- 137+ Professional Reports – MS Word & Excel
- 70+ Printable & Editable ID Card Designs
- 59+ Proposal Formats
- 31+ Best Flyer Designs & Formats
- 100+ Cover Page Templates
- 22+ Free Letterhead Designs and Formats
- 24+ Free Resume Designs & for Freshers and Professionals
- 136+ Printable Certificate Templates
- 55+ Quotations & Invoices
- Create FREE PDF Calendar Online
Search form
You are here.
- Implementing Writing in Your Course
How to Design Successful Writing Assignments

As writing instructors ourselves, we are all too familiar with the many difficulties that come with assigning writing. It’s difficult to create meaningful assignments that help students learn what you want them to learn. And despite all the labor we put into it, students can still express frustration and confusion over writing assignments. It is tempting to ask, “Why bother?”
However, while thoughtful writing instruction tied to learning outcomes takes time to implement, that initial effort can lead to a huge time savings over the long run. Some writing you do not even need to grade! Once you know some of the key components of writing assignment design, you will be able to create a collection of high-value teaching materials that you can adapt for years to come. Also, your students will learn more, and will be better equipped to handle complexity. With regular writing practice and targeted feedback, over time they will become more authoritative participants and contributors in your field.
Designing successful writing assignments involves some or all of the following six strategies:
- Explicitly State Assignment Goals
- Tie Assignment Goals to Course Goals
- Create Antiracist Writing Assignments
- Offer Clear Instructions for Completion
- Clarify Expectations About Genre, Audience, and Formatting
- Provide Examples of the Kinds of Writing You Assign
- Asses Your Own Work
1. Explicitly State Assignment Goals
Are students “writing to learn” key course concepts from course materials or “learning to write” a new and specific form of communication in the class, such as a lab report or business memo? Or do you want your assignment to do some of both? Try to be as specific as possible when thinking about the assignment’s purpose. We encourage you to even jot down some of your desired outcomes. Being detailed about what you want students to gain from completing the assignment will help you create clear instructions for the assignment.
The example below is a strong example of a “writing to learn” assignment. In this assignment the instructor uses words such as "read," “explore,” “shape,” and “reflect” to clearly indicate that the act of composing in this assignment is more about attaining knowledge than it is about the creation of a final product.
From a prompt for a personal narrative in a science writing course:
All scientists have intellectual, cultural, and linguistic histories. For the sake of “neutrality” and “objectivity,” apprentices are often trained to separate themselves from these histories, especially when it comes to conducting and communicating research. This assignment asks you to read examples of scientists’ memoirs in various genres and then you will compose your own narrative in the mode of your choice, exploring how your identities, investments, and intellectual interests have shaped your science training and your trajectory as a scientist. This assignment serves as a form of reflection, orientation to/within a scientific field, and even as a professional credential (if desirable).
Back to top
2. Tie Assignment Goals to Course Goals
While you know why you are assigning a particular writing assignment, your students may not. Being clear about how completing the writing assignment will help your students learn can help create expectations and motivation for students. Without a clear understanding of how a writing assignment will help them learn, students may feel that they are being assigned useless "busywork."
Example 1 :
The example below is drawn from the final paper assignment for a course called “Imagining and Dreaming: Indigenous Futures,” taught by Lydia Heberling. In this assignment, the instructor not only clearly shows students how the assignment aligns with the course content, but it also reminds students how the third section of the course builds upon content learned in earlier units.
Throughout the quarter we have examined various writing practices that affirm the ongoing existence of American Indian peoples in spite of settler colonial attempts to remove, erase, and eradicate them. In our first sequence, we reflected on the relationship between place and identity and learned from Momaday that the land possesses stories from the past that can be accessed through interaction with and memories of those places.
In our second sequence, we examined a contemporary activist moment to deepen our understanding of the ongoing relational formations between Indigenous peoples and how those relations revitalize cultures from the brink of extinction. In learning about how various tribes worked together to protect a valuable natural resource by employing media and storytelling practices to garner support and attention, we learned that regardless of the outcome, activist moments like Standing Rock demonstrate a strong trans-Indigenous community that continues to survive in spite of ongoing settler colonial tactics of dispossession and erasure.
In this third, and last sequence, we are focusing on imagining, or dreaming about, vibrant Indigenous futures. Athabascan poet and scholar (and UW professor) Dian Million defines dreaming the following way [. . .]
Your task i n this next assignment is to return to the place you described in Paper 1, imagine what that place looks like 100 years from now. . .
Example 2 :
Here’s a second example of a writing assignment, created by Jen Malone for a course on writing in environmental science, which clearly demonstrates to students how the writing assignment both builds on previous course content and how it will help students cultivate research skills that they will be able to use in future writing assignments.
Thus far in this class, we’ve written an Op-Ed about ecotourism, and we will be moving into writing a short research paper on the topic of your choice later on in the quarter. But first, we’re going to do something a bit different.
Learning to research well is largely about practice—both in terms of growing accustomed to search engines (particularly scholarly ones) and library databases, and in terms of learning to plug different versions of your research terms into these search engines/databases until you find useful sources. Using research well is largely about figuring out how to analyze your sources--particularly in combination with one another, as a body of research. In order to practice both of these skills (which will totally help us to prepare for Paper #3, later on in the quarter), for Paper #2 we will. . .
3. Create Antiracist Writing Assignments
Antiracist writing instruction is usually discussed in relation to assessment, but it should be considered earlier than that, during assignment creation (just as it should be considered as key elements of curriculum and class culture). Antiracist writing assignment design can be pursued in two ways: through the subject matter, or content, of the writing assignments; and through your values around language use. Some brief suggestions for each follow.
Promoting antiracist subject matter in writing assignments:
Take a step back and discuss knowledge frameworks in your course and in your field. Every discipline has knowledge traditions and methods that can be problematic. How did these traditions come to be? Who do they serve, and who do they harm?
Avoid reductionist binaries when discussing complex questions. For example, framing a question like "What are the pros and cons of conducting medical research without subjects' knowledge or consent?" may lead students to consider both sides as having equal moral weight. A more specific (so a particular context can be considered) and open-ended (so students are not led to one or the other answer) question might work better. For example, "What are some of the ethical considerations of conducting flu vaccine clinical trials without participants' consent?"
Give students opportunities to explore their own identities in relation to the course content. Drawing personal connections not only helps foster deeper learning, but it can also cultivate a student’s sense of belonging in the field. It may also help you see how your field might serve some but not others.
Encourage students to engage academic and non-academic source material. Have discussions about what “counts” as authoritative information in your field, and why.
Promoting linguistic justice in writing assignments:
As this site from Wesleyan College recommends, “Centralize rhetorical situations and writing contexts rather than language standards in your writing classroom.” If you show that all language use (content, structure, syntax, vocabulary, style) is based on authorial choices made in particular contexts and for particular audiences, then you can help bust the myth of the universal standard of “academic English.”
Encourage students to use their own linguistic traditions whenever possible. For example, let students freewrite in a native language or dialect. Encourage them to draw connections between their own language backgrounds and the disciplinary discourse you are teaching. This is called translanguaging, and it can be a powerful tool for learning.
Avoid penalizing language use. If there is a certain style or vocabulary you want students to use, be explicit about why discourse is used that way, and how it conveys discipline-specific knowledge.
Further reading: 10 Ways to Tackle Linguistic Bias in Our Classrooms (Inside HigherEd)
4. Offer Clear Instructions for Completion
Investigative or writing techniques that seem obvious to you—such as making an argument, analyzing, evaluating—might mean something different to students from outside your specific discipline. Being clear about what you mean when you use certain terms can help students navigate an assignment more successfully. While it might feel clunky or obvious, including this information in an assignment will help steer your students in the right direction and minimize miscommunication.
In the following excerpt from a prompt for a writing-in-history course taught by Sumyat Thu, the instructor asks students to use research in their papers, and then clearly describes, and supports with examples from the class and library resources, what counts as appropriate source material.
This essay is based on research. Students are expected to use primary sources and secondary works in developing their essays. We do not frown on the use of on-line resources ; indeed, some very good reference works ( identified on the history librarian Ms. Mudrock's research guide) are available as on-line books, and the library has e-book versions of Paul Spickard's Almost All Aliens . Nonetheless, we strongly urge students to utilize the very rich materials available in the UW Libraries, particularly scholarly books and articles. The UW Libraries' on-line catalog can be explored with keyword searches, and such indexes as America: History and Life (again, see Ms. Mudrock’s website) are very helpful as well.
In this second example, again by Jen Malone, we see how the instructor not only indicates what chronological steps students must take to complete the assignment, but also how she includes thorough and clear instructions for how students can complete each step.
So, the first step you’ll need to take will be to choose a topic . You may wish to choose the same topic you’ll be using for your research paper in ENVIR 100 (if you’ve chosen that option—if so, please follow any instructions they’ve given you for choosing a topic for that), or something related to environmental science that simply interests you, or a topic from the following list of suggestions:
- GMOs (particularly with regards to the ecosystem and/or biodiversity),
- The environmental impact of meat production
- Bees and Colony Collapse Disorder
The second step you’ll need to take will be to do the research —you’ll need to find some sources (via library search engines, Google scholar, etc.). Keep some notes or a log of this process, since you’ll have to talk about how this went for you in your final report. Then you’ll need to read/skim the sources you’ve selected, and then you’ll need to create an annotated bibliography in which you list and briefly summarize those sources. An annotated bibliography is a particularly handy step when performing research, or when writing a paper that involves research. Basically, it is a list of the sources you intend to use for your paper (like a Works Cited page, you may use either MLA or APA format), but with the addition of a substantial paragraph (or two, if you wish) beneath each entry in which you summarize, and often evaluate, the source. This will help you to consider the sources you find as a body of research, and this makes using sources easier because you’ll have these initial notes handy as you write your report.
After you find and skim through your sources, the third step you’ll need to take will be to write the report .
- In the first section of the report, you’ll want to talk about your research process (What was this like? What was easy for you and what was difficult? What did you learn? What search terms did you use? How did those terms change?).
- In the second section of the report, you’ll want to talk about the body of research as a whole (How would you describe the issues/terms/debates surrounding the topic? What did you find? What do these sources indicate—both in terms of conclusions drawn and questions raised? How do these sources fit together and/or differ? What did you find most interesting?)
- In the third section of the report, you’ll want to take a moment to consider how this body of research fits it with what you’re learning in ENVIR 100 and where you might take the topic in a future paper (How do you see what you found regarding this topic as relating to what has been discussed in class thus far? What are the stakes of this topic and for whom? What aspects of this topic do we seem to know little about? What are the questions you still have about this topic? And, finally, now that you’ve read through this body of research, if you were going to write a paper on this topic, what might your basic argument be?). We’ll discuss this all in more detail next week, after you’ve compiled your sources.
Note: the second example may be a lot longer of a writing prompt than many of us are used to. This is not a bad thing. In fact, students tend to really appreciate such clear instruction and it reduces the amount of time you will spend clarifying confusion about what is expected. Also, instructions like these can be easily re-purposed for other, similar assignments in the future so you will not have to reinvent the wheel each time.
5. Clarify Expectations About Genre, Audience, and Formatting
Students will approach your writing assignment with varying knowledge and experience. Unless you have already instructed students explicitly in class about the knowledge and skills needed to complete a writing assignment, you cannot assume that students will already possess that knowledge. While clear, explicit prompts are essential, we also strongly urge you to discuss in class the genre you are assigning as well. Offer examples, both from professionals in the field, and from former students. The more exposure students have to the kinds of writing you want to see, the the more inclusive and accessible your assignments will be. We know of a history TA who said that one of her students, an engineering major, wasn't clear on the nature of a historiography, so he turned in his paper formatted like a technical report! This is an understandable mistake for a student to make, and providing examples can prevent mistakes like this from happening in your own classroom.
Below are two examples of how instructors communicate their expectations about genre, audience, and formatting to students. The first example is less helpful for students because it leaves key parts of the instructor’s expectations vague. (What is the writing assignment’s audience? What citation style does the instructor prefer? Is the works cited page part of the assignment or not?) The second example provides more detail for students.
Example 1: Paper must be 4-5 pages double spaced and must include a works cited page.
Example 2 : T he business memo should be fo rmatted according to the parameters we have discussed: no more than two pages long , typed, single-spaced with one space between paragraphs , with standard margins, in Times New Roman font (12 point), written for an audience of industry professionals.
6. Provide Examples of the Kinds of Writing You Assign
Studies have shown that examples can be a powerful learning tool in writing instruction. We recommend that instructors distribute examples of both successful and unsuccessful student writing to their students and explain why the examples are successful or unsuccessful.
Ask students who have submitted successful assignments if you can borrow their work as examples for future classes. Be sure to remove students’ identifying information from the assignments before they are given to future students.
If you do not have examples of unsuccessful writing (remember, sharing even anonymized student writing without the author's consent would be unethical), you can alternatively create a list of common pitfalls and mistakes to avoid when completing the writing assignment. Distribute the list to your students. Be sure to ground these pitfalls in terms of higher order issues specific to this genre, rather than just distributing a one-size-fits-all personal list of writing pet peeves.
Ask students which examples help them learn the genre, and which do not. Over time your students will help you curate a really great collection of samples.
Create occasional reading assignments where you ask students to find and analyze examples of writing by professionals in the field. What makes them effective or ineffective examples of the genre? What are some of the text's defining characteristics? These kinds of analyses can really help students improve their own writing.
7. Assess Your Own Work
Assessment is not just for student writing: it’s also important to assess the efficacy of the assignments you create. If student work is disappointing or students have struggled with an assignment, it most likely a result of ineffective assignment design. Please remember: everyone , even seasoned writing instructors, has assignments that do not go well initially. That is normal and ok!
We recommend that you engage in self-reflection as to why your assignment did not turn out well, and make tweaks to the assignment and/or grading criteria as needed. Here are some questions to ask yourself to reflect on your writing assignments.
Did many students turn in work which did not meet your expectations? In what specific ways did they fall short?
Did many students struggle with the assignment or a particular piece of the assignment? Where, exactly, did they struggle and how do you know?
Were many students surprised or dissatisfied by their grades on the assignment? Why do you think this happened?
Strategies for understanding what went wrong
Ask your students, either in class, on Canvas, or in a survey like a Google Form, to debrief the assignment. What was easy for them about the assignment? What did they learn from it? What was challenging? What was unclear?
Take writing assignments to writing centers such as OWRC or CLUE to get student feedback on updated or streamlined assignments. Student writing tutors can be a great resource-- they've seen hundreds of writing assignments!
Next guide: Supporting Academic Integrity
Teaching, Learning, & Professional Development Center
- Teaching Resources
- TLPDC Teaching Resources
How Do I Create Meaningful and Effective Assignments?
Prepared by allison boye, ph.d. teaching, learning, and professional development center.
Assessment is a necessary part of the teaching and learning process, helping us measure whether our students have really learned what we want them to learn. While exams and quizzes are certainly favorite and useful methods of assessment, out of class assignments (written or otherwise) can offer similar insights into our students' learning. And just as creating a reliable test takes thoughtfulness and skill, so does creating meaningful and effective assignments. Undoubtedly, many instructors have been on the receiving end of disappointing student work, left wondering what went wrong… and often, those problems can be remedied in the future by some simple fine-tuning of the original assignment. This paper will take a look at some important elements to consider when developing assignments, and offer some easy approaches to creating a valuable assessment experience for all involved.
First Things First…
Before assigning any major tasks to students, it is imperative that you first define a few things for yourself as the instructor:
- Your goals for the assignment . Why are you assigning this project, and what do you hope your students will gain from completing it? What knowledge, skills, and abilities do you aim to measure with this assignment? Creating assignments is a major part of overall course design, and every project you assign should clearly align with your goals for the course in general. For instance, if you want your students to demonstrate critical thinking, perhaps asking them to simply summarize an article is not the best match for that goal; a more appropriate option might be to ask for an analysis of a controversial issue in the discipline. Ultimately, the connection between the assignment and its purpose should be clear to both you and your students to ensure that it is fulfilling the desired goals and doesn't seem like “busy work.” For some ideas about what kinds of assignments match certain learning goals, take a look at this page from DePaul University's Teaching Commons.
- Have they experienced “socialization” in the culture of your discipline (Flaxman, 2005)? Are they familiar with any conventions you might want them to know? In other words, do they know the “language” of your discipline, generally accepted style guidelines, or research protocols?
- Do they know how to conduct research? Do they know the proper style format, documentation style, acceptable resources, etc.? Do they know how to use the library (Fitzpatrick, 1989) or evaluate resources?
- What kinds of writing or work have they previously engaged in? For instance, have they completed long, formal writing assignments or research projects before? Have they ever engaged in analysis, reflection, or argumentation? Have they completed group assignments before? Do they know how to write a literature review or scientific report?
In his book Engaging Ideas (1996), John Bean provides a great list of questions to help instructors focus on their main teaching goals when creating an assignment (p.78):
1. What are the main units/modules in my course?
2. What are my main learning objectives for each module and for the course?
3. What thinking skills am I trying to develop within each unit and throughout the course?
4. What are the most difficult aspects of my course for students?
5. If I could change my students' study habits, what would I most like to change?
6. What difference do I want my course to make in my students' lives?
What your students need to know
Once you have determined your own goals for the assignment and the levels of your students, you can begin creating your assignment. However, when introducing your assignment to your students, there are several things you will need to clearly outline for them in order to ensure the most successful assignments possible.
- First, you will need to articulate the purpose of the assignment . Even though you know why the assignment is important and what it is meant to accomplish, you cannot assume that your students will intuit that purpose. Your students will appreciate an understanding of how the assignment fits into the larger goals of the course and what they will learn from the process (Hass & Osborn, 2007). Being transparent with your students and explaining why you are asking them to complete a given assignment can ultimately help motivate them to complete the assignment more thoughtfully.
- If you are asking your students to complete a writing assignment, you should define for them the “rhetorical or cognitive mode/s” you want them to employ in their writing (Flaxman, 2005). In other words, use precise verbs that communicate whether you are asking them to analyze, argue, describe, inform, etc. (Verbs like “explore” or “comment on” can be too vague and cause confusion.) Provide them with a specific task to complete, such as a problem to solve, a question to answer, or an argument to support. For those who want assignments to lead to top-down, thesis-driven writing, John Bean (1996) suggests presenting a proposition that students must defend or refute, or a problem that demands a thesis answer.
- It is also a good idea to define the audience you want your students to address with their assignment, if possible – especially with writing assignments. Otherwise, students will address only the instructor, often assuming little requires explanation or development (Hedengren, 2004; MIT, 1999). Further, asking students to address the instructor, who typically knows more about the topic than the student, places the student in an unnatural rhetorical position. Instead, you might consider asking your students to prepare their assignments for alternative audiences such as other students who missed last week's classes, a group that opposes their position, or people reading a popular magazine or newspaper. In fact, a study by Bean (1996) indicated the students often appreciate and enjoy assignments that vary elements such as audience or rhetorical context, so don't be afraid to get creative!
- Obviously, you will also need to articulate clearly the logistics or “business aspects” of the assignment . In other words, be explicit with your students about required elements such as the format, length, documentation style, writing style (formal or informal?), and deadlines. One caveat, however: do not allow the logistics of the paper take precedence over the content in your assignment description; if you spend all of your time describing these things, students might suspect that is all you care about in their execution of the assignment.
- Finally, you should clarify your evaluation criteria for the assignment. What elements of content are most important? Will you grade holistically or weight features separately? How much weight will be given to individual elements, etc? Another precaution to take when defining requirements for your students is to take care that your instructions and rubric also do not overshadow the content; prescribing too rigidly each element of an assignment can limit students' freedom to explore and discover. According to Beth Finch Hedengren, “A good assignment provides the purpose and guidelines… without dictating exactly what to say” (2004, p. 27). If you decide to utilize a grading rubric, be sure to provide that to the students along with the assignment description, prior to their completion of the assignment.
A great way to get students engaged with an assignment and build buy-in is to encourage their collaboration on its design and/or on the grading criteria (Hudd, 2003). In his article “Conducting Writing Assignments,” Richard Leahy (2002) offers a few ideas for building in said collaboration:
• Ask the students to develop the grading scale themselves from scratch, starting with choosing the categories.
• Set the grading categories yourself, but ask the students to help write the descriptions.
• Draft the complete grading scale yourself, then give it to your students for review and suggestions.
A Few Do's and Don'ts…
Determining your goals for the assignment and its essential logistics is a good start to creating an effective assignment. However, there are a few more simple factors to consider in your final design. First, here are a few things you should do :
- Do provide detail in your assignment description . Research has shown that students frequently prefer some guiding constraints when completing assignments (Bean, 1996), and that more detail (within reason) can lead to more successful student responses. One idea is to provide students with physical assignment handouts , in addition to or instead of a simple description in a syllabus. This can meet the needs of concrete learners and give them something tangible to refer to. Likewise, it is often beneficial to make explicit for students the process or steps necessary to complete an assignment, given that students – especially younger ones – might need guidance in planning and time management (MIT, 1999).
- Do use open-ended questions. The most effective and challenging assignments focus on questions that lead students to thinking and explaining, rather than simple yes or no answers, whether explicitly part of the assignment description or in the brainstorming heuristics (Gardner, 2005).
- Do direct students to appropriate available resources . Giving students pointers about other venues for assistance can help them get started on the right track independently. These kinds of suggestions might include information about campus resources such as the University Writing Center or discipline-specific librarians, suggesting specific journals or books, or even sections of their textbook, or providing them with lists of research ideas or links to acceptable websites.
- Do consider providing models – both successful and unsuccessful models (Miller, 2007). These models could be provided by past students, or models you have created yourself. You could even ask students to evaluate the models themselves using the determined evaluation criteria, helping them to visualize the final product, think critically about how to complete the assignment, and ideally, recognize success in their own work.
- Do consider including a way for students to make the assignment their own. In their study, Hass and Osborn (2007) confirmed the importance of personal engagement for students when completing an assignment. Indeed, students will be more engaged in an assignment if it is personally meaningful, practical, or purposeful beyond the classroom. You might think of ways to encourage students to tap into their own experiences or curiosities, to solve or explore a real problem, or connect to the larger community. Offering variety in assignment selection can also help students feel more individualized, creative, and in control.
- If your assignment is substantial or long, do consider sequencing it. Far too often, assignments are given as one-shot final products that receive grades at the end of the semester, eternally abandoned by the student. By sequencing a large assignment, or essentially breaking it down into a systematic approach consisting of interconnected smaller elements (such as a project proposal, an annotated bibliography, or a rough draft, or a series of mini-assignments related to the longer assignment), you can encourage thoughtfulness, complexity, and thoroughness in your students, as well as emphasize process over final product.
Next are a few elements to avoid in your assignments:
- Do not ask too many questions in your assignment. In an effort to challenge students, instructors often err in the other direction, asking more questions than students can reasonably address in a single assignment without losing focus. Offering an overly specific “checklist” prompt often leads to externally organized papers, in which inexperienced students “slavishly follow the checklist instead of integrating their ideas into more organically-discovered structure” (Flaxman, 2005).
- Do not expect or suggest that there is an “ideal” response to the assignment. A common error for instructors is to dictate content of an assignment too rigidly, or to imply that there is a single correct response or a specific conclusion to reach, either explicitly or implicitly (Flaxman, 2005). Undoubtedly, students do not appreciate feeling as if they must read an instructor's mind to complete an assignment successfully, or that their own ideas have nowhere to go, and can lose motivation as a result. Similarly, avoid assignments that simply ask for regurgitation (Miller, 2007). Again, the best assignments invite students to engage in critical thinking, not just reproduce lectures or readings.
- Do not provide vague or confusing commands . Do students know what you mean when they are asked to “examine” or “discuss” a topic? Return to what you determined about your students' experiences and levels to help you decide what directions will make the most sense to them and what will require more explanation or guidance, and avoid verbiage that might confound them.
- Do not impose impossible time restraints or require the use of insufficient resources for completion of the assignment. For instance, if you are asking all of your students to use the same resource, ensure that there are enough copies available for all students to access – or at least put one copy on reserve in the library. Likewise, make sure that you are providing your students with ample time to locate resources and effectively complete the assignment (Fitzpatrick, 1989).
The assignments we give to students don't simply have to be research papers or reports. There are many options for effective yet creative ways to assess your students' learning! Here are just a few:
Journals, Posters, Portfolios, Letters, Brochures, Management plans, Editorials, Instruction Manuals, Imitations of a text, Case studies, Debates, News release, Dialogues, Videos, Collages, Plays, Power Point presentations
Ultimately, the success of student responses to an assignment often rests on the instructor's deliberate design of the assignment. By being purposeful and thoughtful from the beginning, you can ensure that your assignments will not only serve as effective assessment methods, but also engage and delight your students. If you would like further help in constructing or revising an assignment, the Teaching, Learning, and Professional Development Center is glad to offer individual consultations. In addition, look into some of the resources provided below.
Online Resources
“Creating Effective Assignments” http://www.unh.edu/teaching-excellence/resources/Assignments.htm This site, from the University of New Hampshire's Center for Excellence in Teaching and Learning, provides a brief overview of effective assignment design, with a focus on determining and communicating goals and expectations.
Gardner, T. (2005, June 12). Ten Tips for Designing Writing Assignments. Traci's Lists of Ten. http://www.tengrrl.com/tens/034.shtml This is a brief yet useful list of tips for assignment design, prepared by a writing teacher and curriculum developer for the National Council of Teachers of English . The website will also link you to several other lists of “ten tips” related to literacy pedagogy.
“How to Create Effective Assignments for College Students.” http:// tilt.colostate.edu/retreat/2011/zimmerman.pdf This PDF is a simplified bulleted list, prepared by Dr. Toni Zimmerman from Colorado State University, offering some helpful ideas for coming up with creative assignments.
“Learner-Centered Assessment” http://cte.uwaterloo.ca/teaching_resources/tips/learner_centered_assessment.html From the Centre for Teaching Excellence at the University of Waterloo, this is a short list of suggestions for the process of designing an assessment with your students' interests in mind. “Matching Learning Goals to Assignment Types.” http://teachingcommons.depaul.edu/How_to/design_assignments/assignments_learning_goals.html This is a great page from DePaul University's Teaching Commons, providing a chart that helps instructors match assignments with learning goals.
Additional References Bean, J.C. (1996). Engaging ideas: The professor's guide to integrating writing, critical thinking, and active learning in the classroom . San Francisco: Jossey-Bass.
Fitzpatrick, R. (1989). Research and writing assignments that reduce fear lead to better papers and more confident students. Writing Across the Curriculum , 3.2, pp. 15 – 24.
Flaxman, R. (2005). Creating meaningful writing assignments. The Teaching Exchange . Retrieved Jan. 9, 2008 from http://www.brown.edu/Administration/Sheridan_Center/pubs/teachingExchange/jan2005/01_flaxman.pdf
Hass, M. & Osborn, J. (2007, August 13). An emic view of student writing and the writing process. Across the Disciplines, 4.
Hedengren, B.F. (2004). A TA's guide to teaching writing in all disciplines . Boston: Bedford/St. Martin's.
Hudd, S. S. (2003, April). Syllabus under construction: Involving students in the creation of class assignments. Teaching Sociology , 31, pp. 195 – 202.
Leahy, R. (2002). Conducting writing assignments. College Teaching , 50.2, pp. 50 – 54.
Miller, H. (2007). Designing effective writing assignments. Teaching with writing . University of Minnesota Center for Writing. Retrieved Jan. 9, 2008, from http://writing.umn.edu/tww/assignments/designing.html
MIT Online Writing and Communication Center (1999). Creating Writing Assignments. Retrieved January 9, 2008 from http://web.mit.edu/writing/Faculty/createeffective.html .
Contact TTU
The Cowbell
News and Resources from UWGB's Center for the Advancement of Teaching and Learning
Assignment Design
There’s a fine line between assignment design and assessment strategies . In short, designing good assignments is one means of assessing your students’ learning on a larger scale.
Assignments help measure student learning in your course. Effective assignment design in your course involves aligning your assignments with learning outcomes. When assignments and outcomes are aligned, good grades and good learning go hand in hand ( https://www.cmu.edu/teaching/designteach/design/assessments.html ).
Assessments fall into one of two categories, formative or summative .
Formative assessments are typically low-stakes and help students identify their strengths and weaknesses so that they can improve their learning. Routine formative assessments also help instructors identify the areas where students are struggling and adapt their teaching accordingly.
Summative assessments evaluate student learning (such as at the end of a unit of instruction). Summative assessments are generally higher stakes (like midterm exams and final projects).
Assignments are what students actually ‘do’ as part of those assessments.
Incorporating a mix of assignment activities in your course can help students practice and demonstrate their mastery of outcomes in multiple ways. Consider ways you can design your assignments so that they better mirror the application of knowledge in real-world scenarios. Assignments designed in this way are often referred to as Authentic Assessments ( Authentic-assessment.pdf (uwex.edu)). One type of highly authentic assessment is the long-term project which challenges students to solve a problem or complete a challenge requiring the application of course concepts ( Project_Based_Learning.pdf (uwex.edu) ).
More details and examples can be found in the tabbed content box below. Please also consider signing up for a CATL consultation with one of our instructional designers for some personalized assistance in developing your ideas for assignments and ensuring that they align with your course outcomes .
(Adapted from Carnegie Mellon's: Design and Teach a Course )
Assessments should provide instructors and students with evidence of how well students have mastered the course outcomes.
There are two major reasons for aligning assessments with learning outcomes.
- Alignment increases the probability that we will provide students with the opportunities to learn and practice knowledge and skills that instructors will require students know in the objectives and in the assessments. (Teaching to the assessment is a good thing.)
- When instructors align assessments with outcomes, students are more likely to translate "good grades" into "good learning." Conversely, when instructors misalign assessments with objectives, students will focus on getting good grades on the assessments, rather than focusing on mastering the material that the instructor finds important.
Instructors may use different types of assessments to measure student proficiency in a learning objective. Moreover, instructors may use the same activity to measure different objectives. To ensure a more accurate assessment of student proficiency, many instructional designers recommend that you use different kinds of activities so that students have multiple ways to practice and demonstrate their knowledge and skills.
Formative assessment
The goal of formative assessment is to monitor student learning to provide ongoing feedback that can be used by instructors to improve their teaching and by students to improve their learning. More specifically, formative assessments:
- help students identify their strengths and weaknesses and target areas that need work
- help faculty recognize where students are struggling and address problems immediately
Formative assessments are generally low stakes , which means that they have low or no point value. Examples of formative assessments include asking students to:
- draw a concept map in class to represent their understanding of a topic
- submit one or two sentences identifying the main point of a lecture
- turn in a research proposal for early feedback
Summative assessment
The goal of summative assessment is to evaluate student learning at the end of an instructional unit by comparing it against some standard or benchmark.
Summative assessments are often high stakes , which means that they have a high point value. Examples of summative assessments include:
- a midterm exam
- a final project
- a senior recital
Information from summative assessments can be used formatively when students or faculty use it to guide their efforts and activities in subsequent courses.
Formative Assessments:
- Reading quizzes
- Concept map
- Muddiest point
- Pro/con grid
- Focused paraphrasing
- Reflective journal
- Virtual lab/game
- Webconference
- Debate (synchronous or asynchronous)
- Participant research
- Peer review
Summative Assessments:
- Presentation
- Portfolio project
Carnegie Mellon University on Aligning Assessments with Objectives with examples.
Items to consider when weighing your assessment options:
If you are thinking about using discussions, be sure to think about the following:.
- What kind of questions/situations do you want the students to discuss? Is it complex enough to allow students to build knowledge beyond the textbook? Will the discussion help students meet your objectives (and develop an answer for your essential questions)?
- What are your expectations for discussions? Should students participate (post) a certain number of times, with a certain number of words, and reply to a certain number of people?
- What is your role in the discussion (traffic cop, the person who clarifies issues, will you respond to every post)?
If you are thinking about using quizzes, be sure to think about the following:
- What type of questions will help your students meet the objectives of the course? Are you going to grade essay questions or just let the computer grade multiple choice questions?
- What is the place for academic integrity? Are you going to randomize questions, randomize answers, restrict time, restrict the answers that students can see after completing the exam?
- How are you going to populate your quiz? Are you going to write the questions or use questions that come from a textbook publisher?
If you are thinking of using essays, be sure to think about the following:
- Will these essays/papers help students to meet the course objectives, which ones? Is the length of the essay appropriate?
- What do you think about plagiarism checkers such as TurnItIn?
- To what extent will you allow students to submit drafts, and will you provide feedback on drafts, or will you use a peer review system?
Other items to consider:
- Are you thinking about using an alternative assignment? If so, you may want to talk with an instructional technologist or designer.
- Consider the type of feedback you will provide for each assignment. What should students expect from you; how will you communicate those expectations; and how soon will you provide feedback (realistically)?
Further resources
Small teaching online.
This book (requires UWGB login) contains many tips that are easy to integrate into your distance education class. The chapter on “ surfacing backward design” contains many tips for assessment for online classes, many of which are adaptable to all distance modalities.
CATL Resources
- Collaborative Learning Assignments (Toolbox article)
- Administering Tests and Quizzes (including alternatives) (Toolbox article)
- Writing Good Multiple Choice Questions ( TeAch Tuesday , YouTube)
Tip sheets from UW-System
UW-System put together some tip sheets for common sticking points in assessment for distance education.
- Writing effective multiple choice questions
- Authentic assessments
- Unproctored online assessments
- Project-based learning
Department Info
- Center for the Advancement of Teaching and Learning , CL 405 UW-Green Bay, 2420 Nicolet Drive Green Bay , WI 54311-7001
- (920) 465-2541 [email protected]
- Events & Programs
UW-Green Bay
- University of Wisconsin-Green Bay 2420 Nicolet Drive Green Bay , WI 54311 , USA
- UW-Green Bay Mission
- College Portrait
- Connect with UWGB: facebook twitter flickr youtube
- General Contact: (920) 465-2000 or [email protected]
- Report a website issue
- Privacy Policy
- Emergency Information: emergency.uwgb.edu
- Online Learning
- Arts & Performances
- Cofrin Library
- Departments & People
- Faculty & Staff
- A to Z index
- Departments

Want to create or adapt books like this? Learn more about how Pressbooks supports open publishing practices.
16 Transparent assignment design

Transparent assignment design is a component of the Transparency in Learning and Teaching ( TILT ) framework that aims to make learning and assessment more explicit for students. Studies show that conveying the purpose, task, and criteria of assignments helps students meet the assignment’s expectations and increases academic performance (Winkelmes, 2016). Transparently designed educational experiences enhance learning for all students, increasing their academic achievement, sense of belonging, and graduation and retention rates, especially for underserved student populations (Winkelmes, 2016).
To effectively implement this strategy into your course, you can start by stating the purpose, task, and criteria of learning experiences (e.g., an assignment, office hours, group work activity, or a final exam). This method has shown significant results even after modifying only two assignments in a course.
Purpose: The purpose section clearly states the assignment’s learning objectives and connects them to the broader course context and to critical skills and knowledge that students will gain or develop through this experience. In the transparent assignment template, Mary-Ann Winkelmes suggests these phrases: “The purpose of this assignment is to help you practice the following skills that are essential to your success in this course / in school / in this field / in professional life beyond school …” and “This assignment will also help you to become familiar with the following important content knowledge in this discipline …” (Winkelmes, 2013).
Task: In the task section, share concrete steps students should take to perform this activity. You can also discuss potential mistakes students should avoid. If figuring out the process is a part of a task, you could explicitly state that: “The purpose of this assignment is for you to struggle and feel confused while you invent and test your own approach for addressing the problem.” (Winkelmes, 2013).
Criteria for success: In the criteria section, describe the characteristics of the finished assignment and share multiple examples of presenting the result. Share rubrics, evaluation guidelines, and principles. Understanding assignment criteria helps nurture students’ self-assessment skills.
To make your assignments more transparent, consult the TILT checklist, template , and rubric to measure transparency. We also encourage you to participate in our asynchronous self-paced Transparent Course Design Workshop .
The Center for Teaching staff also offer partnership for instructors who would like to produce research on the efficacy of their assignment design. Please see the Scholarship of Teaching and Learning (SoTL) program web pages for more information on developing and conducting SoTL.
💡 Draft a transparent assignment:
Choose a major assignment or a learning activity you would like to introduce to your students during the first days of your course. Formulate its purpose, task, and criteria. Write out and format this assignment as you would for your students. This part should look like an artifact (e.g., a handout or a presentation slide) you could use in your class.
Handbook for Teaching Excellence Copyright © 2022 by University of Iowa - Center for Teaching. All Rights Reserved.
Share This Book
Feedback/errata.
Comments are closed.
32 HTML And CSS Projects For Beginners (With Source Code)

updated Apr 17, 2024
If you want to feel confident in your front-end web developer skills, the easiest solution is to start building your own HTML and CSS projects from scratch.
As with any other skill, practicing on simple, realistic projects helps you build your skills and confidence step-by-step.
But if you are new to HTML and CSS, you may be wondering:
Where can I find ideas for beginner-level HTML and CSS projects?
Even if you are just starting out with HTML and CSS, there are some fun and easy projects you can create.
Whether you are new to learning web development or have some experience under your belt, this guide is the perfect place to start improving your skills.
In this article, I’ll walk you through 32 fun HTML and CSS coding projects that are easy to follow. We will start with beginner-level projects and then move on to more demanding ones.
If you want to become a professional front-end developer, the projects below will help you expand your portfolio.
When it’s time to apply for your first entry-level job, you can showcase your skills to potential employers with a portfolio packed with real-life project examples.
Let’s get started!
Please note: This post contains affiliate links to products I use and recommend. I may receive a small commission if you purchase through one of my links, at no additional cost to you. Thank you for your support!
What are HTML and CSS?
HTML and CSS are the most fundamental languages for front-end web development.
Learning them will allow you to:
- Build stunning websites
- Start a coding blog
- Make money freelancing
Let’s take a quick look at both of them next:
What is HTML?
HTML or HyperText Markup Language is the standard markup language for all web pages worldwide.
It’s not a “typical” programming language – like Python or Java – since it doesn’t contain any programming logic. HTML can’t perform data manipulations or calculations, for example.
Instead, HTML allows you to create and format the fundamental structure and content of a web page.
You will use HTML to create:
- Page layouts (header, body, footer, sidebar)
- Paragraphs and headings
- Input fields
- Checkboxes and radio buttons
- Embedded media
Thus, HTML only allows you to determine the structure of a web page and place individual content elements within it.
For more details, check out my post on what HTML is and how it works .
You can’t format the look and feel of your web page with HTML, though.
Your HTML web page will look dull and boring. Sort of like this:

The example above is the first web page every built for the WWW , by the way.
This is how websites used to look in the ’90s. But we’ve come a long way since then – luckily.
To make your HTML content visually appealing and professional-looking, you need another language: CSS. Let’s look at that next.
What is CSS?
CSS or Cascading Style Sheets is a style sheet language that allows you to adjust the design and feel of your HTML content.
Thus, you can turn your pure-HTML pages into stunning, modern websites with CSS. And it’s super easy to learn, too!
Here’s how it works:
CSS allows you to target individual HTML elements and apply different styling rules to them.
For example, here’s a CSS rule that targets H2 headings, their font-size property, and sets it to a value of 24px:
You can use CSS to adjust:
- Backgrounds
- Fonts and text styling
- Spacings (paddings, margins)
- CSS animations
- Responsiveness (media queries)
If you want to create stunning websites and become a front-end web developer, CSS is one of the first tools you must learn and master.
For more details, check out my post on what CSS is and how it works .

Why build HTML and CSS projects?
Practicing on realistic, hands-on projects is the best way to learn how to create something useful and meaningful with HTML and CSS.
The more projects you build, the more confident you will feel in your skills.
To build a web page from scratch , you need a basic understanding of how HTML works. You should be comfortable with writing the necessary HTML code to create a page without copying a boilerplate or following a tutorial.
Thus, if you want to become a front-end web developer , building HTML and CSS projects will teach you how to use these two languages in real life.
Therefore, practising your skills with the projects in this article will give you a competitive edge against anyone who’s simply following tutorials and copy-pasting other people’s code.
Finally, building HTML and CSS projects helps you build a professional portfolio of real-world projects.
When it’s time to start applying for your first job, you will have 10 to 20 cool projects to showcase your skills to potential employers. Not bad!
32 HTML and CSS projects: Table of contents
Here’s an overview of the HTML and CSS projects we’ll go through:
Beginner project: CSS radio buttons
Beginner project: css toggle buttons, beginner project: hamburger menu, beginner project: pure css sidebar toggle menu, beginner project: animated css menu, beginner project: custom checkboxes, beginner project: pure css select dropdown, beginner project: modal/popup without javascript, beginner project: animated gradient ghost button, beginner project: css image slider, basic html & css website layout, tribute page, survey page with html forms, sign-up page / log-in page, job application form page, landing page, product landing page, interactive navigation bar, responsive website header, restaurant menu, restaurant website, parallax website, custom 404 error page, personal portfolio website, blog post layout.
- Photography website
Music store website
Discussion forum website.
- Event or conference website
Technical documentation website
Online recipe book, website clone.
Share this post with others!

This quick project is a great example of what you can do with pure CSS to style radio buttons or checkboxes:
See the Pen CSS radio buttons by Angela Velasquez ( @AngelaVelasquez ) on CodePen .
☝️ back to top ☝️
This HTML and CSS project teaches you how to create custom CSS toggle buttons from scratch:
See the Pen Pure CSS Toggle Buttons | ON-OFF Switches by Himalaya Singh ( @himalayasingh ) on CodePen .
Every website needs a menu, right?
This hamburger menu is beautiful and clean, and you can build it with just HTML and CSS:
See the Pen Pure CSS Hamburger fold-out menu by Erik Terwan ( @erikterwan ) on CodePen .
Placing your website navigation inside a sidebar toggle is an easy way to clean up the overall look and feel of your design.
Here’s a modern-looking solution to a pure-CSS sidebar toggle menu:
See the Pen PURE CSS SIDEBAR TOGGLE MENU by Jelena Jovanovic ( @plavookac ) on CodePen .
If you want to build a more dynamic, interactive website navigation, try this animated CSS menu:
See the Pen Animate menu CSS by Joël Lesenne ( @joellesenne ) on CodePen .
Styling your checkboxes to match the overall design is an easy way to elevate the look and feel of your website.
Here’s an easy HTML and CSS practice project to achieve that:
See the Pen Pure CSS custom checkboxes by Glen Cheney ( @Vestride ) on CodePen .
Standard select dropdowns often look dull and boring. Here’s a quick CSS project to learn how to create beautiful select dropdowns easily:
See the Pen Pure CSS Select by Raúl Barrera ( @raubaca ) on CodePen .
Modals and popups often use JavaScript, but here’s a pure HTML and CSS solution to creating dynamic, interactive modals and popups:
See the Pen Pure css popup box by Prakash ( @imprakash ) on CodePen .
Ghost buttons can look great if they fit the overall look and feel of your website.
Here’s an easy project to practice creating stunning, dynamic ghost buttons for your next website project:
See the Pen Animated Gradient Ghost Button Concept by Arsen Zbidniakov ( @ARS ) on CodePen .
This image slider with navigation buttons and dots is a fantastic HTML and CSS project to practice your front-end web development skills:
See the Pen CSS image slider w/ next/prev btns & nav dots by Avi Kohn ( @AMKohn ) on CodePen .
Now, before you start building full-scale web pages with HTML and CSS, you want to set up your basic HTML and CSS website layout first.
The idea is to divide your page into logical HTML sections. That way, you can start filling those sections with the right elements and content faster.
For example, you can break up the body of your page into multiple parts:
- Header: <header>
- Navigation: <nav>
- Content: <article>
- Sidebar: <aside>
- Footer: <footer>

Depending on your project, you can fill the article area with a blog post, photos, or other content you need to present.
This layout project will serve as a starting point for all your future HTML and CSS projects, so don’t skip it.
Having a template like this will speed up your next projects, because you won’t have to start from scratch.
Here are two tutorials that will walk you through the steps of creating a basic website layout using HTML and CSS:
- https://www.w3schools.com/html/html_layout.asp
- https://www.w3schools.com/css/css_website_layout.asp
Building a tribute page is fantastic HTML and CSS practice for beginners.
What should your tribute page be about?
Anything you like!
Build a tribute page about something you love spending time with.
Here are a few examples:
- a person you like
- your favorite food
- a travel destination
- your home town
My first HTML-only tribute page was for beetroots. Yes, beetroots. I mean, why not?

HTML and CSS concepts you will practice:
- HTML page structure
- basic HTML elements: headings, paragraphs, lists
- embedding images with HTML
- CSS fundamentals: fonts and colors
- CSS paddings, margins, and borders
Here’s a helpful tutorial for building a HTML and CSS tribute page .
Whether you want to become a full-time web developer or a freelance web designer, you will use HTML forms in almost every project.
Forms allow you to build:
- Contact forms
- Login forms
- Sign up forms
- Survey forms
Building a survey page allows you to practice HTML input tags, form layouts, radio buttons, checkboxes, and more.
Pick any topic you like and come up with 10 pieces of information you want to collect from respondents.
Perhaps an employee evaluation form? Or a customer satisfaction form?
- form elements: input fields, dropdowns, radio buttons, labels
- styling for forms and buttons
Here’s an example survey form project for inspiration:
See the Pen Good Vibes Form by Laurence ( @laurencenairne ) on CodePen .
Let’s practice those HTML forms a bit more, shall we?
For this project, you will build a sign-up or log-in page with the necessary input fields for a username and a password.
Because we can create a user profile on almost every website, forms are absolutely essential for allowing people to set their usernames and passwords.
Your forms will collect inputs from users and a separate back-end program will know how to store and process that data.
Creating a clean and clear sign-up page can be surprisingly difficult. The more you learn about HTML and CSS, the more content you want to create to showcase your skills. But the thing is: a sign-up page needs to be as clean and easy-to-use as possible.
Thus, the biggest challenge with this project is to keep it simple, clear, and light.
Here’s an example project to get started with:
See the Pen Learn HTML Forms by Building a Registration Form by Noel ( @WaterNic10 ) on CodePen .
For more inspiration, check out these 50+ sign-up forms built with HTML and CSS .
Using a HTML form is the best way to collect information from job applicants.
You can also generate and format a job description at the top of the page.
Then, create a simple job application form below to collect at least 10 pieces of information.
Use these HTML elements, for example:
- Text fields
- Email fields
- Radio buttons
Here’s an example job application page you can build with HTML and CSS:
See the Pen Simple Job Application Form Example by Getform ( @getform ) on CodePen .
One of your first HTML and CSS projects should be a simple landing page.
Your landing page can focus on a local business, an event, or a product launch, for example.
Landing pages play an important role for new businesses, marketing campaigns, and product launches. As a front-end developer, you will be asked to create them for clients.
For this project, create a simple HTML file and style it with CSS. Be sure to include a headline, some text about the company or its services, and a call-to-action (CTA) button.
Make sure that your landing page is clean and clear and that it’s easy to read.
If you build a landing page for a new product, highlight the product’s key benefits and features.
To get started, follow this freeCodeCamp tutorial to build a simple landing page . You will need JavaScript for a few features. If you are not familiar with JavaScript, leave those features out for now and come back to them later.
For more inspiration, check out these HTML landing page templates .

A product landing page is a page that you build to promote a specific product or service.
For example, if you want to sell your ebook about how to use CSS to build an animated website, then you would create a product landing page for it.
Your product landing page can be very simple to start with. When your skills improve, add some complexity depending on what kind of information you need to present.
One of the most iconic product landing pages is the iPhone product page by Apple, for example:

Of course, the iPhone landing page is technically complex, so you won’t build it as your first project. But still, it’s a good place to find inspiration and new ideas.
The best way to design your first product landing page is to create a simple wireframe first. Sketch your page layout on paper before you start building it.
Wireframes help you maintain a clear overview of your HTML sections and elements.
To get started, browse through these product landing page examples for some inspiration .
Building an interactive navigation bar will teach you how to create an animated menu with dropdowns using HTML and CSS.
This is another great project for beginners, because it will teach you how to create menus using HTML and CSS. You’ll also learn how to style them with different colors, fonts, and effects.
You’ll also learn how to use anchors and pseudo-classes to create the menu navigation, as well as how to create the dropdown menus from scratch.
If you aren’t familiar with CSS media queries yet, building a responsive navigation bar is a smart way to learn and practice them.
CSS media queries allow you to create a responsive navigation menu that changes its size and layout depending on screen width.
To get started, check out this tutorial on how to build an interactive navigation bar with HTML and CSS .
One of the best ways to practice your HTML and CSS skills is to create custom website headers. This is a great project to add to your portfolio website, as it will show off your skills and help you attract new clients.
There are a number of different ways that you can create a stylish and responsive website header. One option is to use a premade CSS framework such as Bootstrap or Foundation. Alternatively, you can create your own custom styles by hand.
No matter which option you choose, be sure to make your header mobile-friendly by using media queries. This will ensure that your header looks great on all devices, regardless of their screen size or resolution.
To get started, check out this simple example for a responsive HTML and CSS header .
If you’re looking to get into web development, one of the best HTML and CSS projects you can build is a simple restaurant menu.
Align the different foods and drinks using a CSS layout grid.
Add prices, images, and other elements you need to give it a professional, clean look and feel.
Choose a suitable color palette, fonts, and stock photos.
You can also add photos or a gallery for individual dishes. If you want to add an image slider, you can create one with HTML and CSS, too.
Here’s an example of a very simple restaurant menu project:
See the Pen Simple CSS restaurant menu by Viszked Tamas Andras ( @ViszkY ) on CodePen .
Once you’ve built your restaurant menu with, it’s time to tackle a more complex HTML and CSS project.
Building a real-life restaurant website is a fun way to practice a ton of HTML and CSS topics.
Not only will you learn the basics of creating a beautiful, professional web page, but you also get a chance to practice responsive web design, too.
And if you’re looking to land your first front-end web developer job, having a well-designed business website in your portfolio will help you stand out from the crowd.

Make sure your website matches the restaurant’s menu and target clientele. A fine-dining place on Manhattan will have a different website than a simple (but delicious!) diner in rural Wisconsin.
Here are a few key details to include on your restaurant website:
- Clear navigation bar
- Restaurant details
- Menu for food and drinks
- Location and directions
- Contact details
- Upcoming events
To get started, check out this free tutorial on how to build a restaurant website with HTML and CSS .
To build a parallax website, you will include fixed background images that stay in place when you scroll down the page.
Although the parallax look isn’t as popular or modern as it was a few years back, web designers still use the effect a lot.
The easiest way to build a parallax HTML and CSS project is to start with a fixed background image for the entire page.
After that, you can experiment with parallax effects for individual sections.
Create 3-5 sections for your page, fill them with content, and set a fixed background image for 1-2 sections of your choice.
Word of warning: Don’t overdo it. Parallax effects can be distracting, so only use them as a subtle accent where suitable.
Here’s an example project with HTML and CSS source code:
See the Pen CSS-Only Parallax Effect by Yago Estévez ( @yagoestevez ) on CodePen .
404 error pages are usually boring and generic, right?
But when a visitor can’t find what they’re searching for, you don’t want them to leave your website.
Instead, you should build a custom 404 error page that’s helpful and valuable, and even fun and entertaining.
A great 404 page can make users smile and – more importantly – help them find what they are looking for. Your visitors will appreciate your effort, trust me.
For some inspiration, check out these custom 404 page examples .
Any web developer will tell you that having a strong portfolio is essential to landing your first job.
Your portfolio is a chance to show off your skills and demonstrate your expertise in front-end web development.
And while there are many ways to create a portfolio website, building one from scratch using HTML and CSS will give you tons of valuable practice.
Your first version can be a single-page portfolio. As your skills improve, continue adding new pages, content, and features. Make this your pet project!
Remember to let your personality shine through, too. It will help you stand out from the crowd of other developers who are vying for the same jobs.
Introduce yourself and share a few details about your experience and future plans.
Employers and clients want to see how you can help them solve problems. Thus, present your services and emphasize the solutions you can deliver with your skills.
Add your CV and share a link to your GitHub account to showcase your most relevant work samples.
Make sure to embed a few key projects directly on your portfolio website, too.
Finally, let your visitors know how to get in touch with you easily. If you want, you can add links to your social media accounts, too.
In this project, you’ll create a simple blog post page using HTML and CSS.
You’ll need to design the layout of the page, add a title, a featured image, and of course add some content to your dummy blog post.
You can also add a sidebar with a few helpful links and widgets, like:
- An author bio with a photo
- Links to social media profiles
- List of most recent blog posts
- List of blog post categories
Once your HTML structure and content are in place, it’s time to style everything with CSS.
Photography website with a gallery
If you’re a photographer or just enjoy taking pictures, then this project is for you.
Build a simple photo gallery website using HTML and CSS to practice your web design skills.
Start with the basic HTML structure of the page, and figure out a cool layout grid for the photos. You will need to embed the photos and style everything beautiful with CSS.
My tip: Use CSS Flexbox and media queries to create a responsive galleries that look great on all devices.
Here’s a full tutorial for building a gallery website with HTML and CSS:
If you love music, why not practice your HTML and CSS skills by building a music store web page?
Before you start, make a thorough plan about your website structure. What’s the purpose of your music store? What genres will you cover?
Pick a suitable color palette, choose your fonts, and any background images you want to use.
My tip: If you feature album cover images, keep your colors and fonts as clean and simple as possible. You don’t want to overpower the album covers with a busy web page with tons of different colors and mismatching fonts.
Create a user-friendly menu and navigation inside the header. Fill the footer with helpful links for your store, career page, contact details, and newsletter form, for example.
Building a music store website with HTML and CSS is a great opportunity to practice your skills while you are still learning.
Start with very basic features, and add new ones as your skills improve. For example, you can add media queries to make your website responsive.
A forum is a great way to create a community around a topic or interest, and it’s also a great way to practice your coding skills.
In this project, you’ll create a simple forum website using HTML and CSS.
You’ll need to design the layout of the site, add categories and forums, and set up some initial content.
Of course, you should start with creating the basic layout and structure with HTML first. You will need a navigation bar, at least one sidebar, and an area for the main content.
To make your discussion forum website more interesting, add new content and remember to interlink related threads to make the site feel more realistic.
Event or conference web page
Creating a web page for an event is a fun HTML and CSS project for beginners.
You can either pick a real event and build a better landing page than the real one, or come up with an imaginary conference, for example.
Make sure to include these elements:
- Register button
- Venue details
- Dates and schedule
- Speakers and key people
- Directions (how to get there)
- Accommodation details
Divide the landing page into sections, and create a header and a footer with menus and quick links.
Come up with a suitable color palette, pick your fonts, and keep your design clean and clear.
Every programming language, software, device and gadget has a technical documentation for helpful information and support.
Creating a technical documentation website with just HTML and CSS allows you to build a multi-page site with hierarchies, links, and breadcrumbs.
The main idea is to create a multi-page website where you have a sidebar menu on the left, and the content on the right.
The left-hand side contains a vertical menu with all the topics your documentation covers.
The right-hand side presents the description and all the details for each individual topic.
For simplicity, start with the homepage and 2–3 subpages first. Come up with a clean layout and make sure your links are working properly.
Then, start expanding the website with additional sub-pages, content, and elements.
- HTML hyperlinks and buttons
Creating an online recipe book as an HTML and CSS project requires a similar setup than the previous project example.
You will need to create a homepage that serves as a directory for all your recipes. Then, create a separate subpage for each recipe.
If you want to challenge yourself, add recipe categories and create separate directory pages for each of them.
- embedding recipe photos
One of the best ways to practice HTML and CSS is to clone an existing web page from scratch.
Use your browser’s inspecting tools to get an idea of how the page is built.
As with any HTML and CSS project, start by creating the basic page template with:
Then, divide your page into sections, rows, and columns.
Finally, fill your page with individual elements like headings, paragraphs, and images.
Once the HTML content is in place, use CSS to style your page.
Start with something simple, like the PayPal login page.
Then move on to more demanding cloning projects, such as a news website. Try the BBC homepage, for example.
Where to learn HTML and CSS?
There are no prerequisites required for you to learn HTML and CSS.
Both languages are easy to learn for beginners, and you can start building real-life projects almost right away.
Here are a few courses to check out if you want to learn HTML and CSS online at your own pace:
1: Build Responsive Real World Websites with HTML5 and CSS3

Build Responsive Real World Websites with HTML5 and CSS3 was my first online web development course focused 100% on HTML and CSS.
You don’t need any coding or web development experience for this course. But if you have watched some online tutorials but you’re not sure how to create a full-scale website by yourself, you are going to love it.
2: The Complete Web Developer Course 2.0

The Complete Web Developer Course 2.0 changed my life back when I started learning web development.
This course takes you from zero to knowing the basics of all fundamental, popular web development tools. You’ll learn:
- HTML and CSS
- JavaScript and jQuery
- and much more
3: Modern HTML & CSS From The Beginning (Including Sass)

I’m a big fan of Brad Traversy, and I really can’t recommend his Modern HTML & CSS From The Beginning course enough.
Even if you have never built a website with HTML and CSS before, this course will teach you all the basics you need to know.
4: The Complete 2023 Web Development Bootcamp

One of my most recent favorites, The Complete 2023 Web Development Bootcamp by Dr. Angela Yu is one of the best web development courses for beginners I’ve come across.
If you’re not quite sure what area or language to specialize in, this course is the perfect place to try a handful of tools and programming languages on a budget.
5: Learn HTML (Codecademy)

Learn HTML is a free beginner-level course that walks you through the fundamentals with interactive online lessons.
Codecademy also offers a plethora of other web development courses. Check out their full course catalog here .
6: Responsive Web Design (freeCodeCamp)

The Responsive Web Design certification on FreeCodeCamp is great for learning all the basics of web development from scratch for free.
You start with HTML and CSS to get the hang of front-end web dev fundamentals. Then, you start learning new tools and technologies to add to your toolkit, one by one.
Also, check out these roundups with helpful web development courses:
- 27 Best Web Development Courses (Free and Paid)
- 20+ Web Development Books for Beginners
- 120+ Free Places to Learn to Code (With No Experience)
- 100+ Web Development Tools and Resources
Final thoughts: HTML and CSS project ideas for beginners
There you go!
When it comes to learning HTML and CSS, practice really makes perfect. I hope you found a few inspirational ideas here to start building your next project right away.
Learning HTML and CSS may seem intimidating at first, but when you break it down into small, less-intimidating projects, it’s really not as hard as you might think.
HTML and CSS are easy to learn. You can use them to create really cool, fun projects – even if you are new to coding.
Try these beginner-level HTML and CSS project ideas to improve your front-end web development skills starting now. Do your best to build them without following tutorials.
Remember to add your projects to your portfolio website, too.
It’s possible to learn how to code on your own, and it’s possible to land your first developer job without any formal education or traditional CS degree.
It all boils down to knowing how to apply your skills by building an awesome portfolio of projects like the ones above.
So, which project will you build first? Let me know in the comments below!
Once you feel comfortable with HTML and CSS, it’s time to start learning and practising JavaScript .
To get started, check out my guide with 20+ fun JavaScript projects ideas for beginners . I’ll see you there!
Share this post with others:
About mikke.
Hi, I’m Mikke! I’m a blogger, freelance web developer, and online business nerd. Join me here on MikkeGoes.com to learn how to code for free , build a professional portfolio website , launch a tech side hustle , and make money coding . When I’m not blogging, you will find me sipping strong coffee and biking around town in Berlin. Learn how I taught myself tech skills and became a web dev entrepreneur here . And come say hi on Twitter !
Leave a reply:
Download 15 tips for learning how to code:.
GET THE TIPS NOW
Sign up now to get my free guide to teach yourself how to code from scratch. If you are interested in learning tech skills, these tips are perfect for getting started faster.

HTML Projects for Beginners: 10 Easy Starter Ideas
Published: December 11, 2023
Are you eager to level up your HTML skills? Embarking on HTML projects for beginners is an excellent way to start. As someone who once stood where you are now, I can confidently say that the journey from HTML novice to proficiency is both thrilling and immensely rewarding. It's not just about learning a language; it’s about creating and bringing your ideas to life.

In my early days of exploring web development, HTML was the cornerstone that laid the foundation for my career. Now, with several years of experience in web development and a passion for being a resource for beginners, I understand the importance of starting with practical, easy-to-follow projects.
In this blog, I'm excited to share with you a curated list of HTML projects that are perfect for beginners. These projects are designed not only to increase your understanding of HTML but also to spark your creativity and enthusiasm for web development.
![Download Now: 25 HTML & CSS Hacks [Free Guide]](https://no-cache.hubspot.com/cta/default/53/848be230-f06a-420e-9a24-82b45fe61632.png "simple design for assignment")
Table of Contents
- Understanding the Basics
- Project 1: Personal Portfolio Page
- Project 2: Simple Blog Layout
- Project 3: Landing Page
- Project 4: eCommerce Page
- Project 5: Recipe Page
- Project 6: Technical Documentation
- Project 7: Small Business Homepage
- Project 8: Simple Survey Form
- Project 9: Event Invitation Page
- Project 10: Parallax Website
The Road Ahead in Web Development
Understanding the basics: what is html.
Before I dive into the exciting world of HTML projects, I want to share why grasping the basics of HTML is crucial. HTML , which stands for HyperText Markup Language, is the foundational building block of the web. It’s not a programming language, but a markup language that I use to define the structure and layout of a web page through various elements and tags.
To me, HTML is like creating a framework for web content, similar to how an architect designs a building's blueprint. You would use tags to mark up text, insert images, create links, and lay out web pages in a format that browsers can understand and display. These tags , the basic units of HTML, help differentiate between headings, paragraphs, lists, and other content types, giving the web its versatile and user-friendly nature.

Every web developer starts somewhere, and for many, including myself, that starting point is HTML. It's a language that empowers me to create, experiment, and develop various digital experiences . So, as we embark on these beginner projects, remember that you're not just learning a new skill. You are stepping into a world full of endless possibilities and opportunities.
10 HTML Projects for Beginners: Your Journey Starts Here
As a web developer passionate about teaching, I‘m thrilled to guide you through this series. This section is crafted to progressively enhance your skills, offering a blend of creativity and learning. I’ve seen firsthand how these projects can transform beginners into confident creators, and I‘m excited to see the unique and innovative web experiences you’ll bring to life. Let's embark on this adventure together, turning code into compelling digital stories!
Project 1: Creating a Personal Portfolio Page
One of the best ways to start your HTML journey is by creating a personal portfolio page. This project allows you to introduce yourself to the world of web development while learning the basics of HTML. It’s not just about coding; it’s about telling your story through the web.
The objective here is to craft a web page that effectively portrays your personal and professional persona. This includes detailing your biography, showcasing your skills, and possibly even including a portfolio of work or projects you've completed. This page will be a cornerstone in establishing your online presence and can evolve as you progress in your career.
See the Pen HTML Project 1 by HubSpot ( @hubspot ) on CodePen .
- Showcase and Evolve : I'm selecting projects that best represent my abilities, and I plan to continually update my portfolio as I develop new skills.
- Simplicity and Clarity : My focus is on creating a clear, user-friendly layout that makes navigating my story and achievements effortless for visitors.
Project 2: Building a Simple Blog Layout
After creating a personal portfolio, the next step in your HTML journey is to build a simple blog layout. This project will introduce you to more complex structures and how to organize content effectively on a webpage.
The goal of this project is to create a basic blog layout that includes a header, a main content area for blog posts, and a footer. This layout serves as the foundation for any blog, providing a clear structure for presenting articles or posts.
See the Pen HTML Project 2 by HubSpot ( @hubspot ) on CodePen .
- Consistency is Key : In designing the blog, I'm focusing on maintaining a consistent style throughout the page to ensure a cohesive look.
- Content First : My layout will prioritize readability and easy navigation, making the content the star of the show.
Project 3: Designing a Landing Page
For the third project, let's shift gears and focus on creating a landing page. A landing page is a pivotal element in web design, often serving as the first point of contact between a business or individual and their audience. This project will help you learn how to design an effective and visually appealing landing page.
The objective is to create a single-page layout that introduces a product, service, or individual, with a focus on encouraging visitor engagement, such as signing up for a newsletter, downloading a guide, or learning more about a service.
See the Pen HTML Project 3 by HubSpot ( @hubspot ) on CodePen .
- Clear Call to Action : I'm ensuring that my landing page has a clear and compelling call to action (CTA) that stands out and guides visitors towards the desired engagement.
- Visual Appeal and Simplicity : My focus is on combining visual appeal with simplicity, making sure the design is not only attractive but also easy to navigate and understand.
Project 4: Crafting an eCommerce Page
Creating an eCommerce page is an excellent project for web developers looking to dive into the world of online retail. This project focuses on designing a web page that showcases products, includes product descriptions, prices, and a shopping cart.
The aim is to build a user-friendly and visually appealing eCommerce page that displays products effectively, providing customers with essential information and a seamless shopping experience. The page should include product images, descriptions, prices, and add-to-cart buttons.
See the Pen HTML Project 4 by HubSpot ( @hubspot ) on CodePen .
- Clarity and Accessibility : In designing the eCommerce page, my priority is to ensure that information is clear and accessible, making the shopping process straightforward for customers.
- Engaging Product Presentation : I'll focus on presenting each product attractively, with high-quality images and concise, informative descriptions that entice and inform.

Project 5: Developing a Recipe Page
One of the best ways to enhance your HTML and CSS skills is by creating a recipe page. This project is not only about structuring content but also about making it visually appealing. A recipe page is a delightful way to combine your love for cooking with web development, allowing you to share your favorite recipes in a creative and engaging format.
The aim of this project is to design a web page that effectively displays a recipe, making it easy and enjoyable to read. This includes organizing the recipe into clear sections such as ingredients and instructions, and styling the page to make it visually appealing. The recipe page you create can serve as a template for future culinary postings or a personal collection of your favorite recipes.
See the Pen HTML Project 5 by HubSpot ( @hubspot ) on CodePen .
- Clarity and Simplicity : My focus is on presenting the recipe in an organized manner, ensuring that the ingredients and instructions are easy to distinguish and follow.
- Engaging Visuals : I plan to use appealing images and a thoughtful layout, making the page not just informative but also a delight to the eyes.
Project 6: Creating a Technical Documentation
Implementing a responsive navigation menu is a crucial skill in web development, enhancing user experience on various devices. This project focuses on creating a navigation menu that adjusts to different screen sizes, ensuring your website is accessible and user-friendly across all devices.
The goal is to create a navigation menu that adapts to different screen sizes. This includes a traditional horizontal menu for larger screens and a collapsible " hamburger " menu for smaller screens. Understanding responsive design principles and how to apply them using HTML and CSS is key in this project.
See the Pen HTML Project 6 by HubSpot ( @hubspot ) on CodePen .
- Flexibility is Key : I'm focusing on building a navigation menu that's flexible and adapts smoothly across various devices.
- Simplicity in Design : Keeping the design simple and intuitive is crucial, especially for the mobile version, to ensure ease of navigation.
Project 7: Building a Small Business Homepage
Creating a homepage for a small business is a fantastic project for applying web development skills in a real-world context. This project involves designing a welcoming and informative landing page for a small business, focusing on user engagement and business promotion.
The aim is to create a homepage that effectively represents a small business, providing key information such as services offered, business hours, location, and contact details. The design should be professional, inviting, and aligned with the business's branding.
See the Pen HTML Project 7 by HubSpot ( @hubspot ) on CodePen .
- Clarity and Accessibility : My priority is ensuring that key information is presented clearly and is easily accessible to visitors.
- Brand Consistency : I plan to incorporate design elements that are in line with the business's branding, creating a cohesive and professional online presence.
Project 8: Setting Up a Simple Survey Form
Creating a simple survey form is a valuable project for practicing form handling in HTML and CSS. It's a fundamental skill in web development, essential for gathering user feedback, conducting research, or learning more about your audience.
The objective of this project is to create a user-friendly survey form that collects various types of information from users. The form will include different types of input fields, such as text boxes, radio buttons, checkboxes, and a submit button. The focus is on creating a clear, accessible, and easy-to-use form layout.
See the Pen HTML Project 8 by HubSpot ( @hubspot ) on CodePen .
- Simplicity in Design : I'm aiming for a design that's straightforward and intuitive, ensuring that filling out the form is hassle-free for users.
- Responsive Layout : Ensuring the form is responsive and accessible on different devices is a key consideration in its design.
Project 9: Creating an Event Invitation Page
Designing an event invitation page is a fantastic way to combine creativity with technical skills. This project involves creating a web page that serves as an online invitation for an event, such as a conference, workshop, or party.
The aim is to create a visually appealing and informative event invitation page. This page should include details about the event like the date, time, venue, and a brief description. The focus is on using HTML and CSS to present this information in an engaging and organized manner.
See the Pen HTML Project 9 by HubSpot ( @hubspot ) on CodePen .
- Visual Impact : I'm aiming for a design that captures the essence of the event, making the page immediately engaging.
- Clear Information Hierarchy : Organizing the event details in a clear and logical manner is crucial for effective communication.
Project 10: Building a Parallax Website
Creating a parallax website involves implementing a visual effect where background images move slower than foreground images, creating an illusion of depth and immersion. It's a popular technique for modern, interactive web design.
The objective of this project is to create a website with a parallax scrolling effect. This will be achieved using HTML and CSS, specifically focusing on background image positioning and scroll behavior. The key is to create a visually engaging and dynamic user experience.
See the Pen HTML Project 10 by HubSpot ( @hubspot ) on CodePen .
- Balance in Motion : While implementing parallax effects, I'll ensure the motion is smooth and not overwhelming, to maintain a pleasant user experience.
- Optimized Performance : I'll be mindful of optimizing images and code to ensure the parallax effect doesn't hinder the site's performance.
As we reach the end of our journey through various web development projects, it's clear that the field of web development is constantly evolving, presenting both challenges and opportunities. From creating basic HTML pages to designing dynamic, interactive websites, the skills acquired are just the beginning of a much broader and exciting landscape.
Embracing New Technologies: The future of web development is tied to the ongoing advancements in technologies. Frameworks like React, Angular, and Vue.js are changing how we build interactive user interfaces. Meanwhile, advancements in CSS, like Flexbox and Grid, have revolutionized layout design, making it more efficient and responsive.
Focus on User Experience: As technology progresses, the emphasis on user experience (UX) will become even more crucial. The success of a website increasingly depends on how well it engages users, provides value, and creates meaningful interactions. Web developers must continuously learn about the latest UX trends and apply them to their work.
The Rise of Mobile-First Development: With the increasing use of smartphones for internet access, mobile-first design is no longer an option but a necessity. This approach involves designing websites for smaller screens first and then scaling up to larger screens, ensuring a seamless experience across all devices.
Web Accessibility and Inclusivity: Making the web accessible to everyone, including people with disabilities, is a growing focus. This includes following best practices and guidelines for web accessibility, ensuring that websites are usable by everyone, regardless of their abilities or disabilities.
Performance and Optimization: As users become more demanding about performance, optimizing websites for speed and efficiency will continue to be a priority. This includes minimizing load times, optimizing images and assets, and writing efficient code.
Emerging Trends: The integration of artificial intelligence and machine learning in web development is on the rise, offering new ways to personalize user experiences and automate tasks. Additionally, the development of Progressive Web Apps (PWAs) is blurring the lines between web and mobile apps, offering offline capabilities and improved performance.
Continuous Learning: The only constant in web development is change. Continuous learning and adaptation are key to staying relevant in this field. Whether it's learning new programming languages, frameworks, or design principles, the ability to evolve with the industry is critical for any web developer.
As you continue on your path in web development, remember that each project is a step towards mastering this ever-changing discipline. Embrace the challenges, stay curious, and keep building, for the road ahead in web development is as exciting as it is limitless.

Don't forget to share this post!
Related articles.

The Ultimate Guide to HTML for Beginners: How to Write, Learn & Use It

How to Add & Change Background Color in HTML

4 Steps to Add a Clickable Telephone Link in HTML
![How to Create an HTML Dropdown Menu [+ Examples]](https://www.hubspot.com/hubfs/html-dropdown.jpg "simple design for assignment")
How to Create an HTML Dropdown Menu [+ Examples]
![Onchange Event in HTML: How to Use It [+Examples]](https://knowledge.hubspot.com/hubfs/onchange.webp "simple design for assignment")
Onchange Event in HTML: How to Use It [+Examples]

HTML Dialog: How to Create a Dialog Box in HTML
![How to Create a Landing Page in HTML & CSS [+ 15 Templates]](https://lh7-us.googleusercontent.com/gmIHbJpUHbZTRtyrKrl3gPKd1vx-42KDD7q3zNsm-KeCrF2YypEaYW7J0lQXsog9CXD4UYxUJ-A7VAvPJTjKclV-Rd-bZrAFHvKLE4JFP5UKk84v8M8R5rtubdotpFQxOCZataRdWf_KE0hKe4N06qw "simple design for assignment")
How to Create a Landing Page in HTML & CSS [+ 15 Templates]

HTML Audio Tag: How to Add Audio to Your Website

How to Add an Image & Background Image in HTML

How to Call a JavaScript Function in HTML
Tangible tips and coding templates from experts to help you code better and faster.
CMS Hub is flexible for marketers, powerful for developers, and gives customers a personalized, secure experience
What are the Common Assignments for Graphic Design Students?
Did you know that creative ruts can often be a source of inspiration ? When you’re stuck in such a situation and you need to complete an assignment, you should still try to enhance your skills.
One great way to do this is by challenging yourself to try something new and out of your comfort zone. Assign yourself with “difficult” tasks once in a while too. Either way, completing projects and assignments is essential for all graphic designer students and here are some of the most common ones.

Assignments for beginners
At the university level, the common 1st-year assignments for Graphic Design students are:
- Redrawing famous logos on the computer as detailed and accurate as possible.
- Using black and white to design logos, posters, book covers, invitations, and other media or you creating these using the most innovative colors possible.
- Making a visual representation of a concept that represents your personality best.
- Reinventing the identity of a famous brand.
- Recreating a poster for a well-known band or creating album artwork for a CD cover for a band you have created in your mind.
- Designing a magazine including the concept, logo, name, masthead, and a grid for the table of contents.
- Designing a résumé or business card for yourself.
Assignments for higher levels
There are also assignments that involve Graphic Design students in higher levels. These include:
- Travel Guides
This is a practical assignment that will give you the chance to demonstrate your ability to realize an entire printed project from cover to cover to show off your design skills.
- Coloring Books
These kinds of projects require a lot of innovation, creativity, and knowledge of what children want. The designs should showcase your unique style in the most creative way. To catch the interest of children, the books should include a lot of fun designs. This assignment will demonstrate your ability to create strong concepts outside of a set design.
- Posters illustrated with the letters of the alphabet
For this project, you will use the letters of the alphabet to come up with a series of posters. This task will provide you with inspiration for how to utilize limited resources to create interesting visuals.

Assignments to practice real-world skills
There also assignments that will provide you with a better understanding of what clients want in the real world. These include:
- Black and White Compositions
These will help you understand how to use layout simple shapes to direct the eye of the viewer in a certain way.
- Expressive Typography
With either a phrase or a single word, you should choose the most appropriate typefaces to convey a feeling relative to the word or phrase. Here, you have to learn how to express yourself without relying on colors, shapes, or pictures.
- Logo Design
This assignment will bring out your self-expression and creativity as you have to create a logo for yourself. The project can even be more effective if you have to create a logo for another person because you will have to get to know them first. That way, you can represent the other person well.
- Print Layouts
These include flyers, posters, package designs, or brochures. Here, you will learn how to use different programs or software to compose layouts.
Web design is a great skill that graphic designers should try to learn. You need a lot of web design assignments to learn how to design sites that work across different devices.
Best assignment help for you
While you might find these assignments to be “right up your alley,” you might get assigned with other kinds of tasks too. Many visually artistic university students find themselves struggling with assignment writing like essays or research papers.
If you are one of those who have difficulty with written work, simply order your assignment from Uk.EduBirdie, an extremely reliable essay writing service. Whether you need research, literature, or even law assignment help , they will help you out. The writers are experts and they know the intricacies of college academic writing so you can really trust them for your work.

Assignments to hone creativity
Apart from the tasks assigned to you by your teacher, you can also assign yourself work to hone your creativity. The following exercises will help you relax and unleash your imagination:
- Monster Doodles
This is a mini-exercise that’s effective if you do it with other students. Together, you will work to draw a monster. You will take turns drawing part of the monster and only see what each of you has drawn until the end. It’s really fun!
- Photo Picture
With your camera – which can be as simple as the camera of your phone or as high-tech as a DSLR camera – find something interesting in your surroundings that you will use to create a photo story. Take around 8 to 10 photos and from these, choose between 3 to 5 pictures and arrange them for your photo story. You can even add some elements to enhance the story without using too many words or sentences. You can either do this on your computer or print out the photos, then add visual elements using different craft materials.
- Faces in Your Imagination
Download a face template online and draw faces from your imagination. As fast as you can, draw different faces to see what you will come up with. Sketching is a fun way of honing your creative skills. One of those faces you draw might even be your jumping point for an amazing animated character sometime in the future.
- Photo Collage
First, choose a subject. Next, surf the internet and search for images or photos that fit into the subject you have chosen. You can also take pictures of yourself too. This is a mini-exercise similar to the Photo Story. The difference is that you’re not telling a story. Instead, you will make a collage that looks almost random but is still an expression of your creativity.
If you experience a creative block that hinders your creative processes, get over this by finding work that will truly inspire you. Teachers understand this too, which is why they give a lot of assignments to Graphic Design students. Of course, these assignments will also work for other artistic students like photographers and illustrators. By accomplishing the graphic design projects here, you will feel more excited to tackle other creative ventures.
Images: Freepik.com
– – – – – – – – – – – – – – – – – – – – – – –
Author’s Bio: Vendy Adams works as an audit consultant for a top-level MNC with clients all over the world. Other than her job, she freelances part-time for an academic writing service that provides essay writing assistance to students. Her free time is for yoga, reading fiction and listening to jazz music.
Recommended:
- A Guide for Design Students: 6 Ways to Boost Your Skills from Home
- 35 Indispensable Online Resources for Part-Time Working Design Students
- How Can Students Develop Creative Thinking?
- The Top 5 Best Laptops for College Students
- 7 Color Trends for 2021 Every Design Student Should Be Aware Of
- Best Online Graphic Design Courses 2021
One Comment
thanks for giving me this useful knowledge.
Leave a Reply Cancel reply
Your email address will not be published. Required fields are marked *
Sign me up for the newsletter!
© Designbolts 2012 - 2019 | All Rights Reserved.
Simple web design tips for beginners: A complete guide
Just getting started in web design? This guide will get you ready to tackle your first project as a beginner.

From 101 to advanced, learn how to build sites in Webflow with over 100 lessons — including the basics of HTML and CSS.

Web design is a crucial component of the web development process.
If you're interested in web design, we're guessing you have a creative streak. And how could you not be excited about jumping in and making your first website? Web design is about crafting a functional piece of art — but where do you start? If you're wondering what you need to know before you begin, this is a simple web design guide that will help you start.
Choose something basic for your first site design
This seems like a no brainer, right? But sometimes we can get overly ambitious and end up discouraged. For your first project, it’s a good idea to choose something simple and fun. An ecommerce site is more complicated and would be better to tackle once you have more experience.
A blog is a great place to start. It will be a good design exercise and you’ll learn how a Content Management System (CMS) works, which will be important to know for future site designs. Best of all — you don’t have to start from scratch. There are plenty of blog templates that make it easy to put one together.
Templates are a valuable learning tool. Watching how HTML, CSS, and Javascript elements are styled and come together will give you deeper insight into what makes a design work. You can use templates as a foundation to make changes and customizations.
Maybe you don't want to start a blog — try pulling from your creative pursuits or hobbies. How about building a showcase for your photography skills or for your collection of short stories? Creating a design to feature a passion of yours makes for an enjoyable first project.
Find inspiration from other designers

You've no doubt come across websites that have wowed you with their stunning design.
Create an inspiration doc with links to sites you love, or bookmark them as you go. Pinterest is a great place to find great site design — you can find and pins illustrations, book covers, posters, blogs, and other types of design work to refer to. Designers use the term "mood board" for these collections. Mood boards are a quick reference resource if you find yourself stuck. Which you will.
Outside the discoveries you make on your own, there are some curated collections you should check out.
- Awwwards always has new and fresh work and a variety of themed collections
- Behance is a fantastic compilation of website design work, where the focus is on quality and creativity
- Dribbble focuses on individual designers, providing a forum to get feedback and communicate with others about their work
And of course, head over to Made in Webflow to see the variety of ways people are using our design platform. There’s so much cool stuff to check out and so many templates available to clone as your very own.
Look outside the web for sources of inspiration
Web design is informed by a visual language that can be found anywhere, like the cover of a graphic novel or the digital kiosk at your bank. Develop an eye for recognizing good design and start analyzing why something works or doesn’t work, whatever the medium.
Pay attention to typography
We often read without even being aware of typefaces. Pay attention to the effect type has on as you consume content. Is that font on the menu readable? What makes that hand-lettered sign for the local business work so well? Letters are everywhere. Make note of both good and bad uses of typography.
Typewolf is an excellent resource to keep tabs on popular fonts. It has plenty of lists to explore, a featured site of the day, and lookbooks that have spectacular font combinations. It’s helpful to see actual examples of typography being used, and websites like Typewolf are a great place to see their practical applications. Getting familiar with different fonts will help you pick the right type for your first site design.

Let the fine arts influence you
Oh, did we mention there’s an entire history of art to draw from? So many movements and artists still shape the work of creatives today — especially web designers. Take a stroll through our Web design and art history piece to discover many monumental artistic achievements. Not only is filled with valuable information, it’s an excellent example of how content and artistry can come together to tell a story.

Research different types of design
There are so many disciplines of design to be familiar with. A knowledge of product design, illustration, and even branding can further develop your creative senses.
For inspiration that goes beyond web design, Abduzeedo offers brilliant examples. Whether it’s poster art, luggage, or furniture, you’ll see fantastic examples of design done right. Be open to different types of design and actively seek out inspiration . The more knowledge you have, the easier it will be to design your first website . Education informs intuition.

Have content ready before you start
Putting content first means having content ready to work with before you start designing your first website.
It doesn’t have to be perfect. You can always edit and optimize for Google SEO (search engine optimization) later. But having at least a rough draft of what will go live will help make sure the design is laid out to accommodate it. Designing with real content gives you a better representation of how the website will look and function. It also gives you the opportunity to make changes earlier in the design process.
For blogs, you’ll need to have a post ready to test in the CMS. Having a couple posts written before you launch will save scrambling to write something after the fact.
Keep your design simple and intuitive
Whether it's writing, navigation, or CTAs, no one wants to struggle with your design.
Your design approach should be rooted in simplicity and order. Logic should guide someone through the site with ease. And since we’re talking about those people who will interact with what you’ve created, this is a good place to introduce UX.
Understand user experience (UX) basics
A website is more than just floating text in space. The color scheme, content, typography, layout, and imagery all come together to serve your audience and stir emotion. Someone wandering through the digital space you’ve created should have a clear path free from obstacles.
UX focuses on understanding your audience. What are they looking for — and how will your design make finding it easy? UX is about getting into the heads of your audience and seeing your design through their eyes.
When building your first website, keep these guiding UX principles in mind:
- Make things simple and intuitive
- Communicate concepts in a logical succession
- Meet your audience’s needs and resist the temptation to showboat your skills at the expense of usability
Learning about your audience will help you craft a design that’s tailored to their wants and needs. Check out our Beginner’s guide to user research for more insights on how to do this.
Understand user interface (UI) basics
If you’re new to web design, you might be confused by the difference between UI and UX . Most of us were. Know this — they’re two distinct concepts.
Where UX is concerned with the overall feel of a design, UI is about the specifics. If you were in an elevator, UI would be the size and arrangement of the floor buttons, while UX would encompass the colors, textures, and other interior design choices of the elevator space. UI is about giving someone the tools they need to experience your website free from complications.
When constructing your first website, keep these UI principles in mind:
- Functionality of interactive elements should be obvious
- Uniformity must guide usability — actions should follow logical patterns
- Design choices should be made with a clear purpose
Take a look at 10 essential UI design tips for a deeper dive into UI.
Introducing The Freelancer’s Journey: a free course that teaches you how to succeed as a freelance web designer — from getting clients to launching their websites.
Use the principles of design for web starters
Effective design is guided by certain rules and it’s important to understand essential web design skills before you start. There are standard practices that will simplify the process and make for a more refined final product.
If you want to design and build websites, understanding good layout is key. We suggest keeping things minimal and working with only a few elements to focus on the perfect placement.
When you first start designing, think grids. Grids align elements, like div blocks and images on a web page, in a way that creates order.
The structure of a layout should follow a visual hierarchy. What are the important ideas you want people to see and in what order? Visual hierarchy needs to adhere to the common patterns people use when reading. There are two paths people’s eyes generally follow on the web: the F-pattern and the Z-pattern. Being familiar with how these patterns work will help you organize your own content.
The F-pattern is more common for designs with dense blocks of content. People’s eyes will scan down the left side of a layout until things catch their attention and then read from left to right. Imagine looking through the menu at a restaurant — you may skip over the bold names of dishes aligned on the left until you come to something that grabs you, which will prompt you to read the supporting details explaining that specific dish.
Most people will read through something like a blog post in this F-pattern. With left-aligned text and bulleted sentences, Nelson Abalos takes advantage of this design technique, making his posts easy to navigate and follow.

The Z-pattern is associated with less text-heavy design. Many landing pages conform to this pattern. All the major elements on the Conservation Guide site adhere to the Z-pattern. If you’re a beginner web designer, this is a simple layout trick to help usability.

You have the colors of the rainbow and beyond available to you. And we all know that "with great power comes great responsibility." The power of the color picker can be wielded for good or evil.
Here are a couple straightforward approaches in choosing a color scheme for your first website.
Use a single color as the base, vary the amount of saturation, include lights and darks, and play with various hues for a uniform color scheme. Regardless of your niche, a monochrome site is a smart design choice. And remember, whatever color you choose for the text, make sure you’re thoughtful about readability .
In this example from Unique , each section is delineated by a monochromatic color scheme. You don’t have to get this fancy in your beginner designs, but it’s nice to see their use of different monochromatic color variations. Notice how each section is made of colors related to the featured bags? This is a nice design trick that makes for a harmonious color scheme.
Complementary
Take colors that are opposite on the color wheel and combine them. Easy enough, right?
Use complementary colors with care. In this design below from the Ignisis website, the designer used blue and orange in different combinations along with whitespace and greys for a layout that never tires the eyes. The contrast feels crisp and refreshing.
Typography is two-dimensional architecture, based on experience and imagination, and guided by rules and readability.
-Hermann Zapf
So what are the rules that you, the neophyte designer, need to know?
Typography informs tone
Think of a wedding invitation or a funeral announcement. Both are profound life events — one a joyful celebration and the other typically more somber. Where an ornate flowery typeface works well for a wedding, it’s not well-suited for a funeral.
When designing your first website, keep tone in mind. If you’re going for a lighthearted vibe, like a food blog, weaving in playful fonts makes sense. But if you’re crafting a website for a law firm, stick to more professional typefaces .
Serifs versus non-serifs
A common mistake of new designers is to mix up serif and non-serif fonts. You can tell them apart because the ends of serif letters have an extra line or stroke added vertically or horizontally.
Check out the differences between PT Serif and PT Sans (without the serif).
Here’s PT Serif:

And here’s PT Sans:

Serifs are an artifact from the time of printing presses when most of the words we read were printed with ink on paper. Serifs anchored words onto the page and made them easier to read. In the earlier days of the web, serifs were shunned by web designers because lower screen resolutions diluted them. Now that screens are better optimized for typography with serifs, they’ve made a comeback.
Those small lines make a huge difference. You’ll notice the above PT Serif typeface feels more formal and the sans-serif version seems lighter and looser.
Since serif fonts are more complicated, they’re best used in moderation. Headers are an ideal place for serif fonts, and larger blocks of content benefit from a more simplified font without serifs.
Ornamentation versus practicality
The loops and whorls of a flourished font will add personality and elegance to a design, but don’t overuse frilly fonts. A website is about communicating to an audience through content. As Hermann Zapf said, readability is one of a font’s most important characteristics.
Typography technicalities
There’s a lot to learn with typography. As you progress as a designer, you’ll need to know how to use line height, kerning, and different weights in your typography. But don’t get too caught up in tweaking all the intricacies for your first site. Focus on making sure everything is readable — you can experiment fine-tuning the details later.
Start designing
Tutorials and research are invaluable to your learning, but you’ll eventually just need to dig in and get designing. Even if you create something no one will ever see, it's still an exercise problem solving and applying what you've learned. Don't worry if it's not amazing. But be proud of crossing that threshold from aspiring designer to actually being one — you’re on your way!
Get feedback
You finished your first design — congratulations! You worked hard and you’re ready to show it to the world. But before you hit publish, get some outside perspective on what you made.
Getting constructive criticism can be uncomfortable. Creating something, whether it’s an essay, a painting, or a website is an act of vulnerability. The things you put into the world are an extension of who you are and what you’re capable of. To be told what you made could be better or is wrong might feel like a personal attack.
In web design, feedback is a normal and necessary part of the process. Learn how to set your ego aside and separate the feedback from your self-worth. As you gain experience, you’ll be able to identify and implement practical, useful feedback and let go of the rest. You’ll find that more experienced designers know what it’s like to be a beginner — they’re excited to see less-experienced designers succeed.
If you’re designing with Webflow, share your work in the Webflow Showcase or request help in the Webflow design forum . As you progress, you’ll want to submit to places like Dribbble and Behance to get more eyes on your work. Not only will you get constructive criticism, you’ll get feedback on what you’re doing well — which always feels great.
Webflow makes web design for beginners accessible
Gone are the days of having to learn complex front-end code to build a website. In the past, you had to depend on a developer to bring your designs to life. Today, you can design, build, and launch complex websites in just a few hours using Webflow .
Knowing a few key concepts, and being able to know the difference between good and bad design will give you the confidence and skills to craft your first website. Webflow frees you up from having to code, opens up your creative bandwidth, and let’s you start designing immediately.
Build completely custom, production-ready websites — or ultra-high-fidelity prototypes — without writing a line of code. Only with Webflow.
Subscribe to Webflow Inspo
Get the best, coolest, and latest in design and no-code delivered to your inbox each week.
Related articles
How to learn web design in 9 steps (+ best practices).
Discover how to learn web design and learn the basics of UI, UX, HTML, CSS, and visual design.

Font pairing: How to find the right combinations for your web designs
Choosing typography for your web designs can often be frustrating. Here's everything you need to know to make pairing up fonts an easier process.
What is graphic design? With examples for beginners
What is graphic design? This beginner’s guide walks you through the definition of graphic design and shares examples of different types.

12 best web design courses of 2024 (free + paid)
Find the best web design courses, free and paid, to sharpen your skills as a web designer and visual developer.

10 best premium UI kits for web designers
Get your new web design project started with these amazing UI kits, or copy and paste elements into your existing projects to give them a creative boost.

13 tips to make you a better web designer
Helpful advice to help you level up your web design skills
Get started for free
Try Webflow for as long as you like with our free Starter plan. Purchase a paid Site plan to publish, host, and unlock additional features.
Transforming the design process at
- Interactions
- Localization
- DevLink Labs
- Figma to Webflow Labs
- Accessibility
- Global alliances
- Freelancers
- Customer stories
- Webinars and ebooks
- Libraries Beta
- Made in Webflow
- Livestreams
- Careers We're Hiring
- Webflow Shop
- Terms of Service
- Privacy policy
- Cookie policy
- Cookie preferences
- Accessibility statement
- Discover the community
- Partner with Webflow
- Certified partners
- Become a Template Designer
- Become an Affiliate
- Become a global leader
- Find a meetup near you
- HTML Tutorial
- HTML Exercises
- HTML Attributes
- Global Attributes
- Event Attributes
- HTML Interview Questions
- DOM Audio/Video
- HTML Examples
- Color Picker
- A to Z Guide
- HTML Formatter
- 10 HTML Project Ideas & Topics For Beginners [2024]
Top 10 Projects For Beginners To Practice HTML and CSS Skills
- Top 10 Coding Projects For Beginners
- Top 10 Front-End Web Development Projects For Beginners
- JavaScript Project Ideas with Source Code
- 10 Best JavaScript Project Ideas For Beginners in 2024
- Top 5 JavaScript Projects For Beginners on GFG
- 90+ React Projects with Source Code [2024]
- Top 7 React Project Ideas For Beginners in 2024
- 12 Best Full Stack Project Ideas in 2024
- Top 10 Best Web Development Projects For Your Resume
- 30+ Web Development Projects with Source Code [2024]
- 10 Best Angular Projects Ideas For Beginners
- Top 7 Node.js Project Ideas For Beginners
- Top 5 MERN Projects To Add In Resume
- 10 Best Web Development Project Ideas For Beginners in 2024
- 5 Amazing React Native Project Ideas for Beginners
Learning to code is always exciting and fun for everyone and when it comes to stepping into the programming world most of the people start with the easiest thing HTML and CSS . Every beginner’s coding journey in frontend starts with these two basic building blocks and you need to be creative when it comes to designing a beautiful application.

Initially, beginners enjoy making buttons, adding the links, adding images, working with layout and a lot of cool stuff in web designing but when it comes to making a project using only HTML and CSS they get stuck and confuse about what they should make to practice all these stuff. Afterall their knowledge is just limited to HTML and CSS. No matter what after learning everything at some point you will realize that making a project is important to practice HTML and CSS skills. You need to check how HTML and CSS work together to design a beautiful frontend application. So the question is what are some beginner-friendly projects you can build to practice everything you have learned…Let’s discuss that.
Table of Content
1. A Tribute Page
2. webpage including form, 3. parallax website, 4. landing page, 5. restaurant website, 6. an event or conference webpage, 7. music store page, 8. photography site, 9. personal portfolio, 10. technical documentation.
The simplest website you can make as a beginner is a tribute page of someone you admire in your life. It requires only basic knowledge of HTML and CSS. Make a webpage writing about that person adding his/her image. On the top of the webpage, add the image and name of the person and below that give layout for the rest of the details. You can use paragraphs, lists, links, images with CSS to give it a descent look. Add a suitable background color and font style on your webpage. Most of the parts you can make using HTML but to give it a better look using a bit of CSS. Take help from the link given below.
- My Tribute Page
Forms are always an essential part of any project and you will be working with a lot of forms in most of the applications so why not practice it earlier and test your knowledge. Once you get familiar with the input field or basic tags in HTML to create a form make a project using all those tags. How to use a text field, checkbox, radio button, date, and other important elements in a single form. You will be learning how to give a proper structure to a webpage while creating a form. Knowledge of HTML / HTML5 is good enough but you can use a bit of CSS to make the project look better. Take help from the links given below.
- Survey Form
A parallax website includes fixed images in the background that you can keep in place and you can scroll down the page to see different parts of the image. With basic knowledge of HTML and CSS, you can give a parallax effect to a website. Using the parallax effect in web designing is really popular and it gives beautiful look and feels to the webpage. Give it a try and divide the whole page into three to four different sections. Set 3-4 background images, align the text for different sections, set margin and padding, add background-position and other CSS elements and properties to create a parallax effect. You can take help from the link given below.
- Parallax Website
A landing page is another good project you can make using HTML and CSS but it requires a solid knowledge of these two building blocks. You will be using lots of creativity while making a landing page. You will practice how to add footer and header, create columns, align-items, divide the sections and a lot of things. You will have to use CSS carefully keeping in mind that different elements do not overlap with each other. You will also take care of color combinations, padding, margin, space between sections, paragraphs, and boxes. Color combinations should go well with each other for different sections or backgrounds.
Showcase your solid knowledge of HTML and CSS creating a beautiful webpage for a restaurant. Making a layout for a restaurant will be a bit complicated than previous project examples. You will be aligning the different food items and drinks using a CSS layout grid. You will be adding prices, images and you need to give it a beautiful look and feel as well using the proper combination of colors, font-style and images. You can add pictures gallery for different food items, you can also add sliding images for a better look. Add links for redirection to internal pages. Make it responsive setting a viewport, using media queries and grid. You can take help from the link given below.
- Restaurant Website
Once you’ve mastered these projects and are ready to expand your knowledge, consider exploring full stack web development . This path combines frontend skills with backend technologies like Node.js, databases, and server management. This Full Stack Development course provides hands-on projects, expert guidance, and a structured learning path to help you become proficient in both frontend and backend web development.
You can make a static page holding an event or conference. People who are interested in attending the conference create a register button for them. Mention different links for speaker, venue and schedule at the top in the header section. Describe the purpose of the conference or the category of people who can get benefit from this conference. Add an introduction and images of the speaker, venue detail and the main purpose of the conference on your webpage. Divide the page into sections, add header and footer showcasing the menu. Use proper background color that can go well with each other for various sections. Choose a descent font style and font color that matches the theme of your web page. It requires HTML/HTML5 and CSS knowledge in depth. You can take help from the link given below.
- Event webpage
If you are a music lover you can make a webpage for it. It requires HTML5 CSS3 knowledge. Add a suitable background image describing the purpose or what the page is all about. In the header section add different menus. Add buttons, links, images and some description about the collection of songs available. At the bottom mention the links for shopping, store, career or contact details. You can also add other features on your webpages such as a trial option, gift cards or subscription. Make it responsive setting viewport or using media queries and grid. You can take help from the link given below.
If you have in-depth knowledge of HTML5 and CSS3, you can make a one-page responsive photography site. Use flexbox and media queries for responsiveness. Add the company name with an image (related to photography) on the top (landing page). Below that showcase your work adding multiple images. Mention the contact detail of the photographer at the bottom (footer). Add a button to view your work. This button will directly bring you down to the images section. You need to take care of the margin, padding, color combination, font-size, font-style, image size and styling of a button. You can take help from the link given below.
- Image gallery
With knowledge of HTML5 and CSS3, you can also create your portfolio. Showcase your work samples and skills in your portfolio with your name and pictures. You can also add your CV there and host your complete portfolio on GitHub account. In your header section mention some menus like about, contact, work or services. At the top add one of your images and introduce yourself there. Below that add some work samples and at last (footer) add contact information or social media account. You can take help from the links given below.
- Simple portfolio
- Portfolio gallery
If you have a little bit of knowledge of Javascript then you can create a webpage of technical documentation. It requires knowledge of HTML, CSS and basic javascript. Divide the whole webpage into two sections. The left side creates a menu with all the topics listed from top to bottom. Right side you need to mention the documentation or description for the topics. The idea is once you click on one of the topics in the left section it should load the content on the right. For click, you can use either javascript or CSS bookmark option. You don’t need to make it too fancy, just give it a simple and descent look, that looks good for technical documentation. You can take help from the links given below.
- Technical Documentation
HTML is the foundation of webpages, is used for webpage development by structuring websites and web apps.You can learn HTML from the ground up by following this HTML Tutorial and HTML Examples .
CSS is the foundation of webpages, is used for webpage development by styling websites and web apps.You can learn CSS from the ground up by following this CSS Tutorial and CSS Examples .

Please Login to comment...
Similar reads.
- Web-Projects
- Web Technologies
Improve your Coding Skills with Practice
What kind of Experience do you want to share?
Explore your training options in 10 minutes Get Started
- Graduate Stories
- Partner Spotlights
- Bootcamp Prep
- Bootcamp Admissions
- University Bootcamps
- Coding Tools
- Software Engineering
- Web Development
- Data Science
- Tech Guides
- Tech Resources
- Career Advice
- Online Learning
- Internships
- Apprenticeships
- Tech Salaries
- Associate Degree
- Bachelor's Degree
- Master's Degree
- University Admissions
- Best Schools
- Certifications
- Bootcamp Financing
- Higher Ed Financing
- Scholarships
- Financial Aid
- Best Coding Bootcamps
- Best Online Bootcamps
- Best Web Design Bootcamps
- Best Data Science Bootcamps
- Best Technology Sales Bootcamps
- Best Data Analytics Bootcamps
- Best Cybersecurity Bootcamps
- Best Digital Marketing Bootcamps
- Los Angeles
- San Francisco
- Browse All Locations
- Digital Marketing
- Machine Learning
- See All Subjects
- Bootcamps 101
- Full-Stack Development
- Career Changes
- View all Career Discussions
- Mobile App Development
- Cybersecurity
- Product Management
- UX/UI Design
- What is a Coding Bootcamp?
- Are Coding Bootcamps Worth It?
- How to Choose a Coding Bootcamp
- Best Online Coding Bootcamps and Courses
- Best Free Bootcamps and Coding Training
- Coding Bootcamp vs. Community College
- Coding Bootcamp vs. Self-Learning
- Bootcamps vs. Certifications: Compared
- What Is a Coding Bootcamp Job Guarantee?
- How to Pay for Coding Bootcamp
- Ultimate Guide to Coding Bootcamp Loans
- Best Coding Bootcamp Scholarships and Grants
- Education Stipends for Coding Bootcamps
- Get Your Coding Bootcamp Sponsored by Your Employer
- GI Bill and Coding Bootcamps
- Tech Intevriews
- Our Enterprise Solution
- Connect With Us
- Publication
- Reskill America
- Partner With Us
- Resource Center
- Bachelor’s Degree
- Master’s Degree
Top Graphic Design Projects to Sharpen Your Skills and Build Your Graphic Design Portfolio
The graphic design industry continues to harness the creativity and innovative ideas of graphic designers . As a result, it is crucial to be equipped with the right skills to place you in high demand. Embarking on graphic design projects is an excellent way to develop top-tier skills and build a robust graphic design portfolio.
We’ve compiled various graphic design projects for designers with different experience levels that can help sharpen relevant skills. In addition, we’ve included some of the skills, techniques, and tips to revamp your portfolio and land high-paying jobs. No matter what kind of graphic design job or design team you want to work for, there are plenty of projects available to instill you with essential graphic design principles.
Find your bootcamp match
5 skills that graphic design projects can help you practice.
If you look around you, you will see the obvious signs of a graphic designer on virtually everything. From books to packaging wraps to software interfaces, it is evident that they subtly play an essential role in our lives. The design principles and the skills utilized define their identity and are integral to our appreciation of the world of graphic design.
- Creativity: A creative mind is central to the development of great designs. While creativity can be subjective, it is the foundation of every design concept, no matter how haphazard that concept is in the beginning.
- Communication: This describes the wholesome ability to listen to a client’s needs, process feedback, and effectively communicate creative ideas. It also refers to the ability to convey a message with visual materials.
- Typography: In context, this refers to the ability to represent written text in the form of art. Every designer must know how to tell a story using various text elements like font size, style, color scheme, and layout.
- Software Skills: Learning Adobe Illustrator , InDesign, and Photoshop is essential. These tools are a basic requirement for many job postings.
- Coding: While many think coding doesn’t have a place in the design industry, having basic experience with HTML can be very useful for designers. Knowing how a website works can help you contribute to the idea generation process and give you an edge in the marketplace.
Best Graphic Design Project Ideas for Beginners
As a beginner, the first projects you complete should develop your creativity, typography, communication, and software skills. You want to make sure to build foundational graphic design skills and techniques before taking on big jobs from clients.
Photo Editing
- Skills Practiced: Software Skills, Creativity
This project exposes you to basic tools like Adobe Photoshop. Being able to manipulate an image will teach you everything from image cleanups to color schemes to enhancements. Also, you get to infuse some creativity with little projects like photo collages and storytelling.
- Skills Practiced: Creativity, Software Skills, Typography, and Communication
Logos are a representation of what a brand or organization stands for. They speak volumes about what companies do and subtly express their values. Professionals often follow the Keep It Simple, Stupid (KISS) approach while designing logos, focusing on minimalism and the business’ core values. This fundamental principle is suggestive of the power of simplicity in graphic design.
Business Cards
- Skills Practiced: Creativity, Software Skills, Typography, Communication
This design challenge will allow you to practice the skills mentioned above. Every business relies on business cards as a means of introduction. They are also an expression of the company’s branding. Therefore, it is vital to capture the company’s essence through excellent typography and some ingenuity.
YouTube Thumbnails
- Skills Practiced: Creativity, Software Skills, Communication
YouTube thumbnails aim is to encourage viewers to click on a video by telling a great story in just one small image. You must have an exciting thumbnail to enhance your content marketing campaign, which requires creativity and communication skills. Given how lucrative YouTube is today, being able to create the perfect thumbnail is an incredibly valuable skill.
Instagram, Twitter, and Facebook Graphics
Social media is an integral part of our lives. While we browse through our feeds, we come across various posts that communicate different messages to us, but not all do so effectively. A good graphic is aesthetically pleasing and successfully conveys our messages and values. To create such designs, you can rely on existing templates that meet recommended standards.
Best Intermediate Graphic Design Project Ideas
At this level, the projects are a lot more technical. They will sharpen your graphic design skills further but require a bigger time commitment. The following is a list of projects you can take on to practice your creativity as well as your software and typography skills.
Invitation Cards
- Skills Practiced: Creativity, Software Skills, Typography
This project requires a lot of creativity. After all, an invitation card is a representation of the host’s class and taste. Creating an outstanding invitation design will test your typography and software skills. The challenge you are up to is to effectively, and aesthetically, communicate the details of the event.
Posters and Fliers
Digital posters and flyers have to be visually appealing while satisfactorily communicating a message to the public. Creating posters and fliers for public relations and marketing campaigns will expose you to scaling and proper design layouts in digital platforms.
Infographics
Infographics employ pictures, data visualizations, typography, and statistical graphics to tell a straightforward story or present information. Working on an infographic will give you experience with important tools like Canva and Venngage and allow you to exercise your creativity as you think of ways to represent information in a way that is visually attractive, impactful, and effective.
Book Covers
The cover of a book plays a key role in sales. While it is advised not to judge a book by its cover, the truth is that a book with a sloppy design won’t sell very well. It is always best to aim for a cover design that is stylish and captures the essence of the book.
Magazines and Brochures
Designing the look and feel of a magazine or brochure is a complex project. It involves a range of elements, including advertising, visual representation, photography, art, and graphic design. Working on a magazine design will expose you to the design principles and standards used in print media.
Advanced Graphic Design Project Ideas
At this level, graphic designers begin to carve a niche and specialize in a particular area. The skills required and practiced here cut across all the technical skills mentioned earlier. In addition, many advanced designers begin to venture into the world of coding, which tends to boost their designer credentials.
Graphic designers are central to good branding. They define the visual identity of a company, shaping the public perception of it with elements like logos, color schemes, fonts, and slogans. Working on a company’s brand identity is a fun project that will allow you to use your technical skills to change how an organization is perceived by the media.
Mockup Designs
Mockups give you a taste of a concept or design before it is created, helping clients visualize what the final product will look like. Creating mockups involves a fair dose of creativity as well as dexterity with software like Balsamiq, Adobe XD, or InVision.
User Interface (UI) Design
- Skills Practiced: Creativity, Software Skills, Typography, Communication, Coding
The complex field of UI design will test all the technical skills discussed thus far. You will even have to dabble in coding as HTML, CSS, and JavaScript skills are required to work on the customer-facing side of an application of a website. You will get a lot of fulfillment out of this project: creating an application or website interface is critical to the consumer experience with a digital product.
Product Design
Product design can be considered an extension of branding. However, rather than focusing on the logo or values of a company, the emphasis is on a particular product, its looks, sustainability, and packaging design. To go about this project, choose an existing product that’s interesting from a design standpoint. Reverse engineer this product and then redesign it following every step of the design process.
Motion Graphics
Motion graphics is animation in which text plays a major role. They are common in ads and movie titles. To work on motion graphics, advanced designers combine their basic graphic design skills with animation and filmmaking techniques.
Creating good-looking motion graphics requires exceptional creativity, innovation, and storytelling. Typography, communication, and software skills are also vital to developing interesting motion graphics.
Graphic Design Starter Project Templates
A graphic template is an excellent tool for beginners and even advanced designers that can save a lot of time. Templates allow you to edit predefined graphics and adjust them to your taste. Working with templates could also help to cure a creative block. The following are recommended templates for basic starter projects.
- Logos : These templates provided by Canva offer complete flexibility with the editing of layers, color schemes, typography, and shape to design the logo that best connects with your brand.
- Social Media Images : Social media posts have to be attractive and engaging. If you cannot come up with posters and fliers that perfectly convey your message, freepik templates can be a helpful tool.
- Mockups : If you are having difficulty designing a mockup that accurately reflects the design concepts involved, these templates by Template.net should come in handy.
- Business Cards : Designing a business card that represents your brand and business becomes a lot easier when you can simply customize a template. Check out these business card templates by PsPrint.
- Brochures : A brochure can be tricky to design considering the number of elements and skills involved. However, with these brochure templates by Envato Elements, you’ll have no trouble creating elegant brochures.
Next Steps: Start Organizing Your Graphic Design Portfolio

The beauty of constantly embarking on design projects is that you’ll sharpen your skill while growing your portfolio. After a few months, you should have a solid portfolio that reflects your skills and experience and that attracts potential clients. Below, we give you a few tips on how to organize your graphic design portfolio.
Keep It Simple
Simplicity is key when it comes to portfolios. Always go for a cleaner and straightforward portfolio look, remove distracting elements and unnecessary components. This ensures that your projects are accessible and that potential employers or clients can appreciate your creative designs.
Keep It Updated
Never stop working on your portfolio, no matter how comfortable you get in your current position. Employers and clients won’t pay attention to your portfolio if all its projects are old. You need to be constantly working on new and exciting projects and adding them to your portfolio so that it is relevant and reflects your current skills.
Keep Your Target Audience in Mind
Strive to build your portfolio with items that resonate with your target audience and leave out anything that they wouldn’t find interesting. For example, if you are applying for jobs at a web development agency, your portfolio should be composed mostly of website designs.

"Career Karma entered my life when I needed it most and quickly helped me match with a bootcamp. Two months after graduating, I found my dream job that aligned with my values and goals in life!"
Venus, Software Engineer at Rockbot
Include a Brief Profile
Your portfolio should contain a brief personal description in which you introduce yourself and describe your skills and aptitudes. Include information about your level of education, work experience, and notable previous collaborations.
Never lie about your skills or previous experience or exaggerate the facts. If you get a project after having lied about your capabilities, you’ll find yourself in an uncomfortable situation when you are asked to do something that you are simply not ready to handle.
Graphic Design Projects FAQ
First, read through the brief of the project to understand the task. Conduct adequate research, come up with a creative idea, and sketch the concepts. Finally, develop your concepts thoroughly before presenting them to your client.
The number of projects you should include in your portfolio depends on several factors, including your level of experience and niche. However, we wouldn’t recommend including more than six projects.
Focus on projects that allow you to exercise your creativity and communication. You also want projects that involve typography, coding, and different software programs. Finally, consider projects that can be completed quickly or that require you to come up with inventive solutions.
No, you can work with colleagues. In fact, it is advisable to collaborate with other designers on projects because it allows you to learn from other creatives while sharing your ideas.
About us: Career Karma is a platform designed to help job seekers find, research, and connect with job training programs to advance their careers. Learn about the CK publication .
What's Next?
Get matched with top bootcamps
Ask a question to our community, take our careers quiz.

Leave a Reply Cancel reply
Your email address will not be published. Required fields are marked *

IMAGES
VIDEO
COMMENTS
07. Create a visual case study. Case studies can be fun to write, but difficult to present in a way that's enjoyable to read and easy to digest. And getting them to look professional without looking dull can be a real drag. Especially if you want your work to stand out from the rest of the class!
Tips for Stunning Front Page Design Of Assignment. While it's important to keep the front page design simple, that doesn't mean it can't be creative. You can still add a touch of personality to your design while making sure it's organized and professional. Here are a few ideas to get you started: Use a unique font or color scheme
If we want our students to read, then make a reading assignment a requirement of a quiz. The tactics above might be applied to written assignments, too. An easy way to bolster a student's interest and investment in these longer assignments is to give them a choice. This could be in the topic, location of study, or presentation style.
Assignment design principles and strategies: Backwards design, alignment, scaffolding, feedback, and transparency. Applying a principle or strategy to improve an assignment. Developing and using rubrics. Helping students with assignments. Joining an assignment design community: Assignments Across Disciplines.
An authentic assessment provides opportunities for students to practice, consult resources, learn from feedback, and refine their performances and products accordingly (Wiggins 1990, 1998, 2014). Authentic assignments ask students to "do" the subject with an audience in mind and apply their learning in a new situation.
01. Choose the right dimensions for your design. To begin, choose your design type from the Canva homepage. These are set to the optimal dimensions for each graphic, whether it's a social media post, flyer, photo book, or more. Or you can use custom dimensions by searching for "custom size". You can choose from pixels, millimetres or inches.
Download your custom page border templates for free as a JPG, PDF, or PNG file you can print and share anytime. Your project autosaves in your dashboard, so you can return to it whenever you need to make some edits. If you need a batch or two of your page border design, Canva Print can take care of your printing needs at an affordable rate.
Exercise 1: Improve an assignment. Brainstorm in your breakout group choose one or more way to improve the assignment: Identify the hidden skills or knowledge explicit by creating learning outcomes or objectives. Devise an activity that gives students practice with required skills. Clarify the instructions.
You'll find a list of general assignment design principles directly below and then a design template that can help you apply best practices and create an effective and clear/easy-to-understand writing assignment. Some General Principles. Clearly link each assignment to the course goals and learning outcomes.
The basic idea behind it is simple - if you make it easier for the teacher, it will reflect better on you. Conclusion. These are simple yet effective ways to make your assignment look as professional as possible. The idea behind this is to make the design language simple and minimalistic while at the same time, aesthetically pleasing.
Design assignments that isolate specific skills. Many people find it helpful to "scaffold" writing assignments; that is, sequence assignments that break reading, analysis, and writing into component parts and give students practice developing mastery in each area, building gradually towards more complex, comprehensive writing tasks. For ...
Download Free Cover Page Templates. Explore our collection of 23 beautifully designed cover page templates in Microsoft Word format. These templates feature captivating colors and layouts that are sure to make a lasting impression. Simply click on the preview image of each template and download it for free.
Designing successful writing assignments involves some or all of the following six strategies: Explicitly State Assignment Goals. Tie Assignment Goals to Course Goals. Create Antiracist Writing Assignments. Offer Clear Instructions for Completion. Clarify Expectations About Genre, Audience, and Formatting.
This site, from the University of New Hampshire's Center for Excellence in Teaching and Learning, provides a brief overview of effective assignment design, with a focus on determining and communicating goals and expectations. Gardner, T. (2005, June 12).
In short, designing good assignments is one means of assessing your students' learning on a larger scale. Assignments help measure student learning in your course. Effective assignment design in your course involves aligning your assignments with learning outcomes. When assignments and outcomes are aligned, good grades and good learning go ...
Transparent assignment design is a component of the Transparency in Learning and Teaching framework that aims to make learning and assessment more explicit for students.Studies show that conveying the purpose, task, and criteria of assignments helps students meet the assignment's expectations and increases academic performance (Winkelmes, 2016).
In this project, you'll create a simple blog post page using HTML and CSS. You'll need to design the layout of the page, add a title, a featured image, and of course add some content to your dummy blog post. You can also add a sidebar with a few helpful links and widgets, like: An author bio with a photo.
Simplicity in Design: Keeping the design simple and intuitive is crucial, especially for the mobile version, to ensure ease of navigation. Project 7: Building a Small Business Homepage . Creating a homepage for a small business is a fantastic project for applying web development skills in a real-world context. This project involves designing a ...
Assignments for beginners. At the university level, the common 1st-year assignments for Graphic Design students are: Redrawing famous logos on the computer as detailed and accurate as possible.; Using black and white to design logos, posters, book covers, invitations, and other media or you creating these using the most innovative colors possible.
If you want to design and build websites, understanding good layout is key. We suggest keeping things minimal and working with only a few elements to focus on the perfect placement. When you first start designing, think grids. Grids align elements, like div blocks and images on a web page, in a way that creates order.
Brown Vintage Scrapbook Cover Project History Document (A4) Document by hanysa. Black and White Simple Portfolio Cover Page. Document by Nuur Studio. Blue Modern Business Proposal Cover A4 Document. Document by Kuning Jeruk Studio. Blue and Brown Retro Vintage Portfolio Cover A4 Document. Document by Ruangkasa Studio.
Simple portfolio ; Portfolio gallery ; 10. Technical Documentation . ... Today, Robotics is one of the best technologies which deals with the design, working, and applications of computer systems for their control and information processing, and in many industries robots are used. This technology also deals with automated machines and is very ...
August 4, 2022. The graphic design industry continues to harness the creativity and innovative ideas of graphic designers. As a result, it is crucial to be equipped with the right skills to place you in high demand. Embarking on graphic design projects is an excellent way to develop top-tier skills and build a robust graphic design portfolio.