- Affiliate Program

- UNITED STATES
- 台灣 (TAIWAN)
- TÜRKIYE (TURKEY)
- Academic Editing Services
- - Research Paper
- - Journal Manuscript
- - Dissertation
- - College & University Assignments
- Admissions Editing Services
- - Application Essay
- - Personal Statement
- - Recommendation Letter
- - Cover Letter
- - CV/Resume
- Business Editing Services
- - Business Documents
- - Report & Brochure
- - Website & Blog
- Writer Editing Services
- - Script & Screenplay
- Our Editors
- Client Reviews
- Editing & Proofreading Prices
- Wordvice Points
- Partner Discount
- Plagiarism Checker
- APA Citation Generator
- MLA Citation Generator
- Chicago Citation Generator
- Vancouver Citation Generator
- - APA Style
- - MLA Style
- - Chicago Style
- - Vancouver Style
- Writing & Editing Guide
- Academic Resources
- Admissions Resources

How to Use Tables & Graphs in a Research Paper
It might not seem very relevant to the story and outcome of your study, but how you visually present your experimental or statistical results can play an important role during the review and publication process of your article. A presentation that is in line with the overall logical flow of your story helps you guide the reader effectively from your introduction to your conclusion.
If your results (and the way you organize and present them) don’t follow the story you outlined in the beginning, then you might confuse the reader and they might end up doubting the validity of your research, which can increase the chance of your manuscript being rejected at an early stage. This article illustrates the options you have when organizing and writing your results and will help you make the best choice for presenting your study data in a research paper.
Why does data visualization matter?
Your data and the results of your analysis are the core of your study. Of course, you need to put your findings and what you think your findings mean into words in the text of your article. But you also need to present the same information visually, in the results section of your manuscript, so that the reader can follow and verify that they agree with your observations and conclusions.
The way you visualize your data can either help the reader to comprehend quickly and identify the patterns you describe and the predictions you make, or it can leave them wondering what you are trying to say or whether your claims are supported by evidence. Different types of data therefore need to be presented in different ways, and whatever way you choose needs to be in line with your story.
Another thing to keep in mind is that many journals have specific rules or limitations (e.g., how many tables and graphs you are allowed to include, what kind of data needs to go on what kind of graph) and specific instructions on how to generate and format data tables and graphs (e.g., maximum number of subpanels, length and detail level of tables). In the following, we will go into the main points that you need to consider when organizing your data and writing your result section .
Table of Contents:
Types of data , when to use data tables .
- When to Use Data Graphs
Common Types of Graphs in Research Papers
Journal guidelines: what to consider before submission.
Depending on the aim of your research and the methods and procedures you use, your data can be quantitative or qualitative. Quantitative data, whether objective (e.g., size measurements) or subjective (e.g., rating one’s own happiness on a scale), is what is usually collected in experimental research. Quantitative data are expressed in numbers and analyzed with the most common statistical methods. Qualitative data, on the other hand, can consist of case studies or historical documents, or it can be collected through surveys and interviews. Qualitative data are expressed in words and needs to be categorized and interpreted to yield meaningful outcomes.
Quantitative data example: Height differences between two groups of participants Qualitative data example: Subjective feedback on the food quality in the work cafeteria
Depending on what kind of data you have collected and what story you want to tell with it, you have to find the best way of organizing and visualizing your results.
When you want to show the reader in detail how your independent and dependent variables interact, then a table (with data arranged in columns and rows) is your best choice. In a table, readers can look up exact values, compare those values between pairs or groups of related measurements (e.g., growth rates or outcomes of a medical procedure over several years), look at ranges and intervals, and select specific factors to search for patterns.
Tables are not restrained to a specific type of data or measurement. Since tables really need to be read, they activate the verbal system. This requires focus and some time (depending on how much data you are presenting), but it gives the reader the freedom to explore the data according to their own interest. Depending on your audience, this might be exactly what your readers want. If you explain and discuss all the variables that your table lists in detail in your manuscript text, then you definitely need to give the reader the chance to look at the details for themselves and follow your arguments. If your analysis only consists of simple t-tests to assess differences between two groups, you can report these results in the text (in this case: mean, standard deviation, t-statistic, and p-value), and do not necessarily need to include a table that simply states the same numbers again. If you did extensive analyses but focus on only part of that data (and clearly explain why, so that the reader does not think you forgot to talk about the rest), then a graph that illustrates and emphasizes the specific result or relationship that you consider the main point of your story might be a better choice.

When to Use Data Graphs
Graphs are a visual display of information and show the overall shape of your results rather than the details. If used correctly, a visual representation helps your (or your reader’s) brain to quickly understand large amounts of data and spot patterns, trends, and exceptions or outliers. Graphs also make it easier to illustrate relationships between entire data sets. This is why, when you analyze your results, you usually don’t just look at the numbers and the statistical values of your tests, but also at histograms, box plots, and distribution plots, to quickly get an overview of what is going on in your data.
Line graphs
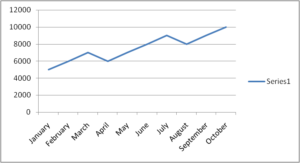
When you want to illustrate a change over a continuous range or time, a line graph is your best choice. Changes in different groups or samples over the same range or time can be shown by lines of different colors or with different symbols.
Example: Let’s collapse across the different food types and look at the growth of our four fish species over time.

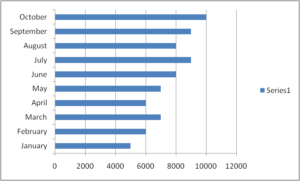
You should use a bar graph when your data is not continuous but divided into categories that are not necessarily connected, such as different samples, methods, or setups. In our example, the different fish types or the different types of food are such non-continuous categories.
Example: Let’s collapse across the food types again and also across time, and only compare the overall weight increase of our four fish types at the end of the feeding period.

Scatter plots
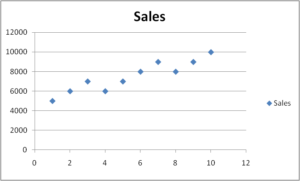
Scatter plots can be used to illustrate the relationship between two variables — but note that both have to be continuous. The following example displays “fish length” as an additional variable–none of the variables in our table above (fish type, fish food, time) are continuous, and they can therefore not be used for this kind of graph.

As you see, these example graphs all contain less data than the table above, but they lead the reader to exactly the key point of your results or the finding you want to emphasize. If you let your readers search for these observations in a big table full of details that are not necessarily relevant to the claims you want to make, you can create unnecessary confusion. Most journals allow you to provide bigger datasets as supplementary information, and some even require you to upload all your raw data at submission. When you write up your manuscript, however, matching the data presentation to the storyline is more important than throwing everything you have at the reader.
Don’t forget that every graph needs to have clear x and y axis labels , a title that summarizes what is shown above the figure, and a descriptive legend/caption below. Since your caption needs to stand alone and the reader needs to be able to understand it without looking at the text, you need to explain what you measured/tested and spell out all labels and abbreviations you use in any of your graphs once more in the caption (even if you think the reader “should” remember everything by now, make it easy for them and guide them through your results once more). Have a look at this article if you need help on how to write strong and effective figure legends .
Even if you have thought about the data you have, the story you want to tell, and how to guide the reader most effectively through your results, you need to check whether the journal you plan to submit to has specific guidelines and limitations when it comes to tables and graphs. Some journals allow you to submit any tables and graphs initially (as long as tables are editable (for example in Word format, not an image) and graphs of high enough resolution.
Some others, however, have very specific instructions even at the submission stage, and almost all journals will ask you to follow their formatting guidelines once your manuscript is accepted. The closer your figures are already to those guidelines, the faster your article can be published. This PLOS One Figure Preparation Checklist is a good example of how extensive these instructions can be – don’t wait until the last minute to realize that you have to completely reorganize your results because your target journal does not accept tables above a certain length or graphs with more than 4 panels per figure.
Some things you should always pay attention to (and look at already published articles in the same journal if you are unsure or if the author instructions seem confusing) are the following:
- How many tables and graphs are you allowed to include?
- What file formats are you allowed to submit?
- Are there specific rules on resolution/dimension/file size?
- Should your figure files be uploaded separately or placed into the text?
- If figures are uploaded separately, do the files have to be named in a specific way?
- Are there rules on what fonts to use or to avoid and how to label subpanels?
- Are you allowed to use color? If not, make sure your data sets are distinguishable.
If you are dealing with digital image data, then it might also be a good idea to familiarize yourself with the difference between “adjusting” for clarity and visibility and image manipulation, which constitutes scientific misconduct . And to fully prepare your research paper for publication before submitting it, be sure to receive proofreading services , including journal manuscript editing and research paper editing , from Wordvice’s professional academic editors .

Figures and Charts
What this handout is about.
This handout will describe how to use figures and tables to present complicated information in a way that is accessible and understandable to your reader.
Do I need a figure/table?
When planning your writing, it is important to consider the best way to communicate information to your audience, especially if you plan to use data in the form of numbers, words, or images that will help you construct and support your argument. Generally speaking, data summaries may take the form of text, tables or figures. Most writers are familiar with textual data summaries and this is often the best way to communicate simple results. A good rule of thumb is to see if you can present your results clearly in a sentence or two. If so, a table or figure is probably unnecessary. If your data are too numerous or complicated to be described adequately in this amount of space, figures and tables can be effective ways of conveying lots of information without cluttering up your text. Additionally, they serve as quick references for your reader and can reveal trends, patterns, or relationships that might otherwise be difficult to grasp.
So what’s the difference between a table and a figure anyway?
Tables present lists of numbers or text in columns and can be used to synthesize existing literature, to explain variables, or to present the wording of survey questions. They are also used to make a paper or article more readable by removing numeric or listed data from the text. Tables are typically used to present raw data, not when you want to show a relationship between variables.
Figures are visual presentations of results. They come in the form of graphs, charts, drawings, photos, or maps. Figures provide visual impact and can effectively communicate your primary finding. Traditionally, they are used to display trends and patterns of relationship, but they can also be used to communicate processes or display complicated data simply. Figures should not duplicate the same information found in tables and vice versa.
Using tables
Tables are easily constructed using your word processor’s table function or a spread sheet program such as Excel. Elements of a table include the Legend or Title, Column Titles, and the Table Body (quantitative or qualitative data). They may also include subheadings and footnotes. Remember that it is just as important to think about the organization of tables as it is to think about the organization of paragraphs. A well-organized table allows readers to grasp the meaning of the data presented with ease, while a disorganized one will leave the reader confused about the data itself, or the significance of the data.
Title: Tables are headed by a number followed by a clear, descriptive title or caption. Conventions regarding title length and content vary by discipline. In the hard sciences, a lengthy explanation of table contents may be acceptable. In other disciplines, titles should be descriptive but short, and any explanation or interpretation of data should take place in the text. Be sure to look up examples from published papers within your discipline that you can use as a model. It may also help to think of the title as the “topic sentence” of the table—it tells the reader what the table is about and how it’s organized. Tables are read from the top down, so titles go above the body of the table and are left-justified.
Column titles: The goal of column headings is to simplify and clarify the table, allowing the reader to understand the components of the table quickly. Therefore, column titles should be brief and descriptive and should include units of analysis.
Table body: This is where your data are located, whether they are numerical or textual. Again, organize your table in a way that helps the reader understand the significance of the data. Be sure to think about what you want your readers to compare, and put that information in the column (up and down) rather than in the row (across). In other words, construct your table so that like elements read down, not across. When using numerical data with decimals, make sure that the decimal points line up. Whole numbers should line up on the right.
Other table elements
Tables should be labeled with a number preceding the table title; tables and figures are labeled independently of one another. Tables should also have lines demarcating different parts of the table (title, column headers, data, and footnotes if present). Gridlines or boxes should not be included in printed versions. Tables may or may not include other elements, such as subheadings or footnotes.
Quick reference for tables
Tables should be:
- Centered on the page.
- Numbered in the order they appear in the text.
- Referenced in the order they appear in the text.
- Labeled with the table number and descriptive title above the table.
- Labeled with column and/or row labels that describe the data, including units of measurement.
- Set apart from the text itself; text does not flow around the table.
Table 1. Physical characteristics of the Doctor in the new series of Doctor Who
Table 2. Physical characteristics of the Doctor in the new series of Doctor Who
Using figures
Figures can take many forms. They may be graphs, diagrams, photos, drawings, or maps. Think deliberately about your purpose and use common sense to choose the most effective figure for communicating the main point. If you want your reader to understand spatial relationships, a map or photograph may be the best choice. If you want to illustrate proportions, experiment with a pie chart or bar graph. If you want to illustrate the relationship between two variables, try a line graph or a scatterplot (more on various types of graphs below). Although there are many types of figures, like tables, they share some typical features: captions, the image itself, and any necessary contextual information (which will vary depending on the type of figure you use).
Figure captions
Figures should be labeled with a number followed by a descriptive caption or title. Captions should be concise but comprehensive. They should describe the data shown, draw attention to important features contained within the figure, and may sometimes also include interpretations of the data. Figures are typically read from the bottom up, so captions go below the figure and are left-justified.
The most important consideration for figures is simplicity. Choose images the viewer can grasp and interpret clearly and quickly. Consider size, resolution, color, and prominence of important features. Figures should be large enough and of sufficient resolution for the viewer to make out details without straining their eyes. Also consider the format your paper will ultimately take. Journals typically publish figures in black and white, so any information coded by color will be lost to the reader. On the other hand, color might be a good choice for papers published to the web or for PowerPoint presentations. In any case, use figure elements like color, line, and pattern for effect, not for flash.
Additional information
Figures should be labeled with a number preceding the table title; tables and figures are numbered independently of one another. Also be sure to include any additional contextual information your viewer needs to understand the figure. For graphs, this may include labels, a legend explaining symbols, and vertical or horizontal tick marks. For maps, you’ll need to include a scale and north arrow. If you’re unsure about contextual information, check out several types of figures that are commonly used in your discipline.
Quick reference for figures
Figures should be:
- Labeled (under the figure) with the figure number and appropriate descriptive title (“Figure” can be spelled out [“Figure 1.”] or abbreviated [“Fig. 1.”] as long as you are consistent).
- Referenced in the order they appear in the text (i.e. Figure 1 is referenced in the text before Figure 2 and so forth).
- Set apart from the text; text should not flow around figures.
Every graph is a figure but not every figure is a graph. Graphs are a particular set of figures that display quantitative relationships between variables. Some of the most common graphs include bar charts, frequency histograms, pie charts, scatter plots, and line graphs, each of which displays trends or relationships within and among datasets in a different way. You’ll need to carefully choose the best graph for your data and the relationship that you want to show. More details about some common graph types are provided below. Some good advice regarding the construction of graphs is to keep it simple. Remember that the main objective of your graph is communication. If your viewer is unable to visually decode your graph, then you have failed to communicate the information contained within it.
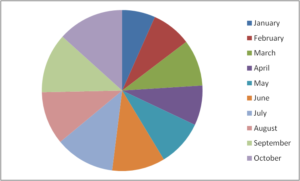
Pie charts are used to show relative proportions, specifically the relationship of a number of parts to the whole. Use pie charts only when the parts of the pie are mutually exclusive categories and the sum of parts adds up to a meaningful whole (100% of something). Pie charts are good at showing “big picture” relationships (i.e. some categories make up “a lot” or “a little” of the whole thing). However, if you want your reader to discern fine distinctions within your data, the pie chart is not for you. Humans are not very good at making comparisons based on angles. We are much better at comparing length, so try a bar chart as an alternative way to show relative proportions. Additionally, pie charts with lots of little slices or slices of very different sizes are difficult to read, so limit yours to 5-7 categories.

The chart shows the relative proportion of fifteen elements in Martian soil, listed in order from “most” to “least”: oxygen, silicon, iron, magnesium, calcium, sulfur, aluminum, sodium, potassium, chlorine, helium, nitrogen, phosphorus, beryllium, and other. Oxygen makes up about ⅓ of the composition, while silicon and iron together make up about ¼. The remaining slices make up smaller proportions, but the percentages aren’t listed in the key and are difficult to estimate. It is also hard to distinguish fifteen colors when comparing the pie chart to the color coded key.

The chart shows the relative proportion of five leisure activities of Venusian teenagers (tanning, trips to Mars, reading, messing with satellites, and stealing Earth cable). Although each of the five slices are about the same size (roughly 20% of the total), the percentage of Venusian teenagers engaging in each activity varies widely (tanning: 80%, trips to Mars: 40%, reading: 12%, messing with satellites: 30%, stealing Earth cable: 77%). Therefore, there is a mismatch between the labels and the actual proportion represented by each activity (in other words, if reading represents 12% of the total, its slice should take up 12% of the pie chart area), which makes the representation inaccurate. In addition, the labels for the five slices add up to 239% (rather than 100%), which makes it impossible to accurately represent this dataset using a pie chart.
Bar graphs are also used to display proportions. In particular, they are useful for showing the relationship between independent and dependent variables, where the independent variables are discrete (often nominal) categories. Some examples are occupation, gender, and species. Bar graphs can be vertical or horizontal. In a vertical bar graph the independent variable is shown on the x axis (left to right) and the dependent variable on the y axis (up and down). In a horizontal one, the dependent variable will be shown on the horizontal (x) axis, the independent on the vertical (y) axis. The scale and origin of the graph should be meaningful. If the dependent (numeric) variable has a natural zero point, it is commonly used as a point of origin for the bar chart. However, zero is not always the best choice. You should experiment with both origin and scale to best show the relevant trends in your data without misleading the viewer in terms of the strength or extent of those trends.

The graph shows the number of male and female spaceship crew members for five different popular television series: Star Trek (1965), Battlestar (1978), Star Trek: TNG (1987), Stargate SG-1 (1997), and Firefly (2002). Because the television series are arranged chronologically on the x-axis, the graph can also be used to look for trends in these numbers over time.
Although the number of crew members for each show is similar (ranging from 9 to 11), the proportion of female and male crew members varies. Star Trek has half as many female crew members as male crew members (3 and 6, respectively), Battlestar has fewer than one-fourth as many female crew members as male crew members (2 and 9, respectively), Star Trek: TNG has four female crew members and six male crew members, Stargate SG-1 has less than one-half as many female crew members as male crew members (3 and 7, respectively), and Firefly has four female and five male crew members.
Frequency histograms/distributions
Frequency histograms are a special type of bar graph that show the relationship between independent and dependent variables, where the independent variable is continuous, rather than discrete. This means that each bar represents a range of values, rather than a single observation. The dependent variables in a histogram are always numeric, but may be absolute (counts) or relative (percentages). Frequency histograms are good for describing populations—examples include the distribution of exam scores for students in a class or the age distribution of the people living in Chapel Hill. You can experiment with bar ranges (also known as “bins”) to achieve the best level of detail, but each range or bin should be of uniform width and clearly labeled.
XY scatter plots
Scatter plots are another way to illustrate the relationship between two variables. In this case, data are displayed as points in an x,y coordinate system, where each point represents one observation along two axes of variation. Often, scatter plots are used to illustrate correlation between two variables—as one variable increases, the other increases (positive correlation) or decreases (negative correlation). However, correlation does not necessarily imply that changes in one variable cause changes in the other. For instance, a third, unplotted variable may be causing both. In other words, scatter plots can be used to graph one independent and one dependent variable, or they can be used to plot two independent variables. In cases where one variable is dependent on another (for example, height depends partly on age), plot the independent variable on the horizontal (x) axis, and the dependent variable on the vertical (y) axis. In addition to correlation (a linear relationship), scatter plots can be used to plot non-linear relationships between variables.

The scatter plot shows the relationship between temperature (x-axis, independent variable) and the number of UFO sightings (y-axis, dependent variable) for 53 separate data points. The temperature ranges from about 0°F and 120°F, and the number of UFO sightings ranges from 1 to 10. The plot shows a low number of UFO sightings (ranging from 1 to 4) at temperatures below 80°F and a much wider range of the number of sightings (from 1 to 10) at temperatures above 80°F. It appears that the number of sightings tends to increase as temperature increases, though there are many cases where only a few sightings occur at high temperatures.
XY line graphs
Line graphs are similar to scatter plots in that they display data along two axes of variation. Line graphs, however, plot a series of related values that depict a change in one variable as a function of another, for example, world population (dependent) over time (independent). Individual data points are joined by a line, drawing the viewer’s attention to local change between adjacent points, as well as to larger trends in the data. Line graphs are similar to bar graphs, but are better at showing the rate of change between two points. Line graphs can also be used to compare multiple dependent variables by plotting multiple lines on the same graph.
Example of an XY line graph:

The line graph shows the age (in years) of the actor of each Doctor Who regeneration for the first through the eleventh regeneration. The ages range from a maximum of about 55 in the first regeneration to a minimum of about 25 in the eleventh regeneration. There is a downward trend in the age of the actors over the course of the eleven regenerations.
General tips for graphs
Strive for simplicity. Your data will be complex. Don’t be tempted to convey the complexity of your data in graphical form. Your job (and the job of your graph) is to communicate the most important thing about the data. Think of graphs like you think of paragraphs—if you have several important things to say about your data, make several graphs, each of which highlights one important point you want to make.
Strive for clarity. Make sure that your data are portrayed in a way that is visually clear. Make sure that you have explained the elements of the graph clearly. Consider your audience. Will your reader be familiar with the type of figure you are using (such as a boxplot)? If not, or if you’re not sure, you may need to explain boxplot conventions in the text. Avoid “chartjunk.” Superfluous elements just make graphs visually confusing. Your reader does not want to spend 15 minutes figuring out the point of your graph.
Strive for accuracy. Carefully check your graph for errors. Even a simple graphical error can change the meaning and interpretation of the data. Use graphs responsibly. Don’t manipulate the data so that it looks like it’s saying something it’s not—savvy viewers will see through this ruse, and you will come off as incompetent at best and dishonest at worst.
How should tables and figures interact with text?
Placement of figures and tables within the text is discipline-specific. In manuscripts (such as lab reports and drafts) it is conventional to put tables and figures on separate pages from the text, as near as possible to the place where you first refer to it. You can also put all the figures and tables at the end of the paper to avoid breaking up the text. Figures and tables may also be embedded in the text, as long as the text itself isn’t broken up into small chunks. Complex raw data is conventionally presented in an appendix. Be sure to check on conventions for the placement of figures and tables in your discipline.
You can use text to guide the reader in interpreting the information included in a figure, table, or graph—tell the reader what the figure or table conveys and why it was important to include it.
When referring to tables and graphs from within the text, you can use:
- Clauses beginning with “as”: “As shown in Table 1, …”
- Passive voice: “Results are shown in Table 1.”
- Active voice (if appropriate for your discipline): “Table 1 shows that …”
- Parentheses: “Each sample tested positive for three nutrients (Table 1).”
Works consulted
We consulted these works while writing this handout. This is not a comprehensive list of resources on the handout’s topic, and we encourage you to do your own research to find additional publications. Please do not use this list as a model for the format of your own reference list, as it may not match the citation style you are using. For guidance on formatting citations, please see the UNC Libraries citation tutorial . We revise these tips periodically and welcome feedback.
American Psychological Association. 2010. Publication Manual of the American Psychological Association . 6th ed. Washington, DC: American Psychological Association.
Bates College. 2012. “ Almost everything you wanted to know about making tables and figures.” How to Write a Paper in Scientific Journal Style and Format , January 11, 2012. http://abacus.bates.edu/~ganderso/biology/resources/writing/HTWtablefigs.html.
Cleveland, William S. 1994. The Elements of Graphing Data , 2nd ed. Summit, NJ: Hobart Press..
Council of Science Editors. 2014. Scientific Style and Format: The CSE Manual for Authors, Editors, and Publishers , 8th ed. Chicago & London: University of Chicago Press.
University of Chicago Press. 2017. The Chicago Manual of Style , 17th ed. Chicago & London: University of Chicago Press.
You may reproduce it for non-commercial use if you use the entire handout and attribute the source: The Writing Center, University of North Carolina at Chapel Hill
Make a Gift
- Interesting
- Scholarships
- UGC-CARE Journals
An Effective Guide to Explain Graphs in Thesis and Research Paper
10 Popular Online Tools for Representing Graphs


Table of contents
Effective guide to explaining graphs in thesis and research papers: tips and tools, 10 popular online tools for representing graphs:.
When explaining graphs in a thesis and research paper, it is essential to provide a clear and concise interpretation of the data represented in the graph. In this article, iLovePhD presented you with an effective guide to explain graphs in the thesis and research paper.
Title and Caption : Begin by providing a clear title for the graph that summarizes its main purpose or finding. Follow it with a descriptive caption that highlights the key elements and trends depicted in the graph. Make sure the caption provides sufficient context and explains any abbreviations or symbols used.
Introduce the graph : In the text preceding the graph, provide a brief introduction to the topic or research question being addressed. Explain why the graph is relevant and how it contributes to answering the research question or supporting the thesis. This helps readers understand the purpose of the graph before delving into its details.
Describe the axes and variables : Clearly identify and label the axes of the graph. Explain what each axis represents and the units of measurement involved. Additionally, define the variables or data points represented on the graph.
Data Points : Draw attention to significant data points or noteworthy features of the graph, such as peaks, troughs, or sudden changes. Describe these points in the context of the research question or thesis statement. Explain any anomalies or unexpected trends observed in the graph.
Highlight trends or patterns : Analyze the graph and identify any significant trends, patterns, or relationships that can be observed. Explain whether the data shows an increase, decrease, fluctuation, or any other notable pattern. Use comparative language (e.g., “higher than,” “lower than,” “increasing,” and “decreasing”) to highlight these patterns and their significance. Use specific data points or numerical values from the graph to support your analysis.
Statistical Analysis : If applicable, provide statistical analysis of the data presented in the graph. Mention the statistical methods used, such as means, standard deviations, or significance tests. This adds rigor to your explanation and reinforces the credibility of your findings.
Provide supporting evidence : Whenever possible, supplement your explanations with additional evidence or information from your research or other sources. This can help to validate the patterns or trends observed in the graph and strengthen your thesis argument.
Interpret the implications : Discuss the implications and significance of the observed trends or patterns. Explain why these findings are important and how they contribute to your overall thesis or research question. Connect the information presented in the graph to the broader context of your study.
Limitations and Uncertainties : Acknowledge any limitations or uncertainties associated with the graph or the data it represents. Discuss potential sources of error, sample size issues, or confounding factors that may have influenced the results. This demonstrates a thoughtful analysis and helps readers understand the scope and reliability of the findings.
Relate to other parts of your thesis : Consider how the graph aligns with other information or analyses presented in your thesis. Highlight any connections between the graph and previous findings, literature reviews, or theoretical frameworks. This will help to create a cohesive narrative and reinforce the validity of your conclusions.
Use clear and concise language : Write your explanations in a clear and concise manner, avoiding jargon or complex language whenever possible. Aim to make your interpretation accessible to readers who may not have a specialized background in your field.
Include captions and references : Make sure to include a caption for each graph that provides a clear title and describes its content. Additionally, provide appropriate citations or references for the graph , following the citation style guidelines specified by your institution or field of study.
The specific approach to explaining graphs may vary depending on your discipline and the nature of your research. It’s crucial to strike a balance between providing enough information to understand the graph and avoiding excessive detail. Keep your explanations concise and focused on the most relevant aspects of the graph.
When it comes to representing graphs in a thesis and research paper, there are several online tools available that can assist you in creating professional and visually appealing visualizations. Here are 10 popular online tools for representing graphs:
Plotly : Plotly provides a wide range of interactive and customizable graph types. It allows you to create visually stunning graphs with options for 2D and 3D re presentations , as well as animations.

Tableau Public : Tableau Public is a powerful data visualization tool that allows you to create interactive graphs and dashboards. You can easily connect your data and create professional-looking visualizations.

Microsoft Excel : Excel offers a range of graphing options and is widely used for data analysis and visualization. It provides a user-friendly interface for creating various types of charts, including bar graphs, line graphs, scatter plots, and more.

Google Charts : Google Charts is a free tool that enables you to create a wide variety of charts and graphs. It offers a simple and intuitive interface with options for customization and interactivity.

D3.js : D3.js is a JavaScript library that allows you to create dynamic and interactive data visualizations. It provides extensive flexibility and control over the design and behaviour of your graphs.

Infogram : Infogram is an easy-to-use tool that enables you to create infographics and data visualizations. It offers a range of graph types and templates to choose from, making it suitable for creating eye-catching visuals for your thesis.

Canva : Canva is a versatile design tool that includes graphing capabilities. It offers a wide range of templates and customization options, allowing you to create visually appealing graphs and charts .

Chart.js : Chart.js is a JavaScript library that provides a simple and responsive way to create static and interactive charts. It is lightweight and easy to implement, making it a popular choice for web-based visualizations.

Lucidchart : Lucidchart is a web-based diagramming tool that can be used for creating various types of graphs and flowcharts. It offers a drag-and-drop interface and collaboration features, making it suitable for complex visualizations.

Adobe Illustrator : Adobe Illustrator is professional design software that allows you to create vector-based graphics, including graphs and charts. It provides advanced customization options and is ideal for creating intricate and detailed visualizations.

These tools offer a range of options for creating graphs and visualizations, catering to different skill levels and design requirements. Choose the tool that best suits your needs and familiarity with the software to effectively represent graphs in your thesis.
- data interpretation
- Data visualization
- effective guide
- graph explanation
- graph representation
- graph tools
- research paper graphs
- statistical analysis
- thesis graphs
- visualizations

What is Research Design? and How to Frame it?
What is a research design importance and types, z-library is legal you can download 70,000,000+ scientific articles for free, email subscription.

iLovePhD is a research education website to know updated research-related information. It helps researchers to find top journals for publishing research articles and get an easy manual for research tools. The main aim of this website is to help Ph.D. scholars who are working in various domains to get more valuable ideas to carry out their research. Learn the current groundbreaking research activities around the world, love the process of getting a Ph.D.
WhatsApp Channel
Join iLovePhD WhatsApp Channel Now!
Contact us: [email protected]
Copyright © 2019-2024 - iLovePhD
- Artificial intelligence
Research Voyage
Research Tips and Infromation
Maximizing the Impact of Your Research Paper with Graphs and Charts

The value of visual aids in today’s data-driven study environment cannot be overlooked.
Graphs and charts are effective communication tools that enable academics to convey difficult information to their audience. These visual tools, which range from pie charts to bar graphs, can significantly improve the readability and impact of research articles.
Graphs and charts are indispensable in contemporary research, whether they are used to compare data points, depict trends and patterns, or just break up text-heavy parts.
In this article, the significance of graphs and charts in research papers will be examined, along with their benefits, types of visual aids that are frequently employed, recommended practices for their use, and typical pitfalls to avoid.
By the end of this article, you will have a comprehensive understanding of the role of graphs and charts in research, and how to use them effectively in your next paper.
If you are not well versed with charts and graphs there is a quick fix. Join online c ourses on Data visualization . This will help you learn tricks involved in representing the data in a quick way. If you are still not comfortable the hire a research consultant who will help you in representing the data in a most adorable way. I have written an article on Why Hiring a Research Consultant Can Benefit Your PhD Work? . Please refer the article for further details.
Why add Graphs and Charts to my research paper?
How graphs and charts in research papers are critical, enhance visual appeal and readability of data, convey complex information effectively, enable easy comparison of data points, facilitate understanding of trends and patterns, improved data visualization, enhanced readability, better communication of results, increased credibility, better understanding of data, choosing the right type of graph or chart, making sure the graph or chart is accurate, using clear and concise labelling, adding a title and caption, formatting the graph or chart appropriately, line graphs, scatter plots, best software options for drawing charts and graphs, how do i choose the appropriate scale for my charts and graphs, how do i handle missing data when creating charts and graphs, how to handle huge data sets using charts and graphs, when should i use logarithmic scales in my charts and graphs, how do i ensure that my charts and graphs are accessible to all audiences, including those with disabilities, whether charts and graphs come under copyright protection, what are some common mistakes to avoid when using charts and graphs in research papers, how many graphs and charts should be there in a research paper, what should be the size of graphs and charts in a research paper, can i place charts and graphs at the end of paper instead of in between text, can i place charts and graphs at the end of text as single column instead of two column text, introduction.
Graphs and charts are often used in the Results section of a research paper to visually represent data and findings obtained from experiments or analyses. They may also be included in the Discussion section to support or refute the hypotheses or research questions presented in the Introduction section.
In the Results section, graphs and charts may be used to display statistical analyses such as histograms, scatter plots, and box plots. They can also be used to show trends over time or across different groups, such as line graphs or bar charts. Tables may also be used to present numerical data in a more organized and concise manner.
I have written an article on How to write Results Section of your Research Paper . The article helps you to represent the results in a better fashion, which will in turn increase the chances of paper acceptance.
In the Discussion section, graphs and charts may be used to support the interpretation of the results and to draw conclusions. They may also be used to compare the findings of the current study to previous research or to provide visual examples of the phenomena being studied.
I have written an article on 07 Easy Steps for Writing Discussion Section of a Research Paper . This article will help you in analyzing the charts and graphs to gain better insights.
It is important to note that while graphs and charts can be useful tools in a research paper, they should be used sparingly and only when they add value to the presentation of the data. Too many or poorly designed graphs can make the paper difficult to read and understand.
In research papers, graphs and charts are used to aid in the audience’s comprehension of the material being given. Graphs and charts give the data a visual representation that is simple to comprehend, evaluate, and compare.
Researchers may successfully communicate difficult information using graphs and charts, which increases the impact and accessibility of their findings.
Data from the study are best presented using graphs and charts. They can be used to draw attention to significant patterns and trends in the data, to present information in a comprehensible manner, and to engage viewers.
Graphs and charts can assist you in clearly expressing your ideas and leaving an impact, whether you are summarising data for a research paper or presenting study findings to a big audience.
Advantages of Using Graphs and Charts in Research Papers
The use of graphs and charts in research papers offers many advantages that cannot be achieved through text alone. The following points clearly elaborate on the same.
Long passages of text can be broken up using graphs and charts, which also offer a more understandable visual depiction of the data. Additionally, they can improve the research paper’s aesthetic attractiveness, which will draw readers in and keep them reading.
When given in the form of text or raw statistics, data sets can frequently be convoluted and challenging to comprehend. This information can be made more understandable and easier to interpret for the reader by using graphs and charts. Additionally, they can be used to contrast several data sets, which makes it simpler to spot connections and trends.
Graphs and charts allow researchers to present data in a way that makes it easy to compare different data points. For example, a bar graph can be used to compare the values of different categories, while a line graph can be used to track changes over time.
Data trends and patterns that might not be immediately obvious through text alone might be found using graphs and charts. A histogram, for instance, can be used to see the distribution of data points while a scatter plot can be used to find correlations between two variables. Researchers can more easily make sense of their data by using graphs and charts to better comprehend the underlying patterns and trends.
The Benefits of Using Graphs and Charts in Research Papers
There are many benefits to using graphs and charts in research papers, including:
Graphs and charts can help researchers effectively visualize their data, making it easier for them to see patterns, trends, and relationships within their data. This can help researchers make more informed decisions and draw more accurate conclusions based on their data.
Graphs and charts can make research papers more visually appealing and easier to read. By breaking up long blocks of text, graphs and charts can help to hold the reader’s attention and make the information more engaging.
Graphs and charts can help researchers effectively communicate their results to a variety of audiences. By using visual aids, researchers can effectively convey complex data and ideas in a simple, straightforward manner.
The use of graphs and charts can help to increase the credibility of a research paper. By effectively visualizing their data, researchers can demonstrate that their findings are based on a strong understanding of the data and that their results are robust and reliable.
Graphs and charts can help researchers to better understand their data. By visualizing the data, researchers can identify patterns, relationships, and trends that might not be immediately apparent in raw data or text-based summaries.
By taking advantage of the benefits of using graphs and charts in research papers, researchers can enhance the quality and impact of their research and effectively communicate their findings to a variety of audiences.
Best Practices for Using Graphs and Charts in Research Papers
There are several best practices that researchers should follow when using graphs and charts in their research papers. These include:
It is important to choose the right type of graph or chart to effectively convey the data and results. Researchers should consider the type of data they are working with, the relationships they want to highlight, and the message they want to convey when selecting a graph or chart.
It is important to ensure that the data represented in a graph or chart is accurate and that the graph or chart is properly labelled. Researchers should also be careful to ensure that the scale used in a graph or chart is appropriate for the data being displayed.
Labels should be clear, concise, and accurately describe the data being displayed. Researchers should use labelling to highlight the key points of their data and to make it easy for the reader to understand the message being conveyed.
A title and caption should be included with each graph or chart to provide context and to summarize the key findings. The title should accurately describe the graph or chart, while the caption should provide additional information and context.
The graph or chart should be presented in a clear, uncomplicated, and readable way. In addition to making sure the graph or chart has the right size and placement within the study report, researchers should avoid utilising too many colours or patterns.
Researchers can efficiently utilise graphs and charts to increase the visual appeal and readability of their research papers as well as to properly communicate their data and results by adhering to certain best practises.
Types of Graphs and Charts Commonly used in Research Papers
There are many types of graphs and charts that can be used in research papers, each with their own strengths and uses.
Bar graphs are used to compare the values of different categories or groups. They are best used to display data that is numerical in nature and can be represented in a structured, organized format. Bar graphs can be horizontal or vertical, and can be used to display data in a variety of ways, including grouped bar graphs, stacked bar graphs, and side-by-side bar graphs.
Line graphs are used to track changes over time and to display trends. They consist of a series of points connected by a line and can be used to display data in a variety of ways, including simple line graphs, multiple line graphs, and cumulative line graphs.
Pie charts are used to represent data as a proportion of the whole. They are best used to display data that is categorical in nature and to display the relationships between different categories.
Scatter plots are used to display the relationship between two variables. They consist of a series of points plotted on a set of axes, and can be used to identify correlations between the two variables.
Histograms are used to display the distribution of data. They consist of a series of bars that represent the frequency of data points within a specific range. Histograms are best used to display data that is numerical in nature and to display the distribution of data points over time.
By understanding the different types of graphs and charts, researchers can choose the best visual aid to convey their data and results effectively.
There are several popular software tools for creating graphs and charts for your research paper. These tools are widely used in academia and industry for visualizing data in a visually appealing and professional manner. Here are some of the best software options:
- Microsoft Excel : Excel is a widely used spreadsheet software that comes with a robust charting feature. It allows you to create a wide variety of charts, such as bar charts, line charts, scatter plots, and more. Excel also offers customization options for colors, fonts, and styles to create visually appealing charts.
- MATLAB : MATLAB is a popular software tool used in various fields of research, including engineering, physics, and finance. It has powerful graphing capabilities, with a wide range of plotting functions and customization options. MATLAB also provides advanced data analysis and visualization features, making it suitable for complex research papers.
- R : R is a popular open-source programming language and environment for statistical computing and graphics. It offers extensive libraries for data visualization, such as ggplot2, lattice, and base graphics, which provide a wide range of charting options for creating publication-quality graphs and charts.
- Tableau : Tableau is a powerful data visualization software that provides a user-friendly interface for creating interactive and visually appealing charts and dashboards. It offers a wide range of chart types and customization options, and allows you to connect to various data sources for easy data integration and visualization.
- Adobe Illustrator : Adobe Illustrator is a vector graphics software that provides advanced drawing and design tools for creating high-quality, professional-looking graphs and charts. It offers extensive customization options for colors, fonts, styles, and shapes, allowing you to create visually stunning graphics for your research paper.
- Google Charts : Google Charts is a free web-based tool that allows you to create interactive charts and graphs. It provides a wide range of chart types, such as bar charts, line charts, pie charts, and more, with easy-to-use customization options. Google Charts also offers integration with other Google products, such as Google Sheets, making it convenient for data visualization.
Here’s a comparison of the software tools for drawing graphs and charts:
Note: The cost of these software tools may vary based on different licensing options, usage plans, and academic discounts that may be available.
It’s important to consider factors such as features, customization options, data integration capabilities, interactivity, and cost when choosing the best software for your specific research paper. Depending on your requirements and preferences, you may find one of these software tools more suitable for your needs.
These are some of the best software options for creating graphs and charts for your research paper. Choose the one that best suits your needs and familiarity with the software, and ensure that the resulting graphs and charts are visually appealing and effectively communicate your research findings.
Key factors to consider when choosing the appropriate scale for your charts and graphs, with examples and visual aids:
- Data range: Your chart or graph’s scale should correspond to the range of values in your data. For instance, a bar chart with a scale that only goes up to 1,000 will not accurately depict the full range of the data if the data extends from 0 to 100,000. In this situation, a bigger scale that can hold the entire range of values could be preferable.
- Purpose of the chart or graph: Think about the goal of your graph or chart. Use a smaller scale that zooms in on a specific area of the data if you want to draw attention to a particular trend or pattern. You could wish to zoom in on a certain time period to draw attention to a certain pattern, for instance, if your line chart of temperature trends over time shows trends over time.
- Audience: Consider the audience that your graph or chart is intended to serve. Your data visualisation may need to be more or less explicit and detailed depending on who it is intended for. If you are presenting your study to a general audience, for instance, you might want to use a straightforward bar chart, however, if you are presenting to a more technical audience, you might want to use a more intricate line chart that provides more detail.
- Data distribution: Take your data’s distribution into account. You might want to choose a different scale if your data is skewed or contains outliers in order to better depict the data. For instance, you might wish to use a logarithmic scale if your data are skewed to the right in order to more accurately depict the distribution of the data.
By considering these factors, you can choose an appropriate scale that effectively communicates the data in your chart or graph and enhances the readability and credibility of your research paper.
Handling missing data in charts and graphs can be challenging, but there are several strategies you can use to minimize its impact on the representation of your data:
- Use visual cues: When you have missing data points, you can use visual cues such as dots or a different colour or pattern to indicate the missing information. This helps the reader understand that the data is missing and avoids misleading them with false information.
- Interpolate: In some cases, you may be able to estimate the missing data by interpolating values between two known data points. This can be useful for creating a continuous line chart or graph, but it should be clearly labelled as estimated data.
- Use statistical methods: Statistical methods, such as imputation, can be used to fill in missing data based on patterns in the existing data. This should be done carefully and with caution, as it can introduce bias into the data if not done correctly.
- Leave it out: If the amount of missing data is significant, it may be best to simply exclude it from your charts and graphs. This will avoid giving false impressions of trends or patterns in the data.
- Provide a separate graph or chart: If the missing data is important, you can provide a separate chart or graph that specifically shows the missing data. This allows the reader to see the complete picture, and understand the limitations of the data you are presenting.
When handling missing data, it’s important to be transparent about the methods you used and to clearly label any estimated or imputed data. This will help to ensure the accuracy and reliability of your research paper, and to build trust with your readers.
Handling huge data in charts can be a challenge, but there are several strategies that can help make the data more manageable and easier to understand. Here are some tips for handling huge data in charts:
- Use aggregated data: Aggregating data into categories or grouping similar data points can help reduce the amount of data being displayed and make it easier to understand.
- Filter data: Filtering data to only display relevant information can also help reduce the amount of data in a chart.
- Use multiple charts: If the data is too large to be displayed effectively in a single chart, consider using multiple charts to break down the data into smaller, more manageable parts.
- Use dynamic charts: Dynamic charts, such as interactive line charts or bar charts, allow users to select and view specific data points, making it easier to understand large amounts of data.
- Use colour coding: Color coding data points in a chart can help distinguish between different data sets and make it easier to see trends or patterns.
- Use a smaller time scale: If the data is time-based, consider using a smaller time scale, such as days or weeks instead of months or years, to reduce the amount of data in a chart.
- Use data visualizations: Data visualizations, such as heat maps or treemaps, can help represent large amounts of data in a more manageable and easy-to-understand format.
- Use summary statistics: Summary statistics, such as mean, median, or mode, can help simplify the data and make it easier to understand.
- Use simplifying shapes: Using simplifying shapes, such as circles or squares, can help represent large amounts of data in a way that is easy to understand.
- Consider a combination of methods: Using a combination of the methods above can help effectively handle huge data in charts and make it easier for audiences to understand.
By using these strategies, you can effectively handle huge data in charts and ensure that your data is represented in a clear and concise manner.
A logarithmic scale is a type of scale used in charts and graphs to represent a large range of values in a compact and readable manner. Unlike a linear scale, which represents equal increments of a variable with equal distances, a logarithmic scale represents equal increments of the variable as equal percentages.
The logarithmic scale is particularly useful when dealing with data sets that have an extensive range of values. For example, if a data set has values that range from 1 to 1,000,000, a linear scale would require a very long axis to accommodate all of the values, making it difficult to read and understand. On a logarithmic scale, the axis would be compressed, making it easier to see the trends and patterns in the data.
In research papers, the use of a logarithmic scale can be particularly helpful when dealing with data sets that have a skewed distribution, such as data that has a few extremely large values and many smaller values. By using a logarithmic scale, researchers can better represent the distribution of the data and highlight the trends and patterns that may not be apparent on a linear scale.
It’s important to note that when using a logarithmic scale, the values on the axis are logarithms, not actual values. This means that the increments on the axis represent multiplicative factors, not additive factors. When interpreting a chart with a logarithmic scale, it’s important to consider the scale and understand that the values are represented differently than on a linear scale.
In conclusion, the use of a logarithmic scale can be a powerful tool for researchers when dealing with data sets that have a large range of values. By compressing the axis and representing equal increments of the variable as equal percentages, logarithmic scales can help make data easier to understand and highlight important trends and patterns.
Let’s consider the number of confirmed COVID-19 cases in a country for 10 days. Here is a table representing the data:
As you can see, the logarithmic scale makes it easier to see the relative changes in the number of cases, especially as the values get larger. On a logarithmic scale, equal increments of the number of cases represent equal percentages, rather than equal distances. This allows you to see changes that might not be as noticeable on a linear scale.
To calculate the values for the logarithmic scale, you would take the logarithm (base 10) of each value in the data. Here is an example of how to calculate the logarithm of the value for the 5th day (800 cases):
code log10(800) = 2.903
This means that on a logarithmic scale, the value for the 5th day would be represented as 2.903.
To ensure that your charts and graphs are accessible to all audiences, including those with disabilities, consider the following:
- Use clear and simple language: Use plain language and avoid technical terms when labelling your charts and graphs, to make it easier for everyone to understand the data.
- Provide alternative text: Provide alternative text descriptions for images, including charts and graphs, so that screen readers can describe the content to users with visual impairments.
- Use accessible colours: Avoid using colour as the only means of conveying information, and ensure that the colour contrast between the text and background is high enough to be easily readable by people with colour vision deficiencies.
- Use clear and concise labels: Label the axes and data points clearly and concisely, and include units of measurement where appropriate.
- Use accessible file formats: Save charts and graphs in accessible file formats, such as PDF or SVG, which can be easily read by assistive technology.
- Consider touch and keyboard navigation: Make sure that your charts and graphs are usable for people who navigate the web using touch or keyboard controls, by ensuring that all interactive elements can be operated using keyboard commands.
- Test for accessibility: Test your charts and graphs with assistive technology, such as screen readers, to ensure that they are fully accessible to all users.
By following these guidelines, you can ensure that your charts and graphs are accessible to everyone, regardless of their abilities. This will help to increase the reach and impact of your research paper, and promote greater inclusivity in the scientific community.
It is easier for readers to comprehend complex material when it is presented visually through charts and graphs. It’s crucial to think about whether the charts and graphs you create for a research paper are subject to copyright laws and whether you require permission to use them.
Original works of authorship, such as literary, musical, theatrical, and aesthetic works, are protected by copyright law. If they are made by a person or group and have enough creative expression, charts and graphs might be regarded as original works of authorship.
Research articles frequently utilise charts and graphs that are based on publicly accessible data, such as statistics from the government or data from surveys.
These kinds of information are typically regarded as being in the public domain and can be utilised without a licence.
Charts and graphs produced by an individual or group, however, and containing a considerable amount of original creative work may be protected by copyright legislation.
In certain situations, you might need to ask the copyright holder for permission before using the graph or chart in your research report.
When using charts and graphs in a research paper, it’s important to consider the source of the data and whether the chart or graph is protected by copyright law. If you are unsure, it’s always best to err on the side of caution and to obtain permission from the copyright owner before using the chart or graph in your research paper.
When using charts and graphs in research papers, it’s important to avoid common mistakes that can undermine the effectiveness of your data visualization. Here are some common mistakes to watch out for:
- Overcomplicating the visualization: Avoid using too many colours, patterns, or elements in your chart or graph, as this can make it difficult for the reader to understand the data. Stick to simple, clean designs that emphasize the data.
- Ignoring the scale: Be careful when choosing the scale for your chart or graph, as the wrong scale can distort the data and give a false impression of the data.
- Improper labelling: Make sure to label the axes of your chart or graph clearly and accurately, and include units of measurement where appropriate.
- Not using appropriate chart or graph types: Choosing the right chart or graph type is important for effectively communicating the data. For example, if you have categorical data, use a bar chart, not a line chart.
- Ignoring the data distribution: Consider the distribution of your data, and adjust the scale and chart type accordingly. For example, if your data is skewed, you may want to use a logarithmic scale to better represent the data.
- Overloading the chart or graph: Avoid putting too much data into a single chart or graph, as this can make it difficult for the reader to understand the data. Instead, break the data down into multiple charts or graphs as needed.
- Using outdated or irrelevant data: Make sure to use the most up-to-date and relevant data in your charts and graphs, as outdated or irrelevant data can undermine the credibility of your research paper.
By avoiding these common mistakes, you can ensure that your charts and graphs effectively communicate the data.
In conclusion, charts and graphs play a crucial role in visualizing and communicating data in research papers. The use of charts and graphs allows researchers to convey information effectively and efficiently, helping the reader to understand complex data easily. Whether it’s a bar graph, scatter plot, heatmap, or histogram, each type of chart has its unique strengths and weaknesses.
Choosing the right type of chart and using it effectively is crucial to getting your message across in a research paper. Additionally, using a logarithmic scale and ensuring accessibility to all audiences can make your charts and graphs more effective and user-friendly. To make the most of charts and graphs in research, it is important to keep in mind the guidelines, best practices, and common mistakes to avoid.
Frequently Asked Questions
The number of graphs and charts in a research paper can vary depending on the nature of the research, the specific requirements of the paper, and the preferences of the author or the guidelines of the target journal or conference. There is no fixed rule or standard for the exact number of graphs and charts in a research paper. However, it is generally recommended to use graphs and charts judiciously, ensuring that they are relevant, clear, and effectively convey the research findings.
The size of graphs and charts in a research paper should be chosen carefully to ensure that they are clear, readable, and effectively convey the information to the readers. Here are some general guidelines for the size of graphs and charts in a research paper: Legibility: The graphs and charts should be large enough to be easily read and interpreted by the readers, even when printed or displayed at a reduced size. The font size of labels, legends, and annotations should be legible, typically ranging from 10-12 points, depending on the font type. Proportionality: The size of the graphs and charts should be proportional to the available space in the paper and the content being presented. Avoid using excessively small graphs or charts that may be difficult to understand or interpret. Clarity: The graphs and charts should be clear and not overly cluttered. Use appropriate line thicknesses, marker sizes, and bar widths that are visually clear and distinguishable. Avoid overcrowding the graphs or charts with too much information, which may make them difficult to read or interpret. Journal/Conference Guidelines: Follow the guidelines of the target journal or conference for the size of graphs and charts. Some journals or conferences may have specific requirements or recommendations for the size of visuals in research papers. Consistency: Ensure that the size of graphs and charts is consistent throughout the paper. Use a consistent style for fonts, colors, and other graphical elements to maintain a cohesive visual appearance. Accessibility: Consider accessibility requirements, such as ensuring that the size of graphs and charts is suitable for readers with visual impairments. Providing alternative text descriptions for visuals can also enhance accessibility.
Yes, it is common practice in research papers to place charts and graphs at the end of the paper as appendices or as separate sections, especially if they are large or numerous. This can help improve the flow and readability of the main text, as readers can refer to the visuals in the appendices or separate sections as needed without interrupting their reading of the main content.
Yes, you can place charts and graphs at the end of a research paper as single-column visuals, even if the main text is formatted in two columns. However, it’s important to ensure that the placement of visuals at the end of the paper does not disrupt the overall organization and readability of your research paper.
Upcoming Events
- Visit the Upcoming International Conferences at Exotic Travel Destinations with Travel Plan
- Visit for Research Internships Worldwide

Recent Posts
- How to End Your Academic/Research Internship?
- PhD or Industry Job? A Comprehensive Career Guide
- Post Doc Positions in India
- 04 Reasons for Outsourcing Academic Conference Management
- How to Put Research Grants on Your CV ?
- All Blog Posts
- Research Career
- Research Conference
- Research Internship
- Research Journal
- Research Tools
- Uncategorized
- Research Conferences
- Research Journals
- Research Grants
- Internships
- Research Internships
- Email Templates
- Conferences
- Blog Partners
- Privacy Policy
Copyright © 2024 Research Voyage
Design by ThemesDNA.com

- Privacy Policy
Buy Me a Coffee
Home » Figures in Research Paper – Examples and Guide
Figures in Research Paper – Examples and Guide
Table of Contents

Figures in Research Paper
Figures play an essential role in research papers as they provide a visual representation of data, results, and concepts presented in the text. Figures can include graphs, charts, diagrams, photographs, and other visual aids that enhance the reader’s understanding of the research.
Importance of Figures in Research Paper
Here are some specific ways in which figures can be important in a research paper:
- Visual representation of data : Figures can be used to present data in a clear and concise way. This makes it easier for readers to understand the results of experiments and studies.
- Simplify complex ideas: Some concepts can be difficult to explain using words alone. Figures can be used to simplify complex ideas and make them more accessible to a wider audience.
- Increase reader engagement : Figures can make a research paper more engaging and interesting to read. They break up long blocks of text and can make the paper more visually appealing.
- Support arguments: Figures can be used to support arguments made in the paper. For example, a graph or chart can be used to show a correlation between two variables, providing evidence for a particular hypothesis.
- Convey important information: Figures can be used to convey important information quickly and efficiently. This is particularly useful when the paper is being read by someone who is short on time and needs to quickly understand the main points.
Types of Figures in Research Paper
There are several types of figures commonly used in research papers, including:
- Line graphs: These are used to show trends or changes in data over time.
- Bar graphs: These are used to compare data across different categories or groups.
- Pie charts: These are used to show proportions or percentages of data.
- Scatterplots : These are used to show the relationship between two variables.
- Tables : These are used to present large amounts of data in a structured format.
- Photographs or images : These are used to provide visual context or examples of the research being presented.
- Diagrams or schematics : These are used to illustrate complex processes or systems.
How to add Figures to Research Paper
Adding figures to a research paper can be a great way to visually convey important information to the reader. Here are some general guidelines for adding figures to your research paper:
- Determine the appropriate type of figure: Depending on the information you want to convey, you may want to use a graph, chart, table, photograph, or other type of figure.
- Label the figure: Give your figure a descriptive title and number it. Also, include a brief caption that explains what the figure shows.
- Place the figure in the appropriate location : Generally, figures should be placed as close as possible to the text that refers to them. For example, if you mention a figure in the middle of a paragraph, it should be placed within that paragraph.
- Format the figure appropriately: Ensure that the figure is clear and easy to read. Use consistent fonts and font sizes, and make sure the figure is large enough to be easily seen.
- Cite the source of the figure: If the figure was not created by you, you must cite the source of the figure in your paper. This includes citing the author or creator, the date of creation, and any relevant publication information.
- Consider copyright : Ensure that you have permission to use any figures that are copyrighted. If the figure is copyrighted, you may need to obtain permission from the copyright holder to use it in your paper.
How to Label Figures in Research Paper
Labeling figures in a research paper is an important task that helps readers to understand the content of the paper. Here are the steps to label figures in a research paper:
- Decide on the numbering system: Before labeling the figures, decide on the numbering system that you want to use. Typically, figures are numbered consecutively throughout the paper, with the first figure being labeled as “Figure 1,” the second figure as “Figure 2,” and so on.
- Choose a clear and concise caption: A caption is a brief description of the figure that appears below the figure. It should be clear and concise and should describe the content of the figure accurately. The caption should be written in a way that readers can understand the figure without having to read the entire paper.
- Place the label and caption appropriately: The label and caption should be placed below the figure. The label should be centered and should include the figure number and a brief title. The caption should be placed below the label and should describe the figure in detail.
- Use consistent formatting: Make sure that the formatting of the labels and captions is consistent throughout the paper. Use the same font, size, and style for all figures in the paper.
- Reference figures in the text : When referring to a figure in the text, use the figure number and label. For example, “As shown in Figure 1, the results indicate that…”
Figure 1. Distribution of survey responses
In this example, “Figure 1” is the figure number, and “Distribution of survey responses” is a brief title or description of the figure.
The label should be placed at the top of the figure and should be centered. It should be clear and easy to read. It’s important to use a consistent format for all figures in the paper to make it easier for readers to follow.
Examples of Figures in Research Paper
Examples of Figures in Research Papers or Thesis are as follows:
Line graphs Example

Bar graphs Example

Pie charts Example

Scatterplots Example

Tables Example

Photographs or images Example

Diagrams or schematics Example

Purpose of Figures in Research Paper
Some common purposes of figures in research papers are:
- To summarize data: Figures can be used to present data in a concise and easy-to-understand manner. For example, graphs can be used to show trends or patterns in data, while tables can be used to summarize numerical information.
- To support arguments : Figures can be used to support arguments made in the text of the research paper. For example, a figure showing the results of an experiment can help to demonstrate the validity of the conclusions drawn from the experiment.
- To illustrate concepts: Figures can be used to illustrate abstract or complex concepts that are difficult to explain in words. For example, diagrams or illustrations can be used to show the structure of a complex molecule or the workings of a machine.
- To enhance readability: Figures can make a research paper more engaging and easier to read. By breaking up long blocks of text, figures can help to make the paper more visually appealing and easier to understand.
- To provide context : Figures can be used to provide context for the research being presented. For example, a map or diagram can help to show the location or layout of a study site or experimental setup.
- To compare results : Figures can be used to compare results from different experiments or studies. This can help to highlight similarities or differences in the data and draw comparisons between different research findings.
- To show relationships : Figures can be used to show relationships between different variables or factors. For example, a scatter plot can be used to show the correlation between two variables, while a network diagram can be used to show how different elements are connected to each other.
- To present raw data: Figures can be used to present raw data in a way that is easier to understand. For example, a heat map can be used to show the distribution of data over a geographic region, while a histogram can be used to show the distribution of data within a single variable.
Advantages of Figures in Research Paper
Figures (such as charts, graphs, diagrams, and photographs) are an important component of research papers and offer several advantages, including:
- Enhancing clarity : Figures can help to visually communicate complex data or information in a clear and concise manner. They can help readers better understand the research and its findings.
- Saving space : Figures can often convey information more efficiently than text, allowing researchers to present more information in less space.
- Improving readability : Figures can break up large blocks of text and make a paper more visually appealing and easier to read.
- Supporting arguments: Figures can be used to support arguments made in the text and help to strengthen the overall message of the paper.
- Enabling comparisons: Figures can be used to compare different data points, which can be difficult to do with text alone. This can help readers to see patterns and relationships in the data more easily.
- Providing context : Figures can provide context for the research, such as showing the geographic location of study sites or providing a visual representation of the study population.
About the author

Muhammad Hassan
Researcher, Academic Writer, Web developer
You may also like

How to Cite Research Paper – All Formats and...

Data Collection – Methods Types and Examples

Delimitations in Research – Types, Examples and...

Research Paper Format – Types, Examples and...

Research Process – Steps, Examples and Tips

Research Design – Types, Methods and Examples
Purdue Online Writing Lab Purdue OWL® College of Liberal Arts
Tables and Figures

Welcome to the Purdue OWL
This page is brought to you by the OWL at Purdue University. When printing this page, you must include the entire legal notice.
Copyright ©1995-2018 by The Writing Lab & The OWL at Purdue and Purdue University. All rights reserved. This material may not be published, reproduced, broadcast, rewritten, or redistributed without permission. Use of this site constitutes acceptance of our terms and conditions of fair use.
Note: This page reflects the latest version of the APA Publication Manual (i.e., APA 7), which released in October 2019. The equivalent resources for the older APA 6 style can be found at this page as well as at this page (our old resources covered the material on this page on two separate pages).
The purpose of tables and figures in documents is to enhance your readers' understanding of the information in the document; usually, large amounts of information can be communicated more efficiently in tables or figures. Tables are any graphic that uses a row and column structure to organize information, whereas figures include any illustration or image other than a table.
General guidelines
Visual material such as tables and figures can be used quickly and efficiently to present a large amount of information to an audience, but visuals must be used to assist communication, not to use up space, or disguise marginally significant results behind a screen of complicated statistics. Ask yourself this question first: Is the table or figure necessary? For example, it is better to present simple descriptive statistics in the text, not in a table.
Relation of Tables or Figures and Text
Because tables and figures supplement the text, refer in the text to all tables and figures used and explain what the reader should look for when using the table or figure. Focus only on the important point the reader should draw from them, and leave the details for the reader to examine on their own.
Documentation
If you are using figures, tables and/or data from other sources, be sure to gather all the information you will need to properly document your sources.
Integrity and Independence
Each table and figure must be intelligible without reference to the text, so be sure to include an explanation of every abbreviation (except the standard statistical symbols and abbreviations).
Organization, Consistency, and Coherence
Number all tables sequentially as you refer to them in the text (Table 1, Table 2, etc.), likewise for figures (Figure 1, Figure 2, etc.). Abbreviations, terminology, and probability level values must be consistent across tables and figures in the same article. Likewise, formats, titles, and headings must be consistent. Do not repeat the same data in different tables.
Data in a table that would require only two or fewer columns and rows should be presented in the text. More complex data is better presented in tabular format. In order for quantitative data to be presented clearly and efficiently, it must be arranged logically, e.g. data to be compared must be presented next to one another (before/after, young/old, male/female, etc.), and statistical information (means, standard deviations, N values) must be presented in separate parts of the table. If possible, use canonical forms (such as ANOVA, regression, or correlation) to communicate your data effectively.

A generic example of a table with multiple notes formatted in APA 7 style.
Elements of Tables
Number all tables with Arabic numerals sequentially. Do not use suffix letters (e.g. Table 3a, 3b, 3c); instead, combine the related tables. If the manuscript includes an appendix with tables, identify them with capital letters and Arabic numerals (e.g. Table A1, Table B2).
Like the title of the paper itself, each table must have a clear and concise title. Titles should be written in italicized title case below the table number, with a blank line between the number and the title. When appropriate, you may use the title to explain an abbreviation parenthetically.
Comparison of Median Income of Adopted Children (AC) v. Foster Children (FC)
Keep headings clear and brief. The heading should not be much wider than the widest entry in the column. Use of standard abbreviations can aid in achieving that goal. There are several types of headings:
- Stub headings describe the lefthand column, or stub column , which usually lists major independent variables.
- Column headings describe entries below them, applying to just one column.
- Column spanners are headings that describe entries below them, applying to two or more columns which each have their own column heading. Column spanners are often stacked on top of column headings and together are called decked heads .
- Table Spanners cover the entire width of the table, allowing for more divisions or combining tables with identical column headings. They are the only type of heading that may be plural.
All columns must have headings, written in sentence case and using singular language (Item rather than Items) unless referring to a group (Men, Women). Each column’s items should be parallel (i.e., every item in a column labeled “%” should be a percentage and does not require the % symbol, since it’s already indicated in the heading). Subsections within the stub column can be shown by indenting headings rather than creating new columns:
Chemical Bonds
Ionic
Covalent
Metallic
The body is the main part of the table, which includes all the reported information organized in cells (intersections of rows and columns). Entries should be center aligned unless left aligning them would make them easier to read (longer entries, usually). Word entries in the body should use sentence case. Leave cells blank if the element is not applicable or if data were not obtained; use a dash in cells and a general note if it is necessary to explain why cells are blank. In reporting the data, consistency is key: Numerals should be expressed to a consistent number of decimal places that is determined by the precision of measurement. Never change the unit of measurement or the number of decimal places in the same column.
There are three types of notes for tables: general, specific, and probability notes. All of them must be placed below the table in that order.
General notes explain, qualify or provide information about the table as a whole. Put explanations of abbreviations, symbols, etc. here.
Example: Note . The racial categories used by the US Census (African-American, Asian American, Latinos/-as, Native-American, and Pacific Islander) have been collapsed into the category “non-White.” E = excludes respondents who self-identified as “White” and at least one other “non-White” race.
Specific notes explain, qualify or provide information about a particular column, row, or individual entry. To indicate specific notes, use superscript lowercase letters (e.g. a , b , c ), and order the superscripts from left to right, top to bottom. Each table’s first footnote must be the superscript a .
a n = 823. b One participant in this group was diagnosed with schizophrenia during the survey.
Probability notes provide the reader with the results of the tests for statistical significance. Asterisks indicate the values for which the null hypothesis is rejected, with the probability ( p value) specified in the probability note. Such notes are required only when relevant to the data in the table. Consistently use the same number of asterisks for a given alpha level throughout your paper.
* p < .05. ** p < .01. *** p < .001
If you need to distinguish between two-tailed and one-tailed tests in the same table, use asterisks for two-tailed p values and an alternate symbol (such as daggers) for one-tailed p values.
* p < .05, two-tailed. ** p < .01, two-tailed. † p <.05, one-tailed. †† p < .01, one-tailed.
Borders
Tables should only include borders and lines that are needed for clarity (i.e., between elements of a decked head, above column spanners, separating total rows, etc.). Do not use vertical borders, and do not use borders around each cell. Spacing and strict alignment is typically enough to clarify relationships between elements.

Example of a table in the text of an APA 7 paper. Note the lack of vertical borders.
Tables from Other Sources
If using tables from an external source, copy the structure of the original exactly, and cite the source in accordance with APA style .
Table Checklist
(Taken from the Publication Manual of the American Psychological Association , 7th ed., Section 7.20)
- Is the table necessary?
- Does it belong in the print and electronic versions of the article, or can it go in an online supplemental file?
- Are all comparable tables presented consistently?
- Are all tables numbered with Arabic numerals in the order they are mentioned in the text? Is the table number bold and left-aligned?
- Are all tables referred to in the text?
- Is the title brief but explanatory? Is it presented in italicized title case and left-aligned?
- Does every column have a column heading? Are column headings centered?
- Are all abbreviations; special use of italics, parentheses, and dashes; and special symbols explained?
- Are the notes organized according to the convention of general, specific, probability?
- Are table borders correctly used (top and bottom of table, beneath column headings, above table spanners)?
- Does the table use correct line spacing (double for the table number, title, and notes; single, one and a half, or double for the body)?
- Are entries in the left column left-aligned beneath the centered stub heading? Are all other column headings and cell entries centered?
- Are confidence intervals reported for all major point estimates?
- Are all probability level values correctly identified, and are asterisks attached to the appropriate table entries? Is a probability level assigned the same number of asterisks in all the tables in the same document?
- If the table or its data are from another source, is the source properly cited? Is permission necessary to reproduce the table?
Figures include all graphical displays of information that are not tables. Common types include graphs, charts, drawings, maps, plots, and photos. Just like tables, figures should supplement the text and should be both understandable on their own and referenced fully in the text. This section details elements of formatting writers must use when including a figure in an APA document, gives an example of a figure formatted in APA style, and includes a checklist for formatting figures.
Preparing Figures
In preparing figures, communication and readability must be the ultimate criteria. Avoid the temptation to use the special effects available in most advanced software packages. While three-dimensional effects, shading, and layered text may look interesting to the author, overuse, inconsistent use, and misuse may distort the data, and distract or even annoy readers. Design properly done is inconspicuous, almost invisible, because it supports communication. Design improperly, or amateurishly, done draws the reader’s attention from the data, and makes him or her question the author’s credibility. Line drawings are usually a good option for readability and simplicity; for photographs, high contrast between background and focal point is important, as well as cropping out extraneous detail to help the reader focus on the important aspects of the photo.
Parts of a Figure
All figures that are part of the main text require a number using Arabic numerals (Figure 1, Figure 2, etc.). Numbers are assigned based on the order in which figures appear in the text and are bolded and left aligned.
Under the number, write the title of the figure in italicized title case. The title should be brief, clear, and explanatory, and both the title and number should be double spaced.
The image of the figure is the body, and it is positioned underneath the number and title. The image should be legible in both size and resolution; fonts should be sans serif, consistently sized, and between 8-14 pt. Title case should be used for axis labels and other headings; descriptions within figures should be in sentence case. Shading and color should be limited for clarity; use patterns along with color and check contrast between colors with free online checkers to ensure all users (people with color vision deficiencies or readers printing in grayscale, for instance) can access the content. Gridlines and 3-D effects should be avoided unless they are necessary for clarity or essential content information.
Legends, or keys, explain symbols, styles, patterns, shading, or colors in the image. Words in the legend should be in title case; legends should go within or underneath the image rather than to the side. Not all figures will require a legend.
Notes clarify the content of the figure; like tables, notes can be general, specific, or probability. General notes explain units of measurement, symbols, and abbreviations, or provide citation information. Specific notes identify specific elements using superscripts; probability notes explain statistical significance of certain values.

A generic example of a figure formatted in APA 7 style.
Figure Checklist
(Taken from the Publication Manual of the American Psychological Association , 7 th ed., Section 7.35)
- Is the figure necessary?
- Does the figure belong in the print and electronic versions of the article, or is it supplemental?
- Is the figure simple, clean, and free of extraneous detail?
- Is the figure title descriptive of the content of the figure? Is it written in italic title case and left aligned?
- Are all elements of the figure clearly labeled?
- Are the magnitude, scale, and direction of grid elements clearly labeled?
- Are parallel figures or equally important figures prepared according to the same scale?
- Are the figures numbered consecutively with Arabic numerals? Is the figure number bold and left aligned?
- Has the figure been formatted properly? Is the font sans serif in the image portion of the figure and between sizes 8 and 14?
- Are all abbreviations and special symbols explained?
- If the figure has a legend, does it appear within or below the image? Are the legend’s words written in title case?
- Are the figure notes in general, specific, and probability order? Are they double-spaced, left aligned, and in the same font as the paper?
- Are all figures mentioned in the text?
- Has written permission for print and electronic reuse been obtained? Is proper credit given in the figure caption?
- Have all substantive modifications to photographic images been disclosed?
- Are the figures being submitted in a file format acceptable to the publisher?
- Have the files been produced at a sufficiently high resolution to allow for accurate reproduction?
- Have your assignments done by seasoned writers. 24/7
- Contact us:
- +1 (213) 221-0069
- [email protected]
Research Paper Graph: How to Insert Graphs, Tables & Figures

Simple Ways Of Representing Your Data Using Graphs
Graphs are common items in the academic scenario. They serve a critical role in summarizing and displaying data in a way that is easier for the audience to comprehend.
There exist different graphs that researchers use to have varying impacts. These graphs offer an additional explanation of the topic of your research.

If you cannot do this, you can get our essay writers to handle the task for you. However, read on if you would like to know how to do it.
In our guide on how to write a term paper , we gave you various steps to complete a good paper. This piece offers you more insights on how to insert a graph in a research paper.
How to Insert a Graph in a Research Paper

- Open The MS Word and choose insert.
- Label the axis well. For example, you can label the X-Axis using the question asked and let Y-Axis have numbers to indicate how many people answered that way.
- Insert all the collected data in every corresponding cell in the excel window.
- Create the graph and place it into the research paper.
- Select the chart and settle with the style it represents your research best.
- Put captions and citations in the research paper.
- Select the graph and paste it into your word document.
People Also Read: How to Use Personal Experience in Research Paper or Essay
Importance of Graphs and Tables in Research Writing

1.Better Understanding
Some situations prompt us to compare the performance of two scenarios.
The traditional approach involves going through bulky data of both scenarios and later analyzing it which is time-consuming.
Graphs help the audience to understand your research work easily and more quickly than when represented in figures.
2. Accurate Analysis
You can only use graphs and tables to enable the audience to understand and analyze the trends easily. They summarize a large amount of data in an easy and interpretable form. Moreover, they help one in studying and interpreting patterns.
3. Easy Sharing of Information
Tables and graphs have a greater role in making your research digestible at visualization. They are perfect avenues to make your research more engaging. At a glance, they will convey the message to the reader instantly.
4. Explores Findings
When you include the tables and graphs in your research work, you will get in-depth knowledge of the new findings. You can use them to understand patterns suppose you are handling business-related concepts.
5. Comparing and Contrasting
It is easier to highlight values with many shared variables and characteristics. As such, it becomes easier in studying patterns and consume the information with ease. They help the audience to understand the data in a comparative state.
6. To Prove a Point
It boosts your understanding when you make tabulated results alongside graphical representation. The reader will encounter an easy time in finding the conclusion without understanding the calculations.
People Also Read : Best Research Paper Font and Size: Best Styles for an Essay
Other Alternatives to Graphs in a Research Paper
A table is a useful tool when you want to show the reader how dependent and independent variables interact. Readers use tables to compare values between groups of related measurements. Tables allow the reader to explore data according to their interest.

One can create such tables by using the Excel program to represent the data wonderfully.
The table should have a title column title and table body. Furthermore, a table should have a descriptive title to act as the topic of your table.
Depending on the discipline, the title can be lengthy or short.
Besides, the table should have a column title to simplify it. The right set of column titles allows the reader to grasp the content.
Finally, the table body is the main area of the table where we put numerical or textual data. Construct the table to allow the elements to read from up to down.
Once you create the table in the excel sheet, copy-paste them on the center page of your research paper. More importantly, ensure that you reference it well. Avoid text wrapping in this case. Set your table apart from the text.
Infographics
You can make your research finding more engaging by collecting your data and reporting it in infographics. Before you create an infographic, you should observe the following:

Begin with a good foundation to create effective graphics.
Some infographics rely on data or quantitative research to explain the information.
You can use the data alone when reporting the findings. The included text appears in labels and headings.
Organize the Information
Organize the information into an outline. You can achieve that through word processing depending on your content.
You should have a beginning, middle, and end. The beginning should have an introductory paragraph. The middle should have figures, facts, and content. The end should have a call to action.
Create a Structure
It is time to create an outline to translate it into a professional-looking design. Alternatively, expand it into an existing outline or choose a new document.
Design the Infograghics
Import the Excel sheets and populate your charts with data directly into the infographic maker. You can select the color palettes, fonts, and icons and move them around the page to your preference.
Refine your work with the right color elements and ensure that you have the correct color that is appealing to your audience.
Inserting the Infograghics
Create an outline that follows the structure of your research paper. As noted before, essays or papers can have charts and infographics , which is definitely in line with the outline.
In addition, fill the outline using your content, data, or information that you referenced in the research paper and present the layout that flows data logically.
Figures take varying forms such as frequency histograms, bar graphs, maps, and drawings. If you are using the figures in your research paper, it is always important to focus on the reader. Use the easiest figure that your reader will use to understand effortlessly.
You can use the figure to present your data more effectively and efficiently. For example, if you want your reader to understand spatial relationships more efficiently, use photographs. Typically, figures should have the following sections:
- Figure Captions: You should number your figures as well as have descriptive titles. Let the captions be clear enough for the reader to understand at a glance. Ensure that you place the captions under the figure.
- Image: Select the image that is simple and easy to understand. One should consider the resolution, size, and the image’s overall attractiveness.
- Extra Information: Number the illustrations from the manuscripts separately. You can include any other information in the figure to allow the reader to understand easily.
You can create a figure from the Excel sheet and format it appropriately. Label the vital parts well for better interpretation of the data. After that, you can copy-paste it into your research paper to present your finding in an analyzed form.

A chart is a graph that features cycles cut into varying sectors. Every sector represents a relative size of value for a whole.
We create charts to represent the quantity proportionally. Furthermore, it can represent many classes of data in a single chart.
The main role of a chart is to place large sums of data in a visual format for better understanding.
In addition, they are more visually appealing than other graphs. Not to forget, a chart offers easy calculation of your data accuracy, making it demand little explanation. As such, different readers can understand it without minimal struggle.
One can create a chart in Excel by doing the following steps:
- Begin by selecting the data that you want to create your chart.
- Choose the insert option and access the recommended charts.
- On the Recommended charts, select your favorite chart and see how it looks.
- Click OK to select it.
- You can format the chart using the given elements in it.
After that, you can now copy-paste it in the research paper at an appropriate page for better interpretation by the readers.

When not handling complex essays and academic writing tasks, Josh is busy advising students on how to pass assignments. In spare time, he loves playing football or walking with his dog around the park.
Related posts

How to Craft an 8-Page Paper
How to Write an 8 Page Paper: Time Needed for Fast Research

Essay about Someone Inspiring
Write an Essay on Someone Who Inspires You: Parent or Famous

Tips to Write a short Essay
Can Essays be short: How Long and some Topic Examples

Effective Use of Tables and Figures in Research Papers
Research papers are often based on copious amounts of data that can be summarized and easily read through tables and graphs. When writing a research paper , it is important for data to be presented to the reader in a visually appealing way. The data in figures and tables, however, should not be a repetition of the data found in the text. There are many ways of presenting data in tables and figures, governed by a few simple rules. An APA research paper and MLA research paper both require tables and figures, but the rules around them are different. When writing a research paper, the importance of tables and figures cannot be underestimated. How do you know if you need a table or figure? The rule of thumb is that if you cannot present your data in one or two sentences, then you need a table .
Using Tables
Tables are easily created using programs such as Excel. Tables and figures in scientific papers are wonderful ways of presenting data. Effective data presentation in research papers requires understanding your reader and the elements that comprise a table. Tables have several elements, including the legend, column titles, and body. As with academic writing, it is also just as important to structure tables so that readers can easily understand them. Tables that are disorganized or otherwise confusing will make the reader lose interest in your work.
- Title: Tables should have a clear, descriptive title, which functions as the “topic sentence” of the table. The titles can be lengthy or short, depending on the discipline.
- Column Titles: The goal of these title headings is to simplify the table. The reader’s attention moves from the title to the column title sequentially. A good set of column titles will allow the reader to quickly grasp what the table is about.
- Table Body: This is the main area of the table where numerical or textual data is located. Construct your table so that elements read from up to down, and not across.
Related: Done organizing your research data effectively in tables? Check out this post on tips for citing tables in your manuscript now!
The placement of figures and tables should be at the center of the page. It should be properly referenced and ordered in the number that it appears in the text. In addition, tables should be set apart from the text. Text wrapping should not be used. Sometimes, tables and figures are presented after the references in selected journals.
Using Figures
Figures can take many forms, such as bar graphs, frequency histograms, scatterplots, drawings, maps, etc. When using figures in a research paper, always think of your reader. What is the easiest figure for your reader to understand? How can you present the data in the simplest and most effective way? For instance, a photograph may be the best choice if you want your reader to understand spatial relationships.
- Figure Captions: Figures should be numbered and have descriptive titles or captions. The captions should be succinct enough to understand at the first glance. Captions are placed under the figure and are left justified.
- Image: Choose an image that is simple and easily understandable. Consider the size, resolution, and the image’s overall visual attractiveness.
- Additional Information: Illustrations in manuscripts are numbered separately from tables. Include any information that the reader needs to understand your figure, such as legends.
Common Errors in Research Papers
Effective data presentation in research papers requires understanding the common errors that make data presentation ineffective. These common mistakes include using the wrong type of figure for the data. For instance, using a scatterplot instead of a bar graph for showing levels of hydration is a mistake. Another common mistake is that some authors tend to italicize the table number. Remember, only the table title should be italicized . Another common mistake is failing to attribute the table. If the table/figure is from another source, simply put “ Note. Adapted from…” underneath the table. This should help avoid any issues with plagiarism.
Using tables and figures in research papers is essential for the paper’s readability. The reader is given a chance to understand data through visual content. When writing a research paper, these elements should be considered as part of good research writing. APA research papers, MLA research papers, and other manuscripts require visual content if the data is too complex or voluminous. The importance of tables and graphs is underscored by the main purpose of writing, and that is to be understood.
Frequently Asked Questions
"Consider the following points when creating figures for research papers: Determine purpose: Clarify the message or information to be conveyed. Choose figure type: Select the appropriate type for data representation. Prepare and organize data: Collect and arrange accurate and relevant data. Select software: Use suitable software for figure creation and editing. Design figure: Focus on clarity, labeling, and visual elements. Create the figure: Plot data or generate the figure using the chosen software. Label and annotate: Clearly identify and explain all elements in the figure. Review and revise: Verify accuracy, coherence, and alignment with the paper. Format and export: Adjust format to meet publication guidelines and export as suitable file."
"To create tables for a research paper, follow these steps: 1) Determine the purpose and information to be conveyed. 2) Plan the layout, including rows, columns, and headings. 3) Use spreadsheet software like Excel to design and format the table. 4) Input accurate data into cells, aligning it logically. 5) Include column and row headers for context. 6) Format the table for readability using consistent styles. 7) Add a descriptive title and caption to summarize and provide context. 8) Number and reference the table in the paper. 9) Review and revise for accuracy and clarity before finalizing."
"Including figures in a research paper enhances clarity and visual appeal. Follow these steps: Determine the need for figures based on data trends or to explain complex processes. Choose the right type of figure, such as graphs, charts, or images, to convey your message effectively. Create or obtain the figure, properly citing the source if needed. Number and caption each figure, providing concise and informative descriptions. Place figures logically in the paper and reference them in the text. Format and label figures clearly for better understanding. Provide detailed figure captions to aid comprehension. Cite the source for non-original figures or images. Review and revise figures for accuracy and consistency."
"Research papers use various types of tables to present data: Descriptive tables: Summarize main data characteristics, often presenting demographic information. Frequency tables: Display distribution of categorical variables, showing counts or percentages in different categories. Cross-tabulation tables: Explore relationships between categorical variables by presenting joint frequencies or percentages. Summary statistics tables: Present key statistics (mean, standard deviation, etc.) for numerical variables. Comparative tables: Compare different groups or conditions, displaying key statistics side by side. Correlation or regression tables: Display results of statistical analyses, such as coefficients and p-values. Longitudinal or time-series tables: Show data collected over multiple time points with columns for periods and rows for variables/subjects. Data matrix tables: Present raw data or matrices, common in experimental psychology or biology. Label tables clearly, include titles, and use footnotes or captions for explanations."

Enago is a very useful site. It covers nearly all topics of research writing and publishing in a simple, clear, attractive way. Though I’m a journal editor having much knowledge and training in these issues, I always find something new in this site. Thank you
“Thank You, your contents really help me :)”
Rate this article Cancel Reply
Your email address will not be published.

Enago Academy's Most Popular Articles

- Reporting Research
Explanatory & Response Variable in Statistics — A quick guide for early career researchers!
Often researchers have a difficult time choosing the parameters and variables (like explanatory and response…

- Manuscript Preparation
- Publishing Research
How to Use Creative Data Visualization Techniques for Easy Comprehension of Qualitative Research
“A picture is worth a thousand words!”—an adage used so often stands true even whilst…

- Figures & Tables
Effective Use of Statistics in Research – Methods and Tools for Data Analysis
Remember that impending feeling you get when you are asked to analyze your data! Now…
- Old Webinars
- Webinar Mobile App
SCI中稿技巧: 提升研究数据的说服力
如何寻找原创研究课题 快速定位目标文献的有效搜索策略 如何根据期刊指南准备手稿的对应部分 论文手稿语言润色实用技巧分享,快速提高论文质量

Distill: A Journal With Interactive Images for Machine Learning Research
Research is a wide and extensive field of study. This field has welcomed a plethora…
Explanatory & Response Variable in Statistics — A quick guide for early career…
How to Create and Use Gantt Charts

Sign-up to read more
Subscribe for free to get unrestricted access to all our resources on research writing and academic publishing including:
- 2000+ blog articles
- 50+ Webinars
- 10+ Expert podcasts
- 50+ Infographics
- 10+ Checklists
- Research Guides
We hate spam too. We promise to protect your privacy and never spam you.
I am looking for Editing/ Proofreading services for my manuscript Tentative date of next journal submission:

What should universities' stance be on AI tools in research and academic writing?
Matplotlib Graphs in Research Papers
When you write a scientific paper, one of the most common tasks is to analyze the obtained results and design beautiful graphs explaining them. Currently, in the research community, Python’s ecosystem is the most popular for achieving these goals. It provides web-based interactive computational environments (e.g., Jupyter Notebook/Lab ) to write code and describe the results, and pandas and matplotlib libraries to analyze data and produce graphs correspondingly. Unfortunately, due to the rich functionality, it is hard to start using them effectively in your everyday research activities when you initiate your path as a researcher. In this article, I would like to share some tips and tricks on how to employ the matplotlib library to produce nice graphs for research papers.
As I mentioned in my articles, as a desktop operating system, I use Kubuntu; hence, all the examples from this article are tested on this OS. Currently, I use Python version 3.9, and for package management, I use poetry . In the configuration file of the accompanying repository , you can find all the details about the versions of the libraries used in this tutorial.
If you want to run the accompanying notebook, install poetry , change the working directory to notebook/ , and run the following command:
This command will create a Python virtual environment, download the necessary dependencies and install them. After that, you can simply run VSCode within this directory, selecting the newly created virtual environment as the kernel for this notebook.
I use a timeseries data provided by plotly as a dataset to show all the visualizations in this article. I have already downloaded the file and added into the repository. However, you can download the file yourself, and load/preprocess it using the following code with the help of the pandas library:
Paths Check
When you start developing your data analysis notebooks, the first important thing is to define the variables that will correspond to the paths where the data for analysis is located and where to store the results of the analysis. Then, in the rest of the notebook, you can use these variables instead of typing a full path each time. Thus, if you need to change a path later (e.g., if you want to analyze another dataset with the same notebook), you would need to do this in only one place.
Usually, I use two dictionaries to define paths: the IN_PATHS dictionary stores the paths of the source data, while the OUT_PATHS dictionary keeps the paths where the results of the analysis. Keys in these dictionaries describe the corresponding locations, e.g., timeseries_file identified the path to the file with the time series data.
Now, I use VSCode for the data analysis activities (see this article for details on how I use it). Its intellisense subsystem supports dictionaries, and if you type the name of a dictionary variable and open the brackets, it suggests possible key names (see Figure 1 exemplifying this feature).
I append the _dir suffix to the keys that define paths to directories. Such a naming convention allows me to enforce additional logic on the paths corresponding to the keys with that suffix. For input paths, I can verify that the paths corresponding to the keys with the _dir suffix exist and point to directories. For output paths, if the output directory corresponding to the key with the _dir suffix does not exist, I can create all intermediate directories to it. Following the DRY principle, I have developed the check_paths(in_paths, out_paths) function that does this by getting two dictionaries, named in_paths and out_paths as the parameters, and performing the logic described above:
I call this function at the beginning of a data analysis notebook providing IN_PATHS and OUT_PATHS dictionaries as the values of the arguments: check_paths (IN_PATHS, OUT_PATHS)`.
Illustrative Example
To plot the time series from the loaded dataset, we can use the following code. At first, we need to import the required modules from the matplotlib library:
And then plot the data:
This code creates a figure space and axes, and plots a separate line for each column in the dataframe. Then it rotates the x-axis labels by 90 degrees to make tick values not overlap. The fig.show() method shows the figure.
However, more often, we use the fig.savefig() method to store the resulting figure. The first parameter of this call is the path to the file, where the figure should be stored. Note that the containing directory must exist. Otherwise, you will get an error. Based on the extension of the file, matplotlib will try to determine the format of the figure. For scientific papers, pdf is de-facto the standard: matplotlib stores vector figures if the pdf format is used, and pdflatex , which we typically use to compile our LaTeX paper, can embed figures of this type. Throughout the article, I mostly use the following code to store figures (see Section “Saving Figures” for an improved approach):
To exemplify how the results of our experiments look in a LaTeX paper, I have created an accompanying fake (Lorem Ipsum) paper using a double-column template typical for many computer science conferences. You can find the sources of the paper in the paper directory. The figures are added to the paper using the figure environment:
Improvements
Unfortunately, suppose you use only the default values for the fig.savefig() arguments, the result is far from the one you would use in a scientific paper (e.g., see Figure 2 or Figure 1 in the accompanying paper): the margins around the graph are wide, the dates and x-axis title are cut. Let’s consider how we can improve the figure and prepare it to be used in scientific papers.
Tightening Bounding Box
The bbox_inches argument of the fig.savefig() method can be used to remove wide margins. It is used to specify a bounding box – a rectangular area that defines a visible part of a graph. You can use it to set the exact coordinates of the upper left and lower right corners of your graph, or you can just set this parameter to tight . In this case, matplotlib will automatically calculate the coordinates of the bounding box, taking into account our preference for small margins around the graph elements. Figure 3 (or Figure 2 of the accompanying paper) shows how this parameter value improves the graph presentation. As you can see, after applying this parameter value, the margins are small, the figure occupies the whole width of the column, and the figure’s cut parts (dates and x-axis title) are also visible.
Figure Style
The matplotlib library brings facilities to change the look and feel of every graph component. For instance, it provides options to change the background; to add and adapt grids; to adjust titles, ticks, and texts location and presentation; to define fonts for different graph elements, etc. However, given a huge number of these parameters, configuring all of them is almost a mission-impossible task. Therefore, matplotlib has a number of embedded styles that change parameter values en masse. The list of available styles can be found in the plt.style.available property. The following code can be used to visualize available styles (see Figure 4 for a result):
As you can see, at the beginning of this code excerpt, we assign to the available_styles variable the list of available styles defined in the matplotlib.style.matplotlib.style.available property. Then, we iterate over this list and apply a style locally with the help of the matplotlib.style.context custom context manager. In addition to this, we can apply a particular style using the matplotlib.pyplot.style.use(style) method. Usually, you use this method at the beginning of your notebook to apply the same style to all figures in it.
There are several styles from the list that I prefer to use in my papers. Here they are:
- seaborn-paper
- seaborn-talk
- seaborn-notebook
- seaborn-colorblind
- tableau-colorblind10
In the accompanying paper, you can see the graphs produced using these styles. Until recently, I have used the seaborn-paper (see Figure 5 ) and seaborn-talk (see Figure 6 ) styles for my papers and talks correspondingly. As you can see, these figures are identical because I used a vector format to save and show them within this article. However, there is a difference: the latter style, seaborn-talk produces figures of larger sizes. Therefore, they look better if you store them using a rasterized format.
However, lately, I have employed the seaborn-colorblind style, which uses colors distinguishable by colorblind people (see Figure 7 ). As you can see, the colors of the lines have changed.
Unfortunately, matplotlib does not provide a style with the same color map to produce graphs for talks. Luckly, when I was writing this article, I have found out that it is possible to combine several styles if the latter does not modify the default colors. Thus, I can produce a seaborn-talk -kind graph with a palette from the seaborn-colorblind style using the following code (see Figure 10 in the accompanying paper, the result look the same as in Figure 7 ):
In addition to these predefined styles, matplotlib also provides a possibility to plot a graph using the xkcd sketching style (please see the official documentation for an additional example). You can apply this style using the following code (see Figure 8 ):
If you want to apply this style to all graphs in a notebook, instead of using the matplotlib.pyplot.style.use(style) method, call matplotlib.pyplot.xkcd() at the beginning of the notebook.
Increasing the Distinguishability of Lines
Unfortunately, the default palettes have a low number of pre-defined colors. For instance, the seaborn-colorblind style defines only six colors. Therefore, if you have more than six different variables to plot on the same graph, you will get some of them using the same color. For instance, you can see in Figure 7 that Lines A and G have the same color. At the same time, in research, it is typical when you have to combine an even higher number of experiment results on the same plot. Of course, you can use styles that have a larger number of default colors in their palette. However, the better approach is to use other visual facets. Fortunately, matplotlib provides some facilities to do this: you can employ different markers or different line styles. The former approach is useful when you have several sparse points, and the line joins them. The latter approach is convenient when the number of dots is very high, or they are close to each other. Anyway, the handier method for both approaches is to define a custom cycler that iterates either over different markers or line styles. Additionally, the colors of lines and markers could be another mechanism to distinguish lines.
A custom Cycler object, used to change line styles in graphs, is defined with a helper factory method called cycler defined in the cycler module. For instance, the following code imports this function and defines a custom cycler with different markers:
Once a custom cycler is defined, you can start employing it in your graphs using the matplotlib.axes.Axes.set_prop_cycle(...) method of the Axes object ( Figure 9 ):
Similarly, it is possible to define a cycler that rotates different line styles (see Figure 10 ):
Instead of drawing plots each time, you can check what styles the cycler defines with the following code:
If you run this code, you should get the following output:
Each line of the output describes a separate style. Thus, our custom_marker_cycler rotates over four different marker styles, i.e., the first line will have o markers, the second – x markers, the fourth – P markers, and the fifth will start with o markers again.
Note the brackets around the call of the cycler function. I put them because it is possible to combine several cyclers together using the + and * operators overriden for the Cycler class. The + operator combines the styles of two Cycler s into one. For instance, consider the following code:
It creates two Cycler objects, each of which is responsible for particular aspects of line visualization, namely markers and line styles in this example. Note that the sizes of the objects should be the same (four in this example). The resulting new Cycler object will combine two styles (see Figure 11 ):
It is also possible to multiply ( * operator) cyclers. In this case, the resulting cycler is a cartesian product of the styles of the constituting cyclers. Note that the sizes of the constituting cyclers are not required to be equal in this case:
The resulting cycler will have 12 different styles (see Figure 12 ):
It is also possible to define a cycler iterating over colors (see Figure 13 ):
Although you can use your own color palette, it is often more convenient to use colors defined in the current style. For instance, the seaborn-colorblind style defines a palette of colors distinguishable by colorblind people. We can get the list of these colors through the matplotlib.pyplot.rcParams['axes.prop_cycle'].by_key()['color'] call and define a custom cycler over these colors (the resulting figure will look like Figure 5 ).
Although scientists currently lean towards using colorful graphs, this is not always the case – some conferences still require the use of only black and white colors. It is possible to define a cycler for this case as well, altering only line and marker styles (see Figure 14 ):
Figure Size
For a long time, the purpose of the figsize parameter was unclear to me. If you open the documentation of the matplotlib.pyplot.figure method , you can read the following description of this argument:
figsize(float, float), default: rcParams[“figure.figsize”] (default: [6.4, 4.8]) Width, height in inches.
However, in research, we usually produce figures in a vector format (pdf); therefore, you should not notice any visual issues in manuscripts. The difference became clear to me only after I produced several figures with different figsize values and put them into the same paper. In this section, I repeat the steps of my experiment to exemplify my findings.
The figsize argument defines width and height together. However, for clarity, let’s consider them separately, starting with the width component. Let’s create three figures with different sizes preserving the same default ratio (4:3) between width and height (Figures 17, 18, and 19 in the accompanying paper):
- 4 by 3 inches ( Figure 15 )
- 6.4 by 4.8 inches ( Figure 16 )
- 16 by 12 inches ( Figure 17 )
As you can see from these examples, the figsize parameter works like a scale changer: the larger the width (and the height), the smaller the figure elements. Thus, you can use this parameter (however, better in a small range) to enhance your figures. For instance, sometimes, a legend box may overlap with some graph elements. You can change the figsize values to get this issue fixed (bigger figsize values will produce more “spare space” for the legend box). However, I would not recommend employing this approach often because otherwise, in your manuscript, the figures will look different.
You can still ask what width value you should use. Frankly, there is no universal answer to this question. You can experiment with different figsize values on your own (like we did in this section: creating several figures and checking how they look in a manuscript) and choose the one that you like the most. I prefer to set the width to either 6.4 or 6 inches. Here, I follow the following logic. Most conferences where I submit my papers require manuscripts in the A4 letter double-column format. The width of the A4 letter page is 8.3 inches; therefore, the size of one column is around 4 inches. However, as you can see, Figure 17, for which we defined the width of 4 inches, does not look nice. The reason is that, by default, matplotlib uses larger font sizes than the ones in scientific papers. Of course, you can adjust the font sizes and the widths of all elements, but the better approach is to make the figsize value bigger.
The default value for the figsize value is [6.4, 4.8] , which gives us the 4:3 ratio between width and height. However, I think figures produced with this ratio do not look nice. One reason is that nowadays, you face 16:10 and 16:9 ratios more often. Indeed, new monitors and presentations’ page setups usually employ these ratio values rather than 4:3. Therefore, I also prefer to use them to produce my figures. Moreover, adding figures with this ratio into presentations is much easier.
Thus, you can calculate the height value depending on the width and what ratio you have chosen. My preferences are the following:
- Ratio: 16:10 -> figsize : [6, 3.75]
- Ratio: 16:9 -> figsize : [6, 3.375]
- Ratio: 16:10 -> figsize : [6.4, 4] <- my default
- Ratio: 16:9 -> figsize : [6.4, 3.6]
Figure 18 (or Figure 20 in the accompanying paper) shows the final result.
Saving Figures
So far, we have been using the matplotlib.figure.Figure.savefig method to store figures, for instance:
However, using this method is not very convenient. For instance, for manuscripts, we produce figures in pdf format, while for presentations, png format is preferable . Thus, if you make figures for a presentation, you must change file extensions everywhere. In addition, when you produce figures in png format, you may also need to set up values of some other arguments, e.g., pixel density or transparency. Doing this each time is not sustainable (DRY!); therefore, I have developed the save_fig function that facilitates the process of saving figures:
This function does several things (that is why it has many parameters). First, it checks if the figure should be stored or not (the save argument). Sometimes, for instance, when you have your figures tracked by a version control system, e.g., git , you do not want to override figures each time after you run a notebook (because, in this case, you need to commit the changes). You can set this argument to False , and then figures will not be saved. Apparently, git sees changes in a figure because matplotlib updates the values of some metadata fields, e.g., CreateionDate for the pdf backend. I have pointed to this feature by @encyclopedist ). Therefore, the other approach to make git happy is to set the metadata fields to some default values.
Second, the function sets the size of the output figure. Third, it creates a path to the directory where the figures will be stored, making all intermediate directories. Note that for each format, I create a separate directory. This approach has a number of benefits, the most obvious of which is that you know where to look for figures of a particular format. Fourth, depending on the format, the save_fig function makes additional relevant configurations and, finally, stores the figure.
Usually, I either add this function at the beginning of my notebook or load it as a separate module (see the article for details). Then, I define several constants at the beginning of a notebook:
Then, you can store a figure with the following code (you only need to change the file name argument value):
However, copying this function with the optional parameter values is not cool. Therefore, I usually define a new partial function setting the arguments to the default values:
With this new partial function, you can store a figure with the following code:
If you need to change some parameters, e.g., create png figures, you just need to change the corresponding constants and rerun the notebook.
Conclusions
I developed the first version of the notebook described in this article when I was making a presentation for our research group colloquium. I have found out that young researchers face the same issues for which I have a solution already. Therefore, such kind of tutorial may save a lot of their time. I made the presentation in Spring 2022 and got very positive feedback. Therefore, I have decided to write an article describing all steps in detail and the result of this work you have just read.
All the related artifacts are available in the accompanying repository .
Yury Zhauniarovich
Assistant professor.
- Styling Matplotlib Graphs with Seaborn
- Forward and Inverse Search in LaTeX Workshop and Okular
- Maintaining CV and Resume Simultaneously with LaTeX and ModernCV Template
- Flattening JSON data using Pandas
- Introducing Pyenv pip-upgrade Plugin
- Skip to main content
- Skip to secondary menu
- Skip to primary sidebar
- Skip to footer
Erin Wright Writing
Writing-Related Software Tutorials
How to Write Figure Captions for Graphs, Charts, Photos, Drawings, and Maps
By Erin Wright

Figures are visuals such as charts, graphs, photos, drawings, and maps. Figures are normally identified by the capitalized word Figure and a number followed by a caption. A caption is a short block of text that gives information about the figure. The following seven tips explain how to write figure captions in your book, article, or research paper.
Although closely related, tables aren’t considered figures. See “ How to Write Table Titles ” for more information.
These tips are general guidelines based on our primary style guides . Each style guide has its own caption format (e.g., line spacing , margins, fonts). Therefore, you should consult your designated guide for specific recommendations, as necessary.
Seven Tips for Writing Figure Captions
Figure 1 and figure 2, located at the bottom of this post, demonstrate the guidelines explained in these tips.
1. Use captions instead of titles.
Figures in traditionally published books and scholarly writing usually have captions instead of titles. 2
However, some journals use titles and captions for figures. 3 Before submitting an article to a specific journal, always check its formatting requirements.
2. Place captions under figures.
Captions typically appear under figures. 4 Sometimes captions appear beside or even above figures; however, the decision to place captions in uncommon locations is normally made by the layout designer or production editor, not by the writer or copy editor. 5
Style Guide Alert: Written Music
The MLA Handbook (MLA style) and the Chicago Manual of Style (Chicago style) use the word Example rather than Figure to identify samples of written music in text. In addition, Chicago style places captions above written music instead of below, while MLA style keeps captions under written music. 6
Note that the academic version of Chicago style, Turabian, also recommends placing captions above written music but uses Figure instead of Example . 7
If you have music samples labeled as Example in addition to other figures, the music samples should be numbered separately from the figures (e.g., Example 1, Figure 1, Example 2, Figure 2).
3. Use a period after figure numbers.
Figures can be identified with regular numbers:
They can also be identified by double numbering in which the first number identifies the chapter and the second number identifies the figure:
Figure 7.10. (the tenth figure in chapter 7)
Figure 7.11. (the eleventh figure in chapter 7)
Figure 7.12. (the twelfth figure in chapter 7)
Whether you are using regular numbers or double numbering, use a period after the figure number to separate it from the caption text. 8
You may occasionally see the period omitted in favor of bold font combined with extra space before the caption text. 9 Like placing captions in uncommon locations, this decision is usually made by a layout designer or production editor rather than the writer or copy editor.
4. Use sentence-style capitalization.
Captions should feature sentence-style capitalization rather than headline-style capitalization . 10 This recommendation applies to complete sentences and to phrases and sentence fragments.
5. End captions with a period … most of the time.
Two of our primary style guides, the Publication Manual of the American Psychological Association (APA style) and the MLA Handbook (MLA style) use periods at the end of all captions even if they are incomplete sentences. 12
One of our other primary style guides, The Chicago Manual of Style (along with its academic version, Turabian) says that periods can be omitted if your captions are all phrases or sentence fragments. But, if your captions consist of complete sentences mixed with phrases and sentence fragments, always use periods. 13
6. Include a variety of information (if necessary).
A caption should briefly describe the figure. You can also include additional information such as copyright statements, source citations, definitions of symbols, and explanations of units of measurement. 14
There’s no official guideline for how long a caption can be. But, keep your readers in mind when writing captions because long blocks of unbroken text can be difficult to read (and therefore easy to ignore). If you think your caption is too long, consider other ways to present the necessary information, including the use of legends, labels, and keys within the figure itself.
7. Reference all figures in your text.
Each figure should be referenced in a sentence in your text, preferably before the figure appears in the document. The purpose of in-text references is to show your readers how figures connect to the content they are reading.
See “ How to Reference Figures and Tables in Sentences ” for examples and information relative to specific style guides.
The captions attached to figure 1 and figure 2, below, are examples based on the seven tips explained above.

Figure 1. Above left , Bartholomew; above right , Peabody; below left , Mr. Heckle; below right , Mr. Jeckle. Photography by Erin Wright.

Figure 2. Study participants’ favorite activities rated by occurrences per day. Reproduced by permission from Erin Wright, The Pets Are Running the Show (Whiting, IN: Fake Press, 2019), 57.
Related Resources
Three Ways to Insert Tables in Microsoft Word
How to Create and Customize Charts in Microsoft Word
How to Insert Figure Captions and Table Titles in Microsoft Word
How to Change the Style of Table Titles and Figure Captions in Microsoft Word
How to Update Table and Figure Numbers in Microsoft Word
How to Create and Update a List of Tables or Figures in Microsoft Word
How to Cross-Reference Tables and Figures in Microsoft Word
- Publication Manual of the American Psychological Association , 7th ed. (Washington, DC: American Psychological Association, 2020), 7.23–7.25.
- Publication Manual of the American Psychological Association , 6th ed. (Washington, DC: American Psychological Association, 2010), 5.23.
- AMA Manual of Style , 10th ed. (Oxford: Oxford University Press, 2007), 4.2.7.
- The Chicago Manual of Style , 17th ed. (Chicago: University of Chicago Press, 2017), 3.21. Publication Manual of the American Psychological Association , 5.23; “ Tables and Illustrations ,” Formatting a Research Paper, The MLA Style Center, accessed September 9, 2019; Kate L. Turabian, A Manual for Writers of Research Papers, Theses, and Dissertations , 9th ed. (Chicago: University of Chicago Press, 2018), 26.3.2.
- “ Headlines and Titles of Works ,” Style Q&A, The Chicago Manual of Style Online, accessed September 10, 2019.
- The Chicago Manual of Style , 3.5. “ Tables and Illustrations ,” The MLA Style Center.
- Turabian, A Manual for Writers of Research Papers, Theses, and Dissertations , 26.3.2.
- The Chicago Manual of Style , 3.23; Publication Manual of the American Psychological Association , 5.23; “ Tables and Illustrations ,” The MLA Style Center; Turabian, A Manual for Writers of Research Papers, Theses, and Dissertations , 26.3.2.
- The Chicago Manual of Style , 3.23.
- “ Tables and Illustrations ,” The MLA Style Center.
- The Chicago Manual of Style , 3.21; Publication Manual of the American Psychological Association , 5.23; Turabian, A Manual for Writers of Research Paper, Theses, and Dissertations , 26.3.3.2.
- Publication Manual of the American Psychological Association , 5.23; “ Tables and Illustrations ,” The MLA Style Center.
- The Chicago Manual of Style , 3.21; Turabian, A Manual for Writers of Research Papers, Theses, and Dissertations , 26.3.3.1.
- The Chicago Manual of Style , 3.25; Publication Manual of the American Psychological Association , 5.23; Turabian, A Manual for Writers of Research Papers, Theses, and Dissertations , 26.3.3.2
- Microsoft Word Tutorials
- Adobe Acrobat Tutorials
- PowerPoint Tutorials
- Writing Tips
- Editing Tips
- Writing-Related Resources

An official website of the United States government
The .gov means it’s official. Federal government websites often end in .gov or .mil. Before sharing sensitive information, make sure you’re on a federal government site.
The site is secure. The https:// ensures that you are connecting to the official website and that any information you provide is encrypted and transmitted securely.
- Publications
- Account settings
Preview improvements coming to the PMC website in October 2024. Learn More or Try it out now .
- Advanced Search
- Journal List
- Korean J Anesthesiol
- v.75(2); 2022 Apr
The principles of presenting statistical results using figures
Jae hong park.
1 Department of Anesthesiology and Pain Medicine, Haeundae Paik Hospital, Inje University College of Medicine, Busan, Korea
Dong Kyu Lee
2 Department of Anesthesiology and Pain Medicine, Dongguk University Ilsan Hospital, Goyang, Korea
3 Department of Anesthesiology and Pain Medicine, Chung-Ang University College of Medicine, Seoul, Korea
Jong Hae Kim
4 Department of Anesthesiology and Pain Medicine, Daegu Catholic University School of Medicine, Daegu, Korea
Francis Sahngun Nahm
5 Department of Anesthesiology and Pain Medicine, Seoul National University Bundang Hospital, Seongnam, Korea
Sang Gyu Kwak
6 Department of Medical Statistics, Daegu Catholic University School of Medicine, Daegu, Korea
Chi-Yeon Lim
7 Department of Biostatistics, Dongguk University College of Medicine, Goyang, Korea
Associated Data
Tables and figures are commonly adopted methods for presenting specific data or statistical analysis results. Figures can be used to display characteristics and distributions of data, allowing for intuitive understanding through visualization and thus making it easier to interpret the statistical results. To maximize the positive aspects of figure presentation and increase the accuracy of the content, in this article, the authors will describe how to choose an appropriate figure type and the necessary components to include. Additionally, this article includes examples of figures that are commonly used in research and their essential components using virtual data.
Introduction
All studies based on scientific approaches in anesthesia and pain medicine must involve an analysis of data to support a theory. After establishing a hypothesis and determining the research subjects, the researcher organizes the data obtained into specific categories. In most cases, data are composed of numbers or letters, but can also be stored as photos or figures, depending on the type of research. After researchers classify and index the data, they must decide which statistical analysis method to use. In general, data composed of numbers or letters are stored in tables with rows and columns. This can easily be accomplished using spreadsheet-based computer programs. The simple functions provided by spreadsheet programs, such as classification and sorting, facilitate the interpretation of the essential characteristics of the data, such as structure and frequency. In addition, some spreadsheet programs can show the results of these simple functions as graphs (such as dots, straight lines, or bars) such that the structure and characteristics of the data can be grasped quickly through visualization.
Graphs can be used to present the statistical analysis results in such a way as to make them intuitively easy to understand. For many research papers, the statistical results are illustrated using graphs to support their theory and to enable visual comparisons with other study results. Even though presenting data and statistical results using visual graphs have many advantages, representative values of variables are not presented as exact numbers. Therefore, it is essential to follow some basic principles that allow for graphical representations to be both transparent and precise so information is not misinterpreted. A previous Statistical Round article has covered the general principles of presenting statistical results as text, tables, and figures [ 1 ]. The current article provides further examples of how to present basic statistical results as graphs and essential aspects to consider to prevent distorted interpretations.
Common considerations
In this section, general considerations for presenting graphs are described. Although not all aspects are essential, we have summarized the key points to improve accuracy and minimize errors when using graphs for information transfer and interpretation.
When data are expressed using dots, lines, diagrams, etc., the axes of the graph should have ticks on a scale sufficient to identify the value corresponding to the position of each mark. Both major ticks and minor ticks can be used to indicate the scale on an axis; however, a corresponding value should at least be presented as a major tick. The axis title should include the name of the measurement variable or result and the unit of measurement. If the scale of the axis is an arithmetic distribution, the interval between the marks should be displayed uniformly. When the value of a variable is transformed during analysis or if the measured value has already been transformed, the interval between the marks should be adjusted according to the characteristics of the data. In this case, the type of transformation or measurement scale used should be included in the graph legend ( Fig. 1 ).

Histogram and accompanying density plot of baseline BNP. The baseline BNP shows a right-skewed distribution. The X-axis scale is logarithmic, and an explanation regarding the x-axis scale should be included in the footnote. Note the difference between the most frequently observed value and the representative value (dashed line). BNP: B-type natriuretic peptide, hsTnI: high-sensitivity troponin I, POD: postoperative day. From the previously-published article: "Moon YJ, Kwon HM, Jung KW, et al. Preoperative high-sensitivity troponin I and B-type natriuretic peptide, alone and in combination, for risk stratification of mortality after liver transplantation. Korean J Anesthesiol 2021; 74: 242-53."
If a part of the axis is removed, it is recommended that a break be inserted into the axis and the scales before and after the break be the same ( Fig. 2 ). If the numbering of an axis has to start from a non-zero value, or if the scales before and after the break must be different, an explanation should be included.

An example of a line and dot plot. Note that there is a break on the y-axis, which is inserted to reduce the white space. The measured value at each time point is on those at the adjacent time points. The interpolated line between dots (markers) indicates their changing trend. The statistical method used was the two-way mixed ANOVA with one within- and one between-factor, and post-hoc Bonferroni adjusted pairwise comparisons. There was statistical intergroup difference (F[1,112] = 6.542, P = 0.012) and a significant interaction between group and time (F[3, 336.4] = 3.535, P = 0.015). * P < 0.05 between groups, † P < 0.05 between groups at each time point.
Each axis should have an appropriate range to distinguish between the data presented in the graph. In the case that the range is too large or too small for the displayed data values, the visual comparison of the data may appear exaggerated or the difference may not be recognizable.
Two-dimensional graphs with orthogonally oriented horizontal and vertical axes (x-axis and y-axis, respectively) that cross at a reference point of zero are most commonly used. However, an additional vertical axis can be included on the opposite side of the existing vertical axis if necessary to represent two variables with different measurement units in a single diagram. 1)
Representative values
The preferred type of graph should be chosen based on the representative value of the data (absolute value, fraction, average, median, etc.). Choosing the most-commonly used graph type for a specific representative value helps the reader to interpret the data or statistical results accurately. However, in the case that the use of an uncommon type of graph is unavoidable, an explanation of the representative value and error term must be provided to prevent misunderstanding.
Symbols, lines, and diagrams for representative values
When a symbol, line, or diagram is used to indicate the representative value of the data, the size or thickness of the line should be adjusted appropriately. Additionally, the degree of adjustment should be uniform so that different sizes or thicknesses are not misunderstood as large or small values. In addition, the size and thickness should be adjusted to indicate real values. When symbols or lines are expressed in overlapping or very close proximity, they must have an appropriate size and thickness to allow for an accurate comparison of the values ( Fig. 2 ). A statistical program or other types of program that draws a professional graph rather than a picture-editing tool should be used to accurately represent the positions of symbols, lines, and diagrams with the corresponding values. The graph tools provided by most statistical programs offer user-selected symbols and lines that can be accurately marked according to the corresponding values.
It is recommended that the same symbols be used every time a representative value is represented. However, to distinguish between different groups, different symbols can be used to improve discrimination. The use of different symbols to present the representative values of the same group is not recommended.
A line can be used either when every point represents a specific value or when it visually indicates a change between two symbols ( Fig. 3 ). In the latter case, adding lines between symbols can make the interpretation difficult if the change is not meaningful. Different lines should be used for different groups or situations ( Fig. 2 ). Sometimes, it may be difficult to distinguish between different dashes owing to the line thickness, the size of the graph, or overlapping lines. Therefore, different line types should be adjusted to allow for easy discernability. One option may be to use a color graph; however, this is recommended only when it is impossible to express the information accurately in black and white. Because some readers may have difficulty distinguishing colors, care must be taken regarding color selection.

An example of a dot-line graph. Dots and error bars indicate the means and SDs. The interpolated line allows for enhanced estimation of the changing trend. Bar plots could also be used to represent this kind of statistical result.
The representative value can also be presented using a shape. If the area or form of the shape is proportional to the value, an explanation of this fact should be included. For a diagram expressed at regular intervals where the height or length corresponds to the value (such as a histogram), precautions similar to those regarding symbols or lines should be applied.
Various colors or specific patterns can be used inside the diagram to facilitate interpretation. It is good practice to set different colors or patterns for each group or to use them differently to allow for data before and after an event to be distinguishable. However, such a graph may become complicated as a result of too many colors and patterns or a lack of unified notation.
A description of the variable or situation, represented by lines, symbols, or shapes, should be included in the graph legend. The legend can be located inside or outside the graph, as long as it does not interfere with interpretation. Explanations of values that the symbols, lines, and/or diagrams represent should be included. If abbreviations are used, their definitions should be included in the figure legend. Borders of the legend box can be added as needed around the legend to make it easier to read, and it may be helpful to match the order of data as it appears in both the legend and the graph.
Statistically inferred representative values and their corresponding errors can be indicated on the graph in various ways. Most commonly, whisker-shaped symbols are used to express errors. Depending on the type of graph, it is typically expressed by the length of a line or an area. When there are many representative values or considerable overlap, the symbols used to express the error will also overlap, making it difficult to distinguish between them. If the spread of data is equal on both sides, such as with a normal distribution, it can be presented in only one direction; however, both errors should be presented when the data are skewed to one side. Alternatively, to avoid overlap, the positions of the corresponding values may be moved forward or backward slightly; however, an explanation of this should be included in the figure legend. For example, if it is difficult to distinguish between the means and standard deviations of blood pressure measured at 5 sec after medication in two groups, the representative values of each group can be displayed at 4.9, and 5.1 sec. It is recommended to describe an explanation that the blood pressure values of the two groups measured at specific time point are displayed separately in the figure legend ( Fig. 2 ). For representative examples, refer to the previous Statistical Round article [ 1 ].
Annotations can be added to the graph to explain specific values or statistically significant differences. Annotations are also used to highlight visible differences in the graphs (in which case, instead of an annotation, an explanation should be included in the figure legend). Symbols can be used for annotations that explain statistical differences and should be consistent in type and order throughout the paper. As specified in the instructions to the authors for the Korean Journal of Anesthesiology, it usually follows the order: * (asterisk), † (dagger), ‡ (double dagger, diesis), § (silcrow), and ¶ (pilcrow) [ 2 , 3 ].
Figure legend
In order for readers to know what is contained in a figure and the results of any statistical analysis conducted, a figure legend should be included. A figure legend usually consists of a graph title, a brief description of the graph content, statistical methods, and results. Definitions of any abbreviations and/or symbols used should also be included to facilitate interpretation.
Commonly used graphs
Scatter plots.
A scatter plot shows the associations between two numerical variables measured from one subject ( Fig. 4 ). By adding another variable, three-dimensional expression is also possible. Scatter plots can also be used for ordered categorical variables, at the expense of reduced readability. A scatter plot displays the coordinates of the measured values on an orthogonal plane with two variables as axes using specific symbols, such as dots. The two variables may be independent of each other or may have a cause-effect relationship. Scatter plots are primarily used in the data exploration stage to examine the relationship between two variables, and a trend line 2) can be added to indicate a statistically significant relationship between the two variables. Scatter plots help the reader to understand the relationship between two variables and contribute considerably to the visual expression and understanding of correlation or regression analyses.

An example of a scatter plot. This plot presents the cardiac output value for the same patients using two different measurement methods: EDCO (esophageal doppler cardiac output) and TDCO (continuous thermodilution method). From the previously-published article: “Shim YH, Oh YJ, Nam SB, et. al. Cardiac output estimations by esophageal Doppler cannot replace estimations by the thermodilution method in off-pump coronary artery bypass surgery patients. Korean J Anesthesiol 2003; 45: 456–61.”
As described above, a scatter plot usually demonstrates the relationship between the actual values between two variables. In addition, however, a scatter plot is used for interpretation in some statistical methods. One example is the Bland-Altman scatter plot, which is a method used to analyze the agreement between two measurements ( Fig. 5 ). In addition, scatter plots are often used to evaluate residuals in regression analyses or visually check the fit of a statistically estimated model.

Bland-Altman scatter plot comparing the standard frontal position with an alternative mandibular position. The dotted horizontal line represents the mean difference between the two measures. The dashed horizontal lines represent the 95% limit of agreement between the two measures. The 95% limit of agreement is drawn at the mean difference +/- 1.96 times the standard deviation of the difference. The solid line is the line of equality which indicates the exact same value between two measures.
A line plot is a graph that connects a series of repeatedly measured data points using a straight or curved line, based on a scatter plot. This type of graph is used in several fields to represent various statistical results. A commonly used example is any case in which the data are measured at a set time interval. A run chart (run-sequential plot) is a line plot that displays the data in chronological order. When applying a continuous variable on one axis, such as time, caution must be taken regarding the scale interval. Ordered categorical variables are also candidates for line plots. With scatter plots, measured values are mainly used to examine the data distribution; however, line plots are used primarily for averages, which are representative values of the measured data under specific conditions in the relevant group. As previously mentioned, the errors (such as the standard deviation) must be displayed on a line plot with the representative values.
For bar charts, the height or length of each bar represents the value of the variables, and the ratio between them makes it easy to visualize the differences between categorical variables. On either the horizontal or vertical axis, the values are presented as scale values, whereas on the other axis, the values are presented by other measurement parameters. This type of graph can also be used to express continuous variables, and it is possible to express multiple measured values as cumulative or grouped values using different bar appearances.
A histogram is a graph used to represent the frequency distribution of the data ( Fig. 1 ). Each column’s height indicates the number of samples corresponding to each bin, divided by a fixed interval. Because the variable corresponding to the bin has the characteristics of a continuous variable, the bins are adjacent to each other but do not overlap. Bar plots differ from histograms. In a bar plot, the bars are separated from each other because they represent the values of categorical variables. Each column’s height in a histogram can also be normalized in the form of the frequency of the samples for the total sample size. In this case, mathematical methods, such as kernel density estimation, can be used to smooth the overall shape (smoothing) and estimate a density plot that can be used to represent the distribution of the data.
Boxplots and box-and-whisker plots
A boxplot is a graph that is used to express the median and quartiles of data using a box shape. It is often used to represent nonparametric statistics ( Fig. 6 , Supplementary R code ). A whisker, which is represented by a line extending from each box, can be used to indicate the range of the data (box-and-whisker plot). The range of data defined using whiskers can be set according to the researchers’ needs. For example, the ends of both whiskers can be the maximum and minimum values or values corresponding to 10% and 90% of the entire data range. If both ends of the whiskers are set to values that correspond to the first quartile minus 1.5 times the interquartile range (IQR) and the third quartile plus 1.5 times the IQR, data outside this range can be defined as outliers. The box-and-whisker plot enables recognition of the distribution of data without a specific distribution assumption and displays data dispersion and kurtosis. Depending on the data spread, one of the quartiles and the median may overlap. In this case, the location of the median should be clearly expressed. Violin and bee-swarm plots are improved versions of the box-and-whisker plot and can be used to represent the frequency of data at specific values along with the spread of data.

An example of a box-whisker plot. Estimated median (Q1, Q3) [min:max] from the sample data is 1.1 (0.8, 1.3) [0.1:2.1]. This graph includes explanations of the components of the box-whisker plot. These are not necessary for the general purpose of publication. A significance marker can be added, though it was not used in this graph. If a significance maker is added, it should be located on the shoulder or alongside the whisker. If markers are located over the mid-top of the whiskers, these could be interpreted as outliers if no detailed explanation is provided. The limits of the whiskers can be varied depending on the purpose.
Other commonly used graphs
In addition to the basic graphs previously introduced, various graphs have also been used to present the results or evaluate the analysis process for a specific statistical method. Some examples include receiver operating characteristic (ROC) curves [ 4 ], survival curves, regression curves by linear regression analysis, and dose-response curves. These graphs deliver information on a specific relationship between interpreted statistical results or indicate the trend of independent and dependent variables expressed as functions. These graphs have predetermined components that reflect the characteristics of the data and analysis, and these components must be included in the graph. Additional information must also be included with these graphs to facilitate interpretation, such as corresponding statistics, tables, trend lines, and guidelines. The graph output from a statistics program includes most of the basic requirements, but some parts may need to be added or removed in some cases. In addition, the graph should be composed according to the guidelines of the target journal because the requirements may vary.
Graphs for specific statistical analysis methods
In general, statistical analyses begin with the selection of a specific statistical method according to the characteristics of the collected variables and the expected relationship between them. Most statistical methods require particular features and relationships between variables, and the estimated results are formalized. The following sections include graphs that express specific statistical results. The following graphs are only examples, and other graph types may be appropriate, depending on the characteristics of the data collected.
All of the example graphs were created using R software 4.1.0 for Windows (R Development Core Team, Austria, 2021). The ggplot2 package used in the R software provides various options for creating graphs in the medical field and a user-centered graph editing function. All examples are fictitious data assuming clinical or experimental conditions and should not be interpreted as actual data. All virtual data and R codes are provided in the Supplementary Materials ( Supplementary material 1; R code ).
Independent t-tests
For the first example, data on the time from administration of a neuromuscular blocking agent antagonist to the patients’ first movement after general anesthesia between two different agents are compared ( Supplementary material 2; reverse.csv ). In total, 218 patients were included in this study. Both groups satisfied the assumption of normal distribution but violated the equality of variance; therefore, an unequal variance t -test was performed ( Table 1 ). Fig. 7 shows a graph of the results in the form of a vertical bar graph ( Supplementary material 1; R code ). 3)

An example of a horizontal bar plot with an error bar. Positive-sided error bars are marked because the SDs are located at the same distance from the mean. The recommended legend for this figure is: “The elapsed time from administration to first movement for two different reversal agents: an anticholinergic (n = 109) and a new drug (n = 109); *two-sided P value < 0.05 with the unequal variances t -test”.
Time to Movement After Two Neuromuscular Reversal Agents
Data are presented as mean ± SD.
Paired t-tests
The next example includes virtual data on the required air volume to ensure endotracheal cuff sealing during general anesthesia ( Supplementary material 3; cuff_pressure.csv ). After tracheal intubation with an adequately sized tube, cuff sealing was achieved through either an arbitrary volume that prevented end-inspiratory leak or by a volume resulting in a cuff pressure of 25 mmHg. The two alternative volumes necessary for the two cuff sealing methods were measured for each patient, and a total of 100 patients were included. A paired t -test was performed because the two methods were conducted on each patient. The results are presented in Table 2 . Fig. 3 shows a graphical representation of the results ( Supplementary material 1; R code ).
Cuff Inflation Volume to Prevent End-inspiratory Gas Leakage
Values are presented as mean ± SD.
Comparisons between more than three independent groups
For the following example, information on the amount of opioids administered for pain control after three types of surgery were obtained ( Supplementary material 4; opioid_surgery.csv ). The total number of patients was 171 (57 in each group).
One-way analysis of variance (ANOVA) was performed, and there was a statistically significant difference in the opioid dose administered according to the surgery type. Tukey’s test was performed for post-hoc testing. The results showed that the opioid dose administered after operation C was significantly higher than that administered after operations A or B ( Table 3 ).
Postoperative Opioid Requirements according to Three Different Types of Surgery
A graph of the statistical results is shown in Fig. 8 . As the three groups were not related to each other, they are expressed as bar graphs. The results of the statistical tests are presented in the Supplementary material 1; R code .

An example of a vertical bar plot. The asterisk (*) is used to represent a comparative statistically significant result.
Comparisons for repeatedly measured data
In the following example, virtual data on the effect of an antihypertensive drug on diastolic blood pressure were used ( Supplementary material 5; dbpmedication.csv ). A total of 114 patients were included, and the control and treatment groups were equally allocated. Data were measured six times at 5-second intervals, including the time of drug administration. For statistical analysis, two-way mixed ANOVA with one within-factor and one between-factor was used. There was a statistically significant difference between the treatment and control groups (F[1,112] = 6.542, P = 0.012), and there was a statistically significant interaction between the treatment and the time (F[3, 336.4] = 3.535, P = 0.015). The treatment group showed significant differences at 15, 20, and 25 s after administration (adjusted P = 0.004, P = 0.003, and P = 0.006, respectively; Table 4 ). The detailed statistical analysis process was omitted, but a graph of the results is shown in Fig. 2 . The graphs are slightly shifted to the left and right so that they can be distinguished from each other, and a gap is set on the y-axis. These methods make the results easier to visualize by preventing the graphs from overlapping and reducing the whitespace ( Supplementary material 1; R code ).
Changes in Diastolic Blood Pressure after Antihypertensive Treatment
Values are presented as mean ± SD. Two-way mixed analysis of variance with one within factor and one between factor. A statistically significant intergroup difference (F[1,112] = 6.542, P = 0.012) and a significant interaction between group and time (F[3, 336.4] = 3.535, P = 0.015) are seen.
Categorical data comparisons
For the following example, two categorical variables (endotracheal intubation success and sore throat occurrence) were assessed in relation to two different intubation techniques ( Supplementary material 6; sorethr.csv ). The data included two observations from 106 patients (53 patients in each group). The chi-square test with Yate’s correction showed that the success rate of the new tracheal intubation technique was significantly higher than that of the conventional technique (P = 0.018), whereas there was no statistical difference in sore throat occurrence ( Table 5 ). The results are represented using a bar graph classified by observation ( Fig. 9 ). Because the 95% CIs are not symmetrically distributed with respect to the representative values, both error bars are presented and statistical significance is indicated using symbols. To better represent the data, the sample size may also be displayed ( Supplementary material 1; R code ).

An example of a grouped bar plot. The height of each bar indicates the observed rate. If the CIs of the rate are not distributed symmetrically from the observed rate, both sides of the error bar should be presented. The asterisk indicates statistical significance.
Observed Intubation Success and Presence of Sore Throat after the Conventional and New Intubation Technique
Values are presented as numbers (percentiles).
Other commonly used statistical graphs
Correlation analyses, linear regression.
As an example of correlation analysis, the blood concentrations of three intravenous anesthetic adjuvants were measured during propofol general anesthesia ( Supplementary material 7; pretxlevel.csv ). All three adjuvants (A, B, and C) showed a positive correlation with exposure time (correlation coefficient r = 0.71, r = 0.65, and r = 0.42, respectively), but only the coefficient of adjuvant A was statistically significant (P = 0.014, P = 0.117, and P = 0.132, respectively; Fig. 10 ). Various diagrams can be used to show these correlations. However, in this article, a scatter plot with a trend line for the group, and the statistical analysis results are presented ( Supplementary material 1; R code ).

An example of a scatter plot with a linear trend line for the correlation analysis. The asterisk indicates statistical significance.
A scatter plot with a trend line clearly represents the data and is used more often in linear regression analyses than in correlation analyses. For the linear regression example graph, blood glucose concentrations and the degree of glucose deposition in the mitral valve node were used in patients with type 2 diabetes with rheumatic mitral valve insufficiency ( Supplementary material 8; dmmvi.csv ). Linear regression analysis was performed with blood glucose concentration as the independent variable and the degree of glucose deposition in the mitral valve as the dependent variable. The regression equation was estimated to be “Glucose in nodule = 0.048 × Blood glucose concentration + 32.98 (P < 0.001)”. The graph in Fig. 11 shows the observed values with a regression line and other necessary information ( Supplementary R code ).

An example of a scatter plot with a trend line for the linear regression. Around the regression line, the shadowed area indicates the range of the 95% CI of the estimated coefficient. The estimated regression line formula is also presented in the graph with statistics.
Logistic regression
For the following example, virtual data showed the influence of five factors on specific test results ( Supplementary material 9; five_factors.csv ). The test result is a yes/no dichotomous variable, whereas all five factors (F1 to F5) are continuous variables. Although logistic regression analyses involve various assumptions that must be verified before statistical analysis to obtain accurate results, the contents of such verification processes have been omitted. The model estimated by logistic regression provides the odds ratio (OR) for each independent variable ( Table 6 ). A graphic representation of ORs allows for a clearer interpretation than a table in the case of multiple independent variables or ORs with many numbers ( Fig. 12 , Supplementary material 1; R code ).

An example of a dot plot with an error bar. For each level of factors (y-axis), corresponding odds ratio (OR) and 95% CIs are presented using dots and accompanying horizontal error bar. The dotted line indicates the reference value of 1. The estimated OR would not be different from 1.0 statistically if its error bar crossed this reference line.
Estimated OR and 95% CI of Logistic Regression Model
OR: odds ratio.
Survival analysis
Survival analysis is a statistical method that can be applied to mortality data and various types of longitudinal data. There are various methods, from the nonparametric Kaplan-Meier method to more complex methods involving different parametric models. Kaplan-Meier survival analysis and Cox regression models are widely used in the medical field. Survival analysis results usually accompany the survival curve, which can increase the reader’s understanding of the results through visualization. For details on the survival curve, refer to the previous Statistical Round article [ 5 , 6 ]. An example of a survival curve is shown in Fig. 13 . In addition to several important pieces of information that should be included, the survival table must be attached to the survival curve because the number at risk is reduced at the end of the observation. This can minimize the likelihood of misinterpretation.

An example of a survival curve. Two survival curves with 95% CIs are presented. The median survival time is also indicated for each curve. Because the number at risk decreases at the end of observation, the survival table should be incorporated with curves to clarify the statistical inference process. From the previously-published article: "In J, Lee DK. Survival analysis: part II - applied clinical data analysis. Korean J Anesthesiol 2019; 72: 441-57."
Dose-response curve
For this example, various concentrations of two antibiotics were assessed by measuring the absorbance of a specific light known to be proportional to the normal bacterial flora amount in a culture medium ( Supplementary material 10; antiobsorp.csv ). The data were fitted using a 4-parameter log-logistic model; the estimated parameters are summarized in Table 7 . A graph of the fitted model is presented in Fig. 14 ( Supplementary material 1; R code ). The absorbance values for the doses of the two antibiotics are expressed using symbols, and a dose-response curve was drawn. Compared to a table that includes only numbers, using a graph is more intuitive and easier to interpret.

An example of multiple dose-response curves. Observed values are plotted using dot symbols: filled circles and triangles. The straight solid and dashed lines indicate the ED50 value of each curve. Be aware that the x-axis is log scaled.
Dose-response Curve Model Fit Result
Dose-response curve fit using a 4-parameter log-logistic model. Values are presented as estimates (95% CI). ED: effective dose at a certain response level indicated by the following number as the percentile.
Conclusions
There are many types of graphs for various statistical methods that can be used to represent data and results, depending on their characteristics. Trying out a few types of graphs that show the characteristics well and then choosing the best one among them is recommended. Presenting results with a table and a figure simultaneously takes up space and can distract readers. Therefore, it is recommended to use graphs and discuss significant results in the body of the manuscript, and tables of granular information can be moved to the supplementary material or vice versa.
1) In addition to a two-dimensional graph consisting of a horizontal (x-axis) and a vertical axis (y-axis), a three-dimensional graph using a third axis (z-axis) perpendicular to both axes is also widely used in specific fields. In this article, we will focus on two-dimensional graphs.
2) The trend line is a type of regression graph that provides useful information regarding the relationship between two variables and can be fitted as linear, quadratic, or cubic formulas.
3) When the range of error has both positive and negative values, like a continuous variable, the histogram contains the possibility of error in a strict sense. This is because, when expressed as a bar graph, the error range on one side does not appear on the graph (as shown in Fig. 7). While there is a way to express both sides when the range of error is different, it is not commonly used. In most medical papers, they are used without distinction given the general perception that the error range expressed in the bar graph is naturally distributed equally on both sides.
Conflicts of Interest
No potential conflict of interest relevant to this article was reported.
Author Contributions
Jae Hong Park (Conceptualization; Methodology; Validation; Writing – review & editing)
Dong Kyu Lee (Data curation; Formal analysis; Methodology; Supervision; Validation; Writing – original draft; Writing – review & editing)
Hyun Kang (Conceptualization; Data curation; Writing – review & editing)
Jong Hae Kim (Conceptualization; Data curation; Writing – review & editing)
Francis Sahngun Nahm (Conceptualization; Data curation; Writing – review & editing)
EunJin Ahn (Conceptualization; Data curation; Writing – review & editing)
Junyong In (Conceptualization; Data curation; Validation; Writing – review & editing)
Sang Gyu Kwak (Conceptualization; Data curation; Writing – review & editing)
Chi-Yeon Lim (Conceptualization; Data curation; Writing – review & editing)
Supplementary Materials
Supplementary material 1., supplementary material 2., supplementary material 3..
cuff pressure
Supplementary Material 4.
opioid_surgery
Supplementary Material 5.
dbpmedication
Supplementary Material 6.
Supplementary material 7., supplementary material 8., supplementary material 9..
five factors
Supplementary Material 10.
IMAGES
VIDEO
COMMENTS
In a table, readers can look up exact values, compare those values between pairs or groups of related measurements (e.g., growth rates or outcomes of a medical procedure over several years), look at ranges and intervals, and select specific factors to search for patterns. Tables are not restrained to a specific type of data or measurement.
Any images used within your text are called figures. Figures include data visualization graphics—e.g. graphs, diagrams, flowcharts—as well as things like photographs and artworks. To correctly format an APA figure, follow these rules: Figure number in bold above the figure. Brief title, in italics and title case, under the figure number.
Research papers usually have massive amounts of data and complicated concepts to explain. And, graphs can be used to represent these data and concepts in a visual, easy to understand manner. Graphs can effectively help to deliver the message that you want to convey. Also, adding graphs to your research paper can make it much, much more interesting.
Every graph is a figure but not every figure is a graph. Graphs are a particular set of figures that display quantitative relationships between variables. Some of the most common graphs include bar charts, frequency histograms, pie charts, scatter plots, and line graphs, each of which displays trends or relationships within and among datasets ...
Effective Guide to Explaining Graphs in Thesis and Research Papers: Tips and Tools. Title and Caption: Begin by providing a clear title for the graph that summarizes its main purpose or finding. Follow it with a descriptive caption that highlights the key elements and trends depicted in the graph. Make sure the caption provides sufficient ...
About Fabricio Pamplona. Fabricio Pamplona is the founder of Mind the Graph - a tool used by over 400K users in 60 countries. He has a Ph.D. and solid scientific background in Psychopharmacology and experience as a Guest Researcher at the Max Planck Institute of Psychiatry (Germany) and Researcher in D'Or Institute for Research and Education (IDOR, Brazil).
The purpose of a graph is to present data that are too numerous or complicated to be described adequately in the text and in less space. Do not, however, use graphs for small amounts of data that could be conveyed succinctly in a sentence. Likewise, do not reiterate the data in the text since it defeats the purpose of using a graph.
As an example elucidating the abovementioned topics a research paper written by the authors of this review article, and published in the Turkish Journal of Urology in the year 2007 ... Most of the readers priorly prefer to look at figures, and graphs rather than reading lots of pages. Selection of appropriate types of graphs for demonstration ...
A research paper is usually a combination of written and visual information. We can assume that those who have a predominant linguistic intelligence would focus on written information, whereas those with a visual-spatial intelligence would feel more comfortable focusing on graphs, diagrams, or images.
The Benefits of Using Graphs and Charts in Research Papers. There are many benefits to using graphs and charts in research papers, including: Improved Data Visualization. Graphs and charts can help researchers effectively visualize their data, making it easier for them to see patterns, trends, and relationships within their data.
Introduction. Every author aims to reach the maximum target audience through his/her research publication/s. Our previous editorials have touched upon the process of writing a quality research paper and its successful publication in an appropriate journal.[1,2] Journal-specific "Instructions for Authors" generally have defined limits to the text and non-textual content for the benefit of ...
Purpose of Figures in Research Paper. Some common purposes of figures in research papers are: To summarize data: Figures can be used to present data in a concise and easy-to-understand manner. For example, graphs can be used to show trends or patterns in data, while tables can be used to summarize numerical information.
Consistently use the same number of asterisks for a given alpha level throughout your paper. * p < .05. ** p < .01. *** p < .001 If you need to distinguish between two-tailed and one-tailed tests in the same table, use asterisks for two-tailed p values and an alternate symbol (such as daggers) for one-tailed p values.
Insert all the collected data in every corresponding cell in the excel window. Create the graph and place it into the research paper. Select the chart and settle with the style it represents your research best. Put captions and citations in the research paper. Select the graph and paste it into your word document.
Research papers are often based on copious amounts of data that can be summarized and easily read through tables and graphs. When writing a research paper, it is important for data to be presented to the reader in a visually appealing way.The data in figures and tables, however, should not be a repetition of the data found in the text.
When you write a scientific paper, one of the most common tasks is to analyze the obtained results and design beautiful graphs explaining them. Currently, in the research community, Python's ecosystem is the most popular for achieving these goals. It provides web-based interactive computational environments (e.g., Jupyter Notebook/Lab) to write code and describe the results, and pandas and ...
Figures are visuals such as charts, graphs, photos, drawings, and maps. Figures are normally identified by the capitalized word Figure and a number followed by a caption. A caption is a short block of text that gives information about the figure. The following seven tips explain how to write figure captions in your book, article, or research paper.
Graphs can be used to present the statistical analysis results in such a way as to make them intuitively easy to understand. For many research papers, the statistical results are illustrated using graphs to support their theory and to enable visual comparisons with other study results. Even though presenting data and statistical results using ...
The Journal of Graph Theory is a high-calibre graphs and combinatorics journal publishing rigorous research on how these areas interact with other mathematical sciences. Our editorial team of influential graph theorists welcome submissions on a range of graph theory topics, such as structural results about graphs, graph algorithms with theoretical emphasis, and discrete optimization on graphs.
Get a visual overview of a new academic field. Enter a typical paper and we'll build you a graph of similar papers in the field. Explore and build more graphs for interesting papers that you find - soon you'll have a real, visual understanding of the trends, popular works and dynamics of the field you're interested in.
Scroll charts created by other Plotly users (or switch to desktop to create your own charts) Create charts and graphs online with Excel, CSV, or SQL data. Make bar charts, histograms, box plots, scatter plots, line graphs, dot plots, and more. Free to get started!
perfect graphs can be found in the survey paper [22]. Unlike perfect graphs, strongly perfect graphs do not have a conjecture similar to the Strong Perfect Graph Conjecture. The class of absorbantly perfect graphs was introduced by Hammer and Ma ray in [15]. A graph is absorbantly perfect if every induced subgraph has a minimal dominating set that
In. mathematics, graph theory is one of the important fields used in structural. models. This structural structure of different objects or technologies leads to. new developments and changes in ...