Set and Check User Rights Assignment via Powershell
You can add, remove, and check user rights assignment (remotely / locally) with the following powershell scripts..
Posted by : blakedrumm on Jan 5, 2022


Local Computer
Remote computer, output types.
This post was last updated on August 29th, 2022
I stumbled across this gem ( weloytty/Grant-LogonAsService.ps1 ) that allows you to grant Logon as a Service Right for a User. I modified the script you can now run the Powershell script against multiple machines, users, and user rights.
Set User Rights
How to get it.
All of the User Rights that can be set:
Note You may edit line 437 in the script to change what happens when the script is run without any arguments or parameters, this also allows you to change what happens when the script is run from the Powershell ISE.
Here are a few examples:
Add Users Single Users Example 1 Add User Right “Allow log on locally” for current user: . \Set-UserRights.ps1 -AddRight -UserRight SeInteractiveLogonRight Example 2 Add User Right “Log on as a service” for CONTOSO\User: . \Set-UserRights.ps1 -AddRight -Username CONTOSO\User -UserRight SeServiceLogonRight Example 3 Add User Right “Log on as a batch job” for CONTOSO\User: . \Set-UserRights.ps1 -AddRight -Username CONTOSO\User -UserRight SeBatchLogonRight Example 4 Add User Right “Log on as a batch job” for user SID S-1-5-11: . \Set-UserRights.ps1 -AddRight -Username S-1-5-11 -UserRight SeBatchLogonRight Add Multiple Users / Rights / Computers Example 5 Add User Right “Log on as a service” and “Log on as a batch job” for CONTOSO\User1 and CONTOSO\User2 and run on, local machine and SQL.contoso.com: . \Set-UserRights.ps1 -AddRight -UserRight SeServiceLogonRight , SeBatchLogonRight -ComputerName $ env : COMPUTERNAME , SQL.contoso.com -UserName CONTOSO\User1 , CONTOSO\User2
Remove Users Single Users Example 1 Remove User Right “Allow log on locally” for current user: . \Set-UserRights.ps1 -RemoveRight -UserRight SeInteractiveLogonRight Example 2 Remove User Right “Log on as a service” for CONTOSO\User: . \Set-UserRights.ps1 -RemoveRight -Username CONTOSO\User -UserRight SeServiceLogonRight Example 3 Remove User Right “Log on as a batch job” for CONTOSO\User: . \Set-UserRights.ps1 -RemoveRight -Username CONTOSO\User -UserRight SeBatchLogonRight Example 4 Remove User Right “Log on as a batch job” for user SID S-1-5-11: . \Set-UserRights.ps1 -RemoveRight -Username S-1-5-11 -UserRight SeBatchLogonRight Remove Multiple Users / Rights / Computers Example 5 Remove User Right “Log on as a service” and “Log on as a batch job” for CONTOSO\User1 and CONTOSO\User2 and run on, local machine and SQL.contoso.com: . \Set-UserRights.ps1 -RemoveRight -UserRight SeServiceLogonRight , SeBatchLogonRight -ComputerName $ env : COMPUTERNAME , SQL.contoso.com -UserName CONTOSO\User1 , CONTOSO\User2
Check User Rights
In order to check the Local User Rights, you will need to run the above (Get-UserRights), you may copy and paste the above script in your Powershell ISE and press play.

Note You may edit line 467 in the script to change what happens when the script is run without any arguments or parameters, this also allows you to change what happens when the script is run from the Powershell ISE.
Get Local User Account Rights and output to text in console:
Get Remote SQL Server User Account Rights:
Get Local Machine and SQL Server User Account Rights:
Output Local User Rights on Local Machine as CSV in ‘C:\Temp’:
Output to Text in ‘C:\Temp’:
PassThru object to allow manipulation / filtering:
I like to collaborate and work on projects. My skills with Powershell allow me to quickly develop automated solutions to suit my customers, and my own needs.
Email : [email protected]
Website : https://blakedrumm.com
My name is Blake Drumm, I am working on the Azure Monitoring Enterprise Team with Microsoft. Currently working to update public documentation for System Center products and write troubleshooting guides to assist with fixing issues that may arise while using the products. I like to blog on Operations Manager and Azure Automation products, keep checking back for new posts. My goal is to post atleast once a month if possible.
- operationsManager
- troubleshooting
- certificates
How to manage user account settings on Windows 11
Here are the steps to add, change, and remove accounts on Windows 11.

View account details
- Add more email accounts
- Change sign-in options
- Control account sync settings
- Connect to organization
- Add multiple accounts
- Delete accounts
On Windows 11 , the "Accounts" page in the Settings app allows you to review and customize many aspects of your account. You can determine the account type, switch from a Microsoft to a local account, change how you sign in, and enable many features to make the experience more secure and easier to use.
In addition, when you need to share a device with other people, you can create an account for each person so that each has a personal space they can customize, apps with their own profile, and a different area to store files.
Furthermore, if you must let a young person use a computer, you can also create a special child account type that provides parental control to monitor and protect them from content that may not be appropriate for their age.
This guide will teach you the steps to manage user accounts on your computer running the latest version of Windows 11.
How to view account details on Windows 11
On Windows 11, the "Your info" settings page includes details about your account, such as the type of account and the Microsoft account associated with the current profile. It also houses the settings to switch from a Microsoft to a local account or vice versa and the option to change the picture profile.
To view the account information on Windows 11, use these steps:
Get the Windows Central Newsletter
All the latest news, reviews, and guides for Windows and Xbox diehards.
- Open Settings .
- Click on Accounts .
- Click the Your info page on the right side.

- Confirm your account details, including account type (Administrator or Standard) and whether you have a local or Microsoft account.

- Quick note: If the page reads "Local account" under your name, there's a link to a Microsoft account. You have a Microsoft account configuration if your email address appears on this page.
- (Optional) Under the "Related settings" section, click the "Accounts" option to access the account online to change billing details, family and security settings, and other settings.
Once you complete the steps, the "Your info" page will give various pieces of information about the account.
In the "Accounts" section, you're also going to find the "Your Microsoft account" page, but it only includes details about your Microsoft 365 subscription.
Change to local account
If you have a Microsoft account and you prefer a local account, you can use these steps to switch:
- Under the "Account settings" section, click the "Sign in with a local account instead" option.

- Continue with the on-screen directions.
- If you have a Microsoft account, click the "Sign in with a local account instead" option to switch to a local account.
- Continue with the on-screen directions.
After you complete the steps, the account will no longer be associated with a Microsoft account.
You can also use the instructions outlined above to switch to a Microsoft account if you have a local account.
Change account picture
To change the account picture on Windows 11, use these steps:
- Click the Browse files button in the "Choose a file" setting.

- Quick tip: You can also use the Camera option to take a picture and set it as the new profile photo.
- Select a new image for the account.
- Click the Choose Picture button.
Once you complete the steps, the picture will apply to the account.
How to link additional emails to an account on Windows 11
You can also add other email accounts in advance, so you don't have to enter the information on other apps (such as Mail & Calendar) and services.
Add accounts for apps
To add additional email accounts on Windows 11, use these steps:
- Click the Email & accounts page on the right side.

- Under the "Accounts used by email, calendar, and contacts" section, click the Add an account button.

- Quick note: If you want to add another Microsoft account, the system will list it under the "Accounts used by other apps" section.
- Select the service provider (such as Outlook, Google, or iCloud).
After you complete the steps, the accounts will be available to set up other apps and services.
Add accounts for work
To add work accounts for apps on Windows 11, use these steps:
- Under the "Accounts used by other apps" section, click the "Add a Microsoft account" or "Add a work or school" account.

- Select the correct service.
Once you complete the steps, the account will be added, giving you quick access to work applications, such as OneDrive for Business.
How to change sign-in options on Windows 11
Windows 11 also includes the "Sign-in options" page that includes the different ways you can customize the preferences to sign into your account. For example, on this page, you can configure Windows Hello, change your local account password, and enable other features like Dynamic lock.
Change account password
If you use Windows 11 with a Microsoft account, you can only change the password online by changing your Hotmail, Live, or Outlook password. You can change the password through the Sign-in options page if you have a local account.
To change the account password on Windows 11, use these steps:
- Click the Sign-in options page on the right side.
- Under the "Ways to sign in" section, click the Password setting.
- Click the Change button.

- Confirm the current password.
- Confirm the new password.

- Quick note: You can't re-use a previous password. You must enter a new password.
- Click the Next button.
- Continue with the on-screen directions (if applicable).
After you complete the steps, you can sign out and sign back in to start using the new password.
Configure or change Windows Hello authentication
On Windows 11, you have multiple ways to configure Windows Hello. You can set up facial or fingerprint recognition if you have the hardware that supports the feature. You can use a physical security key (usually used in organizations). And the most common form of authentication is the PIN option since it doesn't require special hardware and is more secure than a traditional password.
Usually, Windows 11 will prompt you to create a PIN during the initial setup, but if you are still using a password, you can use these steps to set up a Windows Hello PIN:

- Under the "Ways to sign in" section, click the PIN (Windows Hello) setting.
- Click the Set up button.

- Confirm your current password (if applicable).
- Click the OK button.
- Create a new numeric PIN that you will remember.

- (Optional) Under the "Additional settings" section, turn on the "For improved security, only allow Windows Hello sign-in for Microsoft accounts on this device" toggle switch.
- Quick note: This feature will turn on Windows Hello for all authentications across Windows 11, so you are never asked for your account password.
Once you complete the steps, you can start using the PIN to sign in instead of a password.
Change current PIN
If you already have a PIN, you will only find the option to change or remove it.
To change the current account PIN, use these steps:
- Under the "Ways to sign in" section, click the PIN (Windows Hello) setting.
- Click the Change PIN button.

- Confirm the current PIN.
- Create a new PIN.
- Confirm the new PIN.

- (Optional) Under the "Additional settings" section, turn on the "For improved security, only allow Windows Hello sign-in for Microsoft accounts on this device" toggle switch.

- Quick note: This feature will turn on Windows Hello for all authentications across Windows 11, so you are never asked for your account password. However, if enabled, you won't be able to remove the PIN.
After you complete the steps, the Windows Hello information will change to the new PIN.
Enable sign-in upon waking up
As part of the account settings, you can decide whether the system should prompt you for a password upon waking the device or after some time you have been away from your desk.
To require a sign-in after waking up or specific time period, use these steps:
- Under the "Additional settings" section, use the "If you've been away, when should Windows require you to sign in again?" setting to automatically select how long the system should wait before locking the account.

This setting replaces the "Require sign-in" option that lets you decide whether Windows 11 should ask you to sign in when the device wakes up from sleep mode. If you want to disable the option, select the Never option.
Enable Dynamic lock
"Dynamic lock" is a feature that locks your device when you step away from the room automatically. The feature uses proximity technology, meaning you'll need to connect a Bluetooth device like a phone or wearable before you can configure it. Once enabled, if you step away from the computer after 30 seconds, Windows 11 will lock the profile automatically.
To enable Dynamic lock, use these steps:
- Click on Bluetooth & devices .
- Click on Add device button.

- Click on Bluetooth .

- Turn on Bluetooth on the device you want to pair.
- Select the device from the list.

- Continue with the on-screen directions to complete the pairing.
- Click the Sign-in options page on the right side.
- Under the "Additional settings" section, click the Dynamic lock setting.
- Check the "Allow Windows to automatically lock the device when you're away" option.

Once you complete the steps, you can step away from the desk with the Bluetooth device, and then after 30 seconds, when you return, the computer should be locked.
Stop restarting apps on startup
Some apps are able to restart automatically at startup if you don't close them before turning off the computer. If you don't like this behavior, you can disable the feature.
To prevent apps from restarting at startup, use these steps:
- Under the "Additional settings" section, turn off the "Automatically save my restartable apps and restart when I sign back in" toggle switch.

After you complete the steps, apps will no longer restart automatically on startup.
How to control account sync settings on Windows 11
On Windows 11, Microsoft is referring to the sync settings as the new "Windows Backup" feature. On this page, you can choose what folders are backed up in the cloud using OneDrive . You can decide whether the system should remember your apps so you can restore them on another installation. And you can control the settings you want to sync across devices associated with the same Microsoft account.
To control the sync settings on Windows 11, use the steps:
- Click the Windows backup page on the right side.

- Click the Set up syncing button for the "OneDrive folder syncing" setting.

- Select the folders (Desktop, Documents, or Pictures) to upload and back up on the cloud. (You must have enough space to enable this feature.)

- Click the Start backup button.
- (Optional) Turn on the "Remember my apps" toggle switch if you want the system to remember the Microsoft Store app on your computer so that you can restore them later on another computer.
- Turn on the "Remember my preferences" toggle switch to allow your settings to sync across devices.
- Click the "Remember my preferences" setting.
- Check the settings you want to sync across devices, including passwords, language preferences, and other Windows settings.

Once you complete the steps, the settings and files will sync to the cloud and across devices, depending on your configuration.
How to connect account to an organization on Windows 11
The "Access work or school" page has the settings to connect to an organization to access shared resources, such as network resources, apps, and emails. If you are part of an organization, your network administrator will provide the information.
To connect a device to the network, use these steps:
- Click the Access work or school page on the right side.

- Click the Connect button.
- Confirm your work or school account.

- Quick note: You can also select the option to join an Azure Active Direction or local Active Directory domain from this page.
After you complete the steps, you will have access to the organization's resources as configured by the network administrator.
How to add multiple accounts on Windows 11
Although most computers are set up for single users, Windows 11 allows you to share the device with multiple people through the "Family & other people" page, which includes the settings to add, remove, and manage multiple user accounts.
Add family members
On the page, under the "Your family" section, you can manage family members to allow each person to have their desktop, settings, apps, and a place to store files separately from everyone else.
You can have two family account types, including "Child" and "Adult," and each account type provides different features.
Create a child account
A Child account offers a controlled environment with features to keep young members safe while using apps, playing games, and browsing the internet. If you choose to create a child account, the person can use the device, personalize the desktop, work with apps, create files, and safely browse the web with Microsoft Edge.
Also, when using this account type, the organizer can control their activities, enforce limits on apps and games, control screen time, and more using the Microsoft family dashboard online.
To create a child account on Windows 11, use these steps:
- Click the Family & other users page on the right side.

- Click the Add account in the "Add a family member" setting.

- Confirm the email address of the young person you want to add.

- Quick note: If the young person doesn't have an account, choose the "Create one for a child" option and continue with the on-screen directions.
- Click the Next button.
- Select the Member option.
- Click the Invite button.

- Open the invitation email in the child's account online.
- Click the Accept Invitation button.

- Click the Join now button.

- Sign out of the main account.
- Select the child account from the Lock screen.
- Sign in with the child's Microsoft account credentials.
- Click the Skip for now option (if applicable).
- Create a PIN for the account.

- Click the OK button.
- Continue with the on-screen directions to finish the setup.
Once you complete the steps, Windows 11 will create the account, and the user will be able to sign in immediately.
Create an adult account
When using the family settings, an adult account is the same as a traditional local account, but members can also control child accounts.
To add a new member to the family group on Windows 11, use these steps:
- Click the Add account in the "Add a family member" setting.
- Confirm the family member's email address.

- Click the Next button.
- Select the Organizer option.
- Click the Invite button.

After you complete the steps, the account will be created, but the new member will need to accept the email invitation before they can use the device and manage parental control settings for child accounts.
Add non-family member
On Windows 11, you can also create accounts for other people not necessarily part of your family. Using these settings, you can create a Microsoft or traditional local account.
Create a Microsoft account
Using a Microsoft account is recommended because it's easier to configure, the user can choose to sync their settings across devices, and password recovery is straightforward.
To create a profile with a Microsoft account, use these steps:
- Under the "Other users" section, click the Add account button for the "Add other user" setting.

- Confirm the email address or phone number of the new user.

- Quick note: If the user doesn't have a Microsoft account, choose the "I don't have this person's sign-in information" option to create an account and continue with the on-screen directions.
- Click the Finish button.
Once you complete the steps, the person should be able to sign in and start using the device.
Create a local account
On Windows 11, you can still create a local account without needing a Microsoft account, also called an offline account.
To create a local account on Windows 11, use these steps:
- Click the "I don't have this person's sign-in information" option.
- Click the "Add a user without a Microsoft account" option.

- Confirm the username.
- Create a password for the account.
- Complete the security questions to enable the reset option if you forget the password.

After you complete the steps, the user can log in and start using the standard local account on your Windows 11 computer.
Furthermore, the "Family & other users" page also includes an option to set up a kiosk account . This feature is usually reserved for network administrators to turn a computer into a digital sign or interactive display or turn it into a device that only runs a specific application.
Change account type
As standard user account is the recommended type for most users, but if you want to change the type to administrator .
To change a user account type on Windows 11, use these steps:
- Click the Family & other users page on the right side.
- Under the "Other users" section, select the account to update.
- Click the Change account type button.

- Select the Administrator account type.

Once you complete the steps, the new account type will dictate the user's access privileges.
How to delete account on Windows 11
On Windows 11, when you no longer need an account, you can delete the profile and data, but the steps can differ depending on the account type.
Remove family account
To delete a family member account on Windows 11, use these steps:
- Under the "Your family" section, click the "Manage family settings online" option.
- Sign in with your credentials (if applicable).

- Under the "Your family" section, click the (three-dotted) menu button in the right corner of the user account and select the "Remove from family group" option.
- Click the Remove button.

- Quick note: If you are trying to remove a child account, you may first need to choose the "Manage consent" option and remove the consent before you can remove the account from the family group.
Once you complete the steps, the account and files will be deleted from the computer.
Remove non-family account
To delete a local account on Windows 11, use these steps:
- Under the "Other users" section, select the user account and click the Remove button.

- Click the "Delete account and data" button.
After you complete the steps, the profile and files will be deleted from the device.
More resources
For more helpful articles, coverage, and answers to common questions about Windows 10 and Windows 11, visit the following resources:
- Windows 11 on Windows Central — All you need to know
- Windows 10 on Windows Central — All you need to know

Mauro Huculak is technical writer for WindowsCentral.com. His primary focus is to write comprehensive how-tos to help users get the most out of Windows 10 and its many related technologies. He has an IT background with professional certifications from Microsoft, Cisco, and CompTIA, and he's a recognized member of the Microsoft MVP community.
- 2 Chants of Sennaar, Humanity, Senua's Saga: Hellblade 2, and more are coming to Xbox Game Pass
- 3 Baldur's Gate 3 player turns the Astral Prism into a fully functioning Xbox controller
- 4 OpenAI CEO Sam Altman's "magical" GPT-4o felt more like routine Microsoft Copilot updates paired with a snub for Windows
- 5 Grab two of the best JRPGs from famed developer Atlus — now on PC platforms at bargain prices with a temporary discount
Tim’s Tech Blurbs
Tim’s tech ramblings about Intune, Modern Management, Powershell and every thing else.
How to move Windows 10 User Rights Assignment to Endpoint Manager / Intune
Should you change the default user rights assignments in Windows 10? That’s the question. If you ask my college the AD expert, he will tell you to run away and don’t even think about changing the defaults. (He will back it up with some pretty funny stories as well about who someone did it and locked out a company and maybe even a ship)
If you ask the Security team, the answer is a yes. We should set them.
Let taks a look. We will start at my favourite site. The Windows 2004 security baseline. MS recommend quite a few setting to be applied. When we add another baseline from the Security team we end up with the table below.
First things first. Let’s check the CSP and see what we need to do. To note, you can user the nice name for the account. (i.e Administrators). But we have ever lanuguage under the sun. So we need a better way to define the accounts. Lets check the Well know SID Structures for what we need.
Lets start with the local administrator. When you check for the SID, be sure to look for the BUILTIN groups and not the domain Groups. Looking at the table the SID is S-1-5-32-544.
Now we check the local account and we get S-1-5-113.
So Lets set up a polcy. Lets open Endpoint Mananger.
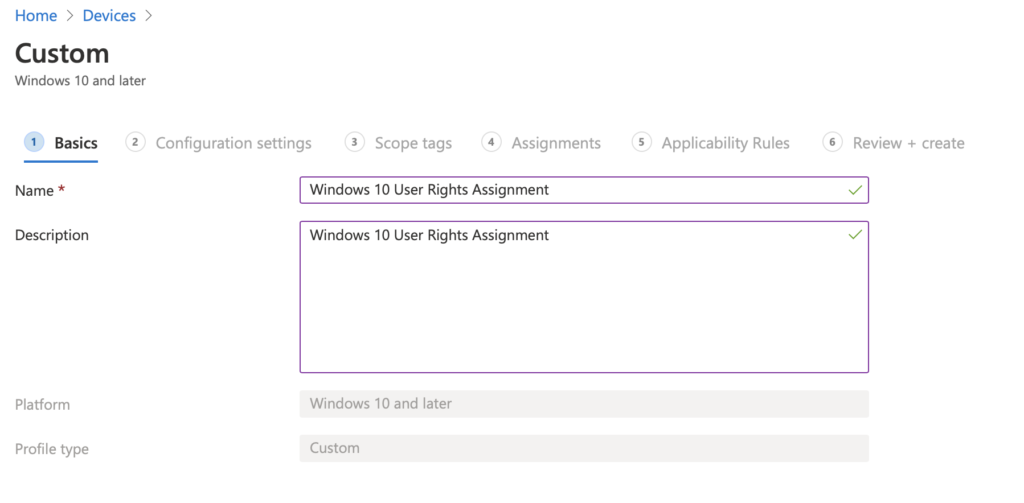
Goto Devices -> Configuration Profiles. Select Add new.
Select “Windows 10 and Later” and Custom in the profile
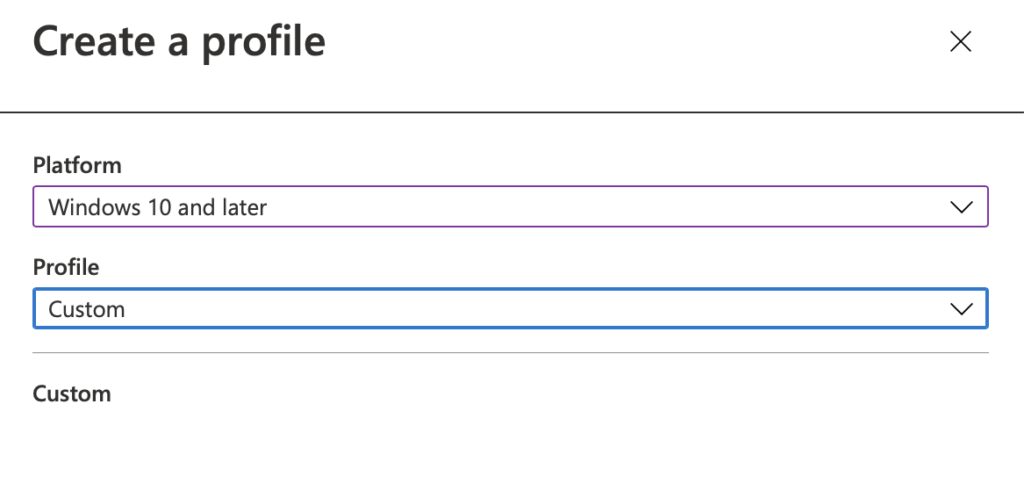
Let’s enter in a Logical name. “Windows 10 User Rights Assignment” and select Save.
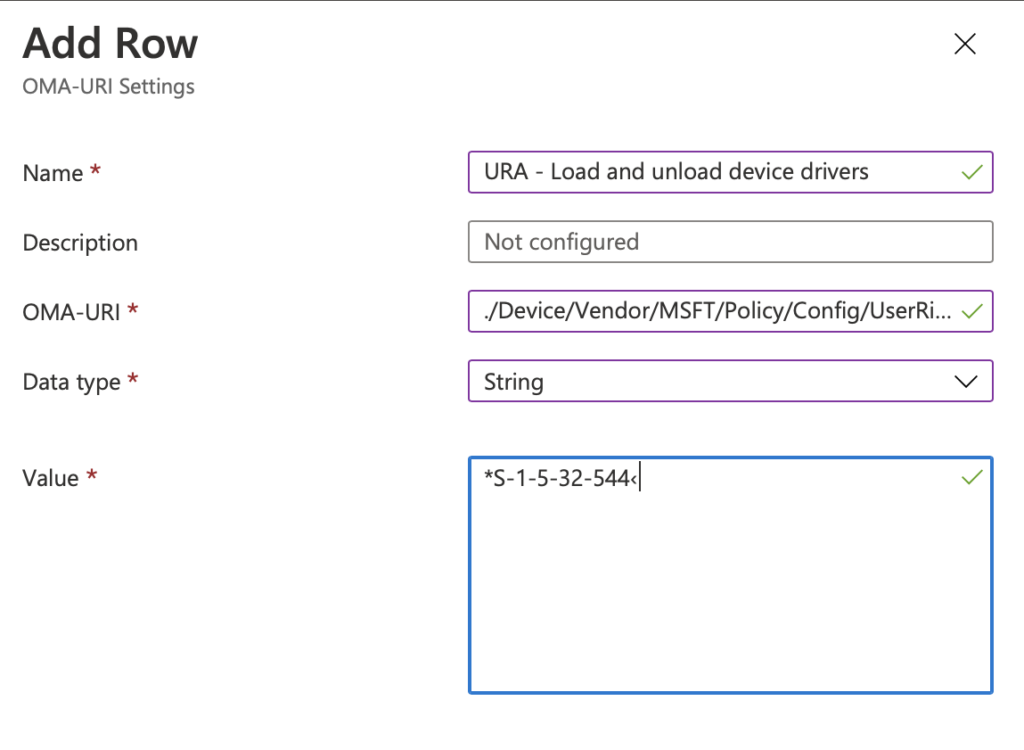
Lets Start with “Load and unload device drivers.” Select Add on the next Page. Enter in the name for the setting. I am preceding the name with URA (for User Rights Assignment). In the OMA-URI after in ./Device/Vendor/MSFT/Policy/Config/UserRights/LoadUnloadDeviceDrivers The Data Type should be string. Andter in the desired SID for the setting. In this case it will be *S-1-5-32-544. (Add the * in before to distinguish its a SID) Pres Save.
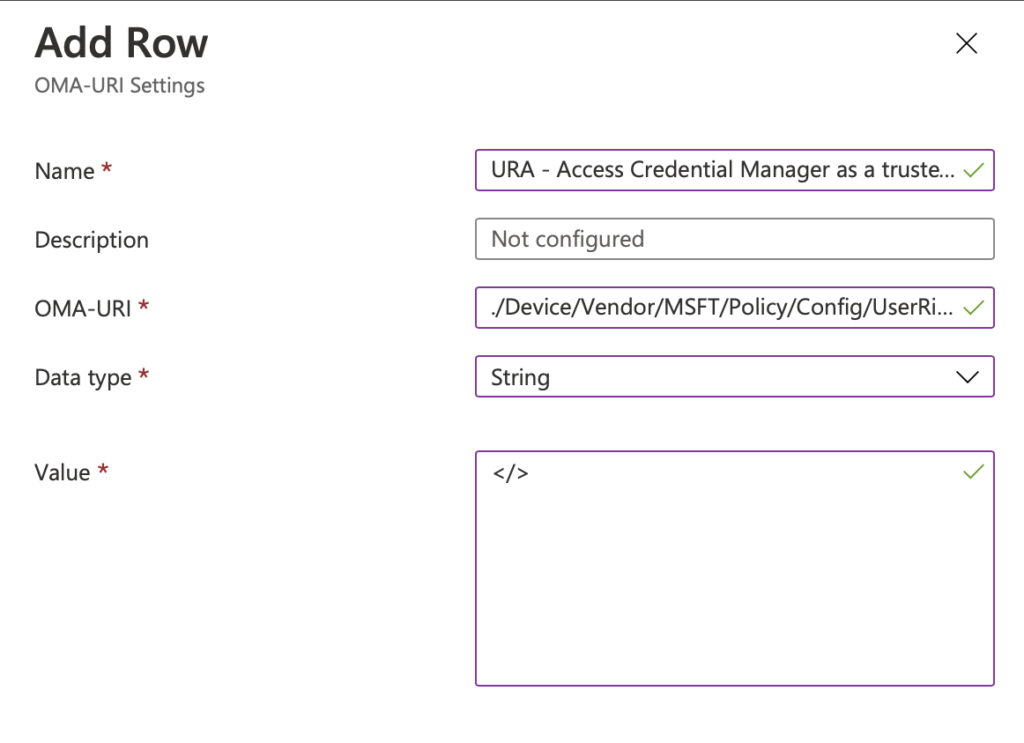
Done. What’s next. Lets go “Access Credential Manager as a trusted caller”. According the baseline no one should have access to this. But how do we define it so no one can access it. Well don’t press save with a blank field. It will fail (I learn the hard way)
Add a new one and add in the name URA – Access Credential Manager as a trusted caller. Then for the OMA-URI enter in ./Device/Vendor/MSFT/Policy/Config/UserRights/AccessCredentialManagerAsTrustedCaller. Select String again. In the data field I have set the value as </>. If you leave it black you get an error when saving it. Its really annoying if you have added 20 on and then relies they have all failed.
Repeat until you have added them all in. Select Next, and then assign them to your test group. Sync your device, and reboot.
You should also do the testing on a test machine. Just in case you lock your self out.
How can you check the User rings assignments have worked? Lets ask Mark. He usually know these things.
Lets download AccessChk from here. https://docs.microsoft.com/en-gb/sysinternals/downloads/accesschk . It allows you to check various permissions fo r files register etc. We will use it with the -a to give us the Windows account right. Lets check SeSystemtimePrivilege or Change the System time. According to the baseline, only Admin and Local services should have this right. Lets run accesschk.exe -a SeSystemtimePrivilege
Great the values are as we expect. What about the checking all the permissions. Let’s run accesschk.exe -a * to show all the permissions.
Now all the rights look good. So lets plan to roll it out and hope we don’t become a funny storey for my college

Published by Tim Wood
Privacy overview.
- NIST 800-53
- Common Controls Hub
The Allow log on locally user right must only be assigned to the Administrators and Users groups.
Stack Exchange Network
Stack Exchange network consists of 183 Q&A communities including Stack Overflow , the largest, most trusted online community for developers to learn, share their knowledge, and build their careers.
Q&A for work
Connect and share knowledge within a single location that is structured and easy to search.
How to list windows privileges for any user
I am trying to write a script to list the privileges (eg SeShutDownPrivilege etc) of all user accounts. I'd prefer it if my script could be run as a standard user, but I can run it as an admin account if I had to. Here are the approaches I have tried so far:
using tokensz (from https://blogs.technet.microsoft.com/askds/2007/11/02/whats-in-a-token/ ): works ( tokensz /compute_tokensize /dump_groups ) for the currently logged in user. But when logged in even as a domain administrator, when trying for another user ( tokensz /compute_tokensize /dump_groups /user:[another.user] ), I get the error SEC_E_LOGON_DENIED
whoami /all works but only for the currently logged in user
ntrights.exe doesn't appear to be able to list privileges, only add and remove.
secedit /export /areas USER_RIGHTS /cfg out.txt : lists all privileges and the SIDs that have that privilege, but that list appears incomplete; the output from tokensz shows a user John.Smith with SeShutdownPrivilege , but the output from secedit for SeShutdownPrivilege lists groups that John.Smith is not a member of.
I can use portable executables (eg tokensz.exe , ntrights.exe ) and built in utilities but will not be able to install applications or extensions
- windows-domain
- I believe your last proposal should really be secedit /export /mergedpolicy /areas USER_RIGHTS /cfg out.txt : this way it should list all the privileges that the security database will apply, should they come from the machine policies (as you got) as well as those granted through the Active Directory policies ("GPOs") – AntoineL Oct 29, 2016 at 21:26
2 Answers 2
You can use AccessChk in accomplish this task.
Accesschk “domain\user” -a * will list all the permissions of a given domain user.
You can call this program within a PowerShell script, concatenate the results into a text file, then filter out just the permissions you want to know about.
For anybody looking for a PowerShell script, this ought to do it:
It gets the list of users who have a profile on the local machine , determines their names from the SID, and invokes accesschk - as recommended by Ramhound - on them. Each user's record starts with the username in DOMAIN\user format, contains each right on a line, and ends with a blank line. (SID translation courtesy of this article .) You can dump its stuff to a file with the redirection operator, > .
A caveat of AccessChk is that it seems to produce an empty list for domain users that don't have local admin rights. Therefore, this version that produces the above information for every known user in the domain and on the machine is a little lame, but may become useful with a future version of the tool:
If you're wondering what secedit is talking about, it's just getting the list of principals (in SID form) to which the rights have been assigned in User Rights Assignment (see secpol.msc ). Therefore, you'll usually see the SIDs for groups like Users or Administrators rather than specific people.
- I approve of this answer. – Ramhound Apr 13, 2016 at 17:17
- My accesschk.exe does not list a -q option. Seems to be silently ignored. What is it supposed to do? – StackzOfZtuff Jun 26, 2017 at 11:04
- @StackzOfZtuff -q removes the banner with the name, version, copyright, and description of the tool, so accesschk only prints the stuff we need. I see it listed here on Accesschk v5.2, but somewhere along the way to v6.1 it seems to have been renamed to -nobanner . – Ben N Jun 26, 2017 at 13:56
You must log in to answer this question.
Not the answer you're looking for browse other questions tagged windows-7 powershell windows-domain vbscript privileges ..
- The Overflow Blog
- Why do only a small percentage of GenAI projects actually make it into...
- Spreading the gospel of Python
- Featured on Meta
- Our Partnership with OpenAI
- What deliverables would you like to see out of a working group?
Hot Network Questions
- Connecting WAN and LAN ports of the same wireless router
- Frank Stella's Protractor Series - Can we reproduce Lac Laronge IV?
- Question regarding multiplication table of group of odd order.
- Keeping an airship aloft using only propellers (and nuclear reactors)
- Will the journal contact my supervisor without me knowing?
- Show don't tell with a blind character
- Bubbly foamed cone with insect inside
- Renewing UK passport also holding an Irish passport
- Quantum fields can leak out of the light cone?
- Finding the price of the last item
- Timetable for Cercanias AM narrow gauge railway in Spain
- Removing Shelf for Electrical Panel Clearance
- Film with a spaceship crew fighting a cyborg who can rebuild themselves. Girl main character
- What word would you use to describe this figure: "20 per 1000 people"? A proportion?
- How should one decide the author order
- how much the pickup can influence the 'quality' of a pinch hamonic
- pgfplot on closed interval doesn't reach endpoints
- Is it illegal for a company to cross out the "To the order of" line on a check and change companies being paid?
- Why did the authors use the phrase "the quantity of people" in these examples?
- May a husband and wife swim together while the wife is niddah
- Waste Products from Hydrogen Fuel Cells
- When should I worry if a potential postdoc PI doesn't respond?
- Why does chaos preclude exact solutions?
- An algebraic group has how many representations?
Windows Security Log Event ID 4704
4704: A user right was assigned
On this page
- Description of this event
- Field level details
This event documents a change to user right assignments on this computer including the right and user or group that received the new right. Note: "User rights" and "privileges" are synonymous terms used interchangeably in Windows. Rights, like most other security settings, are defined in group policy objects and applied by the computer. Therefore this event will normally show the Assigned By user as the system itself. To determine who actually made the rights assignment change you must search the domain controllers' security logs for changes to groupPolicyContainer objects (logged by Directory Service auditing). Logon ID allows you to link this event to the prior event 4624 logon event of the user who performed this action. Note: This event, 4704, and 4705 do not log changes to logon rights such as "Access this computer from the network" or "Logon as a service". See events 4717 and 4718 .
User Rights
Free security log resources by randy.
- Free Security Log Quick Reference Chart
- Windows Event Collection: Supercharger Free Edtion
- Free Active Directory Change Auditing Solution
- Free Course: Security Log Secrets
Description Fields in 4704
The ID and logon session of the user that assigned the right. Unfortunately this is just the local system account - see above.
Security ID: The SID of the account. Account Name: The account logon name. Account Domain: The domain or - in the case of local accounts - computer name. Logon ID is a semi-unique (unique between reboots) number that identifies the logon session. Logon ID allows you to correlate backwards to the logon event (4624) as well as with other events logged during the same logon session. Target Account:
The user or group that was assigned the right. Account Name: name of user or group
New Right:
User Right: the name of the right assigned - user rights table above
Supercharger Free Edition

Your entire Windows Event Collection environment on a single pane of glass.
Examples of 4704
A user right was assigned.
Security ID: SYSTEM Account Name: WIN-R9H529RIO4Y$ Account Domain: WORKGROUP Logon ID: 0x3e7
Target Account:
Account Name: Everyone
User Right: SeCreateTokenPrivilege
Top 10 Windows Security Events to Monitor
Free Tool for Windows Event Collection
Go To Event ID: Must be a 1-5 digit number No such event ID

Everything can be done automatically, as long as you configure it manually :-)
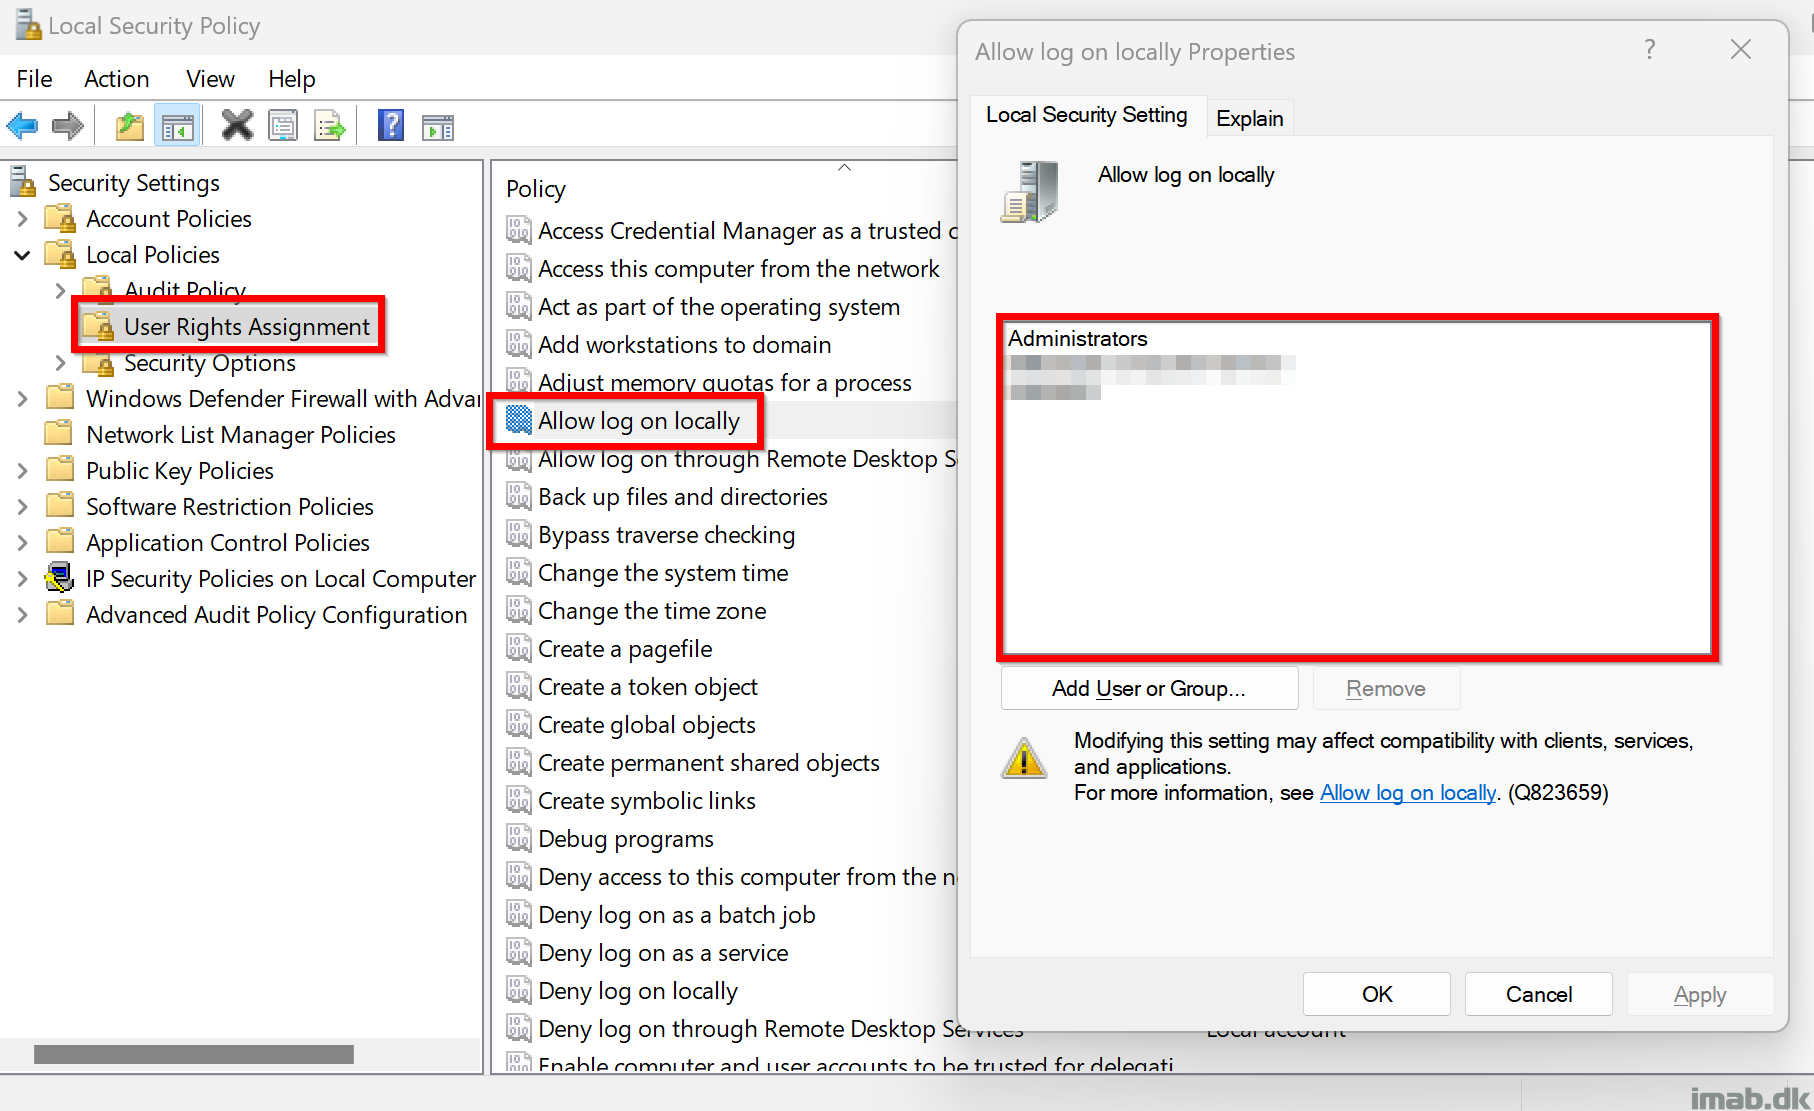
Configure ‘Allow logon locally’ automatically using PowerShell and Microsoft Intune
I know Microsoft Intune has the ability to configure this particular user rights assignment natively already. At time of writing, the new security baseline for Windows 11 23H2 in Intune configure this as well, restricting local logons to the built-in groups: Users and Administrators.
This solution does something else. This solution grabs the currently logged on user and configures the ‘ Allow logon locally ‘ policy to ONLY allow this very user as well as Administrators to be able to log on locally. A custom group is added as well for backup reasons. If no user is logged on, the script does nothing. More details down below.
The solution is made to prevent ‘stealing’ credentials from one user/device and be able to use it on another device within the same environment.
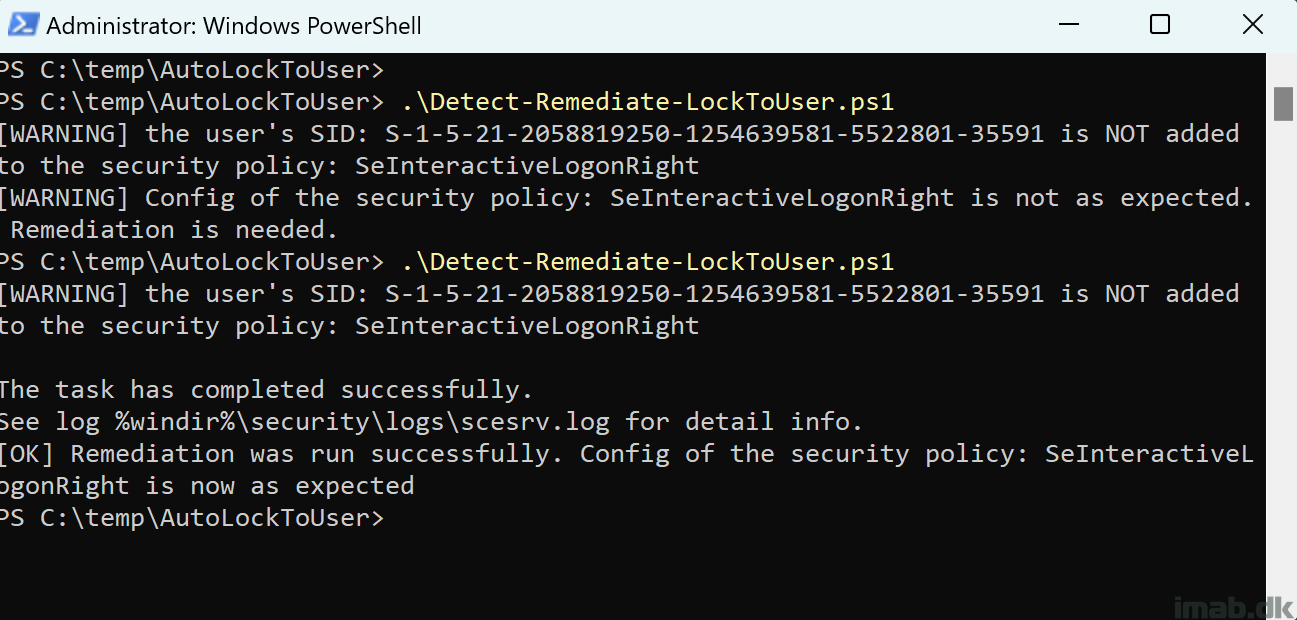
The script is located here on my GitHub repository: Proactive-Remediations/Detect-Remediate-LockToUser.ps1 at main · imabdk/Proactive-Remediations (github.com)
The script accepts 2 parameters: -runDetection and -runRemediation .
-runDetection
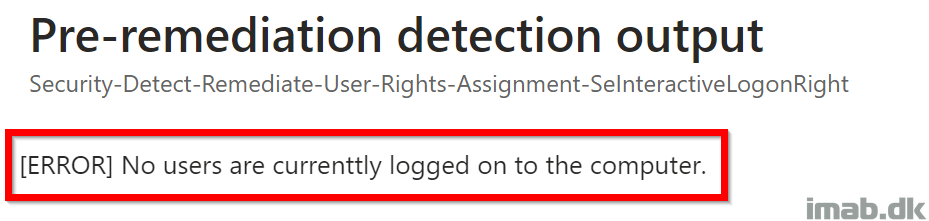
This portion of the script is detecting whether the logged on user is added to the ‘ Allow logon locally ‘ policy. If the user is not added, the script will exit with exit code 1, instructing Microsoft Intune to kick off the remediation script.
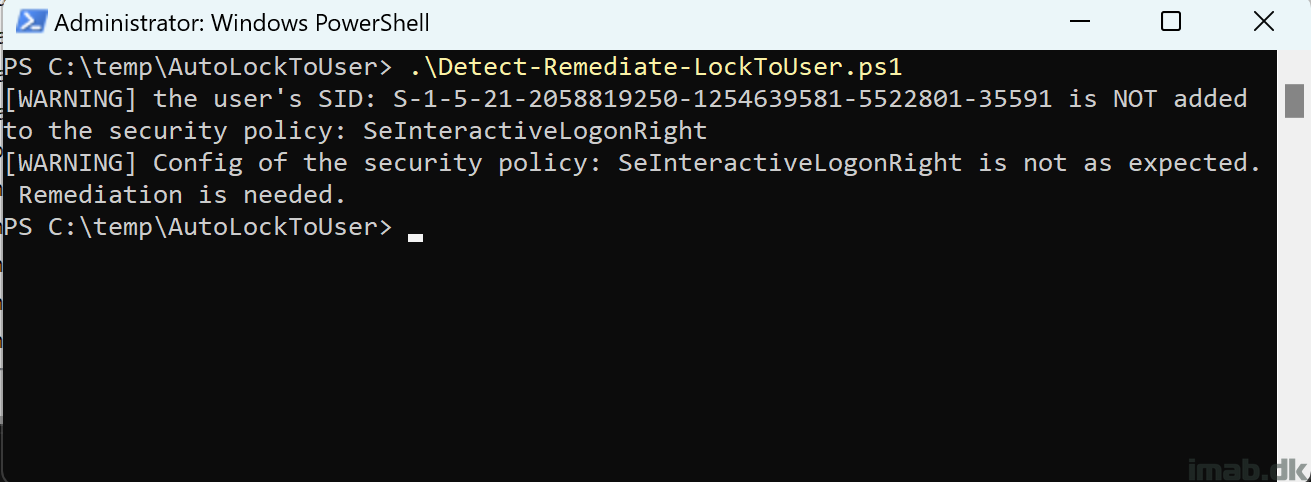
-runRemediation
This portion of the script will add the currently logged on user to the ‘ Allow logon locally ‘ policy, add the additional $trustedGroup as well as remove the built-in group Users .
- Edit the $trustedGroup variable to suit your needs. Again, this is done in a hybrid environment with an on-premises AD. I haven’t tested this with Entra ID identities or groups.
Detect-Remediate-LockToUser.ps1
In headlines, the script does following:
- Queries the explorer.exe for the logged on user(s)
- Exports the current SecPol configuration to C:\Windows\Temp\secedit.tmp
- Translates the logged on user(s) common name to the corresponding SID
- If SID is not found and runRemediation is set to $true a new SecPol configuration will be written to C:\Windows\Temp\secedit.tmp and imported
- Exit script gracefully to signal either success or failure to Intune
Microsoft Intune
Put the script to use with Microsoft Intune and the Remediation feature. The script comes a standalone script, but running this with Microsoft Intune and Remediation , requires 2 scripts.
The first script where -runDetection is set to $true and -runRemediation is to $false . The second script where both are set to $true.
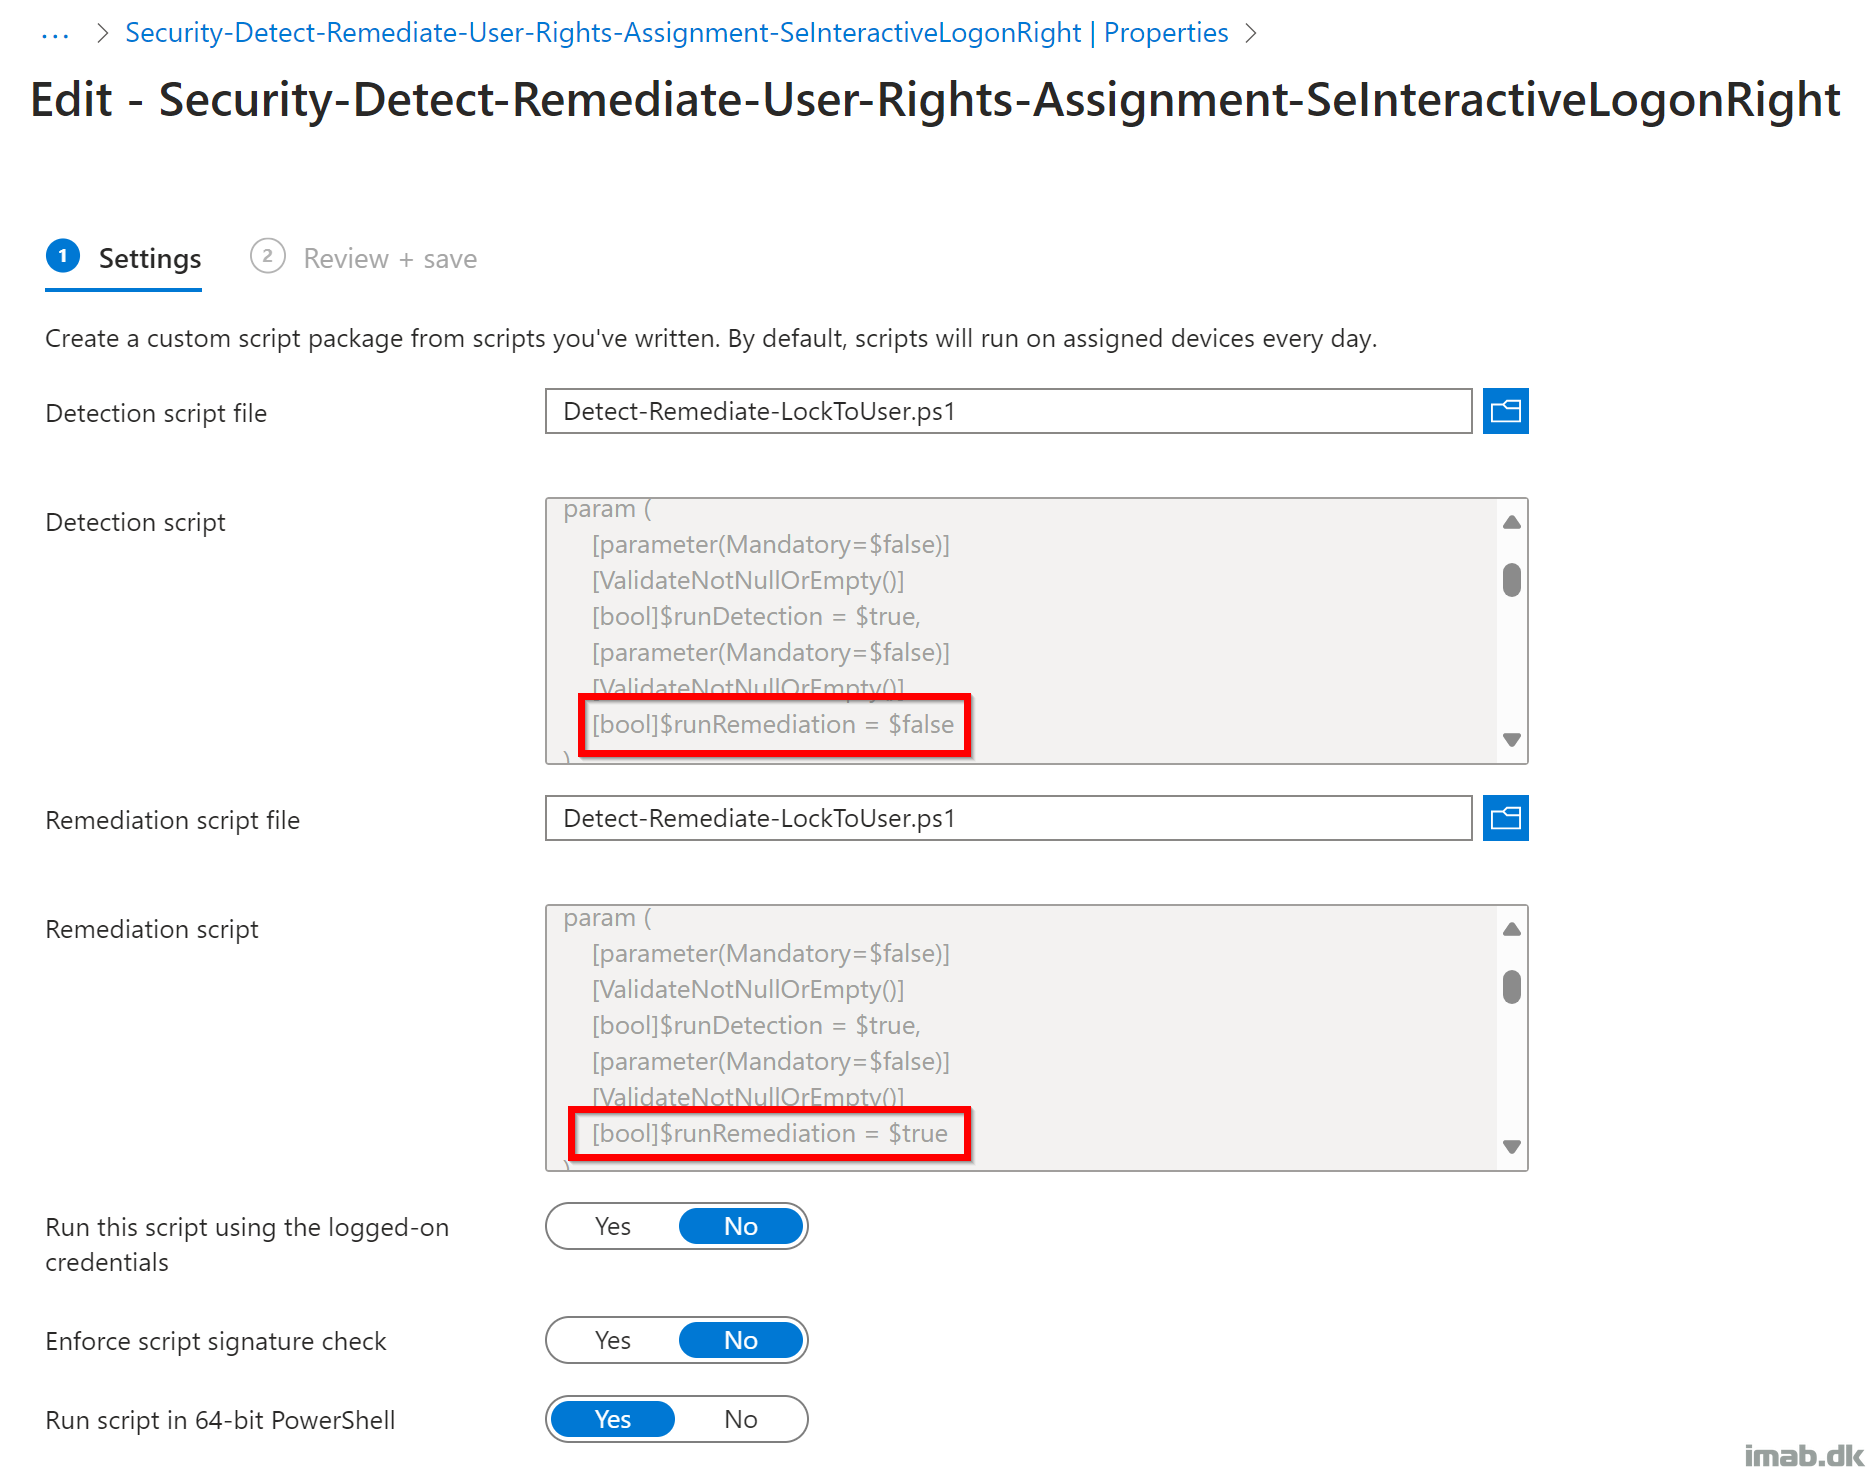
Device status
The script will output various status messages to Intune. This is useful when setting this up initially or troubleshooting.
The scripts are also logging their actions into C:\ProgramData\Microsoft\IntuneManagementExtension\Logs\ HealthScripts.log
Final words
Disclaimer: Test this thoroughly! I have only tested this with on-premises active directory identities. I cannot stress this enough. If something is acting up, you will not be able to logon to the device where this script has been run on. 🙂
Leave a Comment Cancel reply
This site uses Akismet to reduce spam. Learn how your comment data is processed .
Should you give job applicants an assignment during the interview process? Be thoughtful about the ask

Hiring is a time-consuming and expensive endeavor. Companies need candidates who offer the right skills and experience for a given role, and who align with their organization’s vision and mission.
To find the best fit, many companies still lean on a strategy that continues to generate debate : the assignment. Some candidates believe their experience and interviews should give prospective employers enough information to determine whether they will fit the role. Employers have to ask themselves whether they are willing to turn off a strong candidate by asking them to do additional work.
Is the assignment valuable enough to the evaluation process that they cannot move someone forward without it? Sometimes it is—sometimes they help an employer decide between two strong candidates. And if they are necessary, how can employers make assignments fair and equitable for the candidate or candidates?
When done right, assignments help assess practical skills and problem-solving abilities, giving a clearer picture of a candidate beyond what their resume or interview reveals. But employers should be thoughtful about the ask. While it may make sense for roles that require specific technical expertise or creative thinking, it isn’t appropriate for all roles—so assignments should always be given with a clear reason for why they are needed.
Plus, they don’t just benefit the employer. For job seekers, an assignment during the interview process might also help them stand out from the competition. It can also offer a window into what their day-to-day in the new role might entail. Remember that the candidate should be interviewing the company, too. Having a test run of the work they’d be asked to do is a great way to see whether they believe the role is a fit.
However, there is a rift in how people perceive the assignment as part of the interview process. Workers today span many generations, each with unique values and expectations. Whereas older workers often prioritize stability and loyalty, younger millennials and Gen Zers are more focused on flexibility and work well-being, Indeed data shows .
This mindset impacts the amount of time and energy a candidate is willing to devote to each application. After multiple rounds of interviews and prep, taking on an in-depth assignment may feel like a bridge too far—especially if the expectations for the assignment are not clearly communicated ahead of time.
Some candidates are wary of providing free labor to a company that may use their work and not hire them. Hiring managers should be clear about how the work will be used. They may also consider offering compensation if the assignment requires more than a couple hours of someone’s time, or if they plan to use the work without hiring the candidate.
The key for early career candidates in particular is to ensure their time and efforts are respected. This is a win-win for employers: By providing clarity and transparency, they not only elicit the additional information they want from candidates, but they demonstrate that the organization is transparent and fair.
Equity is also imperative: Which candidates are being asked to complete assignments? Is the hiring team consistent in giving out assignments across ages, experience levels, and roles? There should always be a process and clear evaluation criteria in place to ensure fairness.
As we adapt to the rapidly evolving world of work, we must continue to think critically about each step in the hiring process. Candidate assignments can be a valuable tool, but only with appropriate respect for job seekers’ time and contributions.
With the right strategy, we can bridge the gap between generations in the workplace and build a hiring culture that values efficiency, talent, and integrity.
Eoin Driver is the global vice president of talent at Indeed.
More must-read commentary:
- Fannie Mae CEO: Beyoncé is right. Climate change has already hit the housing market—and homeowners aren’t prepared
- Congress could soon spell the end of employment arbitration—but it’s not all good news for American workers
- Outdated laws prevent gig economy workers from getting benefits. This pilot program shows the path forward
- No, combustion engines won’t be supplanted by electric vehicles—and they’re critical for sustainable transport
The opinions expressed in Fortune.com commentary pieces are solely the views of their authors and do not necessarily reflect the opinions and beliefs of Fortune .
Latest in Commentary

I grew up in Kenya’s biggest slum and know from experience: International aid must shift toward community-based organizations

Gen AI looks easy. That’s what makes it so hard

Ex-Lululemon CEO: Gen Zers want sustainably made and compostable products. Firms taking heed today will be market leaders tomorrow

Trade and investment data in the last two years dispel the deglobalization and decoupling myths as U.S.-China competition ignites ‘reglobalization’

Daniel Lubetzky: Here’s the real reason moderates are losing ground

24/7 trading is already in full swing. Now Wall Street is considering ditching the opening and closing bells altogether
Most popular.

The collapsed Baltimore bridge will be demolished soon, and the crew of the ship that’s trapped underneath will be onboard when the explosives go off

The housing crisis in the U.S. is flipped upside down in Japan, where each home that’s occupied could be next to an empty one by 2033

E. Jean Carroll, who won $83 million from Donald Trump, says he will lose the 2024 election

The juice isn’t worth the squeeze for many college majors, new report reveals: Lifetime earnings simply can’t keep up with the cost of degrees

Florida HBCU floored after record $238 million ‘gift’ from 30-year-old hemp mogul is put on hold and could be worthless

After selling his startup for a life-changing $3.7 billion, Jyoti Bansal launched a VC firm and two high-value startups. Why?
This browser is no longer supported.
Upgrade to Microsoft Edge to take advantage of the latest features, security updates, and technical support.
Access this computer from the network - security policy setting
- 1 contributor
- Windows 11
- Windows 10
- Windows Server 2022
- Windows Server 2019
- Windows Server 2016
- Azure Stack HCI
Describes the best practices, location, values, policy management, and security considerations for the Access this computer from the network security policy setting.
If running Windows Server or Azure Stack HCI Failover Clustering, don't remove Authenticated Users from the Access this computer from the network policy setting. Doing so may induce an unexpected production outage. This is due to the local user account CLIUSR that is used to run the cluster service. CLIUSR is not a member of the local Administrators group and if the Authenticated Users group is removed, the cluster service won't have sufficient rights to function or start properly.
The Access this computer from the network policy setting determines which users can connect to the device from the network. This capability is required by many network protocols, including Server Message Block (SMB)-based protocols, NetBIOS, Common Internet File System (CIFS), and Component Object Model Plus (COM+).
Users, devices, and service accounts gain or lose the Access this computer from network user right by being explicitly or implicitly added or removed from a security group that has been granted this user right. For example, a user account or a machine account may be explicitly added to a custom security group or a built-in security group, or it may be implicitly added by Windows to a computed security group such as Domain Users, Authenticated Users, or Enterprise Domain Controllers. By default, user accounts and machine accounts are granted the Access this computer from network user right when computed groups such as Authenticated Users, and for domain controllers, the Enterprise Domain Controllers group, are defined in the default domain controllers Group Policy Object (GPO).
Constant: SeNetworkLogonRight
Possible values
- User-defined list of accounts
- Not defined
Best practices
- On desktop devices or member servers, grant this right only to users and administrators.
- On domain controllers, grant this right only to authenticated users, enterprise domain controllers, and administrators.
- On failover clusters, make sure this right is granted to authenticated users.
- This setting includes the Everyone group to ensure backward compatibility. Upon Windows upgrade, after you've verified that all users and groups are correctly migrated, you should remove the Everyone group and use the Authenticated Users group instead.
Computer Configuration\Windows Settings\Security Settings\Local Policies\User Rights Assignment
Default values
The following table lists the actual and effective default policy values for the most recent supported versions of Windows. Default values are also listed on the policy’s property page.
Policy management
When you modify this user right, the following actions might cause users and services to experience network access issues:
- Removing the Enterprise Domain Controllers security group
- Removing the Authenticated Users group or an explicit group that allows users, computers, and service accounts the user right to connect to computers over the network
- Removing all user and machine accounts
A restart of the device isn't required for this policy setting to be effective.
Any change to the user rights assignment for an account becomes effective the next time the owner of the account logs on.
Group Policy
Settings are applied in the following order through a Group Policy Object (GPO), which will overwrite settings on the local computer at the next Group Policy update:
- Local policy settings
- Site policy settings
- Domain policy settings
- OU policy settings
When a local setting is greyed out, it indicates that a GPO currently controls that setting.
Security considerations
This section describes how an attacker might exploit a feature or its configuration, how to implement the countermeasure, and the possible negative consequences of countermeasure implementation.
Vulnerability
Users who can connect from their device to the network can access resources on target devices for which they have permission. For example, the Access this computer from the network user right is required for users to connect to shared printers and folders. If this user right is assigned to the Everyone group, anyone in the group can read the files in those shared folders. This situation is unlikely because the groups created by a default installation of at least Windows Server 2008 R2 or Windows 7 don't include the Everyone group. However, if a device is upgraded and the original device includes the Everyone group as part of its defined users and groups, that group is transitioned as part of the upgrade process and is present on the device.
Countermeasure
Restrict the Access this computer from the network user right to only those users and groups who require access to the computer. For example, if you configure this policy setting to the Administrators and Users groups, users who sign in to the domain can access resources that are shared from servers in the domain if members of the Domain Users group are included in the local Users group.
Note If you are using IPsec to help secure network communications in your organization, ensure that a group that includes machine accounts is given this right. This right is required for successful computer authentication. Assigning this right to Authenticated Users or Domain Computers meets this requirement.
Potential impact
If you remove the Access this computer from the network user right on domain controllers for all users, no one can sign in to the domain or use network resources. If you remove this user right on member servers, users can't connect to those servers through the network. If you have installed optional components such as ASP.NET or Internet Information Services (IIS), you may need to assign this user right to other accounts that are required by those components. It's important to verify that authorized users are assigned this user right for the devices that they need to access the network.
If running Windows Server or Azure Stack HCI Failover Clustering, don't remove Authenticated Users from the Access this computer from the network policy setting. Doing so may induce an unexpected production outage. This outage is due to the local user account CLIUSR that is used to run the cluster service. CLIUSR isn't a member of the local Administrators group and if the Authenticated Users group is removed, the cluster service won't have sufficient rights to function or start properly.
Related topics
User Rights Assignment
Additional resources
IMAGES
VIDEO
COMMENTS
1 Press the Win + R keys to open Run, type secpol.msc into Run, and click/tap on OK to open Local Security Policy. 2 Expand open Local Policies in the left pane of Local Security Policy, and click/tap on User Rights Assignment. (see screenshot below step 3) 3 In the right pane of User Rights Assignment, double click/tap on the policy (ex: "Shut down the system") you want to add users and/or ...
User rights are managed in Group Policy under the User Rights Assignment item. Each user right has a constant name and a Group Policy name associated with it. The constant names are used when referring to the user right in log events. You can configure the user rights assignment settings in the following location within the Group Policy ...
Personal File Server - Get-UserRights.ps1 Alternative Download Link. or. Personal File Server - Get-UserRights.txt Text Format Alternative Download Link. In order to check the Local User Rights, you will need to run the above (Get-UserRights), you may copy and paste the above script in your Powershell ISE and press play.
User Rights Assignment is one of those meat and potatoes features of the operating system that we all have a cursory understanding of but rarely think about in depth. User rights include logon rights and permissions. Logon rights control who is authorized to log on to a device and how they can log on. User rights permissions control access to ...
In the console tree, click Computer Configuration, select Windows Settings, and then select Security Settings. Do one of the following: Select Account Policies to edit the Password Policy or Account Lockout Policy. Select Local Policies to edit an Audit Policy, a User Rights Assignment, or Security Options. In the details pane, double-click the ...
They include account policies, local policies, user rights assignment, the Windows firewall, software restrictions, and so on. There are several ways to configure security policy settings. The most common are: Group policy objects (GPO) - Used in Active Directory domains to configure and regularly reapply security settings to multiple computers.
To Add a User or Group to a User Rights Assignment Policy. A) In the elevated command prompt, type the command below for what user or group that you would like to add to what policy, and press Enter. NOTE: See blue note box below step 4. ntrights -U " User or Group " +R PolicyConstantName.
User Rights Assignments. Although in this section they are called user rights, these authority assignments are more commonly called privileges. Privileges are computer level actions that you can assign to users or groups. For the sake of maintainability you should only assign privileges to groups not to individual users.
How to Set Logon User Rights with the Ntrights.exe in windows 10(64 bit) [duplicate] Ask Question Asked 7 years, 9 months ago. Modified 8 months ago. ... Set and Check User Rights Assignment via Powershell You can add, remove, and check User Rights Assignment (remotely / locally) with the following Powershell scripts. ...
User rights permissions control access to computer and domain resources, and they can override permissions that have been set on specific objects. User rights are managed in Group Policy under the User Rights Assignment item. Each user right has a constant name and a Group Policy name associated with it. The constant names are used when ...
To add work accounts for apps on Windows 11, use these steps: Open Settings. Click on Accounts. Click the Email & accounts page on the right side. (Image credit: Future) Under the "Accounts used ...
For domain controllers, assign the Allow log on locally user right only to the Administrators group. For other server roles, you may choose to add Backup Operators in addition to Administrators. For end-user computers, you should also assign this right to the Users group. Alternatively, you can assign groups such as Account Operators, Server ...
Goto Devices -> Configuration Profiles. Select Add new. Select "Windows 10 and Later" and Custom in the profile. Let's enter in a Logical name. "Windows 10 User Rights Assignment" and select Save. Lets Start with "Load and unload device drivers.". Select Add on the next Page. Enter in the name for the setting.
Run "gpedit.msc". Navigate to Local Computer Policy >> Computer Configuration >> Windows Settings >> Security Settings >> Local Policies >> User Rights Assignment. If any groups or accounts other than the following are granted the "Allow log on locally" user right, this is a finding: Administrators. Users.
2. I'm new to PowerShell (PS). Currently I'm using windows server 2012 and I'm interested to know whether there is any way to export User Rights Assignment into a txt file. I tried. secedit /export /areas USER_RIGHTS /cfg d:\policies.txt. The above should should export it. So, I get this: Current Output.
9. You can use AccessChk in accomplish this task. Accesschk "domain\user" -a * will list all the permissions of a given domain user. You can call this program within a PowerShell script, concatenate the results into a text file, then filter out just the permissions you want to know about. Share.
Any change to the user rights assignment for an account becomes effective the next time the owner of the account logs on. Group Policy. Settings are applied in the following order through a Group Policy Object (GPO), which will overwrite settings on the local computer at the next Group Policy update:
1. Press the Win+R keys to open Run, type secpol.msc into Run, and click/tap on OK to open Local Security Policy. 2. Expand open Local Policies in the left pane of Local Security Policy, click/tap on User Rights Assignment, and double click/tap on the Deny log on locally policy in the right pane. (see screenshot below) 3.
4704: A user right was assigned. On this page. Description of this event. Field level details. Examples. This event documents a change to user right assignments on this computer including the right and user or group that received the new right. Note: "User rights" and "privileges" are synonymous terms used interchangeably in Windows.
I know Microsoft Intune has the ability to configure this particular user rights assignment natively already. At time of writing, the new security baseline for Windows 11 23H2 in Intune configure this as well, restricting local logons to the built-in groups: Users and Administrators.. This solution does something else. This solution grabs the currently logged on user and configures the ...
Welcome! You can use this tool to find and compare different types of Medicare providers (like physicians, hospitals, nursing homes, and others). Use our maps and filters to help you identify providers that are right for you. Find Medicare-approved providers near you & compare care quality for nursing homes, doctors, hospitals, hospice centers ...
User rights are assigned for user accounts or groups. The name of the policy defines the user right in question, and the values are always users or groups. Values can be represented as Security Identifiers (SID) or strings. For more information, see Well-known SID structures.
When done right, assignments help assess practical skills and problem-solving abilities, giving a clearer picture of a candidate beyond what their resume or interview reveals. But employers should ...
Any change to the user rights assignment for an account becomes effective the next time the owner of the account logs on. Group Policy. Settings are applied in the following order through a Group Policy Object (GPO), which will overwrite settings on the local computer at the next Group Policy update: