
How to Animate in Google Slides? [Everything to Know!]
By: Author Shrot Katewa
![How to Animate in Google Slides? [Everything to Know!]](https://artofpresentations.com/wp-content/uploads/2021/04/Featured-Image-How-to-Add-Animations-in-Google-Slide.jpg "google presentation animation")
Animation can be a great way to bring your presentation alive, and make it more engaging for the viewer. It’s also an easy way to add some variety into what might otherwise be a very static document. Animating in Google Slides is actually quite simple and straightforward.
To animate in Google Slides, select the object (text, shape, or image) and right-click on it. From the menu, click on “Animate”. In the “Motion” settings pane that opens on the right, choose the “Animation Type” and “Start condition” from the dropdown options under “Object Animations”.
In this article, you will learn how to animate objects, text, bullet points, add delay, edit animations, and even delete animations – as well as everything else that you need to know about animations in your Google Slides presentations!
I shall be covering the basics so you will be able to follow along even if you are a beginner. If you are an advanced user and are looking for specific animation instruction, I advise that you skip the beginner information at the start, and scroll down to find the relevant information.
Let me first start with the basics of animations in Google Slides. So, without further delay, let’s get to it!
A Quick Note Before We Begin – if you want to make jaw-dropping presentations, I would recommend using one of these Presentation Designs . The best part is – it is only $16.5 a month, but you get to download and use as many presentation designs as you like! I personally use it from time-to-time, and it makes my task of making beautiful presentations really quick and easy!
1. What does Animation Mean in Google Slides?
The word ‘animation’ in itself refers to the technique used to move inanimate objects in order to bring life to pictures or graphics.
Animation in Google Slides allows objects to move or fade in or out of the slides. This feature on Google Slides enables you to insert multiple effects on your slides. Animations can be used to focus the attention of your audience on the specific part of the slide or even make your presentation more engaging!
Google Slides is equipped with tons of features that will help you to amplify your presentation without having to do much. It also allows you to adjust the speed of each effect by dragging the animation speed slider. This allows you to put a professional touch on your slides.
In Google Slides, you can apply animations to text boxes, shapes, pictures, bullet points, graphics, and icons.
One thing that you need to keep in mind is that while using animations on Google Slides, do not get carried away with too many animations and transitions. Make sure you do not overpower your message with too many effects.
One last thing before we move on to the next section is to remember not to confuse animations with transitions in Google Slides. Let’s talk about the differences between animations and transitions in a bit more detail in the next section.
2. Difference Between Animation and Transition in Google Slides
It is easy to get confused between “Animations” and “Transitions” in Google Slides since both add motion effect and movement in the presentation. However, they are not the same thing.
The key difference between animation and transition in Google Slides is that animation is applied to objects present on a slide, whereas transition is applied to the slide itself! Animation effect is visible on the slide while transition effect can be seen when you move one slide to the next.
Thus, it is important to remember that these two can not be used interchangeably. However, these motion effects can be used together.
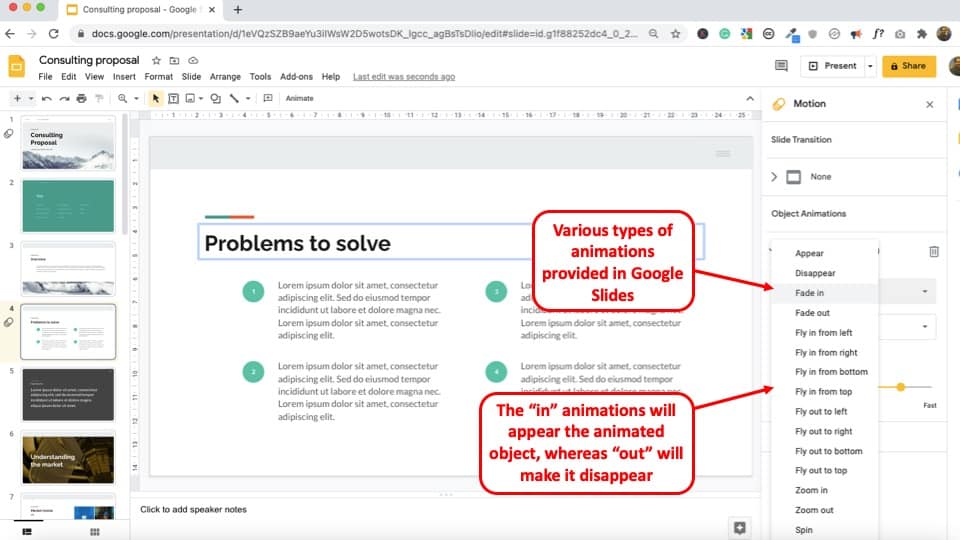
Pro Tip! Animations in Google Slides are of two types – a.) ones that will make your elements appear (usually contain the word “in” in it), and b.) ones that will make your elements disappear from the slide! (usually contain the world “out” in it)
Let’s understand the types of animations and transitions before we move on the next section –
Types of Animations in Google Slides
There are a total of 13 animation types that are available in Google Slides. These are as follows –
- Fly in from left
- Fly in from right
- Fly in from top
- Fly in from bottom
- Fly out to left
- Fly out to top
- Fly out to bottom
A quick way to understand these animations is that when the animation has the word “in” mentioned in it, that animation effect will make the object appear on the slide. The animation with the word “out” mentioned, will make the object disappear from the slide.
Another glance at the list above (with the information about the ‘in’ and ‘out’ animation types), and you will perhaps notice that in reality, Google Slides actually only provide 4 animations i.e. Appear, Fade, Fly, and Zoom.
The other animation types provided are either to use the same effect to make the element disappear or use a variation of the same animation effect in Google Slides.
Transitions in Google Slides
As mentioned earlier, the motion effect that takes place while switching from one slide to another is denoted as Transition. By default, you will not see any transitions applied as they are turned off. However, you can enable them pretty easily.
Slide transitions actually deserve a completely different post altogether! (which I plan to cover in the near future). For now, let’s take a look at the various transitions provided in Google Slides –
- Slide from right
- Slide from left
I hope this has helped you differentiate between animation and transition in Google Slides.
3. How to Animate in Google Slides?
Now that we have understood the basics, let us now learn how to add animations to your Google Slides presentation. Remember, you can add animation to different objects including text, images, objects, shapes, icons, graphics, tables, etc.
Regardless of what element you plan to consider, the process of adding animations to each of those elements is going to be quite similar.
That said, for the sake of this article, I’m going to consider adding animations to text, and adding animations to images and text as an example. Plus, I will show you multiple different ways in which you can add animations to the objects in Google Slides.
3.1 How to Animate Text in Google Slides?
Here’s a step-by-step process to add animations to text in Google Slides –
Step-1: Open Google Slides
To open a Google Slides presentation, simply click here or visit slides.google.com. Make sure that you are logged into your Google account to open a new presentation.
Step-2: Select the Text and click on the “Insert” Menu

Once you’ve opened a new presentation, type out your desired text on your selected slide. Select the text and click “Insert” , which you will find on the top left corner of your screen. Choose the “ Animation ” option from the dropdown menu.
Step-3: Select the Animation Type and Start Condition from the Motion Pane
After clicking on “ Animation ” you will see a new window open up on the right side of the screen. This will help you adjust the motion settings.
Pro Tip! Google Slides allows for 3 start conditions for animations namely a.) on-click, b.) with previous, and c.) after previous. These settings help determine when the animation should start playing and depending on your chosen setting, it could be played on a click of a button, with a previous animation, or after an animation is completed.
Under the “ Object Animation ” section, choose the “Animation Type “. In the above example, I’ve gone with the “Fade in” animation.
Next, choose the “ Start Condition “. You can choose to start the animation on click, with previous (animation), or after previous (animation).
3.2 How to Change Duration of Animations in Google Slides?
Google Slides also allows you to slow down or make the animations appear quickly! This can be done using the “duration” setting for animation.
Here’s how you can change the duration for animations in Google Slides –
Step-1: Select the Object to Change Animation Duration
The first step is to select the text or other object that already has the animation added. You can select it by clicking on it.
Step-2: Open the Motion Settings Tab by Clicking on View
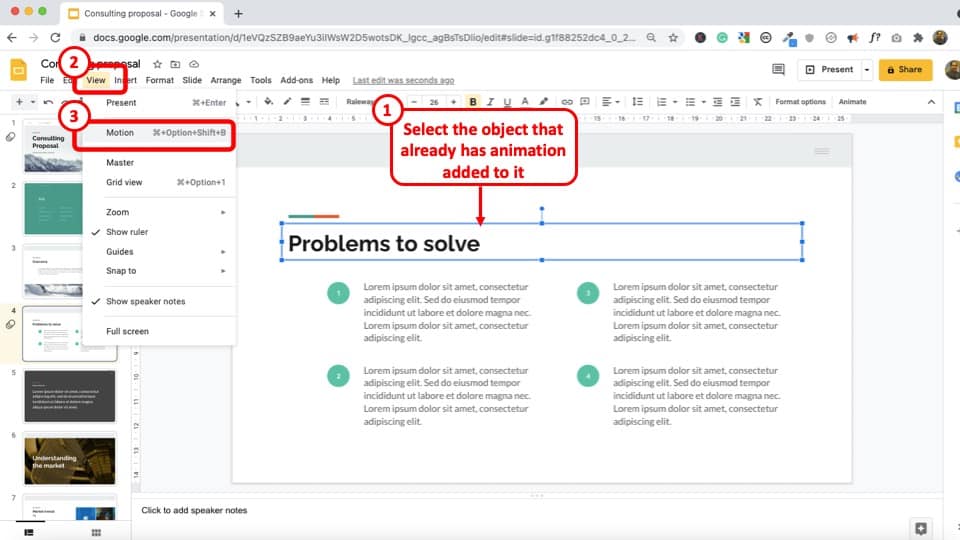
If an object has animation already added to it, then click on the “ View ” tab. From the dropdown, click on “ Motion “.
This will open the “motion” settings window on the right part of your screen.
Pro Tip! To make changes to an existing animation, always open the “ Motion ” tab first from the “ View ” menu. By using the “ Add Animation ” option from the “ Insert Menu ” (or by any other method), will add an additional animation to the same object!
It is important to note that if you select an object that already has an animation added to it, then click on insert, and add animation as described in the previous section, you will end up adding another animation to the same object instead of editing the existing animation.
Step-3: Change the Duration of the Animation

The last thing that you would want to do is to change the duration of the animation by dragging the “Duration” slider towards the left or the right.
Dragging the slider towards the left will result in slowing the animation, while dragging it towards the right will make the animation speed up.
3.3 How to Reorder Animations in Google Slides?
Sometimes, you may add animations in the wrong order. In such a scenario, you may want to change the order in which the animations appear. This can also be done easily in Google Slides.
Here’s how to change the order of the animations in Google Slides –
Step-1: Open the Motion Settings Window from the View Menu
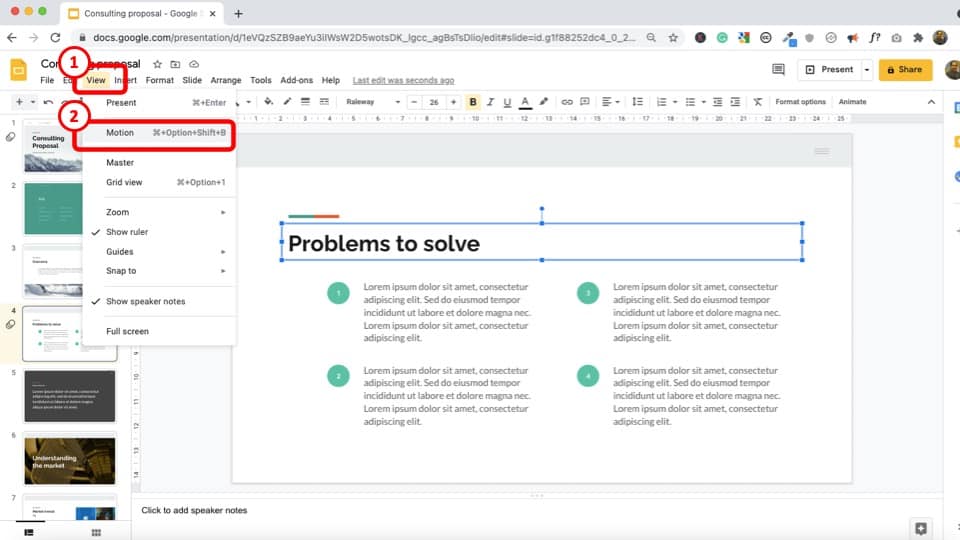
If you don’t have the motion window open, then go to the “View” menu, and click on “Motion” to view the existing animations that are present on the slide.
Step-2: Change the Order of the Animations from the Motion Window
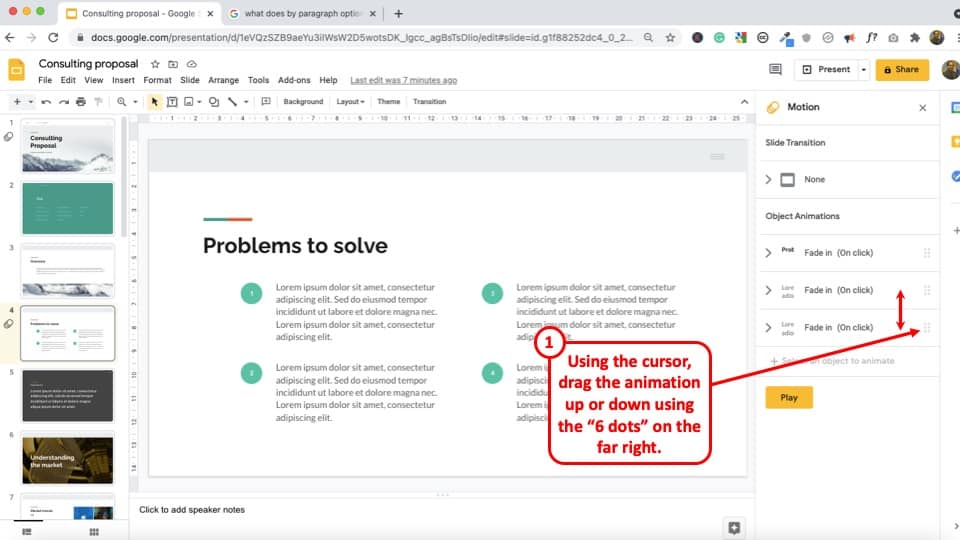
Choose the animation that you want to change the order for. Then, in the “Motion” window pane, hover over on the “6 dots” at the far right of the animation until the cursor changes to a crosshair. Then, click and drag the animation up or down as per the requirement.
Step-3: Click Play to Review the Changes
As a final step, click on the “Play” button on the Motion settings window pane to review if the order of the animation is as per requirement.
3.4 How to Remove Animations in Google Slides
Sometimes, you may have added an animation to an object or text by mistake. In that case, you may like to remove the added animation. In case you are wondering, here’s how to remove the animation in Google Slides –
Step-1: Go to the Slide Containing the Animation to be Deleted
First, you should go to the slide which contains the animation you want to remove or delete.
Step-2: Open the Motion Window and Select the Animation to be Deleted
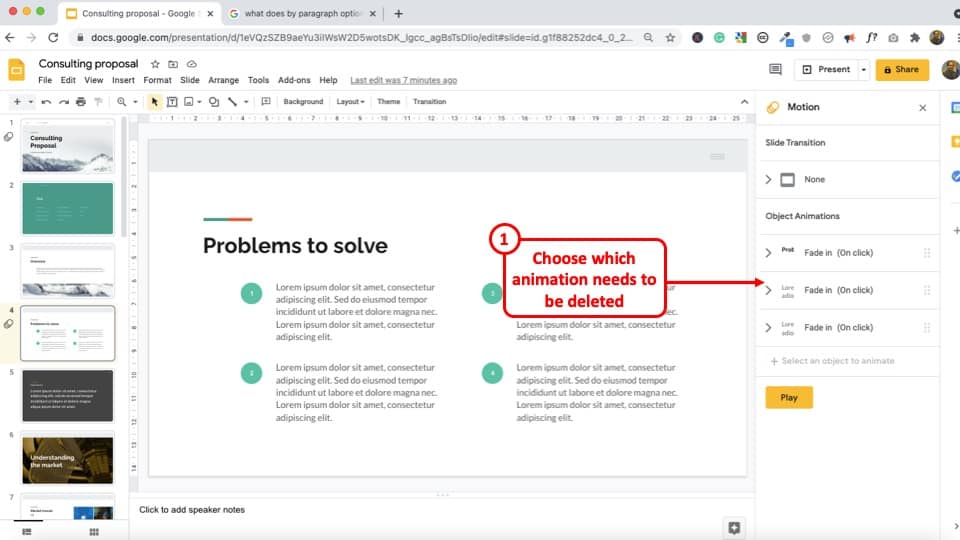
From the animation plane, select the animation that you want to remove or delete.
Step-3: Select the Animation and Press the “Delete” button

Press the “Delete” button or icon to remove the chosen animation. Follow the same method to delete any animation that you want to remove.
4. How to Animate Bullet Points in Google Slides?
Having bullet points on our presentation can be helpful when we want to summarize key pieces of information. However, how do you animate bullet points in Google Slides? In this section, I will share a cool tip to help you animate bullet points quickly.
Here’s what you need to do to animate bullet points in Google Slides –
Step-1: Select the Bulleted List
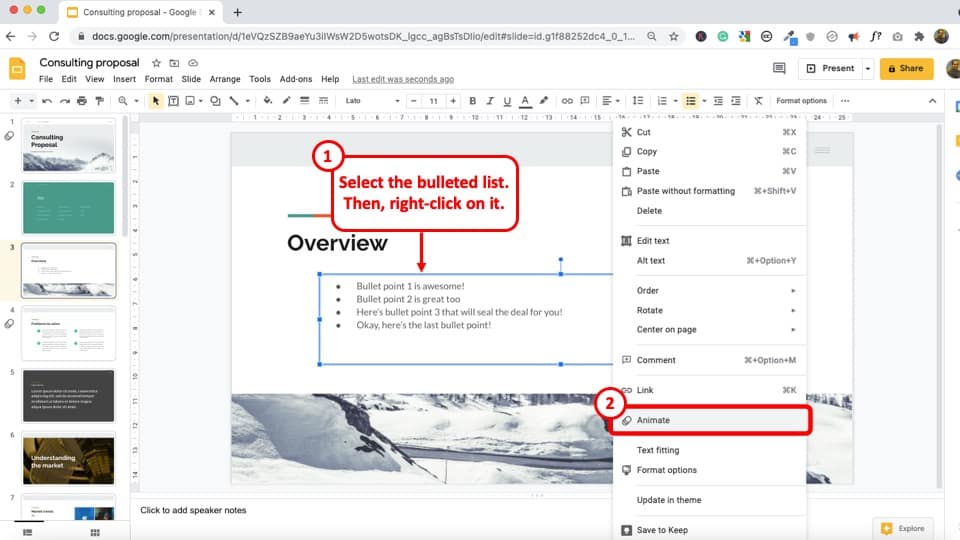
Click on the Bulleted list you want to animate and “Select” it.
Step-2: Press Right Click and Select Animate
Right click on the mouse and select the “Animate” tab to add animation to the bulleted list.
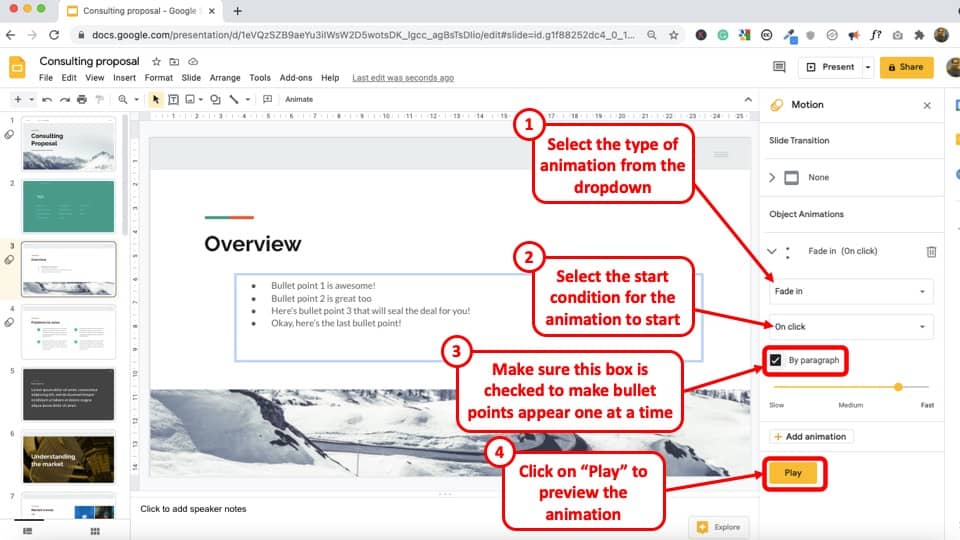
Step-3: Select the Type of Animation
Depending on the type of animation you want, click on “Fade in” tab to select on the animation style.
Step-4: Select the Start Condition and enable “By Paragraph” setting
Depending on when you want the Bulleted List to show, select the “On Click” tab. Next, make sure that you click on the “ By Paragraph ” setting. This will allow the bulleted points to appear one at a time.
Step-5: Preview the Animation to See the Result
To preview the animation of the bulleted points, click on the yellow “Play” tab at the bottom of the section.
Press the yellow “Stop” button when you want to end the preview of the animation.
5. How to Animate Image and Objects in Google Slides?
Animating images and other objects in Google Slides works just the same way you would animate text. That said, I shall show you another way to access animations option for adding animations on Google Slide.
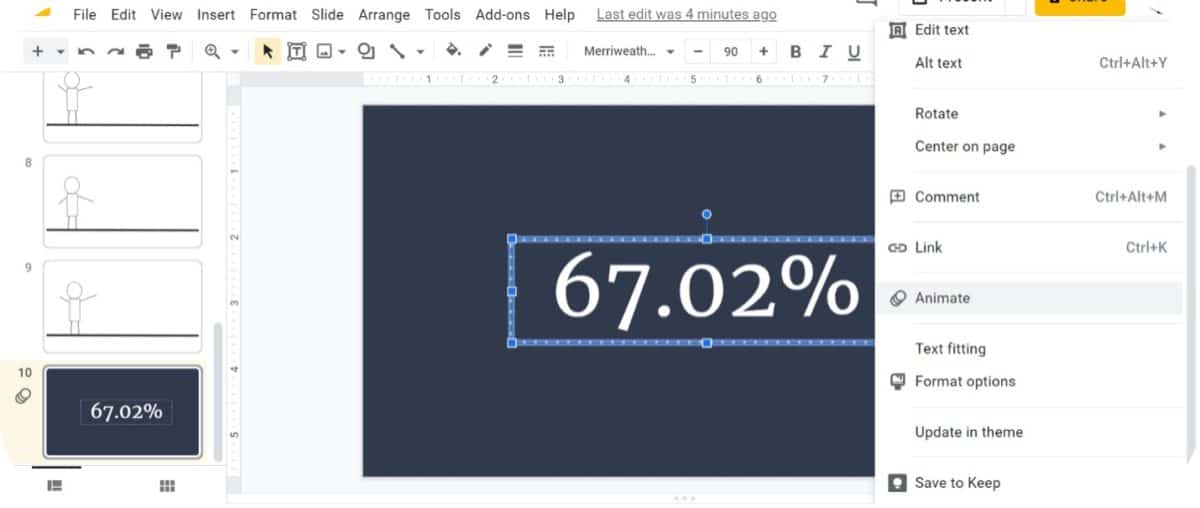
Step-1: Select the Image or Object
Select the image or object that needs to be animated. You can do that by clicking on it.
Step-2: Click on “Animate” Option on the Toolbar
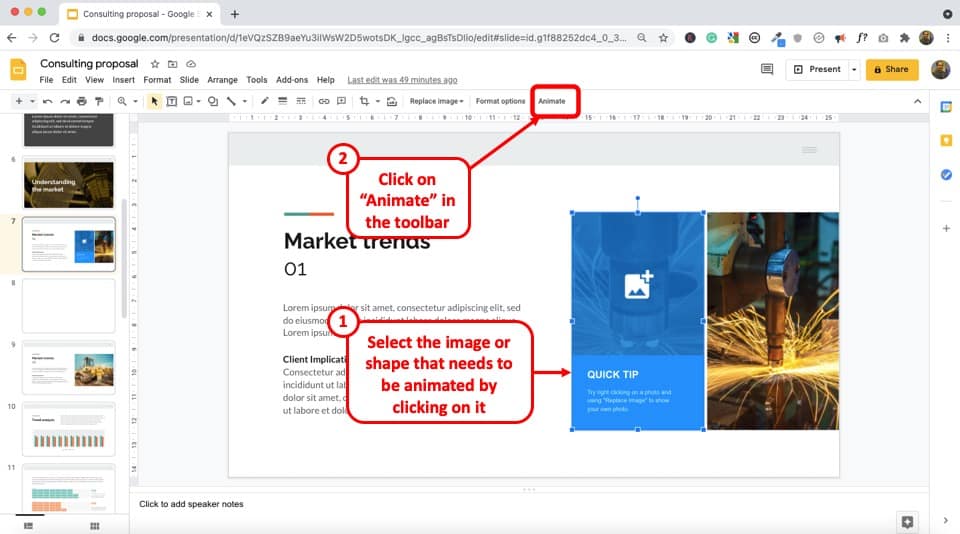
Once the image is selected, you will notice that a “ Animate ” option is visible on the toolbar as showcased in the image above.
Click on it to add an animation to the image. This is another way to add animation to an object.
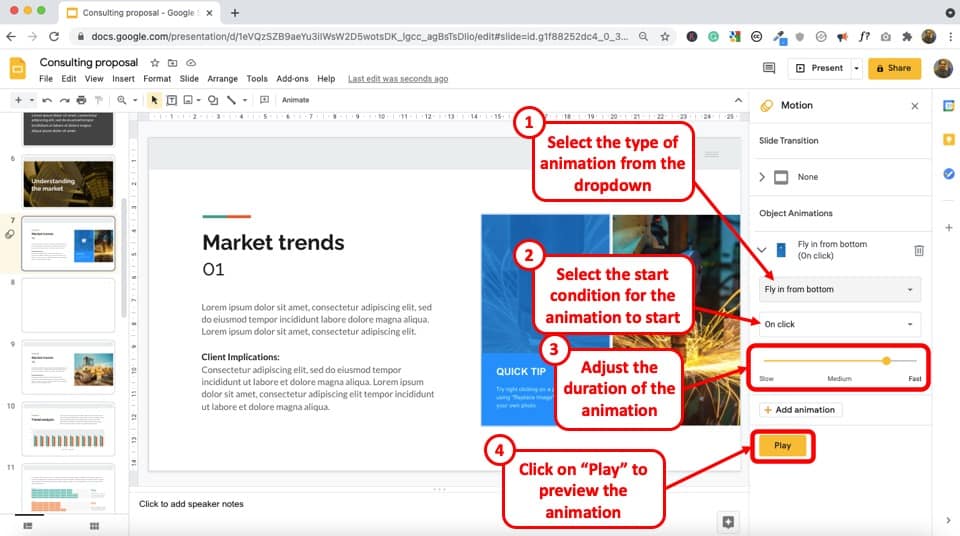
Depending on the type of transition you desire, choose one. For this example, I’ve gone with the “ Fly in from Bottom ” animation option.
Step-4: Select the Start Condition for the Animation and the Duration
A time can be chosen depending on when you want the Object or Image to show. Press the “On Click” tab to allow the Image or Object to appear one at a time. Other options include “ After Previous ” and “ With previous ”.
Likewise, you can choose how fast or slow the animation show appear using the “ Duration ” option. Drag the slider towards right or left.
To preview the animation of the Image or Object, click on the yellow “Play” tab at the bottom of the section.
To end the preview of the animated Image or Object, click the “Stop” button.
6. How to Add a Motion Path Animation in Google Slides?
Motion path animations allow an object to move along in a certain path. This could be from right to left, up or down, or even diagonally.
Unfortunately, Google Slides doesn’t have an option to add a motion path animation on the slides directly. However, motion path animation can be recreated by using duplicating the slides and changing the position of the object slightly on each slide.
Unlike PowerPoint or Keynote, Google Slides doesn’t have an option to add “ Path Animations “. However, the desired result can also be achieved with what is called a stop motion animation.
Check out the video below that explains the process of creating a stop motion animation in Google Slides –
7. How to Loop Animations in Google Slides?
Looping animations in Google Slides is not possible till now. However, you can create loop animation for an object, image, or text box in Google Slides using a hack. Let’s understand that in further detail.
Step-1: Create an Object on your Slide
The object created can be from the “Shape” tab, or an image, or a text box. It can contain statistical numbers or pictures related to the topic of the Presentation.
Step-2: Right Click and Select Animate Tab
Right click on the mouse and Select on the “Animate” tab to add animation to the already existing object.
Step-3: Select the Object to Add Looping Animation
After the animation sidebar pops up, make sure that the desired object is selected by clicking on it.
Step-4: Add Animation and Timing to your Object
Supposing that you want a Spin Loop Animation. From the transition option, select the “Spin” tab available on the bottom of the transition type list.
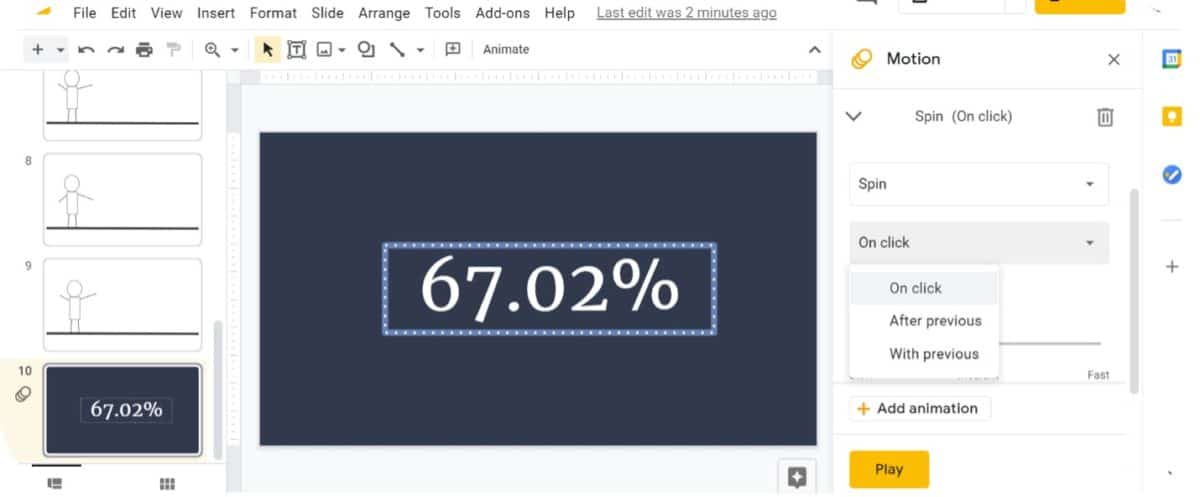
To select the time appearance of the object, select “On click” tab available on top of the list. This starts the animation when the object is clicked.
Step-5: Create Second Animation
Now, click “Add animation” button to create a second animation for the object. Select “Spin” available at the bottom of the list again to maintain coherence.
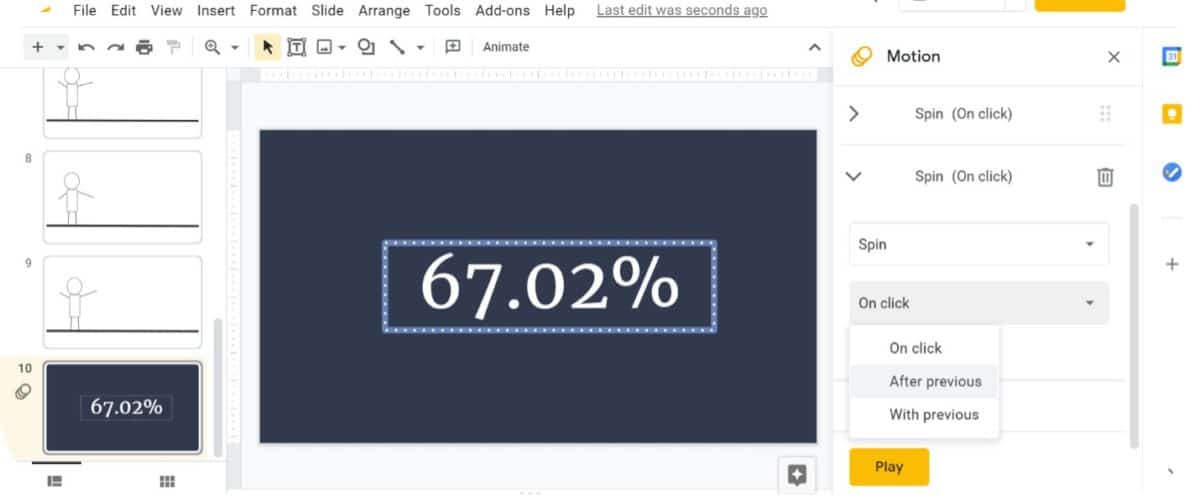
For the time of appearance of the object, click “After previous” available as the second option on the list. This ensures the object appears after the first animation process.
Step-6: Repeat step 5
Depending on how long you want the loop animation to be, keep repeating the 5 th step. After a certain number of repetitions, the list of animations should show.
It is vital to ensure all the animations maintain the same speed for the object . Click “Medium” to get a moderate spin on the object.
Step-7: Click Play
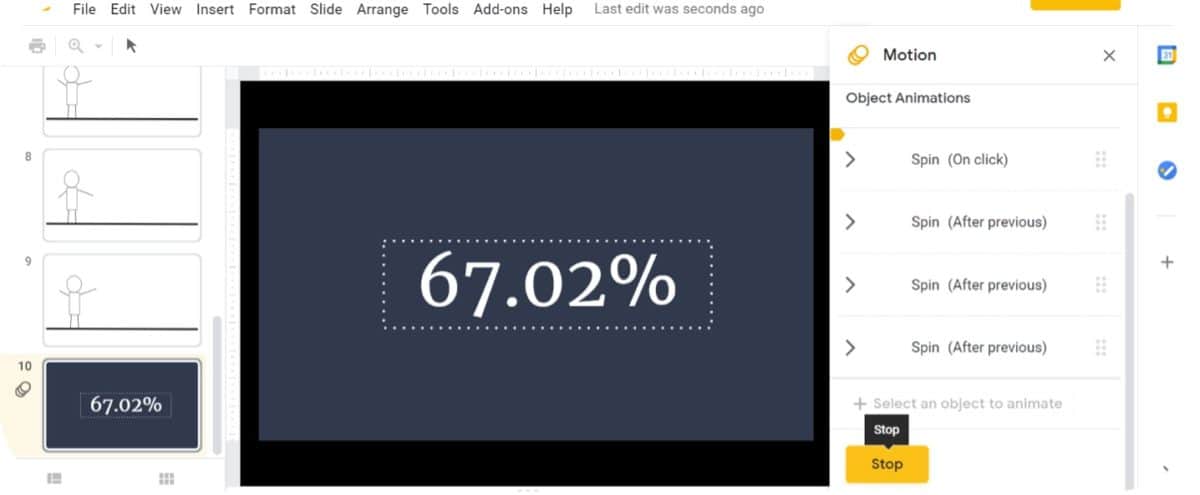
Click the “Play” button available on the bottom of the sidebar to see how the object spins in a loop animation. Click “Stop” when you want the preview to end!
8. Can you Animate in Google Slides using Mobile App?
Google Slides has a very robust mobile application for both Android and iOS devices. It does have several functionalities built-in that can enable you to design a presentation on the fly!
Unfortunately, you can not add animation using the mobile app in Google Slides. Although the option to add an animation doesn’t exist on the mobile app in Google Slides, you can still view a presentation that already contains animations.
You can also present a Google Slides presentation that contains animations, using just your phone.
9. Do PowerPoint Animations Work in Google Slides?
If you have created a presentation using Microsoft PowerPoint that contain animations, and if you need to share it using Google Slides, you may be wondering whether PowerPoint animations will work in Google Slides!
In general, most PowerPoint animations are not supported by Google Slides. However, if you use animations in your PowerPoint presentation that are also present in Google Slides (for eg. appear, fly in, etc.), it will work in Google Slides.
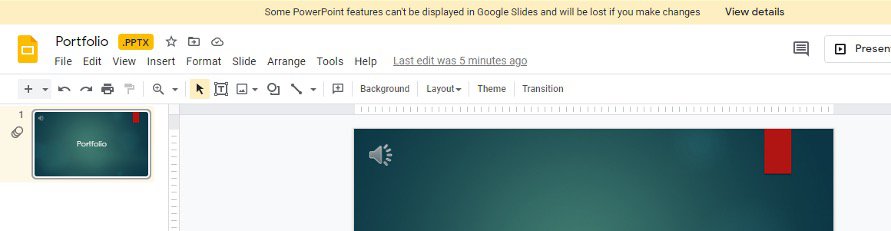
If you try uploading a PowerPoint presentation that contains animations that are not supported by Google Slides, you will see a warning in the top part of the Google Slides window (as shown in the image above).
The error message will inform you that “Some PowerPoint features can’t be displayed in Google Slides and will be lost if you make changes”
More Related Topics
- How to Fix Almost Anything on Google Slides! [A Comprehensive Troubleshooting Guide]
- Do Presentation Clickers Work with Google Slides? [Interesting Read!]
- How to Curve Text in Google Slides? Always Use THIS Trick!
- How to Use the Eyedropper Tool in Google Slides? [Even When This Tool Doesn’t Exist!]
- 17 Pros and Cons of Google Slides! [Should You Even Use it?]
- How to Give a Presentation on Zoom? [Step-by-Step Guide!]
Credit to Wayhomestudio for the Featured Image of this article
- Editor's Choice: Tech Gifts for Mom
- New! iPad Air 6 Details
How to Use Google Slide Animations and Transitions
Spice up your presentation with timed and untimed moving parts
:max_bytes(150000):strip_icc():format(webp)/ColettaTeske-af57404a91b342578a97252b7dbd720f.jpg "google presentation animation")
- Central Washington University
In This Article
Jump to a Section
- Understanding Animations and Transitions
- Step-by-Step: Create Transitions
- Step-by-Step: Animate Text and Images
- Animate a Bulleted List
- Apply the Same Animation to Multiple Elements on a Slide
- Delete Animations and Transitions
- Preview Transitions and Animations
Transitions and animations in Google Slides add movement to a presentation. Transitions are applied to slides and animations are applied to elements on a slide. Learn how to do animations in Google Slides and apply Google Slides transitions to create interesting presentations .
This tutorial uses the Science project template from Google Sheets , which contains several text and image elements that would look even cooler with transition and animation effects. To create this presentation and follow along with the tutorial, go to Google Drive and select New > Google Sheets > From a template . Scroll to the bottom of the list and select Science project .
Understanding Google Slides Animations and Transitions
Transitions occur when you move from one slide to the next during a presentation. Google Slides contains transitions that dissolve, fade, slide, flip, turn on a cube, and bounce in a gallery.
Animations highlight text and images on a slide. Animations help with eye flow by directing where your audience should look during the presentation. Google Slides contains animations that appear, disappear, fade, fly, zoom, and spin.
You can even take your presentation design a step further by collaborating with others or adding audio to your Google Slides presentation , since Google Slides is a web-based, fully-powered presentation creation app.
Play around with different transitions and animations and choose those that match the tone of your presentation.
Less is better when using transitions and animations in Google Slides. You want your audience to be drawn in by your cool graphical moves, but you don’t want them distracted by a constantly moving presentation. Limit the use of transitions and animations to keep the audience focused on you and the topic of your presentation.
Here are a few more guidelines:
- Don’t overdo it : Think about your audience, the purpose of your presentation, and the image you want to project. Then, choose your transitions and animations wisely.
- Avoid twirling and bouncing slides : Choose subtle animations and transitions that fade and dissolve. Complex movements can be distracting.
- Automate animations as much as possible : Set up animations so they automatically start with or after a previous animation. If you’re focused on initiating the next animation, you’re not focused on your audience.
- Use animations to keep your audience focused : Create animations to help your audience focus on the content of your presentation. Use animations to highlight important points, ideas, and concepts.
How to Create Google Slides Transitions
In a Google Slides presentation using the default slide transition, slides just appear and disappear as you move through your slideshow. Give your presentation some visual interest by changing the transition.
You have the option to use the same transition on all slides or to use a different transition on each slide. In most cases, a single slide transition in a presentation works best.
Go to Slide and select Transition .
Select the Transition type down arrow and choose a transition. For example, choose Slide from right to scroll the slideshow across the screen.
Select and drag the Duration slider to change the length of the transition. For example, drag the slider from Fast to Medium .
Select Play to see what the transition looks like in the slideshow.
Select Stop when the transition is over.
If you don’t like the animation, choose a different Transition type and Play it.
When you’ve found a transition you like, select Apply to all slides to use it in your entire presentation.
How to Animate Text and Images
Animations in Google Slides are easy and straightforward. For simple animations, add a single effect to text or an image. If you want to add more emphasis to a slide element, add multiple animations to it.
To add multiple animations to a slide element:
Go to the slide where you want to add an animation and select the text or image element. For example, choose a section heading text box to add a text animation that introduces the topic.
In the Animations pane, select Add animation .
If the Animations pane is not displayed, go to Insert and select Animation .
In the Animation type list, choose an animation. For example, select Fade in to make the text fade into the slide.
In the Start Condition list, choose when the animation will start. For example, select After previous to make the text fade in after the slide has stopped.
Select and drag the Duration slider to change the speed.
To add a second animation to the element, select Add animation .
Select an Animation type. For example, select Spin to make the text rotate after it fades in.
Select a Start Condition. For example, select After previous so the text automatically spins after it appears on the slide.
Select Play to see how the animation works.
Animations play in the order they appear in the Animations pane. To change the order in which animations play, drag an animation to a different location in the list.
Select Stop when the animation is finished playing.
How to Animate a Bulleted List
When you want the items in your bulleted list to appear on the slide one at a time, animate the list.
Select the bulleted list.
In the Animation pane, select Add animation .
Select an Animation type. For example, select Fly in from right to match this animation with the Slide from right transition.
Select a Start condition. For example, select On click to display each bullet point when you click on the screen.
Select By Paragraph .
Drag the Duration slider to choose a speed for the animation.
Select Play to see the animation in action.
To start the animation, select the slide. Then, select again to see the first bullet point. Keep clicking until you get to the end of the list.
Select Stop when you’re done.
How Apply the Same Animation to Multiple Elements on a Slide
Another cool effect is to make two or more objects appear on the slide at the same time using the same animation.
To apply the same animation to multiple elements:
Select two or more elements. For example, choose two images that will appear on the slide at the same time.
Select an Animation type. For example, select Fade in so the images go from transparent to opaque.
Select a Start condition. For example, select After previous so the animation starts after the slide transition has finished.
Select and drag the Duration slider to change the animation speed.
How to Delete Google Slides Animations and Transitions
Sometimes transitions and animations need to disappear. When you no longer want to use a transition or animation in your presentation, delete it.
Go to the slide containing the transition.
In the Animations pane, select the transition.
Select the Transition type down arrow and select No transition .
If the transition appears on all slides, select Apply to all slides to remove the animation from the entire presentation.
To delete an animation, go to the slide containing the animation.
In the Animations pane, select the animation you want to delete.
Select Delete .
Preview Google Slides Transitions and Animations
After you’ve applied transitions to your slides and created animations for important elements of your presentation, preview the entire presentation before you deliver it in front of a live audience. Select Present to open your presentation in a browser window, then use the controls to see the transition from slide to slide and to watch the animations move across your screen.
Get the Latest Tech News Delivered Every Day
- How to Use Copilot in Powerpoint
- How to Add Animation to PowerPoint
- What Is an Animation in Presentation Software?
- The 8 Best Slideshow Apps of 2024
- How to Apply Custom Animation in PowerPoint
- The 8 Best Google Drive Add-ons for 2024
- How to Use Google Duet in Slides
- How to Create a Microsoft Sway Presentation
- Dim Text in PowerPoint Presentations
- How to Change a Black-and-White Picture to Color in PowerPoint
- Make the Most of PowerPoint's Slide Transition Options
- The Definition of a Slide (or Slides) in a PowerPoint Presentation
- The 10 Most Common PowerPoint Terms
- Add Rolling Credits to a PowerPoint Presentation
- Change Order of Animations for PowerPoint Slides
- Animate Specific Parts of a PowerPoint Chart
How to Add Animation in Google Slides
Want to add animation to your presentation in Google Slides to make it more appealing? Here's how to do it.
You can add animations to your presentation in Google Slides and the elements in it to make your presentation more interesting. When used properly and in moderation, animations can break the deadly seriousness of the presentation, and make it easier for the eyes to take in all the text and data.
Google Slides' animation and transition repertoire isn't as extended as PowerPoint's, but it's still more than enough to help you add some subtle animations to your presentation. Read on to find out how you can add animations in Google Slides.
How to Add Animations in Google Slides
Adding animations in Google Slides basically consists of selecting the object you want to animate (text, picture, etc.) and then selecting the animation type. Another factor that plays a role, is the order of animations, which instructs Google Slides on which animations it should play first.
Much like PowerPoint, there are three types of animation in Google Slides: Entrance , Emphasis , and Exit . You can add single or multiple animations to an object in your slide. Though, naturally, it's best if you don't add more than one of each type. Having two entrance animations on a single object can make your presentation look silly.
- Select the object that you want to animate.
- Go to the Insert menu.
- Select Animation . The Motion pane will appear on the right.
- In the Motion pane, under Object Animations , click Add animation .
- Click on Fade in and change the animation type to your liking.
- Click on Play to preview the animation.
Now your object is animated. You can go on and add more animations to the same object, or to a different object. To do so, you need to select the object and repeat the process above.
When you have multiple animations in a single slide, they're going to appear in the order indicated in the Motion pane. To change the order, grab one animation and drop it to where you want. The animation on top will play first, and the rest will play out in order, one after another.
Aside from animating the objects in your slides, you can also add animated GIFs correctly to add some motion to your Google Slides presentation.
Animation Options in Google Slides
Other than the animation type itself, there are three additional settings that you can tweak within Google Slides. First, you can change the Start condition of the animation.
By default, the start condition of all animations is click. Meaning that once you click the presentation, the next animation will play. You can change this by changing the start condition.
- Go to the Insert menu and then select Animation . This will bring up the Motion pane.
- Collapse the animation that you want to modify.
- Change the Start condition. This is set to On click by default.
Changing the start condition to After previous will play the animation right after the previous one is finished. Changing it to With previous will play the animation at the same time as the previous one. In this form, the animation's start time depends on the previous animation's start time.
You can create a cascade of automatic animations by setting all start conditions to After previous, or you can have all the animations play at the same time by setting them all to With previous. In these scenarios, you will need to click only once for the first animation to play, and the rest will unfold automatically.
The second animation setting in Google Slides is a checkbox labeled By paragraph . This setting is eligible for text objects. Once you check it, Google Slides will animate the paragraphs one after another and show them sequentially, rather than treating the whole text as a single object.
- Go to the Motion pane.
- Select your animation.
- Check By paragraph .
The final setting is the Duration. This is a number between 0 and 5 seconds, which indicates how long the animation should last. The larger the number, the slower the animation will be.
- Set the slider to your desired amount.
Animating the slides themselves, for instance, how they enter and how they leave, is called slide transition. You can read our article about slide transitions in Google Slides to learn more.
Present Your Data With Animations
Presentations can sometimes get too serious, or god-forbid, even boring. A good way to make the data flow smoother, and to give the eyes a break, is adding animations.
You can add as many animations as you want to the objects in your Google Slides' presentation, and Google Slides does a great job at helping you keep track of all the animations. Just remember that adding too many animations can backfire and make your presentation lose its subtlety.
5 ways to make the most of Google Slides animation features
- Written by: Cecilia Croasdell
- Categories: Google Slides
- Comments: 47

How can you bring your Google Slides presentation to life and engross your audience further? The answer is simple: animation! When used well, animation is a great tool, helping to capture your audience’s attention and consequently strengthening your message. Though Google Slides animation features aren’t incredibly wide ranging, we’re going to show you how to make the most of what’s there to work with.
Animation can build up processes step by step, keeping the audience connected throughout. It can compare before and afters and also show movement. That’s why animation – when used to communicate meaning – is so important. You wouldn’t want to pose a question and reveal the answer at the same time. It is crucial to time these elements to the presenter’s talk track, allowing the audience to interact with information in a more meaningful way.
With Google Slides animation can be applied to text, shapes, objects, and slides. Sometimes a simple transition or fade in can make a world of difference – allowing you to pace the flow of information or communicate processes and changes more effectively. It is also important to remember to not overpower your message with too many animations, make sure they are consistent and keep it to a minimum. Remember less is more.
If you’re looking for ways to enhance your Google Slides presentation and have been following our blog posts, you will know that compelling visuals are the most effective way to inform and persuade your audience. If you are new to our philosophy, here is a great place to start. To access Google Slides, click here .
We’re going to explain how to add animation to Google Slides and show you five ways to make the most of its animation features. Now, let’s get to it!
Google Slides Transitions
Transitions are animations added in between slides to help move smoothly between different pieces of content. Just like in PowerPoint, Google Slides allows you to add animations when you transition from one slide to another. Unlike in PowerPoint, these transitions are stored alongside the animations.
How to add a transition: Open a presentation in Google Slides. Click the slide you want to add a transition to. Then click Insert > Animation . Select a transition from the scroll down. If you want to apply the transition to every slide, just click on the Apply to all slides button.
If you change your mind and decide you want to remove the transition, here is how you do it: Go to Insert on the menu, then scroll down to Animation . The animation pane will open on the right of the slide. Click T ransition and then N o transition .
With this in mind, let’s look at two ways you can use transitions in Google Slides.
1. Dissolve
As seen on the slide below, a Dissolve transition in between slides gives your presentation better flow and to allow your audience a second to breathe and take the information in, before moving on to the next topic.
2. Slide from the left
You can also transition from slide to slide using a Slide from the left transition. In the example below we present important stats – by using the transition we can move along as if using the motion path animation found in PowerPoint . It’s a simple and effective way of showing progression.
Google Slides Animations
Right, now that we’ve covered transitions, let’s talk about the more traditional animations in Google Slides. These apply to individual shapes, text, or objects on the slide.
How to add an animation: Open a presentation in Google Slides. Click the text or image you want to animate. Then click Insert > Animation . Click on Select an object to animate , scroll down and choose the animation you want to use. Then on the scroll underneath select whether you want your object to animate On click , After previous or With previous.
There’s three animation features that we really like to use, and we’ll show you how to use them.
3. Fly in from Left to Right
This Google Slides animation allows you to bring in objects or text boxes one by one, automatically or with clicks. By setting objects to animate on clicks, you can to reveal each object as you discuss it, maintaining your audience’s focus on the topic. Without animations to pace the flow, your audience will likely read all of the content in one go, ignoring what you’re saying as the presenter and reaching the conclusion ahead of time.
Fade in is a very popular Google Slides animation as it can serve many different purposes. By bringing objects in with a fade, you can direct the audience’s attention to the item being discussed and you avoid overwhelming them with too many visuals all at once. It is very effective with bullet points, process items, or any shapes you want to present in a particular order.
In the example below we show the background photo of the Christ the Redeemer. It is both a beautiful and a relevant landscape that will engage the audience, in this case the travel industry. Having it take up the entire slide is an effective way to draw the audience in. After setting the scene we can then fade in the text content for the presenter to discuss.
5. Fly in from bottom
This Google Slides animation is very useful if your presentation includes technical information, as it allows you to break up the data with eye catching motions, particularly in graphs. In our example below, we used it to add some movement to our chart, bringing one value at a time, helping the audience study the numbers one at a time. We’ve also used a white rectangle to mask the fly in below the X axis. For a tutorial of how to do that, check out our guide to animating with masks : it focuses on PowerPoint but the principle of masking and animation on a graph are identical in Google Slides.
So those are our five ways to use animation in Google Slides: two awesome transitions, and three useful animations! As you can see, it’s not difficult to use the Google Slides animation features to make your presentation more compelling and engaging. Be sure to consider the purpose and timing of your animations: use them to pace the flow of information and keep your audience following your narrative. Now that you know how to add animation to Google Slides and have seen some creative animation ideas, go and get started! If you are new to Google Slides and want to learn more about how to use the tool from scratch, here is our ultimate guide .

Cecilia Croasdell
Managing consultant, related articles, best google slides accessibility tools.
- Google Slides
We've rounded up some key Google Slides accessibility tools and features to help more people access your content more fully.

Adding and editing GIFs in Google Slides
- Comments: 4
Is your Google Slides deck looking a little drab and dull? GIFs could be the answer, adding movement and life to your presentations in the place of complex animations. Learn how to add GIFs to Google Slides and more!

How to insert video and audio into Google Slides
- Comments: 39
Although Google Slides is an incredibly simple and intuitive tool for building presentations, its animation limitations mean that slides can lack oomph. An easy way to bring movement and dynamism to your slides is by adding audio or video. In this blog post, we’re going to show you how to…

Appreciated! It’s one of the finest and concise articles on the animations in Google Slides. I would appreciate it if you could share the Google Slide-deck to my Gmail address.
Hi Gelli. Yes, we are happy to share this deck with you. If you could please email me on [email protected] I will share it with you. Many thanks!
how do i animations on google sides ?
I agree these are very good and very helpful! #OMGLlovethese
#OMG!Llovethese
nice work , keep up the good work. excellent
Thank you, Qdot! I am so glad you are finding our posts useful.
They are kinda useful.
4. how did you make the white area?
Hello. If you mean the white gradient box, on the 4th slide, this is how you can do it: 1. Create a box shape 2. Click the paint bucket tool and go to Gradient 3. Within Gradient click Custom 4. Make the left hand slider white and the right hand slider transparent
Many thanks!
Wow – thats cool! Thank you very much!
there is no dissolve
Hi Noah. We are referring to the dissolve transition, not animation. Many thanks!
thanks a lot
are there any add-ons for Google slides that allows you to use some of the animation effects that are in powerpoint?
Hi Marc I’m afraid not, the only animations effects you can use within Google slides are the ones that are in the original program. It’s a real shame that even some of the more simple effects featured in PowerPoint aren’t able to be performed in slides. Wipe in being a good example of this.
There is one fairly long winded work around. If you have a newer PowerPoint version e.g. Microsoft 365 there’s now the ability to export out your slides as a GIF. This means you could animate your slides in PowerPoint the way you’d like them to work in Google slides, export to GIF format and then pull the GIF into the Slides deck (the same way you can drag in an image)
Hope this helps!
Thank you! Do you know how to put a curtain up on a slide that I can drag down as I reveal the steps to a math problem? I want to have it already finished and then just pull it down so students can check if each step is correct, one step at a time.
Hi Kasie, You can just add a white box over the section you wish to hide and then you can add a fly out animation to reveal. In order to do that, just follow the same steps as #5 on the blog post, but instead of ‘fly in from bottom”, select ‘fly out from bottom’. I hope this is helpful!
Thank you very much! Very useful for me!
How can you make bullets come in in the reverse order? For instance I have a list of 5 things, and want to start at number 5 and build up to number 1. Thanks!
Hi Gregory. In order for the bullet points to come in in reverse order you would have to have each point in a separate box and animate them one by one. I hope this was helpful.
Thank you for this!
My question: I have a .png of a bird (it’s cut out and has a transparent background). When I have the bird enter from the left of the screen and fly out to the right, the bird is almost see-through as it begins its “flight” across the screen. By the time it’s leaving on the right side, it’s solid colors. I have no fade set. Can you advise?
Hi Charley, I am afraid that if that’s how the animation is set then there’s no tool to alter it on Slides. Sorry we couldn’t be more helpful.
I would like to make an object exit “fly out” diagonally from left to right.
It is a common animation on Ppt but this possible in Google slides?
Hi Vera. Unfortunately on Google Slides you can only Fly out vertically or horizontally. Google Slides animations are a bit more limited than PPT. Sorry we couldn’t be more helpful.
This is rather late, but you can achieve this effect I believe. If you do “fly out right” and pair it with “fly out up (or down)” the image will appear to fly out diagonally. You must be sure to choose the option “With Previous” for this to work!
When you are trying to do the animations, how do you make 1 object do 2 or more. My friend, Jade, made that happen and I am trying to make an arrow do 2 things at the same time. I am trying to do SPIN & FADE IN, and it won’t work.
Hi Ashlyn, just select the object, go to Insert>Animations and then add the animations to it. You can add as many as you need. I hope this is helpful. Many thanks.
I tried that many times
Hi Ashlyn. To apply two animations to the same object at the same time, you have to ensure that the lower of the two animations is set to ‘with previous’ instead of ‘on click’. Also make sure the timings of the animations are the same. To adjust the timings simply adjust the slider underneath. Hope this s helpful!
Thank you so much! Very helpful!
Thanks Cecilia Croasdell, words are too small for the value you add through your content, This is the best guide I have seen so far on the internet. 5 ways to make the most of Google Slides animation features was easy to understand with comprehensive and easy explanation. Really hard work, thanks for it.
I am so happy you found this helpful! Thank you! 🙂
Thank you for sharing these tips! VERY helpful for me and my students! Much appreciated! 🙂
Thanks for the info
Hey do you know how to make an animation like on tv? in google slides me and my friends are bored.
Hello. I’m afraid animations are limited on Slides and won’t allow for that level of movement. You’d need an animation specific software. Sorry I couldn’t be more helpful.
its a amazing information Thank you! Do you know how to put a curtain up on a slide that I can drag down as I reveal the steps to a math problem? I want to have it already finished and then just pull it down so students can check if each step is correct, one step at a time
Hello. If you cover each step with a rectangle you can have each fly out on a click, revealing each step. Just follow the same steps as we did with “Fly in from bottom” in the article above. Hope this is helpful!
if you could emil this slide to me pl and thank you
Hi Naod. Happy to – please email me at [email protected] and I can share it with you!
very informative guide
Hi, I love the animation! Can you provide me the link to how to make the slides?
Leave a Reply Cancel reply
Save my name and email in this browser for the next time I comment.
Join the BrightCarbon mailing list for monthly invites and resources
All of the content I've seen so far has been valuable and definitely worthwhile. The resources are awesome, and you're really crushing it with useful content. Theresa Schuck Thorp Olympic Steel

We explain and teach technology, solve tech problems and help you make gadget buying decisions.
Top 11 Google Slides Animation Tips and Tricks to Use It Like a Pro

Mehvish Mushtaq is a computer engineer by degree. Her love for Android and gadgets led her to develop the first Android app for Kashmir. Known as Dial Kashmir, she won the prestigious Nari Shakti award from the President of India. She has been writing about technology for 6+ years and her favorite categories include how-to guides, explainers, tips and tricks for Android, iOS/iPadOS, social media, and web apps.
Presentations offer you a space to get creative. The more creative you are, the better your presentations will be. One way to enhance your presentations is with the help of animations and transitions. Interestingly, you can add animations in Google Slides too. We have covered the basics of animations in a separate post. In this post, we shall tell you 11 tips and tricks to use Google Slides animations in the best possible way.

Animations help in attracting and retaining the user’s attention. It’s helpful, especially when you have lots of information regarding text, images, and other objects on your slide. You can hide them using animations. So users will only see the information that you are currently talking about. The information that will be presented ahead remains hidden. That doesn’t make your audience lose interest in your presentation.
Let’s check various tips and tricks for Google Slides animations.
Note: You can add animations only on the web version of Google Slides. You cannot add animations from Android, iPhone, or iPad.
1. Add Transition Effect to Slide
For starters, you can apply transition effects to your slides. The transitions will come into effect whenever you move from one slide to the next during a presentation. Google Slides supports transition effects such as dissolve, slide, fade, flip, bounce, etc.
To add a transition effect, right-click on the slide from the left sidebar. Select Transition from the list.

You will see Motion sidebar will appear on the right side. Under the Slide transition section, choose a transition effect for the current slide. You can adjust the speed of transition using the slider that shows up.

Note: You can only add one transition effect per slide.
2. Add Same Transition Effect to All Slides
Using the above tip, you can add transitions to other slides. You can use different transition effects for each slide. However, if you want your presentation to be constant, you can apply the same transition to every slide.

Tip : Find out how to fit an image in shape on Google Slides .
3. Add Animation to Objects
You can animate images, text, shapes, and other objects in Google Slides. To add animation on any object, right-click on it and select Animate. Alternatively, select the object, click on Insert > Animation.

The Motion sidebar will open on the right side. By default, animations are added with Fade in effect. However, you can change it. Expand the animation section under Object animations. Choose the animation effect and how the animation should start (on click, after previous, with previous) from the available drop-down boxes. You can adjust the speed of the animation from the slider too.

Tip: Check out 15 tips to edit images in Google Slides .
4. Add Multiple Animations
Interestingly, you can add multiple animations to the same object. For instance, you can add an animation once, animate another object, and then animate the first object again. That way, you don’t need to add the same object again. The result depends on your creativity and what you want to achieve.
To add more animations to the same object, select the object. Click on Add animation from the Motion panel that appears when you right-click on the object and select Animation.

5. Rearrange Animations
When you have added multiple animations to the slide, you can reorder them. Animations are arranged in the Motion panel in the order that they will play. To change their order, drag and move them using the 8-dot icon available next to the animation name.

6. Check Animations Added to an Object
When multiple animations are added to a slide, that can confuse you to figure out which ones are added to a particular object.
To view and identify the object’s animations, click on the View option present in the top bar and select Motions or Animations. That will open the Motion panel.

Now there are two ways to check the animations. Firstly, with the Motion panel open, click on the object. Google will highlight the animations for that object.

Alternatively, you will see the object icon before the animations. That will also help in identifying the animation.

7. Preview Animations
To be sure whether the animations are right, you can preview them without playing your entire Google Slide. For that, click on the Play button under the Object animations section in the Motion panel.

8. Animate Lists or Bullet Points
If you want to show list items one-by-one, you can use animations for the same. For that, select the text box containing your list items. Right-click on the text box and select Animate.

Check the box next to By paragraph under the animation for the text box. In case you want all the list items to appear at once, uncheck the By paragraph box.

You can use the same feature to animate multiple paragraphs. One paragraph will appear at a time followed by the next.
Tip: Find out how to hyperlink text, images, or objects in Google Slides .
9. Use Different Animations for List Items
Another creative way to animate lists is to add a different animation effect to your list items. For that, you will have to add each list item as a new text box. Then add animation to each point individually.
10. Animate Multiple Items
If you want multiple items to have the same animation, you should group them. For that, drag your mouse over the items that you want to group. A blue selection box will appear around the selected images. With all the objects selected, right-click on any of them and select Animate. You will notice all the selected objects will appear in the right panel.

11. Delete Animations or Transitions
To remove the transition effect from any slide, open the Motion panel. For that, click View > Motions. Then select None under the Slide transition section.

To remove the animation from an object, select the object. The animations for that object will be highlighted in the Motion panel. Expand the added animation and click on the Delete icon.

Bring Presentations to Life
You can use animations in multiple ways . For instance, you can make animated timelines, create graphs where each bar will show up one after the other, animated bullet lists, and much more. However, we would suggest don’t go overboard with animations. Sometimes, less is more.
Next up: From the next link, check out more tips and tricks related to Google Slides. Those would enhance the overall experience of Google Slides.
Was this helpful?
Last updated on 02 February, 2022
The above article may contain affiliate links which help support Guiding Tech. However, it does not affect our editorial integrity. The content remains unbiased and authentic.

The article above may contain affiliate links which help support Guiding Tech. The content remains unbiased and authentic and will never affect our editorial integrity.
DID YOU KNOW

More in Internet and Social

How to Fix YouTube Feeds Not Loading Issue

How to Create and Use Communities in WhatsApp
Join the newsletter.
Get Guiding Tech articles delivered to your inbox.

- Get started with computers
- Learn Microsoft Office
- Apply for a job
- Improve my work skills
- Design nice-looking docs
- Getting Started
- Smartphones & Tablets
- Typing Tutorial
- Online Learning
- Basic Internet Skills
- Online Safety
- Social Media
- Zoom Basics
- Google Docs
- Google Sheets
- Career Planning
- Resume Writing
- Cover Letters
- Job Search and Networking
- Business Communication
- Entrepreneurship 101
- Careers without College
- Job Hunt for Today
- 3D Printing
- Freelancing 101
- Personal Finance
- Sharing Economy
- Decision-Making
- Graphic Design
- Photography
- Image Editing
- Learning WordPress
- Language Learning
- Critical Thinking
- For Educators
- Translations
- Staff Picks
- English expand_more expand_less
Google Slides - Adding Transitions and Animations
Google slides -, adding transitions and animations, google slides adding transitions and animations.

Google Slides: Adding Transitions and Animations
Lesson 12: adding transitions and animations.
/en/googleslides/adding-pictures-and-shapes/content/
Adding transitions and animations
Presentations don't have to be a series of static slides. You can add animations to objects on slides or transitions to entire slides. A transition can be as simple as fading to the next slide, or it can be a more flashy effect. Any object can be animated , making it move or fade in or out of the slide. Google Slides makes it easy to apply these effects to some or all of your slides, adding emphasis or polish to your presentation.
Watch the video below to learn how to add transitions.
Google Slides has one pane to manage all of your transitions and animations. The Motion pane will allow you to configure the transition and all animations for the current slide.

Transitions and animations are best used in moderation. Adding too many of these effects can make your presentation look a little silly and can even be distracting to your audience. Consider using mostly subtle transitions and animations—or not using them at all.
To add a transition:

To add an animation:

If the Motion pane is already open and you want to add more animations, you can select an object and click Add animation. You can also add multiple animations to one object.

Watch the video below to learn more about using animations.
Animation options
By default, an effect starts playing when you click the mouse during a slide show. If you have multiple effects, you will need to click multiple times to start each effect individually. However, by changing the start option for each effect, you can have effects that automatically play after the previous effect or with the previous effect.

If the object is a placeholder or text box, the By paragraph check box will be displayed. It determines if the animation is applied to the entire box or if it animates each paragraph of text in the box one at a time.

You can also adjust the speed of the animation by dragging the animation speed slider.

- Open our example file . Make sure you're signed in to Google, then click File > Make a copy .
- With the first slide selected, add a flip transition , set the speed to medium , and select Apply to all slides .
- Select slide 6 .
- Delete the animation that says Fade in (on click) .
- Select the Nice Work text box and add a spin animation .
- Set the animation to happen after previous at medium speed.
- Select the Next week, Space: The Final Exam text box.
- Add the animation Fly in from left and set it to happen after previous .
/en/googleslides/presenting-your-slide-show/content/
How-To Geek
How to convert google slides to a video or gif.
Share your Google Slides with ease with these quick tips.
Quick Links
Convert using powerpoint, capture with your screen recording tool, use a google slides add-on.
While it's easy to share Google Slides using a link or publishing it to the web , you may want a single non-editable file that you can share privately. By converting the slideshow to a video or GIF, your visitors can watch it as you intended. Here are three methods to try.
Microsoft PowerPoint offers both video and GIF exporting . So, if you have PowerPoint, you can open the Google Slides presentation in it and create the video or GIF from there.
Related: How to Convert Google Slides to PowerPoint
Open your Google Slides presentation and go to File > Download. Select "Microsoft PowerPoint (.pptx)" in the pop-out menu.
Head to your downloads folder and click or double-click the file to open it in PowerPoint.
Go to File > Export. Then, choose "Create a Video" or "Create an Animated GIF."
If you pick a video, you can then use the drop-down boxes to choose the quality and whether you want to include recorded timings and narrations. You can also set the duration per slide. Click "Create Video."
If you pick a GIF, you can choose the quality, make the background transparent, set the duration per slide, and include only specific slides if you like. Click "Create GIF."
For both video and GIF, you'll then be prompted to choose a location, optionally change the name, and click "Export" when you finish. Then, grab your video or GIF and share it where you please.
If you have a screen recording tool, such as Game Bar on Windows , the Screenshot Utility on Mac , or a third-party application, you can capture your slideshow as it plays. Then, save the video file to share or turn it into a GIF using an online tool.
Related: How to Screen Record on Your Mac
Get your screen recording tool ready and select the Slideshow drop-down box at the top of Google Slides and pick "Start From beginning."
To ensure you don't see your mouse cursor in the recording when advancing through the slides, you can set it to automatically play.
When the presentation appears in full-screen mode, click the three dots on the right of the floating toolbar, move to Auto-Play, and choose the time per slide.
Then, start capturing with your screen recording tool and stop when the slideshow finishes. You can then edit or share your video.
Additionally, you can use a file converter to obtain a different video file format or turn the video into a GIF. You can use a few free online tools including Cloud Convert , Convertio , or Zamzar .
One other way to convert Google Slides to a video or GIF is with an add-on. There are a few Google Slides add-ons that you can try if you search the Google Workspace Marketplace.
One that works well and allows you to create a video or a GIF for up to five slides for free is Slides to Video .
Related: Everything You Need to Know About Google Chrome's Profile Switcher
Slides to Video works using Google Chrome with the same Google account as Google Slides. If you use a different browser, there are other add-ons such as Video and GIF From Slides and Creator Studio that each offer a free trial.
Once you install the add-on, open your presentation and go to Add-Ons in the menu. Move your cursor to Slides to Video and pick "Create Video" in the pop-out menu.
When the sidebar opens, you can choose a duration per slide or a default for all slides at the top. Then, use the Choose Your Export Type drop-down box to pick "MP4" or "GIF." Click "Create Video."
You'll see the progress as your video or GIF is created. When complete, you'll receive an email to your Gmail account and will also see a link in the sidebar to download the file.
Until Google Slides provides the export option to create a video or GIF, these workarounds can help you get the job done.
For more, learn how to add a YouTube video or how to add other types of videos and customize the playback in Google Slides.
Create an Animation in Google Slides
Students create a presentation in Google Slides and animate an image.
Example outcome

- Teaching Materials
Time to complete
access_time 45—90 minutes
Digital tools
- Data visualization
- Internet search
- Presentation formatting
- Researching a topic
- Slide design
- Google Docs-Editoren
- Datenschutzbestimmungen
- Nutzungsbedingungen
- Feedback geben
- Tools und Animationen
Animationen auf einer Folie hinzufügen
In Google Präsentationen können Sie Texte mit Animationen versehen sowie Bilder, Folien und andere Elemente einfügen. Außerdem können Sie mit nur einem Klick Listen animieren, während Sie eine Präsentation halten.
Texte oder Bilder animieren
- Öffnen Sie auf dem Computer eine Präsentation in Google Präsentationen .
- Klicken Sie auf den Text oder das Bild, das animiert werden soll.
Folienübergänge hinzufügen
- Klicken Sie links auf die Folie, für die Sie einen Übergang erstellen möchten.
Animationen und Folienübergänge ändern
Wenn Sie neue Animationen hinzufügen, werden diese automatisch auf "Überblenden" gesetzt. Sie können die Folienübergänge und Animationen im rechten Bereich ändern.
- Klicken Sie auf die Animation, die Sie ändern möchten.
- Verschieben Sie den Schieberegler, um die Geschwindigkeit der Animation zu verändern.
- Setzen Sie ein Häkchen in das Kästchen neben "Absatzweise", um in Listen eine Zeile nach der anderen zu animieren.
Hinweis : In manchen Browsern funktionieren bei der Wiedergabe einer Präsentation nicht alle Animationen.
Sie nutzen Google-Produkte wie Google Docs bei der Arbeit oder in einer Bildungseinrichtung? Wir helfen Ihnen mit praktischen Tipps, Lernprogrammen und Vorlagen. Sie werden erfahren, wie Sie auch ohne Office mit Office-Dateien arbeiten, dynamische Projektpläne und Teamkalender erstellen, Ihren Posteingang automatisch organisieren und vieles mehr.
Avez-vous des suggestions ?
Nous voulons avoir de vos nouvelles ! Envoyez-nous un message et aidez-nous à améliorer Slidesgo
Recherches populaires
Tendances de recherche

1250 modèles

6083 modèles

340 modèles

683 modèles

157 modèles
Interactifs et animés | Modèles de présentation
Vous avez besoin de quelque chose pour rendre votre présentation totalement unique vous pouvez toujours la rendre interactive ou animée c'est le but de tous ces modèles gifs, animations, fonctions interactives... rendez vos présentations plus amusantes grâce à ces ressources mobiles sympas. vous pouvez toujours utiliser les présentations en gardant à l'esprit vos idées originales, mais avec une touche intéressante qui fera certainement la différence. téléchargez ces modèles et faites ressortir votre présentation grâce à ces ressources animées , collections connexes.

449 modèles

166 modèles

Filtrer par
Classer par

Modèle Premium
Déverrouillez ce modèle et obtenez un accès illimité
Division de nombres entiers
Téléchargez la présentation « Division de nombres entiers » pour PowerPoint ou Google Slides et enseignez en toute confiance. Parfois, les enseignants ont besoin d’un peu d’aide, et il n’y a rien de mal à cela. Nous sommes heureux de vous donner un coup de main ! Puisque Slidesgo s’engage...

Newsletter sur l'athlétisme
Téléchargez la présentation « Newsletter sur l'athlétisme » pour PowerPoint ou Google Slides. Attention à tous les spécialistes du marketing ! Vous cherchez un moyen de rendre vos newsletters plus créatives et plus accrocheuses pour votre public cible ? Ce modèle étonnant est parfait pour créer la newsletter idéale qui...

Fractions : Addition et soustraction de nombres mixtes
Téléchargez la présentation « Fractions : Addition et soustraction de nombres mixtes » pour PowerPoint ou Google Slides et enseignez en toute confiance. Parfois, les enseignants ont besoin d’un peu d’aide, et il n’y a rien de mal à cela. Nous sommes heureux de vous donner un coup de main...
"Marketing Canvas" interactif et numérique
Prêt à changer votre façon de voir le marketing ? Voici un "marketing canvas" numérique et interactif, créé entièrement pour PowerPoint, où chaque diapositive est un lieu où créer de la magie, de la magie marketing. La palette est pleine de couleurs énergiques, et tout est totalement personnalisable. Exécutez l'un...

Plan d'affaires pour le support du service client
Téléchargez la présentation Plan d'affaires pour le support du service client pour PowerPoint ou Google Slides. Transmettre votre plan d'affaires de manière précise et efficace est la pierre angulaire de toute entreprise réussie. Ce modèle vous permet de mettre l’accent sur les éléments essentiels de votre activité, tandis que votre...
Plan de travail élégant
L'élaboration d'un plan d'affaires réussi peut s'avérer difficile, mais avec les bons outils à votre disposition, cela devient beaucoup plus simple. Ce modèle est un document complet qui vous permet de présenter vos objectifs commerciaux, vos stratégies et vos projections financières d'une manière professionnelle et esthétique. La suite complète de...

Percée dans le traitement de Lyme
Téléchargez la présentation Percée dans le traitement de Lyme pour PowerPoint ou Google Slides. Le traitement des maladies implique de nombreuses recherches préalables et des essais cliniques. Mais chaque fois qu’une nouvelle découverte, une découverte révolutionnaire, ouvre la voie à de nouveaux traitements, vaccins ou moyens de prévenir les maladies,...

Multiplier des nombres entiers
Téléchargez la présentation « Multiplier des nombres entiers » pour PowerPoint ou Google Slides et enseignez en toute confiance. Parfois, les enseignants ont besoin d’un peu d’aide, et il n’y a rien de mal à cela. Nous sommes heureux de vous donner un coup de main ! Puisque Slidesgo s’engage...

Opérations et pensée algébrique : opérations de puissances avec le même exposant
Téléchargez la présentation Opérations et pensée algébrique : opérations de puissances avec le même exposant pour PowerPoint ou Google Slides et enseignez en toute confiance. Parfois, les enseignants ont besoin d’un peu d’aide, et il n’y a rien de mal à cela. Nous sommes heureux de vous donner un coup...
Stratégie de médias sociaux interactive et animée
Téléchargez la présentation Stratégie de médias sociaux interactive et animée pour PowerPoint ou Google Slides. Comment utilisez-vous les plateformes de réseaux sociaux pour atteindre vos objectifs commerciaux ? Si vous avez besoin d’un outil complet et professionnel pour planifier et suivre votre stratégie de réseaux sociaux, ce modèle entièrement personnalisable...
Interface corporative interactive pour les entreprises
Donnez à votre entreprise une visibilité sur le marché et démarquez-vous de vos concurrents grâce à cette présentation d'entreprise qui vous permet de présenter votre société, ses principaux services et clients, et de montrer ses projections futures. Découvrez des ressources telles que des icônes, des images, des diagrammes et des...

Thème créatif et audacieux pour le marketing
Téléchargez la présentation « Thème créatif et audacieux pour le marketing » pour PowerPoint ou Google Slides et faites passer vos projets marketing à la vitesse supérieure. Ce modèle est l’allié parfait pour vos stratégies publicitaires, vos campagnes de lancement ou vos présentations de rapports. Personnalisez votre contenu en toute...

Conseil en gestion de la qualité
La gestion de la qualité est essentielle pour toute organisation qui veut réussir. Avec ce modèle pour consultants, vous pouvez présenter une présentation engageante et puissante à vos clients. Il dispose de tout ce dont vous avez besoin, des diagrammes et tableaux aux graphiques. La conception moderne avec une touche...
Intro animée pour les plateformes de médias sociaux
Décrivez-vous la manière dont votre entreprise va publier du contenu sur les médias sociaux ? Êtes-vous en train de définir ce qui sera publié, quand et comment pour le prochain trimestre ? Vous pouvez le faire avec ce nouveau modèle, qui a été créé pour PowerPoint uniquement. Quelle est sa...

Cours de littérature avec des corbeaux animés
Préparez un cours de littérature originale avec ce modèle pour les enseignants du secondaire. Il est basé sur l'ouvrage The Raven, de l'écrivain et poète américain Edgar Allan Poe. Il est interactif et comporte des éléments animés. Vous pouvez inclure des exercices pour tester les connaissances de vos élèves après...

Comparaison de fractions (produits croisés)
Téléchargez la présentation « Comparaison de fractions (produits croisés) » pour PowerPoint ou Google Slides et enseignez en toute confiance. Parfois, les enseignants ont besoin d’un peu d’aide, et il n’y a rien de mal à cela. Nous sommes heureux de vous donner un coup de main ! Puisque Slidesgo...

Proposition de projet de musée d’art contemporain
Téléchargez la présentation « Proposition de projet de musée d’art contemporain » pour PowerPoint ou Google Slides. Une proposition bien conçue peut être le facteur clé de la réussite de votre projet. C’est l’occasion de présenter vos idées, vos objectifs et vos plans de manière claire et concise, et de...
Consultation avec la Morphose
Vous aidez les entreprises à maximiser leurs performances, vous les aidez à identifier les domaines d'amélioration potentiels, vous les aidez à optimiser leurs coûts. Ah, que feraient beaucoup d'entreprises sans consultants... Et que feraient les consultants sans Slidesgo ? C'est aujourd'hui que nous publions ce modèle créé exclusivement pour PowerPoint....
Page suivante
- Page 1 de 23
Des présentations excellentes, plus rapidement
Slidesgo pour Google Slides :
Impressionnez facilement !

Inscrivez-vous gratuitement et commencez à modifier en ligne
IMAGES
VIDEO
COMMENTS
Change animations and transitions. When you add new animations, they are automatically set to "fade in." You can change transitions and animations in the panel on the right. On your computer, open a presentation in Google Slides. Click View Animations. Click the animation you want to change. To change the speed of the animation, drag the slider.
Step-2: Press Right Click and Select Animate. Right click on the mouse and select the "Animate" tab to add animation to the bulleted list. Step-3: Select the Type of Animation. Depending on the type of animation you want, click on "Fade in" tab to select on the animation style.
In this video, you'll learn more about adding animations in Google Slides. Visit https://www.gcflearnfree.org/googleslides/adding-transitions-and-animations/...
To animate an image, object, or shape, select it. Click to View > Motion in the menu to open the Motion sidebar on the right. At the bottom of the sidebar, below Object Animations, click "Add Animation." Use the first drop-down box you see to choose the effect for the animation. You can pick from options like fade in or fade out, fly in or fly ...
Start with the Google Slides presentation open to the slide where you want to remove or change the transition. Click the Transition button to the right of the toolbar. The Animations panel opens: You can also use the Animations panel to change or remove a transition. Use the drop-down menu to select a new transition.
Learn how to enhance your presentations and lessons with animations and transitions in Google Slides. Watch the full tutorial and get tips from the playlist.
Go to the slide containing the transition. In the Animations pane, select the transition. Select the Transition type down arrow and select No transition . If the transition appears on all slides, select Apply to all slides to remove the animation from the entire presentation.
Adding Transitions between Slides. Go to the panel on the left, the Filmstrip view, and choose the slide that you want to animate. Click Slide → Change transition. Adding a transition in Google Slides. The Transitions panel will appear on the right. Choose the transition that you want. You can adjust the speed of the transition with the slider.
Select Animation. The Motion pane will appear on the right. In the Motion pane, under Object Animations, click Add animation . Click on Fade in and change the animation type to your liking. Click on Play to preview the animation. Now your object is animated. You can go on and add more animations to the same object, or to a different object.
Open the Change Transitions pane from the menu bar or press the keyboard shortcut Ctrl+Alt+Shift+B (Windows/Chrome OS) or Cmd+Option+Shift+B (macOS) to add an animation to an object. Related: All the Best Google Slides Keyboard Shortcuts. Click on an object you want to animate and then click "Add Animation." Choose the type of animation, start ...
Animate an object in Google SlidesLearn More → https://goo.gle/3qSdPDR Try Google Slides for yourself → https://goo.gle/3xZ4E8AWhat is Google Workspace? → ht...
How to add an animation: Open a presentation in Google Slides. Click the text or image you want to animate. Then click Insert > Animation. Click on Select an object to animate, scroll down and choose the animation you want to use. Then on the scroll underneath select whether you want your object to animate On click, After previous or With previous.
Select the text box on your Google Slides. Go to the "Insert" tab and click the "Animation" option. Select the "Add animation" option and click your desired animation for your text box. Then, repeat Steps 1 to 3 to add many animations in one slide. Note: Remember that you can only use a limited number of animations in your presentation.
3. Add Animation to Objects. You can animate images, text, shapes, and other objects in Google Slides. To add animation on any object, right-click on it and select Animate. Alternatively, select ...
Challenge! Open our example file.Make sure you're signed in to Google, then click File > Make a copy.; With the first slide selected, add a flip transition, set the speed to medium, and select Apply to all slides.; Select slide 6.; Delete the animation that says Fade in (on click).; Select the Nice Work text box and add a spin animation.; Set the animation to happen after previous at medium speed.
Download the "Animation Studio Business Plan" presentation for PowerPoint or Google Slides. Conveying your business plan accurately and effectively is the cornerstone of any successful venture. This template allows you to pinpoint essential elements of your operation while your audience will appreciate the clear and concise presentation ...
Open your Google Slides presentation and go to File > Download. Select "Microsoft PowerPoint (.pptx)" in the pop-out menu. Head to your downloads folder and click or double-click the file to open it in PowerPoint. Go to File > Export. Then, choose "Create a Video" or "Create an Animated GIF." If you pick a video, you can then use the drop-down ...
Watch: Create an Animation in Google Slides - a video lesson from Applied Digital Skills that is free of charge. Students create a presentation in Google Slides and animate an image. Skip to content
Download the "Creative and Bold Theme for Marketing" presentation for PowerPoint or Google Slides and take your marketing projects to the next level. This template is the perfect ally for your advertising strategies, launch campaigns or report presentations. Customize your content with ease, highlight your ideas and captivate your audience...
How do I animate my presentation? Select the element you want to animate. Open the Animations tab and click Add Animation. Scroll down to Motion Paths, and choose a motion effect. To animate a group of elements, text, or other graphics, hit Ctrl and select the elements you want. Choose Format > Group > Group to group the elements together.
Wenn Sie neue Animationen hinzufügen, werden diese automatisch auf "Überblenden" gesetzt. Sie können die Folienübergänge und Animationen im rechten Bereich ändern. Öffnen Sie auf dem Computer eine Präsentation in Google Präsentationen. Klicken Sie auf Ansicht Animationen. Klicken Sie auf die Animation, die Sie ändern möchten.
Create without limits with a subscription to https://elements.envato.com/?utm_campaign=elements_social_eyt_szD42v_KHPU&utm_medium=social&utm_source=YouTube&u...
PowerPoint Tutorials Apprendre à travailler avec Microsoft PowerPoint Google Slides Tutorials Découvrez les secrets de Google Slides Presentation Tips Les meilleurs conseils pour faire une excellente présentation Blog Articles et autres ressources Slidesgo Academy Travaillez plus vite, ... 16:9 Animated PPT / Aimer . Télécharger