- PRO Courses Guides New Tech Help Pro Expert Videos About wikiHow Pro Upgrade Sign In
- EDIT Edit this Article
- EXPLORE Tech Help Pro About Us Random Article Quizzes Request a New Article Community Dashboard This Or That Game Popular Categories Arts and Entertainment Artwork Books Movies Computers and Electronics Computers Phone Skills Technology Hacks Health Men's Health Mental Health Women's Health Relationships Dating Love Relationship Issues Hobbies and Crafts Crafts Drawing Games Education & Communication Communication Skills Personal Development Studying Personal Care and Style Fashion Hair Care Personal Hygiene Youth Personal Care School Stuff Dating All Categories Arts and Entertainment Finance and Business Home and Garden Relationship Quizzes Cars & Other Vehicles Food and Entertaining Personal Care and Style Sports and Fitness Computers and Electronics Health Pets and Animals Travel Education & Communication Hobbies and Crafts Philosophy and Religion Work World Family Life Holidays and Traditions Relationships Youth
- Browse Articles
- Learn Something New
- Quizzes Hot
- This Or That Game
- Train Your Brain
- Explore More
- Support wikiHow
- About wikiHow
- Log in / Sign up
- Computers and Electronics
- Microsoft Office
- Microsoft Word

How to Add WordArt to a Microsoft Word Document
Last Updated: June 5, 2023
This article was co-authored by Christopher Batchelor, a trusted member of wikiHow's volunteer community. Christopher Batchelor is a wikiHow community member and technology enthusiast. He has experience using a range of different platforms and software, and likes to keep up with updates and new features. This article has been viewed 125,133 times. Learn more...
Most people who use Microsoft Word for designing creative printouts know about the WordArt feature and it's many features. If you don't know about it yet, follow the directions in this article to help you achieve these same techniques to make your printouts look spectacular.

- Type the previous text.
- You can either continue on that line (rarely used), or press enter to start a new line.

- Learn how to copy the piece of WordArt to an alternate location, if you'd like. Use the Copy and Paste technique to copy and paste the item from one area to another, through the use of Windows clipboard (which is where all copy and pasted items are temporarily stored).
Community Q&A
- You can also rotate your WordArt, by following the steps in the " Rotate Images in Microsoft Word " article below. Thanks Helpful 4 Not Helpful 3
- You can also select the text in the original page. You then can select the style, and it will pre-fill the words for you into the boxes. Thanks Helpful 2 Not Helpful 1
- The steps in this article are based on the 2003 version of Microsoft Word. Thanks Helpful 3 Not Helpful 4

Things You'll Need
- Microsoft Word program
- computer mouse and keyboard
You Might Also Like

About This Article
- Send fan mail to authors
Reader Success Stories
Frank Lucas
Dec 19, 2016
Is this article up to date?

Featured Articles

Trending Articles

Watch Articles

- Terms of Use
- Privacy Policy
- Do Not Sell or Share My Info
- Not Selling Info
Keep up with tech in just 5 minutes a week!
Mastering Word Art in Microsoft Word: A 13-Point Detailed Guide
In this article, we’ll walk you through every aspect of Word Art in Microsoft Word, answering all the questions you might have along the way. With Word Art, you can transform your text into eye-catching, artistic designs that add flair to your documents. Whether you’re creating invitations, posters, or simply want to make your documents more visually appealing, Word Art is your ticket to creative freedom.

Section 1: Getting Started with Word Art in Microsoft Word
1. what is word art.
Word Art is a feature in Microsoft Word that allows you to transform ordinary text into visually striking designs. It enables you to apply various formatting and artistic effects to text, making it an essential tool for creating captivating documents.
2. How to Insert Word Art?
- Open your Microsoft Word document.
- Click on the “Insert” tab in the ribbon.
- Select “Word Art” from the drop-down menu.
- Choose a Word Art style or create your custom text.
Section 2: Customizing Word Art
3. how to change the text in word art in microsoft word.
- Double-click on the Word Art object to select the text.
- Type or paste your desired text.
4. Can I Change the Font and Size of Word Art?
- Yes, you can! Select the Word Art object.
- Navigate to the “Format” tab in the ribbon.
- Use the “Font” and “Font Size” options to make changes.
5. How to Apply Text Effects to Word Art?
- Highlight your Word Art.
- Click on the “Format” tab.
- Explore the “Text Effects” menu for various effects like shadows, reflections, and more.
Section 3: Advanced Word Art Techniques
6. how to customize word art fill and outline colors.
- Select your Word Art.
- Go to the “Format” tab.
- Use the “Fill” and “Outline” options to choose colors.
7. Can I Rotate or Flip Word Art?
- Yes, you can! Select the Word Art.
- Use the rotation handle to rotate, or right-click for more options.
8. How to Group or Ungroup Word Art Elements?
Select multiple Word Art objects.Right-click and choose “Group” or “Ungroup.”
Section 4: Word Art Tips and Tricks
9. how to layer word art over images or other text.
- Position your Word Art where you want.
- Right-click and select “Bring to Front” or “Send to Back.”
10. How to Create Word Art in Different Shapes?
- Create your Word Art.
- Right-click and choose “Edit Text.”
- Select “Transform” to experiment with shapes.
11. Can I Animate Word Art in a Presentation?
Yes, in PowerPoint! Copy your Word Art and paste it into PowerPoint for animation option.
Section 5: Saving and Exporting Word Art
12. how to save word art as an image.
- Right-click and choose “Save as Picture.”
13. Can I Use Word Art in Other Microsoft Office Apps?
Absolutely! Copy and paste your Word Art into other Office applications like PowerPoint or Excel.
Word Art in Microsoft Word is a versatile tool that can breathe life into your documents. By following this step-by-step guide, you can unleash your creativity and effectively harness the power of Word Art to make your documents more engaging and visually appealing. So, go ahead and give it a try – your documents will never be the same again!
Related Posts

How to Find Word Count in Microsoft Word

How to Add Watermark in Word: A Step-by-Step Guide

Mastering Charts in Power BI: Supercharge Your Data Insight Skill!

How to Delete Pages from Word: A Step-by-Step Guide
Leave a comment cancel reply.
Your email address will not be published. Required fields are marked *
Save my name, email, and website in this browser for the next time I comment.
How to Insert Word Art in Word 2016: A Step-by-Step Guide
Word Art is a fun tool in Word 2016 that allows you to add stylized text to your document. Whether you’re making a poster, a flyer, or just want to emphasize a point, Word Art can help you make your text stand out. In less than 100 words, here’s how to do it: Go to the ‘Insert’ tab, click on ‘Word Art,’ select the style you like, and type your text. It’s that simple!
Step by Step Tutorial: Inserting Word Art in Word 2016
Before you start jazzing up your document with Word Art, it’s important to know that these steps will guide you through the process of adding, customizing, and positioning your Word Art in your document.
Step 1: Open the ‘Insert’ Tab
Click on the ‘Insert’ tab at the top of your Word document.
The ‘Insert’ tab is where you’ll find all sorts of tools to add different elements to your document, not just Word Art. Once you click on it, a ribbon with various options will appear.
Step 2: Click on ‘Word Art’
Find and click on the ‘Word Art’ button in the ‘Text’ group.
You’ll see a range of different pre-designed Word Art styles. Hover over them to see a preview of what they’ll look like in your document.
Step 3: Select Your Word Art Style
Choose a Word Art style that catches your eye and click on it.
After clicking on a style, a text box will automatically appear in your document. This is where you’ll type the text you want to turn into Word Art.
Step 4: Type Your Text
Click inside the text box that appears and type your desired text.
Remember, you can always change the text later if you need to, so don’t worry too much about getting it perfect on the first go.
Step 5: Customize Your Word Art
Format your Word Art using the ‘Format’ tab that appears when the text box is selected.
You can change the fill color, outline color, add effects like shadows or reflections, and much more. Play around with the settings to get the look you want.
After you’ve completed these steps, your document will have a lovely piece of Word Art that should make your text pop!
After adding Word Art to your document, you’ll be able to move it around, resize it, and further customize it until it fits perfectly with the rest of your content. Word Art can be a dynamic addition to any project!
Tips for Inserting Word Art in Word 2016
- Experiment with different styles and effects to find the right look for your document.
- Use the alignment tools to place your Word Art precisely where you want it.
- If you’re working with a multi-page document, make sure to add Word Art to the correct page.
- Remember that you can also edit the text in your Word Art after you’ve created it.
- Word Art can be resized just like any other image, so don’t be afraid to adjust it to fit your needs.
Frequently Asked Questions
Can i edit the text in my word art after i’ve created it.
Yes, you can edit the text by simply clicking on the Word Art and then clicking inside the text box.
How do I resize my Word Art?
Click on the Word Art to select it, and then drag one of the corner handles to resize it.
Can I add effects to my Word Art?
Absolutely! With the ‘Format’ tab active, you can add all sorts of effects like shadows, glows, and 3D effects.
Is Word Art available in all versions of Word?
Word Art is available in most versions of Word, but the interface and options may vary slightly.
Can I convert existing text into Word Art?
Yes, you can convert existing text by highlighting it and then following the same steps to insert Word Art.
- Open the ‘Insert’ tab.
- Click on ‘Word Art.’
- Select your Word Art style.
- Type your text.
- Customize your Word Art.
Word Art in Word 2016 is a versatile and fun way to add some flair to your documents. Whether you’re working on a professional report or a personal project, Word Art can help emphasize key points and add a creative touch. Remember to experiment with different styles and effects to get the perfect look you’re aiming for. With a little practice, you’ll be a Word Art wiz in no time! If you ever get stuck, refer back to this article or explore further resources to keep improving your skills. Now go ahead, give it a try, and see how Word Art can transform your document!

Matthew Burleigh has been writing tech tutorials since 2008. His writing has appeared on dozens of different websites and been read over 50 million times.
After receiving his Bachelor’s and Master’s degrees in Computer Science he spent several years working in IT management for small businesses. However, he now works full time writing content online and creating websites.
His main writing topics include iPhones, Microsoft Office, Google Apps, Android, and Photoshop, but he has also written about many other tech topics as well.
Read his full bio here.
Share this:
Join our free newsletter.
Featured guides and deals
You may opt out at any time. Read our Privacy Policy
Related posts:
- How to Insert Text Box in Google Docs
- How to Use Word Art in Google Docs
- How to Remove Section Breaks in Word Documents
- How to Insert Word Art in Powerpoint: A Step-by-Step Guide
- How to Insert a Square Root Symbol in Word
- How to Use Microsoft Word Clip Art in Office 365: A Step-by-Step Guide
- How to Make All Columns the Same Width in Excel 2013
- How to Do a Hanging Indent on Google Docs
- How to Return to Normal View in Word 2010
- How to Center Text in Word [2023 Guide]
- How to Select All in Word for Office 365
- How Do I Send Confetti on My iPhone 13?
- How to Edit Text in Office Word 2016: A Step-by-Step Guide
- How to Insert a Check Mark in Word 2013
- How Do I Do a Grammar Check on Word Documents?
- How to Subscript in Google Docs (An Easy 4 Step Guide)
- How to Save as doc Instead of docx in Word 2010 By Default
- How to Merge Cells in Word 2016 Tables
- How to Curve Text in Word 2019: A Step-by-Step Guide
- How to Draw a Text Box in Word: A Step-by-Step Guide
- All-Access Subscriptions
- Business Licensing
- Lightroom Classic
- Photoshop Elements
- Crystal Reports
- Interview Skills
- Resume Skills
- Excel for Lawyers
- Outlook for Lawyers
- QuickBooks for Lawyers
- Word for Lawyers
- Microsoft Office Suite
- Outlook on the Web
- Microsoft Project
- Microsoft Teams
- QuickBooks Online
- QuickBooks Pro
- Video Course Options
- SUBSCRIPTIONS
- Photoshop Elements 2024
- Photoshop Elements 2023
- Photoshop Elements 2022
- Photoshop Elements 2021
- Photoshop Elements 2020
- Photoshop Elements 2019
- Photoshop Elements 2018
- Photoshop Elements 15
- Google Classroom for Teachers
- Google Docs
- Google Drive
- Google Forms
- Google Sheets
- Google Slides
- Mac OS Keyboard Shortcuts
- Excel Formulas and Functions
- Excel Keyboard Shortcuts
- Excel Tables PivotTables and Charts
- Access for Microsoft 365
- Excel for Microsoft 365
- Microsoft Office 365
- Outlook for Microsoft 365
- PowerPoint for Microsoft 365
- Publisher for Microsoft 365
- Word for Microsoft 365
- Access 2021
- Microsoft Office 2021
- Outlook 2021
- PowerPoint 2021
- Publisher 2021
- Access 2019
- Microsoft Office 2019
- Outlook 2019
- PowerPoint 2019
- Publisher 2019
- Access 2016
- Microsoft Office 2016
- OneNote 2016
- Outlook 2016
- PowerPoint 2016
- Publisher 2016
- Microsoft Office 2013
- OneNote 2013
- Outlook 2013
- PowerPoint 2013
- Microsoft Office for iPad
- QuickBooks Pro 2024
- QuickBooks Pro 2023
- QuickBooks Pro 2022
- QuickBooks Pro 2021
- QuickBooks Pro 2020
- QuickBooks Pro 2019
- QuickBooks Pro 2018
- QuickBooks Pro 2017
- QuickBooks Pro 2016
- QuickBooks Pro 2015
- QuickBooks Pro 2014
- Sage 50 Accounting
- Windows 11 and 10 Keyboard Shortcuts
- Chrome OS for Chromebooks
- Word and Excel (Mac) 2022
- Word and Excel (PC/Windows) 2021-2016 and 365
- QuickBooks Desktop (PC/Windows) 2024
- QuickBooks Desktop (PC/Windows) 2023
- QuickBooks Desktop (PC/Windows) 2022-2015
- Windows 11 and 10
- Our History
- Customer Service
- Testimonials
- Lost Password
- Register a Product
- Manage My Account
- Member Login
Try the Word Course for Free!
Insert wordart in word – instructions and video lesson, insert wordart in word: video lesson.
This video lesson, titled “ Inserting WordArt ,” shows you how to insert WordArt in Word. This video is from our complete Word tutorial , titled “ Mastering Word Made Easy v.2019 and 365 .”
Insert WordArt in Word: Overview
This lesson shows you how to insert WordArt in Word. WordArt is text that is created and formatted as a shape. Therefore, when formatting WordArt, you can use the formatting techniques applied to standard text as well as techniques applied to shapes.
To insert WordArt in Word, click into the document at the position at which to insert the WordArt. Next, click the “Insert” tab in the Ribbon. Then click the “WordArt” button in the “Text” button group. Doing this displays a colorful list of WordArt styles from which to choose in a drop-down menu. Click a style you like to select it. Word then automatically inserts the WordArt into your document. Then immediately type the text for the WordArt to display.

Insert WordArt in Word – Instructions: A picture of a user inserting WordArt into a document in Word.
To set the display of the text in the WordArt when finished, click back into the document, outside the bounding box of the WordArt. To edit the text, if desired, click and drag over the text to change and then type new text. You can also select text within the WordArt and then apply the standard text formatting found on the “Home” tab of the Ribbon.
To apply shape formatting, first click the bounding box, or border, of the WordArt. You can then apply shape formatting by either using the tools found on the “Shape Format” contextual tab of the Ribbon or by using the “Format Shape” task pane.
Insert WordArt in Word: Instructions
- To insert WordArt in Word , click into the document at the position at which to insert the WordArt.
- Then click the “Insert” tab in the Ribbon.
- Then click the “WordArt” button within the “Text” button group.
- Click a style in the drop-down menu of WordArt styles that appears to automatically insert it.
- Then immediately type the text for the WordArt to display.
- To set the display of the text in the WordArt when finished , click back into the document, outside the bounding box of the WordArt.
- To edit the WordArt text , click and drag over the text to change.
- Then type new text.
- To apply standard text formatting to WordArt , select text within the WordArt.
- Then apply the text formatting found on the “Home” tab of the Ribbon.
- To apply shape formatting to WordArt , click the WordArt’s bounding box or border.
- Then apply shape formatting by either using the tools found on the “Shape Format” contextual tab of the Ribbon or by using the “Format Shape” task pane.

About Joseph Brownell


Try Process AI free
How to use wordart in microsoft word.
Word Art in Microsoft Word is a creative way to enhance your documents. It adds stylized text with effects like shadows, gradients, and 3D effects. With its user-friendly interface , you can customize the font, size, color, and layout. You can create titles, banners, and logos. Plus, you can add shapes and images too. It integrates with SmartArt and chart tools.
Word Art first appeared in Office 97 . It quickly became popular. Microsoft keeps improving it based on feedback and trends. It is an essential part of Microsoft Word’s design.
How to Access Word Art in Microsoft Word
Word Art is a great way to liven up your documents! With just a few clicks, you can access Word Art and add some flair. Here’s a guide on how to get started:
- Open Microsoft Word – either click on the program icon or search for it in your applications.
- Insert a Text Box – go to the “Insert” tab, select “Text Box” from the “Text” group, and choose the desired location for your text box.
- Access Word Art – click inside the text box to activate the Format tab. Look for the “WordArt Styles” group and click on it.
- Explore Word Art Styles – scroll through the options in the gallery until you find one that suits your taste. Click on a style to apply it.
You can further customize your Word Art by changing its size, color, fonts, etc. You can also use the Transform option to bend or twist your text into various shapes or directions. So go ahead, unleash your creativity, and make your words come to life with Word Art in Microsoft Word!
Steps to Create Word Art
Bring creativity and flair to your documents with Microsoft Word Art! Follow these steps to get started:
- Open Microsoft Word.
- Insert a Text Box via the “Insert” tab.
- Double-click and enter the desired text.
- Format the text using the “Format” tab.
- Apply Word Art Styles from the “Format” tab for extra enhancement.
Be creative! Combine different fonts, colors, and effects to make your design stand out.
For further alignment and positioning, use the alignment options in the “Format” tab. To edit existing Word Art, double-click on it.
To finish your creation, add images or graphics that fit the theme. Keep fonts consistent and maintain balance between document elements to create professional-looking documents!
Tips for Using Word Art Effectively
Word Art can make your document stand out! Here are some tips to help you use it well:
- Fonts: Pick fonts that fit the tone of your document. Try different styles to find the right one.
- Colors: Select colors that contrast with your background. This will make your Word Art readable and eye-catching.
- Sizing and Positioning: Adjust Word Art to create balance in your document. Don’t let it look cluttered or overpower other elements.
- Special Effects: Add special effects, but sparingly. Too many can take away from the main content.
- Proofread: Double-check spellings and grammar. Errors could hurt the impact and professionalism of your Word Art.
For a creative touch, try experimenting with different formats such as curved or 3D text, shadows, and reflections. Aim for an appealing yet readable effect.
Pro Tip: Use Word Art beyond just headings and titles. You can also highlight important points or create visual cues throughout your document.
Troubleshooting Common Word Art Issues
Throughout history, artists have faced trouble with Word Art . Now, with tech advances, troubleshooting is simpler. Here are 6 common issues and fixes:
- Alignment: Select the text box and use alignment options in Format tab .
- Distorted text: Resize the text box or adjust font size.
- Missing effects: Select Word Art object and check Drawing Tools Format tab .
- Poor resolution: Increase size or use higher-quality background image.
- Color issues: Check if colors are set to transparent or if there are conflicting settings.
- Printing problems: Ensure printer settings optimized for graphics.
These tips only apply to Microsoft Word and can save a lot of time and frustration!
Conclusion and Final Thoughts on Using Word Art in Microsoft Word
In Microsoft Word, Word Art is a fun way to spruce up your documents. To use it, begin by clicking the Insert tab at the top of the screen. In the Text group, click Word Art . A drop-down menu will appear with many styles to choose from.
After you pick one, a textbox will appear on your document. Type in the text you want and customize it . You can pick font sizes, colors, and effects from the Format tab. Also, adjust the position and alignment with the tools provided.
For extra pizzazz, combine Word Art with other formatting options in Microsoft Word . Put shapes or images behind or around your Word Art for an original design. Try different formatting options to get the look you want.

No credit card required
Your projects are processes, Take control of them today.
Locked lesson.
- Lesson resources Resources
- Quick reference Reference
About this lesson
Learn this creative text format often found on flyers, and a clever “rubber stamp” to use on documents.
Lesson versions
Multiple versions of this lesson are available, choose the appropriate version for you:
2013 , 2016 , 2019/365 .
Exercise files
Download the ‘before’ and ‘after’ Word documents from the video tutorial and try the lesson yourself.
Quick reference
Learn this creative text format often found on flyers.
When to use
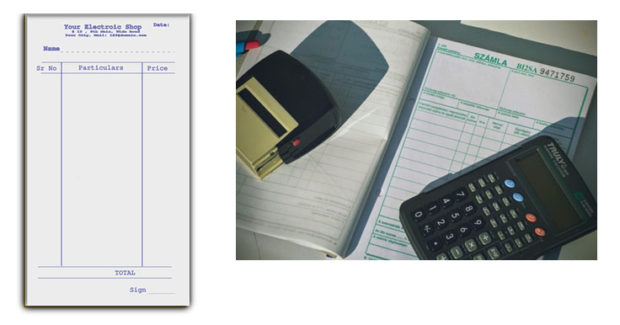
Word Art is a fun and creative way to place a banner across a flyer and many other uses. You can invent “rubber stamps” electronically and stamp an invoice.
Instructions
To begin, select the text: "Notice to All Employees!"
- Cli ck Insert and click the Word Art button :
- Ch oose from the gallery to begin a design.
- The Drawing Tools ribbon opens at the top of your screen.
- Use the tools in the Word Art Styles group to change your design.
- Use the Text Effects , Transform button to apply curves to your design.
- 00:05 All right, Word Art is so fun to work with, but keep in mind,
- 00:08 you can almost have too much of a good thing sometimes.
- 00:11 Okay, rule number one, go ahead and select the text you want to work with.
- 00:15 And this is on the Insert ribbon and it's way over here on the right hand side.
- 00:19 There's a section called Text, and
- 00:21 right up here we have a little letter A kind of tipped on one of its legs, so
- 00:24 I'm going to go ahead and click that, and here's our first gallery.
- 00:27 I'm going to choose this particular design, And right away my drawing tools came
- 00:32 up and it's allowing me to reformat this word art in any way I want.
- 00:36 I can change the outside box, maybe fill it with a color, that's a little too much,
- 00:41 I'm gonna Ctrl + Z and undo that.
- 00:43 Again, make sure you're selected on the word art, so
- 00:47 I can go to quick styles, and I can change the print if I want to change that.
- 00:52 I can change the Color of the internal text maybe to green, and
- 00:57 I can change the outside edge to whatever I want.
- 01:00 And you can also do this, you can put Shadows on here,
- 01:03 here's where you have to go by the rule.
- 01:05 Just because Microsoft does it, doesn't mean you should do it.
- 01:09 Sometimes, like I said, too much would be good thing.
- 01:13 It's interesting 'cause you can even,
- 01:15 let me see if I can select this whole thing again, you can even transform it.
- 01:19 Yeah, I can go back to my drawing tools hit this drop-down go to transform,
- 01:24 I can actually bend it and bend it.
- 01:27 Anyway, I would never do that on a flyer but
- 01:30 it's kind of fun to experiment and see everything that can be done.
- 01:35 How about a professional reason to use it?
- 01:37 I'm going to scroll down to another exercise right down here.
- 01:40 Back in the days of paper invoices,
- 01:42 and paper everything we often had PAID IN FULL stampers on our desks.
- 01:46 You grab it and just stamp Paid In Full, how do you do that electronically?
- 01:50 Well, with WordArt, okay, so what I have is some text right here, paid in full.
- 01:55 And I'm just going to try to make it look just like this.
- 01:58 I actually do this on some of my invoices, so I've got paid in full already selected.
- 02:02 I'm going to go to the Insert ribbon way over here to my little tiny A that's
- 02:06 tipped sideways, and I think I'll choose this font right here.
- 02:10 And that looks pretty good, but I do have my drawing tools.
- 02:13 And so I'm going to come over here I have Shape Outlines and Shape Fills and
- 02:17 Shape Effects, Quick Styles.
- 02:19 If I wanna change any of that, I just want to make this look a little better.
- 02:24 So I think I will go with the rounded one that I had earlier.
- 02:27 And I do want this to be red, so I'm gonna do the red here and a red here.
- 02:33 To see what can happen you just keep going and
- 02:36 going until you decide you like it and it looks the way you want.
- 02:39 You can align the text, Alt Text would be simply putting the names if this
- 02:44 goes on the Internet, you've named it Paid in Full.
- 02:47 So that name would be attached to be while it's online,
- 02:50 the only placed you'd ever see that is online, that's what the Alt Text means.
- 02:54 Let me click back on this, get my Drawing Tools, ribbons back, I can Position it,
- 02:58 I can Wrap Text, bring it forward, bring it backward.
- 03:01 Maybe I've got another Image that I wanna put it in front of or behind.
- 03:06 Check out this, I can even rotate this and flip it vertical or horizontal or
- 03:10 whatever you want, so anyway, have fun with that, keep it professional, and
- 03:14 just remember just because Microsoft does it, doesn't mean you should, okay, thanks.
Lesson notes are only available for subscribers.
Facebook Twitter LinkedIn WhatsApp Email
© 2024 GoSkills Ltd. Skills for career advancement
Technology integration blog for teachers

How to Have Fun with Microsoft WordArt
Discover how to have fun with WordArt. WordArt is a graphic object that transforms text into art by applying design elements such as fills, outlines, shadows, and more! It is a terrific way to make a document eye-catching. The decorative special effects draw attention to the text. Microsoft WordArt tools offer a myriad of combinations of colors and styles that are sure to catch the attention of readers. You can use WordArt generators online, however they cannot produce the unique one-of-a-kind creations that can be made using the WordArt tools on the Microsoft Word Shape Format tab.

About the WordArt Tools
WordArt Styles Gallery: Select from a collection of preset designs.

Text Fill: Fill letters with solid color or gradient. Create a custom gradient by setting the type, angle, and stop points to produce a unique design.

Text Outline : Apply an effect such as shadow, reflection, glow, bevel, 3D rotation, and transform. Each effect has additional options to customize the appearance.
Try This! Have Fun with WordArt
Follow the steps below to fill the frame of a WordArt with an image. This activity is from the TechnoKids technology project, TechnoEditor . It has many fun word processing lessons. For example, you can have your students edit a poem with text effects, complete a comic with shapes, or illustrate a story using stylized grouped images.
- Open a new document in Microsoft Word.
- Click the Insert tab. In the Text group, click WordArt.
- Choose a style from the gallery and add the text sunflowers.

- On the Shape Format tab, find the Shape Styles group.
- Click Shape Fill. Click Picture.

- Pick Stock Images or Online Pictures .

- Search for a sunflower picture. When you find one you like, click Insert.

Create Your Own
Now try your own. Transform text into WordArt and add a picture behind the letters. The possibilities are unlimited!

Tip: If the picture doesn’t fit well, resize the WordArt frame.

More Word Processing Lessons for Students

This activity is an optional challenge from TechnoEditor , a fun and engaging word processing project for junior and middle school students. Using a template, young learners build foundational skills that they will apply to many future school assignments. View this short video to see what your students can achieve using TechnoEditor.
Subject Explorer
School Subjects
Math & Science
Business & Technology
Electives & Health
Board & Administration
Teaching & Learning
Audio/Video Lectures
Books & Documents
Classifieds
Jobs & Resources
Discussions
Language & Literature
Practice Projects for Microsoft Word

Word 9 Table
In this practice project for Word, students create a document with a title and table. The table has two columns that have different font alignment and incluces various fonts. …

Word 8 Formatting Text
In this practice project for Word, students create a document using a different size and color font for the title than the rest of the paragraph. …

Word 7 Bullets
In this practice project for Word, students create a document with two different types of bullets showing points and subpoints. …

Word 6 Letter
In this practice project for Word, students create a letter. Included in the letter is a heading on the right, indented paragraphs, and the closing and signiture near the middle of the document. …

Word 5 Text And Outline
In this practice project for Word, students create a document that contains several paragraphs of text and also includes an outline with key points and subpoints. …

Word 4 Modified Text
In this practice project for Word, students create a document with the heading on the right, a boldfaced, centered title, and indented paragraphs. The document is double-spaced. …
Word 3 Basic Text
In this practice project for Word, students create a document with the heading on the right, a boldfaced title that is centered, and several paragraphs that are indented. …

Word 22 Preset Headings
In this practice project for Word, students create a document using the preset headings to create a title bar. The document has different alignment and font, blanks, and a short outline. …

Word 21 Formatting Options
In this practice project for Word, students create a document that shows some different effects that can be used with the same font. …

Word 20 Numbered List
In this practice project for Word, students create a document that includes a centered title followed by a numbered list. …

Word 2 Heading 2
In this practice project for Word, students create a document that has a centered title, a heading in the upper right corner, and indented paragraphs. …

Word 19 Advanced Table
In this practice project for Word, students create a document with a table showing a school schedule. The blocks in the table are different sizes and will take individual work within the blocks to …

Word 18 Columns
In this practice project for Word, students create a document with a header and two colomns. The columns include boldfaced and italic font and different alignment. …

Word 17 Columns
In this practice project for Word, students create a document with two identical columns in landscape orientation. Included in each are indented lines and different alignment and font. …

Word 16 Lesson Notes Handout
In this practice project for Word, students create a document like a student handout. This includes an outline with several levels, blanks for students to write on, and different font. …

Word 15 Lesson Notes
In this practice project for Word, students create a document with a header and two outlines. Students are asked to use the automatic numbering and outlining features in Word. They must use different …

Word 14 Table
In this practice project for Word, students create a scoresheet using a table. Students must use different sizes, colors and styles of font, including different alignment. …

Word 13 Outline
In this practice project for Word, students create an outline using the automatic outline in Word, including many levels of subpoints. …

Word 12 Formatting
In this practice project for Word, students create a document with a centered title in all capitals, the first letter of each word slightly larger than the rest. Throughout the document the font is …

Word 11 Formatting
In this practice project for Word, students create a document similar to a test or quiz. They must include points and subpoints, blanks, boldfaced text, tabs, and spacing. …
Resource Type:
Pass it on:
Leave a Reply
- Skip to main content
- Skip to secondary menu
- Skip to primary sidebar
- Skip to footer
Erin Wright Writing
Writing-Related Software Tutorials
How to Insert and Modify Images in Microsoft Word
By Erin Wright
This tutorial shows how to insert images in Microsoft Word. We will also look at how to resize images, align images with the text, and add a border.
Quick Links:
- How to Insert an Image
- How to Resize an Image
- How to Align an Image with the Text
- How to Add a Border to an Image
Do you want to insert shapes instead of images? Please see “ How to Insert and Modify Shapes in Microsoft Word (PC & Mac) .”
This tutorial is also available as a YouTube video showing all the steps in real time.
Watch more than 250 other writing-related software tutorials on my YouTube channel .
The images below are from Word for Microsoft 365. These steps also apply to Word 2021, Word 2019, Word 2016, and Word 2013. However, the stock image options will be limited in those older versions of the software.
How to Insert an Image in Microsoft Word
- Place your cursor where you want to insert the image. (This is an approximate placement. You can change the alignment with the text after inserting the images, as shown in the section below.)
- Select the Insert tab in the ribbon.

- Select the Pictures button in the Illustrations group.

- Select the location of the image from the Insert Picture From menu:
- This Device lets you choose an image stored on your computer or network server.
- Stock Images lets you choose stock images, icons, cutout people, stickers, and illustrations. The full stock image library is only available to users signed into Word for Microsoft 365 .
- Online Pictures lets you search for images through Bing, Microsoft’s search engine. This option also provides a link to OneDrive.

For this tutorial, we will insert an image stored on the device.
- (For “This Device” option only) Locate the image in the Insert Picture dialog box.

- Select the Insert button.

Your image should now appear in your Word document.
How to Resize an Image in Microsoft Word
- Select the image. A border with resizing handles will appear when the image is selected.
- Select one of the resizing handles and then drag the image to a new size.
Pro Tip: Choose a corner handle to maintain the image’s current shape.

Optional Steps: How to Rotate an Image in Microsoft Word
- Select the image.
- Select the rotation handle at the top of the border.
- Rotate the image to the left or right.

How to Align an Image with the Text in Microsoft Word
- Select the Layout Options button.

- Select an option from the layout menu:
- In Line with Text
- Top and Bottom
- Behind Text
- In Front of Text
The visual effectiveness of each option will depend on the size of your image and the density of your text. So, you may need to experiment with several options to find the one most suited to your content.

Pro Tip: If you select an option other than In Line with Text, you can select and “grab” the image, and then move it almost anywhere in the document.
How to Add a Border to an Image in Microsoft Word
- Select the Picture Format tab in the ribbon. (This tab only appears when an image is selected.)

From here, you can add a built-in border or edge effect or manually create a border.
How to Add a Built-In Border or Edge Effect to an Image
- Select the bottom menu arrow in the Picture Styles group.
- Select a frame or other edge effect from the Picture Styles menu.

Your new border or edge effect should appear immediately.

How to Add a Manual Border to an Image
- Select Picture Border in the Picture Styles group.

- Select a color from the drop-down menu.

- Reselect Picture Border , select Weight , and then choose a line thickness.

- Reselect Picture Border , select Dashes , and then choose a line style.

Your new manual border should appear immediately.

Documents with a lot of images can negatively affect Word’s performance. If you notice Word reacting slowing, please see “ How to Make Microsoft Word Faster by Hiding Images .”
Related Resources
How to Write Figure Captions for Graphs, Charts, Photos, Drawings, and Maps
How to Insert Figure Captions and Table Titles in Microsoft Word
How to Change the Style of Table Titles and Figure Captions in Microsoft Word
How to Update Table and Figure Numbers in Microsoft Word
How to Save Tables and Figures as Images in Microsoft Word (PC & Mac)
How to Insert Images Inside Text in Microsoft Word (PC & Mac)
How to Insert Full-Page Background Images in Microsoft Word (PC & Mac)
Updated July 02, 2023
- Microsoft Word Tutorials
- Adobe Acrobat Tutorials
- PowerPoint Tutorials
- Writing Tips
- Editing Tips
- Writing-Related Resources

- Get started with computers
- Learn Microsoft Office
- Apply for a job
- Improve my work skills
- Design nice-looking docs
- Getting Started
- Smartphones & Tablets
- Typing Tutorial
- Online Learning
- Basic Internet Skills
- Online Safety
- Social Media
- Zoom Basics
- Google Docs
- Google Sheets
- Career Planning
- Resume Writing
- Cover Letters
- Job Search and Networking
- Business Communication
- Entrepreneurship 101
- Careers without College
- Job Hunt for Today
- 3D Printing
- Freelancing 101
- Personal Finance
- Sharing Economy
- Decision-Making
- Graphic Design
- Photography
- Image Editing
- Learning WordPress
- Language Learning
- Critical Thinking
- For Educators
- Translations
- Staff Picks
- English expand_more expand_less
Word 2016 - SmartArt Graphics
Word 2016 -, smartart graphics, word 2016 smartart graphics.

Word 2016: SmartArt Graphics
Lesson 28: smartart graphics.
/en/word2016/inspecting-and-protecting-documents/content/
Introduction
SmartArt allows you to communicate information with graphics instead of just using text. There are a variety of styles to choose from, which you can use to illustrate many different types of ideas.
Watch the video below to learn more about working with SmartArt.
To insert a SmartArt graphic:
- Place the insertion point in the document where you want the SmartArt graphic to appear.

To add text to a SmartArt graphic:

You can also add text by clicking the desired shape and then typing. This works well if you only need to add text to a few shapes . However, for more complex SmartArt graphics, working in the text pane is often quicker and easier.

To reorder, add, and delete shapes:
It's easy to add new shapes, change their order, and even delete shapes from your SmartArt graphic. You can do all of this in the text pane, and it's a lot like creating an outline with a multilevel list . For more information on multilevel lists, you may want to review our Lists lesson.

Organizing SmartArt from the Design tab
If you'd prefer not to use the text pane to organize your SmartArt, you can use the commands on the Design tab in the Create Graphic group. Just select the shape you want to modify, then choose the desired command.

In our example, we've been organizing a graphic with a hierarchical layout. Not all SmartArt graphics use this type of layout, so remember that these commands may work differently (or not at all) depending on the layout of your graphic.
Customizing SmartArt
After inserting SmartArt, there are several things you might want to change about its appearance. Whenever you select a SmartArt graphic, the Design and Format tabs will appear on the right side of the Ribbon. From there, it's easy to edit the style and layout of a SmartArt graphic.

To change the SmartArt layout:
If you don't like the way your information is organized within a SmartArt graphic, you can always change its layout to better fit your content.

If the new layout is too different from the original, some of your text may not appear. Before deciding on a new layout, check carefully to make sure no important information will be lost.
- Open a blank document .
- Insert a Basic Cycle SmartArt graphic from the Cycle category .
- Insert the following text in clockwise order: Condensation , Evaporation , Infiltration , Precipitation , Collection .
- Delete the shape containing the word Infiltration .
- Select the shape containing Evaporation , and click the Move Down command twice to move the shape between Collection and Condensation .
- Change the SmartArt Layout to Block Cycle .
- Change the colors of the SmartArt to a range of your choice.
- Change the SmartArt Style to Intense Effect .

/en/word2016/applying-and-modifying-styles/content/

22 Basic Microsoft Word practice exercises for beginners

Microsoft Word Exercises for Practice: – This article is very important for a basic computer course, for college and school students learning Microsoft Word online and offline. In this, you will get the best ideas on how to learn and practice Microsoft Word. And you can explore the capabilities of Microsoft Word as a business software in this post.
The best way to learn anything is by doing exercises and creating samples of existing materials from experts. It’s ok that you know about Bold, Italic, Page Layout, Insert Menu, View options, etc. but it’s great if you can use such options in creating anything in Microsoft Word.
I mean tools are the same, but the field, seed, and process are changed. So, Can you do that with the same tools? I know farmers do it daily.
So, let’s explore how to learn Microsoft Word. Microsoft Word Exercises ideas that I think every student around the world should practice.
Microsoft Word practice exercises for beginners:
1. create and design admission/enquiry forms etc..
To create this kind of form, you need to use shapes, text boxes, colors, formatting options, tables, and horizontal lines in MS Word. This is a very good exercise to practice because it will give you an idea of how to use such options practically on various official documents that we use in our daily official life.
These days many people do not create forms and charts usually they download them. That makes the forms boring. And often you see similar kinds of formats in forms. But as a student or teacher or small business owner if you learn to create such forms not only do you expand your thinking and creativity but you can also utilize this ability in business and job.
See a sample in the image below.

2. Create bills/leaflets/brochures. See the sample below.
Everyone has various designs of bills such as your refrigerator shopping bill, computer bill, electricity bills, and various other kinds of bills. So you can practice in Microsoft Word to create that type of bill format. It’s good for practice in which you will learn the Insert menu option, text adjustment between the table, page size, and text boxes.
3. Design E-book cover pages / Magazine front/ books front/back page using the cover page option in Insert Menu.
This practice is an advance. But try to find the books and magazine cover pages. And try to make it similar in MS Word. Imagine if you’re the designer, how you will design the same content or front page. You will learn while practicing this about the Cover Page option in MS Word or you can design without using that option. The benefit of learning this is about understanding the various practical uses of Microsoft Word in our daily lives.
4. Create Business Cards using Shapes, text, and colors.
People use Adobe Photoshop, Corel Draw, and websites to create business cards nowadays automatically and manually. You can also use that. But it’s about mastering MS Word options and skills. When you create and design anything in Microsoft Word. Your basic computer skills become strong. That helps you in the future when you start working on a Computer or MS Office or MS Word. Also, basic computer skills are very important before doing any degree course in IT. So, Design the business cards similarly you see in the below sample picture.

This is an advanced exercise, but if you do it and create cards then the options you’ve learned during your computer courses in MS Word remain forever in your brain.
Related: Importance of MS Word in Education
5. Use smart art and create organizational charts and showcase relations:
Smart Art is one of the favorite options in Microsoft Word. Smart art is used to draw diagrams that are used to showcase the content visually that will be easy to understand and manage. As you see below the smart art image Hierarchy Diagram is used to create an organizational chart or structure of the Telecom company.
This is the best method to understand and teach certain things to students, teachers, parents, and companies. You will see such organizational charts in the company’s office and government head offices.

Radial Cluster:
I have created this radial cluster diagram and organizational chart using Smart Art in Microsoft Word to showcase the difference between Managed WordPress Hosting and Shared Hosting” in one of the latest published posts. You can practice and create a similar chart to showcase the relation or useability differences.
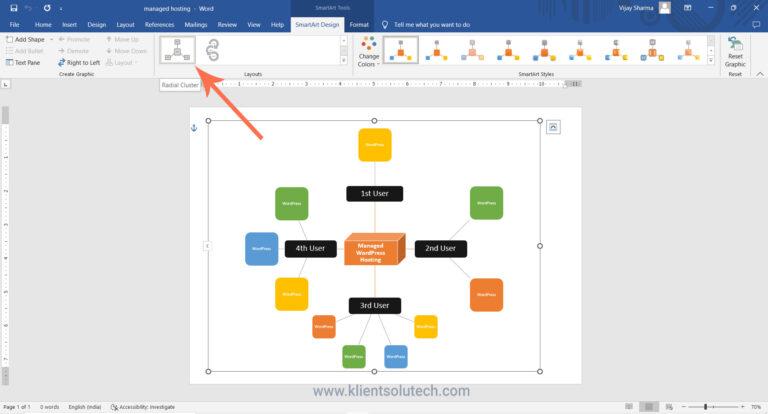
Structural Chart:

I hope that you can see (if not zoom in the browser using (Ctrl+ + ) both WordPress hosting and shared hosting smart images that are created in Microsoft Word.
When you practice MS Word Option to create the above diagram or any other, you get many problems. Those problems were not there while you were learning MS Word. These are the problems such as font size adjustment, lines adjustment, etc. colors, shape adjustment, etc. when you use tools or Word applications to communicate your point of view.
So, when you solve these problems by yourself or with the help of your computer course instructor it will be great for your computer knowledge and MS Office skills. Because when you solve the problem you learn very important working lessons in MS Word. This is why you’re learning.
Related: Steps to create a simple business plan using templates in Word App
6. Make book content page or index page
This is another idea in which you need to create an index or content page of the book. In this process, you will learn about the first-line indent, hanging indent, and the perfect use of the ruler bar in Microsoft Word.
And also about a page number, and a hyperlink (if it is an eBook). You can discuss this article with your computer teachers, to allow us or provide us with similar things to practice on.

7. Try to create a similar Header and footer that you’re seeing in the Book
This is the most important option and thousands of students find it difficult to use the header and footer. It’s easier to learn header and footer one time but if you’re not practicing it in various ways or the things such as books header and footer, it’s tough for you to explain it to others.
That’s why I am suggesting you try using the different styles of header and footer. And you will get such an example from the books.

8. Insert the Image into the shape
This is a little easy. But you must know easier things more than difficult things. Because in interviews especially related to IT, people ask easier questions than difficult ones.
So, practicing even on small things is also beneficial. You don’t know when it will be helpful for you in the future.
So, insert an image into the shape. Take and draw a shape from the Illustration menu, place it on a page a little higher in size, and then double-click on the shape. Go to the shape fill option and click on the picture. As an example, you can see the following image.

Related: – Top 10 powerful uses of Microsoft Word.
9. Practice hyperlinking and creating links between Word document texts to D: /, Play songs from Microsoft Word text, and create links between internal and external files.
This is the most important option in Microsoft Word. Most of the processes on the internet contain links. The hyperlink is the starting point in which you learn how things are connected.
It’s also a great option for Web Designers or web designing teachers to teach “How website links work” by using the hyperlink as an example.
As you can see in the image below, I am displaying the connection between the play song text to the location of the song.
Now you need to select the text in which have written the play song and then insert a hyperlink (Ctrl+K) and in the hyperlink address, put the path of the song. After that press, the Ctrl button and click on the blue link, so now any song that you selected will start playing.

Here is my complete article based on the Hyperlink option: – Hyperlink Example within Microsoft Word Document
10. Design a Happy Birthday Message by using Word Art and print it.
I think it’s the easiest thing for you. You can use the Word Art option for this. You can create the best wishes message in MS Word. After that, you can print. And give it to the person. It’s about creating small things at home. This is also a good way to make kids interested in learning the computer.
Also good for students and kids to create fun things and print or give them as a gift to parents. So, they will enjoy your creativity.

11. Create a chart and show the product price comparison between years:
The chart option is very important in Microsoft Word and Excel. However, the use of the chart option and any other option in MS Word depends on the demand for a certain content type.
For example, you’re writing a book or making notes about something in which you have to write and explain the price comparison between 3-4 years. Then you can use the chart for visualizations to analyze the data.
In visual format or the chart, it’s easier for people to understand, what you mean. Also, it gets more views or focus than the content.

So, try to create the chart you’re seeing in the above image.
12. Get the newspaper and see the text-based advertisement and Design
Design and create text or image-based advertisements that you saw in the newspaper. Designing such an advertisement will be a very beneficial role for Microsoft Word students or people learning Advanced Microsoft Word skills. Advertisement designs contain high-quality images, text, and layouts. And these designs are created by experts. When students practice expert material and create similar or better than that.
I think that movement is great for learners and teachers. So, try to create as many as you like. It will make you master MS Word. And I think doing exercises after completing the class topic is the best way to learn MS Word.

13. Take a double-column book or newspaper and design or create a similar paragraph style in the Word document .
Not all often type or create content in a double column. I know computer teachers can teach you such options. But they will not be able to explain the deepest or professional uses of such options for certain reasons.
So, I will suggest that you use the column option and find the newspaper similarly as you see below and create or type the text as you’re seeing in the newspaper. And if you’re having a problem, ask your teachers. So, when your teachers teach you how to do that thing or this thing, it will be great for your knowledge.
14. Create a letterhead or identity card of any company or institution that you have and insert the Watermark with that company name in the document.

You can create an identity card, visiting card or birthday card in MS Word. As you’re seeing below this is an example of cards and letterheads. But you can find such things. And practice your MS Word knowledge in creating an identity card, and letterhead.
This will give you an idea of how to adjust the text in different shapes and areas. Also, this is a good exercise in which you learn after printing, what size you need to adjust on the page. And when you do that, you learn very precious things in MS Word.
In this video tutorial, you will get basic ideas to create a letterhead. You will get ideas to insert letterhead content in the header and footer, you will also learn how you can use watermarks in letterhead, and how to print and adjust content on the page. The video tutorial is in Hindi, but even if you’re not familiar with the Hindi language, you can still learn and watch it for practice ideas:
Step by Step Guide to create printable letterhead in Microsoft Word and Google Docs
15. Decorate a Word document with a page border, and content border, add patterns, and write beautiful text in it.
This is the easiest page layout option, in which you can learn about page borders in MS Word, text borders, color or shading on the page, and pattern.
These options are very beautiful when you’re creating eBooks, making notes, and doing anything that requires the following type of style. See the image below and try to create something similar to this one.

16. Insert Images and Practice on Format Menu and Image Options.
You can use image options and style to decorate, retouch, and adjustment of colors and brightness in MS Word. As you can see, I have created various styles and image effects. These are easy to create.
But to learn more advanced effects later in other professional software, you need to learn and practice such things during your basic computer course.

17. Insert a template or download the new template in Microsoft Word from the Internet and edit those templates with your content.
There are 100+ templates almost for anything in the Microsoft Word Template option. The top benefit of using the template is that if you don’t know how to create or design a certain thing then you can just download the template and replace the existing text with your text. And it’s done.
This is the most important option that you should learn because it’s tough when you don’t know how to design or create anything, so try to practice on 10+ templates and see what it will look like.

Related: Uses and features of Microsoft Word.
18. Practice Typography
Write 10 lines or 10 sentences and then change the font, style, color, and size of each sentence. make each one different from than previous and next..
Fonts are the face of the text. The following image displays various fonts and styles. Just create similarly. During the practice, you will learn which font will be better for the specific text. Just write 10 lines and differentiate each one.

19. Create a Tenant management form in Hindi or your native language.
We use computers or technology mainly for two reasons the one is Innovation and the second is problem-solving. There are various ways of solving problems using computers. Some problems are solved immediately or some take time. For example, you can create an accounts management software to manage business incoming, outgoings, cash flow, balance, and taxes.
Similarly, there are software and mobile apps to manage tenants. I have created this form for my office space owner. He wanted a simple solution that they could follow and manage easily. They are not that much familiar with apps and other digital methods. I told them about digital options. But they want something that can be taken care of easily and also send tenants’ details for police verification when needed.
So we created the following form and this is also an example of immediate problem-solving using a computer and Microsoft Word. Now after printing one copy of this, they can photocopy it as per the number of tenants they want to manage.

So as beginners, you can try to create a similar form by using the Table feature in Microsoft Word. For the best practice 1st create and decide on columns on rough physical paper and the details that you want. You can create a better form than this and I expect that from you.
And for Hindi or your native language, even if you do not have Hindi font or French or Spanish font on your computer or in Microsoft Word. You can use Google Translate for this, convert the word into Hindi or Spanish, and then copy and paste it into the form table column.
20. Practice to design a brochure for an event
When you try creating this brochure design in Microsoft Word, you’ll learn basic and advanced techniques. This includes using image effects, grouping shapes, adding colorful bullets, and creating textures. These skills are valuable, especially if you plan to work with Word or as a virtual assistant. But even as a Word beginner, practicing these exercises is essential for building your Word skills.

Here you can watch a free video tutorial to learn brochure design : Brochure Design Practice in Microsoft Word | Word Exercise for Beginners | Hindi Tutorial
21. Learn and Practice creating business card designs in Microsoft Word
Today, there are plenty of software options available for creating business cards, such as online tools, Adobe InDesign, Corel Draw, Photoshop, Canva, and more. However, making a printable business card may seem straightforward but does involve some technicalities and creative flair.
As a student, it’s beneficial to tackle challenging and intricate design tasks in Microsoft Word, like this business card project. This practice will help you strive for excellence and mastery of Word skills. Consider it your 21st exercise towards becoming a Word expert.
Here you can watch a complete and detailed video tutorial on this: How to Create Modern Business Card Design in MS Word | Step-by-Step Detailed Tutorial
22. Practice to create a professional-looking certificate design
Practicing certificate design and Microsoft Word is essential because it empowers you with valuable digital skills that are increasingly relevant in today’s technology-driven world. By honing your proficiency in Microsoft Word, you not only gain the ability to create professional certificates but also enhance your competence in document formatting, layout design, and image manipulation. These skills have broad applications across various personal and professional tasks, making you more adaptable and capable in a digital environment.
Furthermore, practicing certificate design offers you a practical avenue for skill development while producing tangible outcomes. It allows you to create certificates for courses, achievements, or even for your own business, helping you develop an eye for aesthetics, attention to detail, and the ability to produce polished documents. Overall, this practice not only enhances your digital competence but also provides you with a versatile skill set that can significantly benefit your personal and professional growth.
By creating and practicing below certificate design below, you will be able to explore various design options to create a professional-looking certificate. This is just a sample but along with this design, you can take it’s design to the next level.

If you want to learn how you can do it please follow this step tutorial: How to create a professional-looking certificate design in Word | Step-by-Step Tutorial in Hindi
I think if you practice Microsoft Word by working on these exercises then it will be enough to make you above average among all the students around the world doing basic computer courses or learning Microsoft Word.
Because after learning Microsoft Word, you have to work with professionals or in companies. And almost all official works are related directly and indirectly to the above exercises.
So, this is the best method to learn Microsoft Word by doing exercises. And this is about practical knowledge.
I hope these Microsoft Word Exercises ideas will be helpful for you. To learn more visit: Top 10 Basic and Advanced Microsoft Word skills
How useful was this post?
Click on a star to rate it!
Average rating / 5. Vote count:
No votes so far! Be the first to rate this post.
We are sorry that this post was not useful for you!
Let us improve this post!
Tell us how we can improve this post?
7 thoughts on “22 Basic Microsoft Word practice exercises for beginners”
good practical please send more practical in winword. Thanks
These are good Practical exercises. Please send list of practicals of MS Word in Vocational IT NSQF level-1 subject code-402 class IX
please send a book which covers exercises like this
Great content! Thanks for putting this out there!
This is very nice
I have recently joined a Private Computer classes at the age of 53. Can you guide me through WORD, EXCEL, POWERPOINT & INTERNET
Is it possible for you send step by step Assignments for all the above 4 courses, so that I can evaluate whether I am learning properly or not ?
Hi, That’s a very good concern as a student “whether I am learning properly or not” I think 80% students ignore this. I will contact you by email. Age is not a problem. I expect you have strong reason or specific task or goals to learn all these three + internet in this age. Yes, I can evaluate through giving you assignment and testing it.
Leave a Comment Cancel reply
Save my name, email, and website in this browser for the next time I comment.
Convert from PDF
Convert to PDF
.css-ifzj4q{width:var(--chakra-sizes-14);height:var(--chakra-sizes-8);margin-right:var(--chakra-space-2);margin-left:calc(var(--chakra-space-4) * -1);-webkit-transform:translateY(-2px);-moz-transform:translateY(-2px);-ms-transform:translateY(-2px);transform:translateY(-2px);display:inline;} DOCX Editor
Edit docx files online without word.
Or drop a Word file here
Secure Processing
Your data is encrypted at rest (AES-256) and in transit (TLS 1.2+).
Get Job Done Fast
Process your files in seconds – save time for more important tasks.
Work on Any Platform
Use Xodo tools on every device. Windows, Mac, Linux, Android, iOS.
How to edit a DOCX file online:
Upload your file to the free online DOCX editor.
Edit, annotate, and view your DOCX file without Word.
Download the edited DOCX file instantly back to your device or save it in the cloud.
Frequently Asked Questions
Essential tools for your workflow.
PDF to PDF/A
PDF to Word
PDF to PowerPoint
PDF to Excel
PDF to HTML
PDF to Text
HEIC to JPG
HEIC to PNG
Word to PDF
Excel to PDF
PowerPoint to PDF
DICOM to PDF
HEIC to PDF
PDF Converter
OCR Converter
Delete Pages
Rearrange PDF
Annotate PDF
DOCX Editor
Compress PDF
Fill in PDF Forms
Edit PDF Text
Flatten PDF
Document Reader
Validate PDF/A
Text Compare
PDF Compare

Contribute to the Microsoft 365 and Office forum! Click here to learn more 💡
April 9, 2024
Contribute to the Microsoft 365 and Office forum!
Click here to learn more 💡
- Search the community and support articles
- Microsoft 365 and Office
- Search Community member
Ask a new question
WordArt doesn't get printed through Word in Office 2024
This is a feedback / bug report.
I'm currently on Office Professional Plus 2024 (Version 2406 Build 16.0.17630.20000).
I've some work documents that have WordArt Elements in it and whenever I print them, the WordArt elements don't print and every things else gets printed.
I've tried making new word documents with WordArt and the issue persists.
Saving as PDF also gives error "The export failed. The document could not be prepared for exporting."
- Subscribe to RSS feed
Report abuse
Reported content has been submitted
Replies (9)
- Volunteer Moderator
There is on Office 2024.
It is 2024 today. However, the product is Office 2021.
I appreciate your supplying the version number.
Make sure your options are set to print drawing objects in Word.

1 person found this reply helpful
Was this reply helpful? Yes No
Sorry this didn't help.
Great! Thanks for your feedback.
How satisfied are you with this reply?
Thanks for your feedback, it helps us improve the site.
Thanks for your feedback.
To add to what Charles has said, if one of these WordArts are used as watermarks, for example, you would also want to select the option "Print background colors and images" at File > Options > Advanced (this option is also shown in Charles's screen shot).
With the options set as shown, i.e., without allowing printing of background colors and images, WordArt Watermarks print fine on my system.
You are quite right. I just tested myself. I didn't expect that.
I'm on Office 2024 Preview

Also, I've checked and enabled all setting mentioned in the replies. The issue still persists.
Do you see these watermarks in the print preview at File > Print?
Yes, they're visible in print preview.
You said previously that saving to PDF did not work reliably.
Are you able to print the document to pdf using the Microsoft Print to PDF virtual printer?

I'm on Office 2024 Preview *** Release 2406 Also, I've checked and enabled all setting mentioned in the replies. The issue still persists.
Unless you are a software developer, you should be using the current channel, not the preview. The preview is pre-release and often has bugs.
@Stefan - I was under the impression previously that both were required. Lately I started putting background color on many of my documents. Those I did not want the color to print and use up all my ink so I switched that option off. I noticed that watermarks and other background images continue to print. I do not know if that was always that way or if something changed.
Question Info
- For business
- Norsk Bokmål
- Ελληνικά
- Русский
- עברית
- العربية
- ไทย
- 한국어
- 中文(简体)
- 中文(繁體)
- 日本語
- Create a document Article
- Save your document to OneDrive Article
- Design and edit Article
- Collaborate Article
- Set up your mobile apps Article
- Learn more Article
Create a document
Create a document in word.

With Word you can:
Create a document from scratch or from a template .
Add text, images, art, and videos.
Research a topic and find credible sources.
Access your documents from a computer, tablet, or phone via OneDrive.
Share your documents and collaborate with others.
Track and review changes.
Create a new document
On the File tab, select New .
Select Blank document , or double-click a template image or type the kind of document into the Search for online templates box and press Enter .
Tip: For practice using Word features, try a learning guide like Welcome to Word or Insert your first table of contents .

Add and format text
Click on your new blank page and type some text.
Select text to format and choose font options on the Home tab: Bold , Italic , Bullets , Numbering , and more.

Add Pictures, Shapes, SmartArt, Chart, and more
Select the Insert tab.
Select what you want to add:

Note: Older versions of Word may have Online Pictures on the ribbon next to Pictures .

Next: Save your document to OneDrive in Word

Need more help?
Want more options.
Explore subscription benefits, browse training courses, learn how to secure your device, and more.

Microsoft 365 subscription benefits

Microsoft 365 training

Microsoft security

Accessibility center
Communities help you ask and answer questions, give feedback, and hear from experts with rich knowledge.

Ask the Microsoft Community

Microsoft Tech Community

Windows Insiders
Microsoft 365 Insiders
Find solutions to common problems or get help from a support agent.

Online support
Was this information helpful?
Thank you for your feedback.
IMAGES
VIDEO
COMMENTS
In Word for the web you can see WordArt that's already in your document, but to add more WordArt you need to open or edit the doc in the desktop version of Word. You can use the Font features on the Home tab to change the font color and size, and apply bolding, italics, or underlines to your text.
For quick access if this toolbar isn't available, press and release Alt on your keyboard. 5. Click the "Insert" option from this toolbar. 6. Click the "Picture" button.This should open a drop-down list. 7. Click the "WordArt" option from the drop-down that results. This should open a new window, along with adding a toolbar to the display window ...
Place your cursor in the text where you want to insert the WordArt. (This can be an approximate placement because it can moved later.) Select the Insert tab. Select the WordArt button. Select one of the default designs from the drop-down menu. (This design can be modified, as shown in the next section.)
Select the Word Art object. Navigate to the "Format" tab in the ribbon. Use the "Font" and "Font Size" options to make changes. 5. How to Apply Text Effects to Word Art? Highlight your Word Art. Click on the "Format" tab. Explore the "Text Effects" menu for various effects like shadows, reflections, and more.
Step 1: Open the 'Insert' Tab. Click on the 'Insert' tab at the top of your Word document. The 'Insert' tab is where you'll find all sorts of tools to add different elements to your document, not just Word Art. Once you click on it, a ribbon with various options will appear.
To add WordArt to your document. Click or tap where you want WordArt. Select Insert > WordArt. Pick a style, and type your text.
To insert WordArt in Word, click into the document at the position at which to insert the WordArt. Next, click the "Insert" tab in the Ribbon. Then click the "WordArt" button in the "Text" button group. Doing this displays a colorful list of WordArt styles from which to choose in a drop-down menu. Click a style you like to select it.
Bring creativity and flair to your documents with Microsoft Word Art! Follow these steps to get started: Open Microsoft Word. Insert a Text Box via the "Insert" tab. Double-click and enter the desired text. Format the text using the "Format" tab. Apply Word Art Styles from the "Format" tab for extra enhancement.
Exercise files. Download this lesson's related exercise files. Word Art - Exercise.docx. 93 KB Word Art - Exercise Solution.docx. 95.8 KB. Symbols. Learn this creative text format often found on flyers, and a clever "rubber stamp" to use on documents.
Unlock your creativity with this step-by-step guide on how to create stunning Word Art in Microsoft Office Word! In this tutorial, we'll explore the diverse ...
Download the 'before' and 'after' Word documents from the video tutorial and try the lesson yourself. Word Art .docx. 118.8 KB Word Art - Solution.docx. 118.8 KB. Symbols. Learn this creative text format often found on flyers, and a clever "rubber stamp" to use on documents.
To insert a text box: Select the Insert tab on the Ribbon. Click the Text Box command in the Text group. A drop-down menu will appear. Select Draw Text Box. Creating a blank text box. Click and drag on the document to create the text box. Drawing the text box. You can now start typing to create text inside the text box.
Open a new document in Microsoft Word. Click the Insert tab. In the Text group, click WordArt. Choose a style from the gallery and add the text sunflowers. Type inside the WordArt text box. On the Shape Format tab, find the Shape Styles group. Click Shape Fill. Click Picture.
Add WordArt. Select Insert > WordArt and select the option you want. Enter your text. Convert existing text to WordArt. Select the text. Select WordArt and select the option you want. Customize your WordArt. Select the WordArt. Select Text Fill and select an option.
Description. Teach students to use and format Word Art in Microsoft Word with this fun introductory activity! Students will be given step-by-step directions with illustrations to: Complete an Acrostic using their name and descriptive attributes. Insert Word Art and format it using fill and stroke color, glow, shadow, reflection, bevel and ...
Word 12 Formatting. ★★★☆☆. Kendall Myers November 15, 2017. In this practice project for Word, students create a document with a centered title in all capitals, the first letter of each word slightly larger than the rest. Throughout the document the font is ….
Select the Insert tab in the ribbon. Figure 1. Insert tab. Select the Pictures button in the Illustrations group. Figure 2. Pictures button. Select the location of the image from the Insert Picture From menu: This Device lets you choose an image stored on your computer or network server. Stock Images lets you choose stock images, icons, cutout ...
To insert a SmartArt graphic: Place the insertion point in the document where you want the SmartArt graphic to appear. From the Insert tab, select the SmartArt command in the Illustrations group. A dialog box will appear. Select a category on the left, choose the desired SmartArt graphic, then click OK. The SmartArt graphic will appear in your ...
3. Design E-book cover pages / Magazine front/ books front/back page using the cover page option in Insert Menu. This practice is an advance. But try to find the books and magazine cover pages. And try to make it similar in MS Word. Imagine if you're the designer, how you will design the same content or front page.
PRACTICAL- Type this paragraph &checks the spelling &grammer using spelling &grammar tool. Microsoft Word is a word processor developed by Microsoft. It was first released in 1983 under the name Multi-Tool Word for Xenix systems. MS Word is a popular word-processing program used primarily for creating documents such as letters ...
Open and edit DOCX files without Word software. Use the free DOCX editor for processing Word documents online.
Change the inside color of the WordArt letters. Select the WordArt text to fill with color. Go to Shape Format or Drawing Tools Format, select Text Fill, and pick the color you want. Tip: You can make your WordArt more see through (transparent) by changing the color. Select Gradient and then pick the variation you want.
Try it! When you want text to really stand out on a page, use WordArt to add outlines, shading, and other effects to your words. Add WordArt. Select Insert > WordArt and select the option you want.
This is a feedback / bug report.I'm currently on Office Professional Plus 2024 (Version 2406 Build 16..17630.20000).I've some work documents that have WordArt Elements in it and whenever I print
Learn how to format text, add graphics, and more in Word documents. Create professional-looking documents with ease using our step-by-step guide. Try it now! ... Add text, images, art, and videos. Research a topic and find credible sources. Access your documents from a computer, tablet, or phone via OneDrive. ... your feedback will be used to ...